


haas506开发教程-driver-GPIO
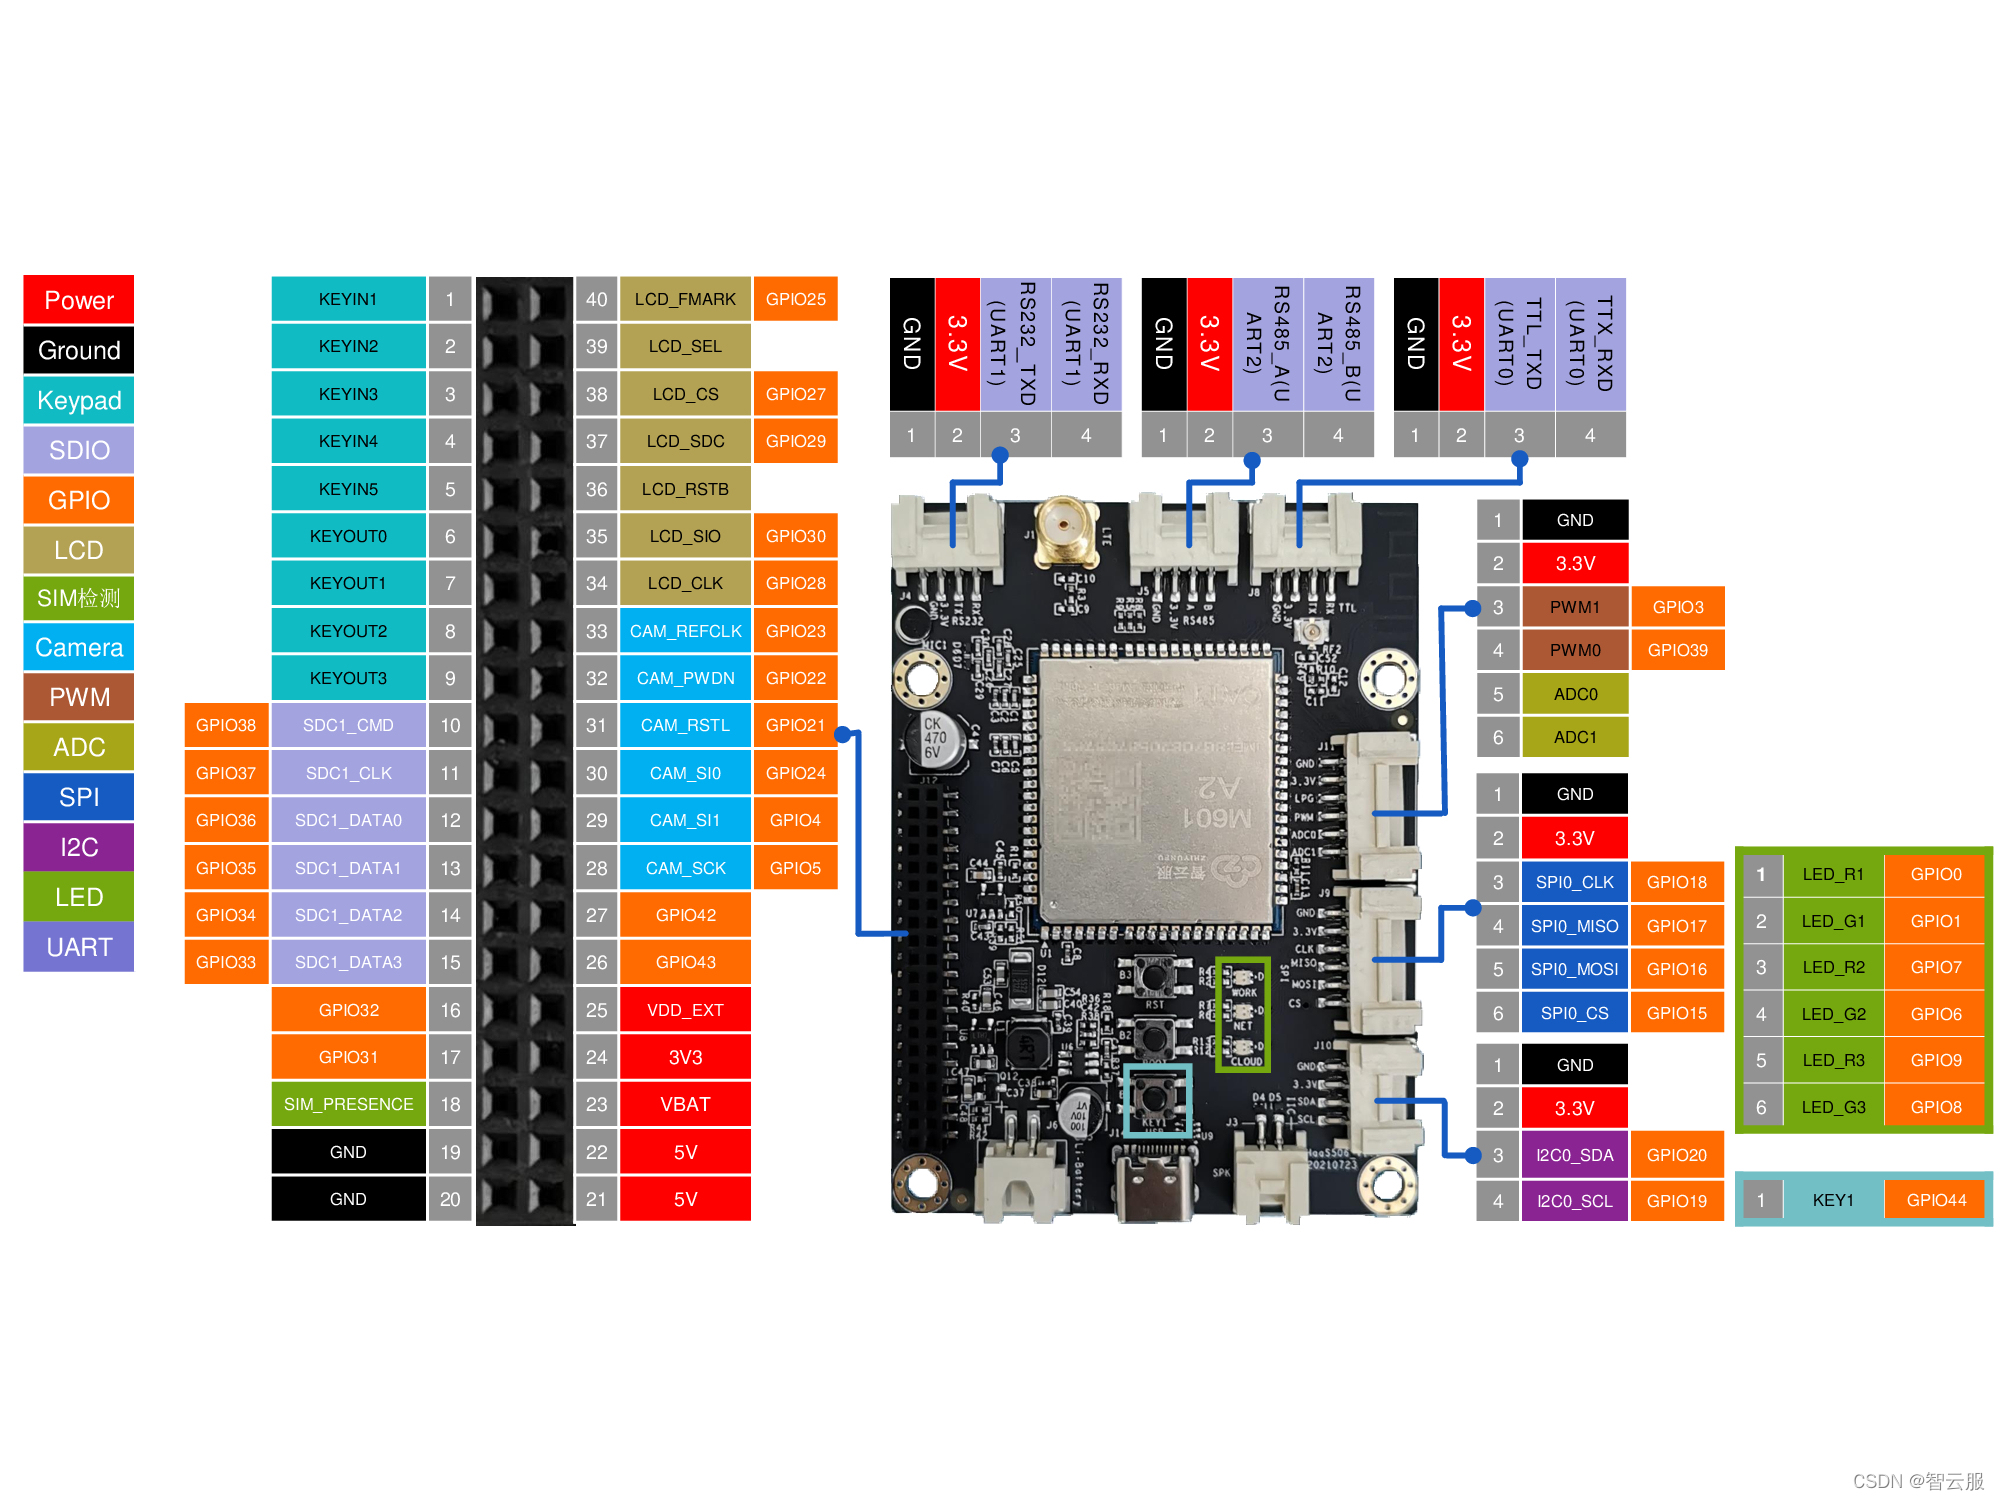
1.硬件图
2.流水灯
(1)案例说明
- haas506开发板一共6个led灯,其中1个是电源指示灯,剩下的5个led灯用户可以任意使用。
- 在board.json中配置5个led的参数,其中type选择GPIO、port选择led所对应的gpio口、dir选择output模式、pull选择pullup/pulldown。
- 在main.py中编写代码。首先导入相关库,其次实例化对象,最后打开/点亮小灯。
(2)main.py
# coding=utf-8
# This is a sample Python script.
from driver import GPIO
import utime as time
print("start led test")
#将board.json中定义的key(led1...led5)添加到一个列表中
leds=["led1","led2","led3","led4","led5"]
#实例化一个gpio对象
gpio=GPIO()
#循环5次
for i in range(5):
    #遍历leds列表
    for led in leds:
        #打开gpio
        gpio.open(led)
        #将该led灯所对应的io口置成高电位,点亮小灯
        gpio.write(1)
        #延时1秒
        time.sleep(1)
        #将该led灯所对应的io口置成低电位,熄灭小灯
        gpio.write(0)
        time.sleep(1)
        #关闭gpio
        gpio.close()
print("end led test")
(3)board.json
{
"version": "1.0.0",
"io": {
    "led1": {
        "type": "GPIO",
        "port": 0,
        "dir": "output",
        "pull": "pullup"
        },
    "led2": {
        "type": "GPIO",
        "port": 6,
        "dir": "output",
        "pull": "pullup"
        },
    "led3": {
        "type": "GPIO",
        "port": 7,
        "dir": "output",
        "pull": "pullup"
        },
    "led4": {
        "type": "GPIO",
        "port": 8,
        "dir": "output",
        "pull": "pullup"
        },
    "led5": {
        "type": "GPIO",
        "port": 9,
        "dir": "output",
        "pull": "pullup"
        }
    },
"debugLevel": "DEBUG"
}
3.读取io口的电平值
(1)案例说明
- 循环读取led1和led2所对应的io口的电平值
- 在board.json中配置led1和led2的参数
- 在main.py中编写代码
(2)main.py
# coding=utf-8
# This is a sample Python script.
from driver import GPIO
import utime as time
led1=GPIO()
led2=GPIO()
while True:
    time.sleep(1)
    led1.open("led1")
    led2.open("led2")
    print('-------------------led on-------------------------')
    led1.write(1)
    led2.write(1)
    #需要使用read()读取io口电平值
    print("gpio levels of led1 and led2:",led1.read(),led2.read())
    time.sleep(5)
    print('-------------------led off-----------------------')
    led1.write(0)
    led2.write(0)
    print("gpio levels of led1 and led2:",led1.read(),led2.read())
    led1.close()
    led2.close()
(3)board.json
{
"version": "1.0.0",
"io": {
    "led1": {
        "type": "GPIO",
        "port": 0,
        "dir": "output",
        "pull": "pullup"
        },
    "led2": {
        "type": "GPIO",
        "port": 6,
        "dir": "output",
        "pull": "pullup"
        }
    },
"debugLevel": "DEBUG"
}
4.按键中断,点亮/熄灭小灯
(1)案例说明
- 使用按键来实现小灯的点亮和熄灭
- 在board.json中配置led1和key1的参数。注意key1的dir和intMode,即设置中断模式和上升沿触发(也可改为下降沿)。
- 在main.py中编写代码
(2)main.py
import utime as time
from driver import GPIO
#中断回调函数
def key1_callback(args):
    global flag
    if flag==0:
        led1.write(0)
        flag=1
    elif flag==1:
        led1.write(1)
        flag=2
    elif flag==2:
        led1.write(0)
        flag=1
    key1.disableIrq()
    key1.clearIrq()

def enable_key():
    #开启中断
    key1.enableIrq(key1_callback)

if __name__ == '__main__':
    global flag
    flag=0
    #实例化key1
    key1=GPIO(10,10)
    #打开key1
    key1.open("KEY1")
    #实例化led1
    led1=GPIO()
    #打开led1
    led1.open('led1')
    time.sleep(2)
    #打开按键使能
    enable_key()
(3)board.json
{
"version": "1.0.0",
"io": {
    "led1": {
        "type": "GPIO",
        "port": 0,
        "dir": "output",
        "pull": "pullup"
        },
    "led2": {
        "type": "GPIO",
        "port": 6,
        "dir": "output",
        "pull": "pullup"
        },
    "led3": {
        "type": "GPIO",
        "port": 7,
        "dir": "output",
        "pull": "pullup"
        },
    "led4": {
        "type": "GPIO",
        "port": 8,
        "dir": "output",
        "pull": "pullup"
        },
    "led5": {
        "type": "GPIO",
        "port": 9,
        "dir": "output",
        "pull": "pullup"
        },
    "KEY1": {
        "type": "GPIO",
        "port": 44,
        "dir": "irq",
        "pull": "pullup",
        "intMode": "rising"
        }
    },
"debugLevel": "DEBUG"
}
5.将io口作为输入端使用
(1)案例说明
- 将gpio31作为输入端使用,读取它的电平值。
- 在board.json中配置gpio31参数。注意将io口的dir设置成input
- 在main.py中编写代码
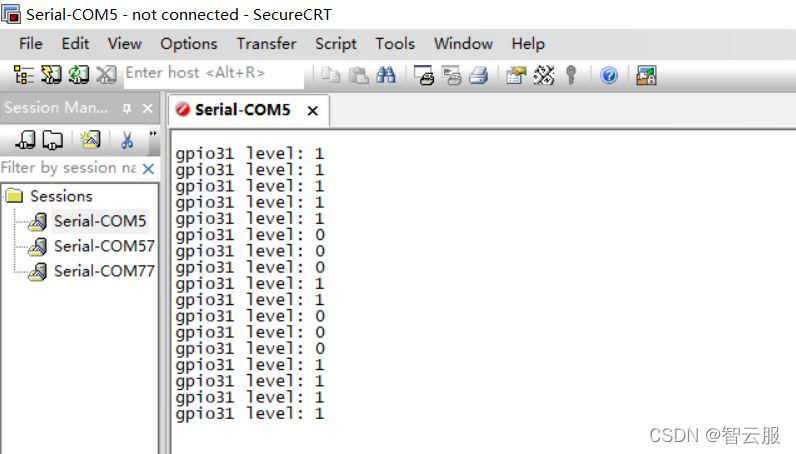
(2)main.py
import utime as time
from driver import GPIO
gpio=GPIO()
gpio.open("gpio31")
while True:
    print("gpio31 level:",gpio.read())
    time.sleep(1)
(3)board.json
{
"name": "haas506",
"version": "1.0.0",
"io": {
    "gpio31":{
        "type":"GPIO",
        "port": 31,
        "dir": "input",
        "pull":"pullup"
    },
    "serial1":{
        "type":"UART",
        "port":0,
        "dataWidth":8,
        "baudRate":115200,
        "stopBits":1,
        "flowControl":"disable",
        "parity":"none"
    },
    "serial2":{
        "type":"UART",
        "port":1,
        "dataWidth":8,
        "baudRate":115200,
        "stopBits":1,
        "flowControl":"disable",
        "parity":"none"
    },
    "serial3":{
        "type":"UART",
        "port":2,
        "dataWidth":8,
        "baudRate":115200,
        "stopBits":1,
        "flowControl":"disable",
        "parity":"none"
    }
},
"debugLevel": "ERROR",
"repl":"disable"
}
(4)效果图
6.Class -GPIO
- GPIO
- 实例化
- gpio=GPIO()
- 特例:在使用IO中断的时候需要在实例化对象时,传入两个参数,例如gpio=GPIO(10,10)表示使用IO中断方式实现按键消抖10ms,其中两个10分别表示软硬件消抖10ms
- gpio.open(param)
- 作用:打开某个gpio口
- 参数:是一个字符串,需要在board.json中预先定义,例如“led1”。
- 返回:0成功,其他失败
- gpio.write(param)
- 作用:将IO脚置高电平/低电平
- 参数:值为0或1
- 返回:0成功,其他失败
- gpio.read()
- 作用:读取某个io口的电平值
- 参数:是一个字符串,需要在board.json中预先定义
- 返回:低电平0/高电平1,非0/1则出错
- gpio.close()
- 作用:关闭某个已打开的io口
- 返回:0成功,其他失败
- gpio.enableIrq(callback)
- 作用:开启中断
- 参数:需要传入一个回调函数,在发生中断后,可以在回调中执行并实现某些功能。例如,按键中断发生时,可以在回调函数中,点亮/熄灭小灯
- 返回:0成功,其他值则失败
- gpio.disableIrq()
- 作用:关闭中断
- 返回:0成功,其他失败
- gpio.clearIrq()
- 作用:清除中断
- 返回:0成功,其他失败
- 实例化
7.总结
本节内容介绍了如何使用haas506的driver库中的GPIO模块。实现了io口的输入、输出和中断功能。


 526
526

 被折叠的 条评论
为什么被折叠?
被折叠的 条评论
为什么被折叠?
 到【灌水乐园】发言


