


缓冲分析(Buffer Analysis)是一种常见的地理空间分析方法,用于创建给定要素周围的缓冲区域。其结果是一个面状要素,即缓冲要素,它表示了原始要素在一定距离内的范围。
在缓冲方向上,点状要素和线状要素只能进行向外缓冲,而面状要素则可以进行双向缓冲,即向外缓冲和向内缓冲。
在ArcGIS Engine中,缓冲分析通常由ITopologicalOperator.Buffer(double Distance)方法来实现。这个方法的参数可以是正值,表示向外缓冲;也可以是负值,表示向内缓冲。缓冲分析的基本实现步骤如下:
- 设置缓冲距离:确定缓冲区域的距离。
- 调用ITopologicalOperator.Buffer()方法:根据设置的缓冲距离,生成缓冲区。
- 将缓冲区添加到axMapControl中:将生成的缓冲区添加到地图控件中,以便进行显示和进一步分析。
通过这些步骤,可以方便地对地理要素进行缓冲分析,从而更好地理解其空间范围和特征。
private void AddAllLayerstoComboBox(ComboBox combox)
{
try
{
combox.Items.Clear();
int pLayerCount = frmMain.m_mapControl.LayerCount;
if (pLayerCount > 0)
{
for (int i = 0; i <= pLayerCount - 1; i++)
{
if (frmMain.m_mapControl.get_Layer(i) is IFeatureLayer) //只添加矢量图层,栅格图层没有属性表
combox.Items.Add(frmMain.m_mapControl.get_Layer(i).Name);
}
}
}
catch (Exception ex)
{
MessageBox.Show(ex.Message);
return;
}
}
private void btnOutputLayer_Click(object sender, EventArgs e)
{
SaveFileDialog saveDlg = new SaveFileDialog();
saveDlg.CheckPathExists = true;
saveDlg.Filter = "Shapefile (*.shp)|*.shp";
saveDlg.OverwritePrompt = true;
saveDlg.Title = "输出图层";
saveDlg.RestoreDirectory = true;
DialogResult dr = saveDlg.ShowDialog();
if (dr == DialogResult.OK && saveDlg.FileName !="")
this.txtOutputPath.Text = saveDlg.FileName;
}
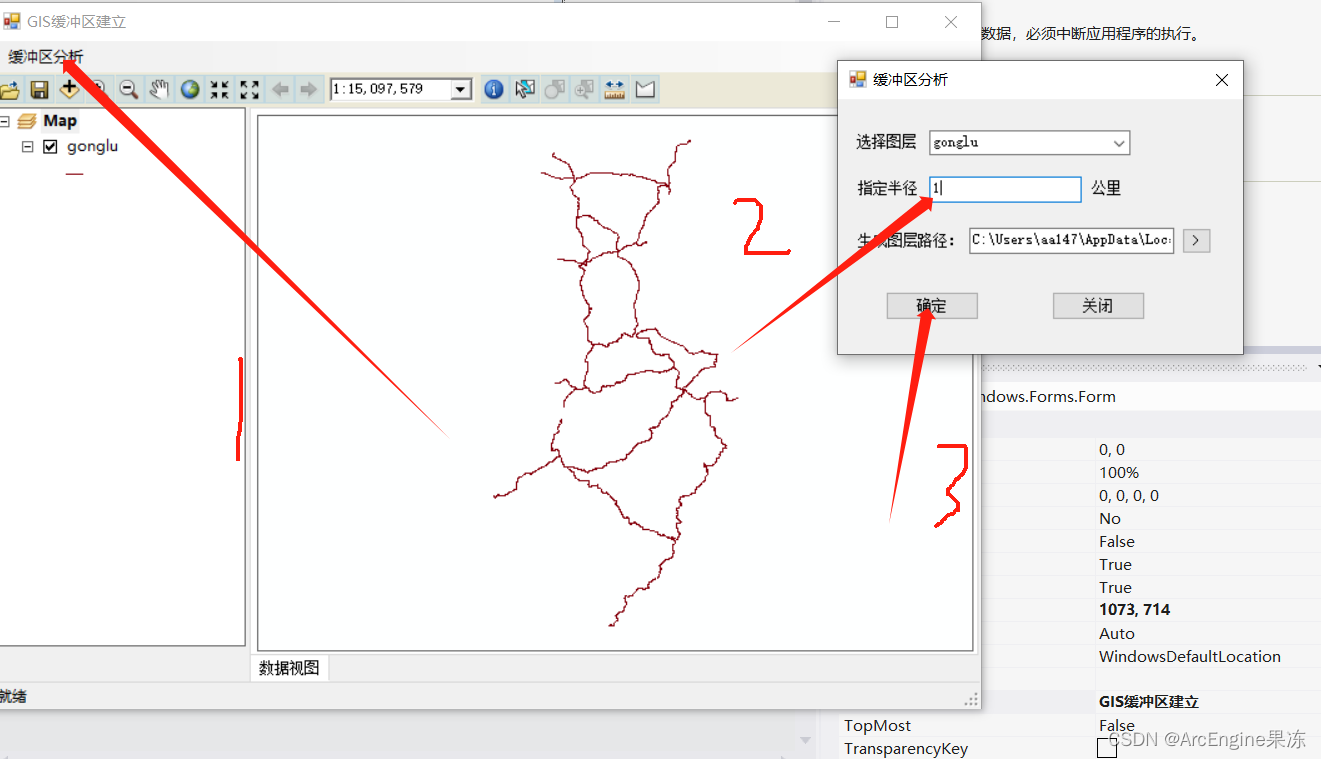
private void buttonOk_Click(object sender, EventArgs e)
{
double bufferDistance;
double.TryParse(txtBufferDistance.Text, out bufferDistance);
if (0.0 == bufferDistance)
{
MessageBox.Show("距离设置错误!");
return;
}
if (!System.IO.Directory.Exists(System.IO.Path.GetDirectoryName(txtOutputPath.Text)) || ".shp" != System.IO.Path.GetExtension(txtOutputPath.Text))
{
MessageBox.Show("输出格式错误!");
return;
}
if (ComboBoxLayer.Items.Count<=0)
{
return;
}
IFeatureLayer pFeatureLayer =(IFeatureLayer) GetLayerByName(ComboBoxLayer.SelectedItem.ToString());
Geoprocessor gp = new Geoprocessor();
gp.OverwriteOutput = true;
gp.AddOutputsToMap = true;
string unit = "Kilometers";
ESRI.ArcGIS.AnalysisTools.Buffer buffer = new ESRI.ArcGIS.AnalysisTools.Buffer(pFeatureLayer, txtOutputPath.Text, Convert.ToString(bufferDistance) + " " + unit);
IGeoProcessorResult results = (IGeoProcessorResult)gp.Execute(buffer, null);
string fileDirectory = txtOutputPath.Text.ToString().Substring(0, txtOutputPath.Text.LastIndexOf("\\"));
int j;
j = txtOutputPath.Text.LastIndexOf("\\");
string tmpstr = txtOutputPath.Text.ToString().Substring(j + 1);
IWorkspaceFactory pWorkspaceFactory = new ShapefileWorkspaceFactoryClass();
IWorkspace pWS = pWorkspaceFactory.OpenFromFile(fileDirectory, 0);
IFeatureWorkspace pFS = pWS as IFeatureWorkspace;
//IFeatureClass pfc = pFS.OpenFeatureClass(this.ComboBoxLayer.SelectedText+ "_buffer.shp");
IFeatureClass pfc = pFS.OpenFeatureClass(tmpstr);
IFeatureLayer pfl = new FeatureLayerClass();
pfl.FeatureClass = pfc;
pfl.Name = pfc.AliasName;
IRgbColor pColor = new RgbColorClass();
pColor.Red = 255;
pColor.Green = 0;
pColor.Blue = 0;
pColor.Transparency = 255;
ILineSymbol pOutline = new SimpleLineSymbolClass();
pOutline.Width = 2;
pOutline.Color = pColor;
pColor = new RgbColorClass();
pColor.Red = 255;
pColor.Green = 0;
pColor.Blue = 0;
pColor.Transparency = 100;
ISimpleFillSymbol pFillSymbol = new SimpleFillSymbol();
pFillSymbol.Color = pColor;
pFillSymbol.Outline = pOutline;
pFillSymbol.Style = esriSimpleFillStyle.esriSFSSolid;
ISimpleRenderer pRen;
IGeoFeatureLayer pGeoFeatLyr = pfl as IGeoFeatureLayer;
pRen = pGeoFeatLyr.Renderer as ISimpleRenderer;
pRen.Symbol = pFillSymbol as ISymbol;
pGeoFeatLyr.Renderer = pRen as IFeatureRenderer;
ILayerEffects pLayerEffects = pfl as ILayerEffects;
pLayerEffects.Transparency = 150;
frmMain.m_mapControl.AddLayer((ILayer)pfl, 0);
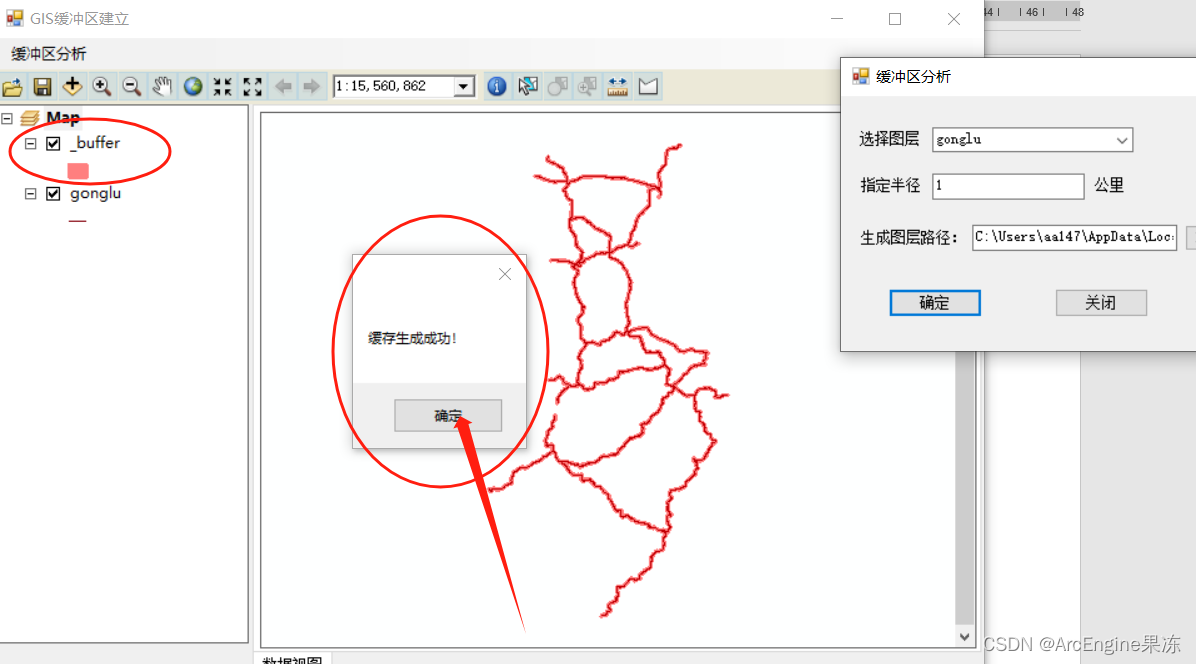
MessageBox.Show(ComboBoxLayer.SelectedText + "缓存生成成功!");
}
双击.


 3047
3047


 被折叠的 条评论
为什么被折叠?
被折叠的 条评论
为什么被折叠?
 到【灌水乐园】发言


