


底部Panel
一准备阶段:
这一部分内容是我们在点击上一篇提到的食物列表右边的加号时,从底部会弹出一个食物量选择的面板
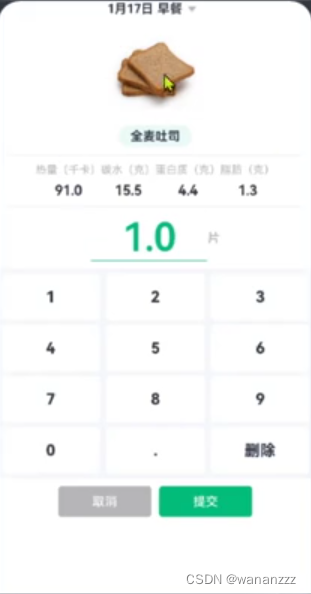
效果呢就如上图所示,这个面板就是Panel组件,其中是最上方一个顶部日期然后跟一个记录项卡片还有数字键盘和按钮,这一篇中就先解决前两部分顶部日期和记录项卡片
顶部日期是一个Row容器内部左边text右边image
记录项卡片是三部分,一个Column容器中放 一个Column容器 隔一个下划线 Row容器 隔下划线 Row容器,第一个Column容器是Image+text,下面一个Row容器里面放几组Column容器是text+变量 最后一个Row容器是左边一个Column变量+下划线接text
这就是全部的前期准备
二代码实现:
在ItemIndex里加入Panel组件
build() {
  Column() {
    // 1.头部导航
    this.Header()
    // 2.列表
    ItemList({ showPanel: this.onPanelShow.bind(this), isFood: this.isFood })
      .layoutWeight(1)
    // 3.底部面板
    Panel(this.showPanel) {
      // 3.1.顶部日期
      ItemPanelHeader()
      // 3.2.记录项卡片
      if(this.item){
        ItemCard({amount: this.amount, item: $item})
      }

    }
    .mode(PanelMode.Full)
    .dragBar(false)
    .backgroundMask($r('app.color.light_gray'))
    .backgroundColor(Color.White)
  }
  .width('100%')
  .height('100%')
}
这里要注意一个点就是ItemList要加上权重不然会导致panel挤压在最下面无法显示
.layoutWeight(1)
然后先是顶部日期ItemPanelHeader:
import { CommonConstants } from '../../common/constants/CommonConstants'
@Component
export default struct ItemPanelHeader {
  build() {
    Row(){
      Text('2024年1月25日 早餐')
        .fontSize(18).fontWeight(CommonConstants.FONT_WEIGHT_600)
      Image($r('app.media.ic_public_spinner'))
        .width(20)
        .fillColor(Color.Black)
    }
  }
}
然后是记录项卡片ItemCard:
import { CommonConstants } from '../../common/constants/CommonConstants'
import RecordItem from '../../viewmodel/RecordItem'
@Component
export default struct ItemCard {

  @Prop amount: number
  @Link item: RecordItem

  build() {
    Column({space: CommonConstants.SPACE_8}){
      // 1.图片
      Image(this.item.image).width(150)
      // 2.名称
      Row(){
        Text(this.item.name).fontWeight(CommonConstants.FONT_WEIGHT_700)
      }
      .backgroundColor($r('app.color.lightest_primary_color'))
      .padding({top: 5, bottom: 5, left: 12, right: 12})
      Divider().width(CommonConstants.THOUSANDTH_940).opacity(0.6)
      // 3.营养素
      Row({space: CommonConstants.SPACE_8}){
        this.NutrientInfo({label: '热量(千卡)', value: this.item.calorie})
        if(this.item.id < 10000){
          this.NutrientInfo({label: '碳水(千卡)', value: this.item.carbon})
          this.NutrientInfo({label: '蛋白质(千卡)', value: this.item.protein})
          this.NutrientInfo({label: '脂肪(千卡)', value: this.item.fat})
        }
      }
      Divider().width(CommonConstants.THOUSANDTH_940).opacity(0.6)
      // 4.数量
      Row(){
        Column({space: CommonConstants.SPACE_4}){
          Text(this.amount.toFixed(1))
            .fontSize(50).fontColor($r('app.color.primary_color'))
            .fontWeight(CommonConstants.FONT_WEIGHT_600)
          Divider().color($r('app.color.primary_color'))
        }
        .width(150)
        Text(this.item.unit)
          .fontColor($r('app.color.light_gray'))
          .fontWeight(CommonConstants.FONT_WEIGHT_600)
      }
    }
  }

  @Builder NutrientInfo($$:{label: string, value: number}){
    Column({space: CommonConstants.SPACE_8}){
      Text($$.label).fontSize(14).fontColor($r('app.color.light_gray'))
      Text(($$.value * this.amount).toFixed(1)).fontSize(18).fontWeight(CommonConstants.FONT_WEIGHT_700)
    }
  }
这里我们使用了下划线,用了
Divider().width(CommonConstants.THOUSANDTH_940).opacity(0.6)
还有要注意的是数量这一部分的amount,因为amount是一个变量所以我们要有状态修饰符
@Prop amount: number
Row(){
    Column({space: CommonConstants.SPACE_4}){
      Text(this.amount.toFixed(1))
        .fontSize(50).fontColor($r('app.color.primary_color'))
        .fontWeight(CommonConstants.FONT_WEIGHT_600)
      Divider().color($r('app.color.primary_color'))
    }
    .width(150)
    Text(this.item.unit)
      .fontColor($r('app.color.light_gray'))
      .fontWeight(CommonConstants.FONT_WEIGHT_600)
  }
}


 371
371


 被折叠的 条评论
为什么被折叠?
被折叠的 条评论
为什么被折叠?
 到【灌水乐园】发言


