


文章目录
1. 背景
实时数据展示,通常分两部分,
一部分是离线数据计算,这部分通过大数据程序计算好后,同步到MySQL中。
一部分是实时程序,这部分是Flink实时写入Phoenix表中。
这样两部分拼接好后,就是完整的实时数据部分,所以现在一个接口查询需要将MySQL和Phoenix中的表查询并合并在一起。
2. 技术点
通过本篇博客,将可以学习到Spring多环境配置、多数据源配置、数据库自定义连接池设置、子模块搭建SpringBoot程序等内容。
- 多数据源配置
- springboot多环境设置
- 数据库连接池Druid配置
3 子模块依赖SpringBoot设置
由于我的项目是一个子模块,已经存在父模块,无法再添加Parent模块引入Springboot,所以需要通过依赖方式引入Springboot包。
Pom中依赖设置如下:
    <dependencyManagement>
        <dependencies>
            <dependency>
                <groupId>org.springframework.boot</groupId>
                <artifactId>spring-boot-dependencies</artifactId>
                <version>2.6.14</version>
                <type>pom</type>
                <scope>import</scope>
            </dependency>
        </dependencies>
    </dependencyManagement>
4. 多环境配置
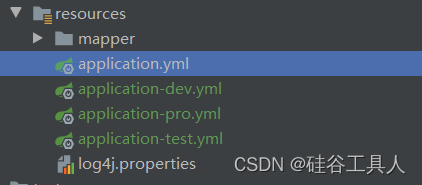
通常开发环境分为dev、test、pro三个环境,所以在Springboot中需要根据不同的环境使用不同的配置文件,在resources中建立以下四个文件。
application.yml
application-dev.yml
application-pro.yml
application-test.yml
4.1 application.yml
其中,application.yml配置如下:
spring:
  profiles:
    active: "@profileActive@"
mybatis-plus:
  configuration:
    log-impl: org.apache.ibatis.logging.stdout.StdOutImpl
    map-underscore-to-camel-case: true
mybatis-plus是作为公共的配置部分放到这里的。
spring.profiles.active是读取动态配置的,这里的@profileActive@需要和Pom文件联动设置。
Pom文件中设置如下:
<!--多环境配置优先级,默认配置dev -->
    <profiles>
        <profile>
            <id>dev</id>
            <properties>
                <profileActive>dev</profileActive>
            </properties>
            <activation>
                <activeByDefault>true</activeByDefault>
            </activation>
        </profile>
        <profile>
            <id>test</id>
            <properties>
                <profileActive>test</profileActive>
            </properties>
        </profile>
        <profile>
            <id>pro</id>
            <properties>
                <profileActive>pro</profileActive>
            </properties>
        </profile>
    </profiles>
    <build>
        <resources>
            <resource>
                <directory>src/main/resources</directory>
                <filtering>true</filtering>
            </resource>
        </resources>
    </build>
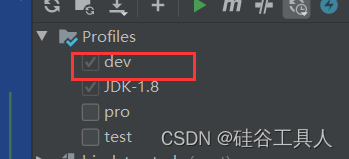
通过以上的设置以后,就可以在 idea的maven中看到如下的配置。
4.2 application-pro.yml
这里可以根据具体的环境,进行不一样的配置
spring:
  config:
    activate:
      on-profile: pro
  datasource:
    driver-class-name: com.mysql.cj.jdbc.Driver
    url: jdbc:mysql://IP:3306/WEB_SERVER?characterEncoding=utf-8&useSSL=false
    username: test
    password: test
server:
  port: 8802
spring.config.active.on-profile 注意这个是springboot 2.4版本以后更改的。
之前的版本使用的是spring.profiles,但是不推荐使用了。
application-dev.yml在下面重点说明。
5. 多数据源配置
一个服务引入多个数据源时,需要分别定义每个数据源的配置。所以这里我们以在application-dev.yml配置为例子。
5.1 yml配置
通常以下面方式在yml中定义数据源。
spring:
  datasource:
    db1:
      xxx
      xxx
    db2:
      yyy
      yyy
我们这里的需求是mysql和phoenix两个数据源如下,并且修改了连接池为Druid:
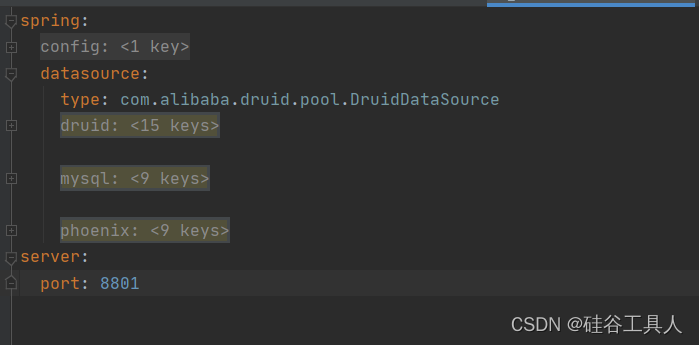
完整内容如下:
spring:
  config:
    activate:
      on-profile: dev
  datasource:
    type: com.alibaba.druid.pool.DruidDataSource
    druid:
      initial-size: 5                                       # 初始化大小
      min-idle: 10                                          # 最小连接数
      max-active: 20                                        # 最大连接数
      max-wait: 60000                                       # 获取连接时的最大等待时间
      min-evictable-idle-time-millis: 300000                # 一个连接在池中最小生存的时间,单位是毫秒
      time-between-eviction-runs-millis: 60000              # 多久才进行一次检测需要关闭的空闲连接,单位是毫秒
      filters: stat,wall                                    # 配置扩展插件:stat-监控统计,log4j-日志,wall-防火墙(防止SQL注入),去掉后,监控界面的sql无法统计
      test-on-borrow: true                                  # 申请连接时执行validationQuery检测连接是否有效,默认true,开启后会降低性能
      test-on-return: true                                  # 归还连接时执行validationQuery检测连接是否有效,默认false,开启后会降低性能
      test-while-idle: true                                 # 申请连接时如果空闲时间大于timeBetweenEvictionRunsMillis,执行validationQuery检测连接是否有效,默认false,建议开启,不影响性能
      validation-query: SELECT 1                            # 检测连接是否有效的 SQL语句,为空时以下三个配置均无效
      connectionTestQuery: SELECT 1
      stat-view-servlet:
        enabled: true                                       # 是否开启 StatViewServlet
        allow: 127.0.0.1                                    # 访问监控页面 白名单,默认127.0.0.1
        deny: ip                                            # 访问监控页面 黑名单
        login-username: admin                               # 访问监控页面 登陆账号
        login-password: admin                               # 访问监控页面 登陆密码
      filter:
        stat:
          enabled: true                                     # 是否开启 FilterStat,默认true
          log-slow-sql: true                                # 是否开启 慢SQL 记录,默认false
          slow-sql-millis: 5000                             # 慢 SQL 的标准,默认 3000,单位:毫秒
          merge-sql: false                                  # 合并多个连接池的监控数据,默认false
        wall:
          config:
            multi-statement-allow: true
      web-stat-filter:
        enabled: true
        exclusions:
          - "*.js"
          - "*.gif"
          - "*.jpg"
          - "*.png"
          - "*.css"
          - "*.ico"
          - "/monitor/druid/*"

    mysql: # 数据源1
      driver-class-name: com.mysql.cj.jdbc.Driver
      jdbc-url: jdbc:mysql://XXXXipXXXXX:3306/TEST_SERVER?characterEncoding=utf-8&useSSL=false
      username: test
      password: test
      mapper-locations: classpath*:mapper/mysql/*.xml
      filters: stat,wall
      test-on-borrow: true
      test-while-idle: true
      validation-query: SELECT 1

    phoenix: # 数据源2
      driver-class-name: org.apache.phoenix.jdbc.PhoenixDriver
      jdbc-url: jdbc:phoenix:IP地址:2181:/hbase
      username: phoenix
      password: ""
      mapper-locations: classpath*:mapper/phoenix/*.xml
      filters: stat
      test-on-borrow: true
      test-while-idle: true
      validation-query: SELECT 1
server:
  port: 8801
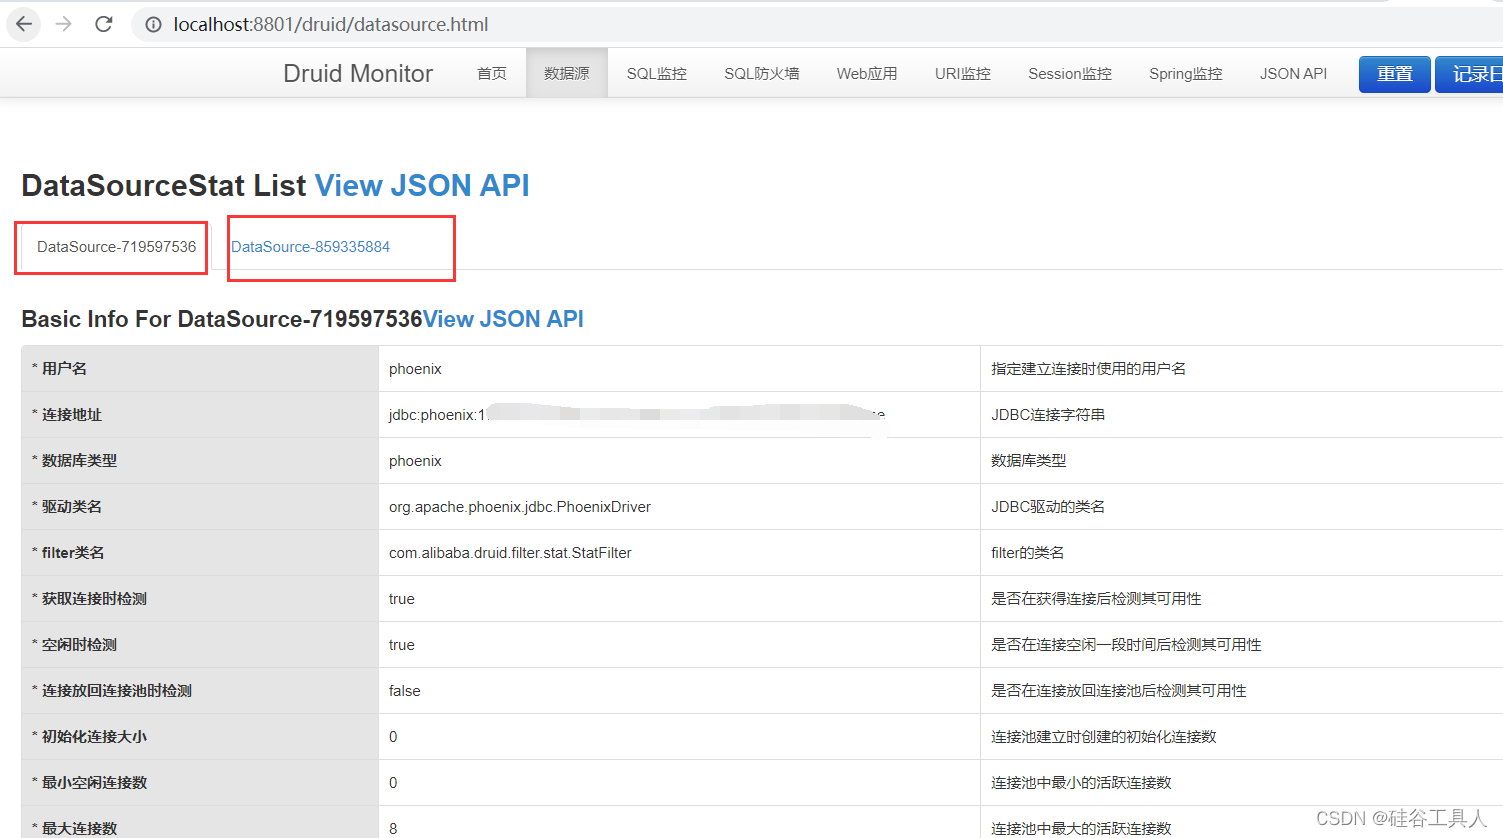
需要说明的是,在spring.datasource.druid下面的配置,针对phoenix数据源,只是部分生效。
例如filters: stat,wall 如果配置在spring.datasource.druid下面,针对phoenix的数据源其实并没有生效。
我们在druid的监控页面中会发现filter类名为空。
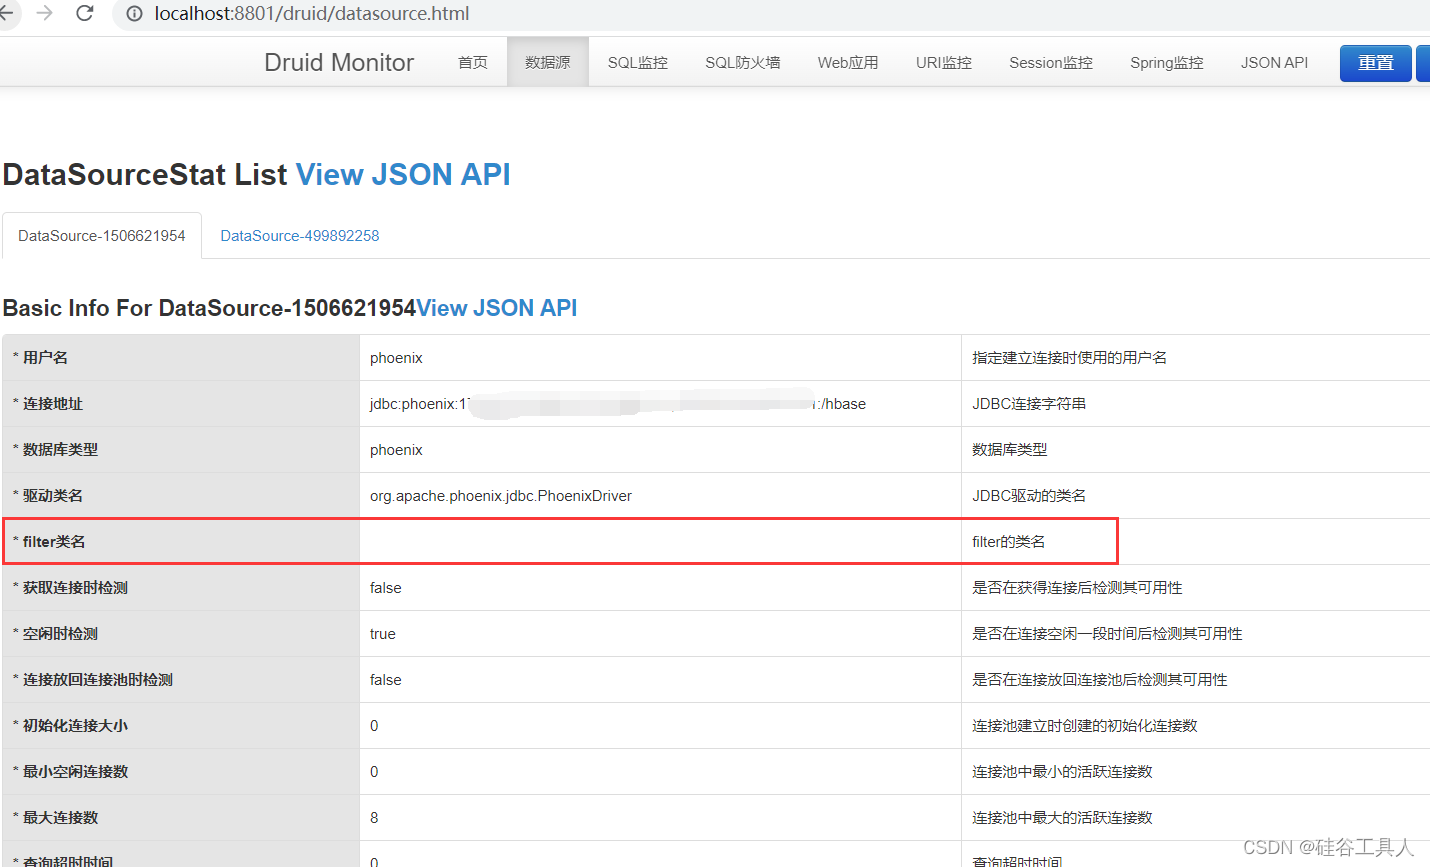
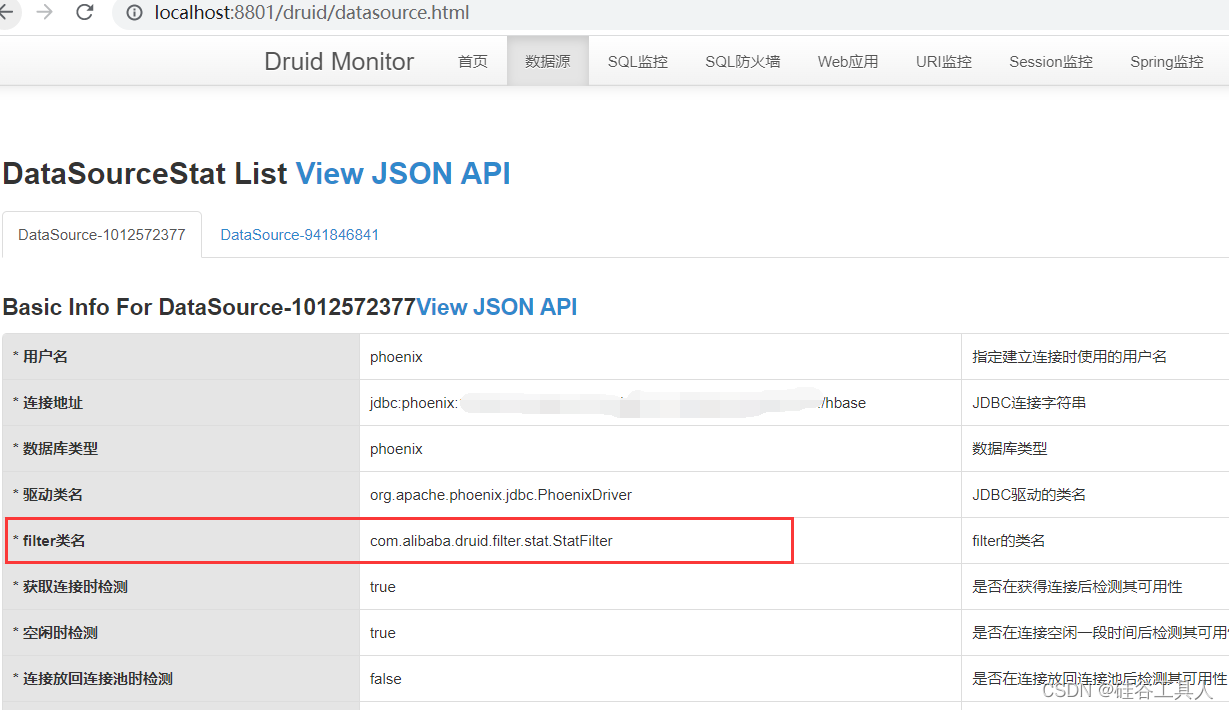
所以在spring.datasource.phoenix下面又加了filters: stat之后才生效的。如下:
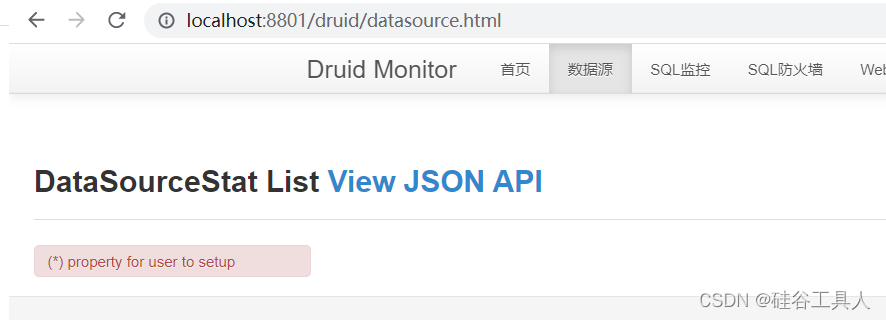
如果在Druid中的数据源只是显示(*) property for user to setup,是因为还没有接口查询,并不是什么配置有问题,接口查询一次就会显示有记录了。
注意点:
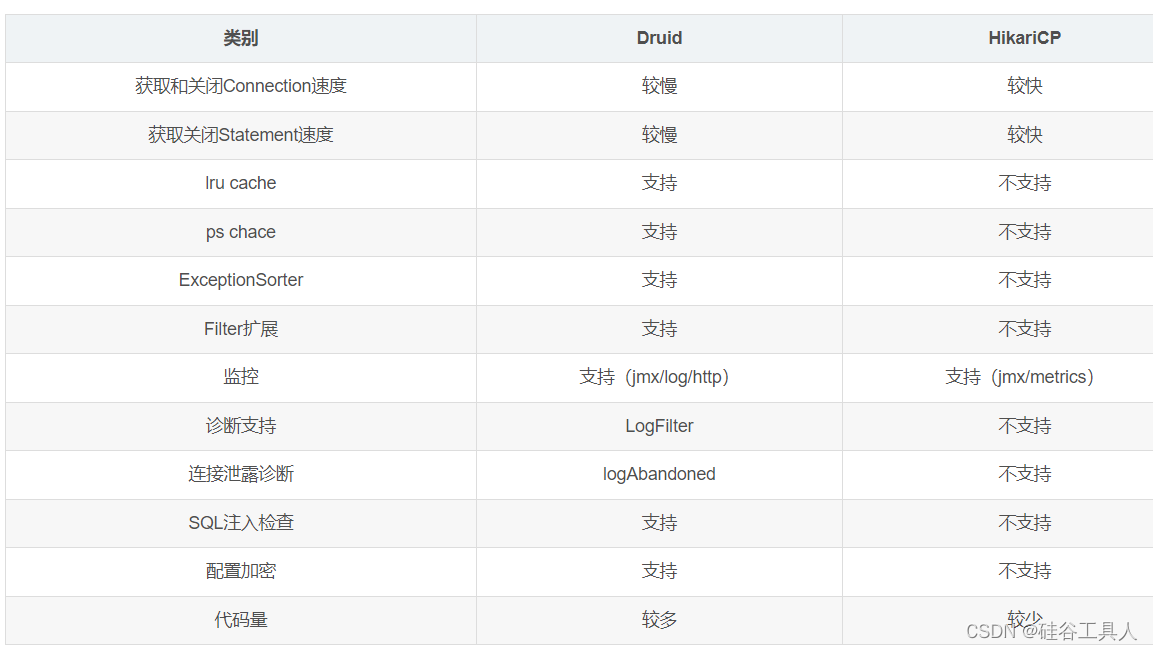
这里配置了自定义的数据连接池是阿里的Druid,默认的是Hikari。
关于Druid和Hikari的比较,可以大概参考下图,网上找的。
5.2 自定义数据源在Java中配置
除了在yml中配置spring.datasource.mysql或者spring.datasource.phoenix自定义数据源以外,还需要再java中单独配置数据源。
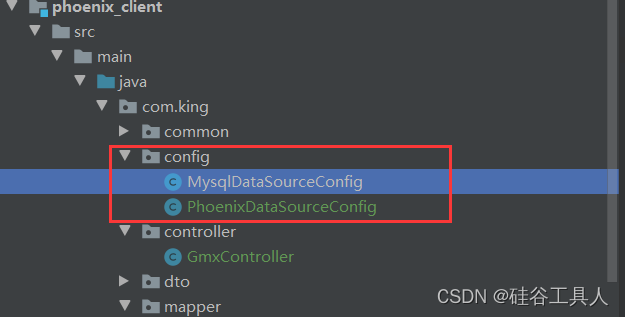
新建config文件夹,针对不同的数据源进行单独的配置。
5.2.1 PhoenixDataSourceConfig
注意:自定义数据源中,虽然我们设置了
@ConfigurationProperties(prefix = "spring.datasource.phoenix"),但是如果直接使用DataSourceBuilder.create().build();创建datasource,
并不会生效,可能是多数据源配置的原因,必须手工来创建,如下:
@Slf4j
@Configuration
@MapperScan(basePackages = "com.king.mapper.phoenix",sqlSessionTemplateRef = "phoenixSqlSessionTemplate")
public class PhoenixDataSourceConfig {

    @Value("${spring.datasource.phoenix.mapper-locations}")
    private String mapperLocation;
    @Value("${spring.datasource.phoenix.jdbc-url}")
    private String jdbcUrl;
    @Value("${spring.datasource.phoenix.driver-class-name}")
    private String driverClassName;
    @Value("${spring.datasource.phoenix.username}")
    private String username;
    @Value("${spring.datasource.phoenix.password}")
    private String password;


    @Bean
    @ConfigurationProperties(prefix = "spring.datasource.phoenix")
    public DataSource phoenixDataSource() throws SQLException {
        log.info("init phoenix data source");
//        DataSource ds = DataSourceBuilder.create().build();
        DruidDataSource ds = new DruidDataSource();
        ds.setUrl(jdbcUrl);
        ds.setDriverClassName(driverClassName);
        ds.setUsername(username);
        ds.setPassword(password);
        Properties prop = new Properties();
        prop.setProperty("phoenix.schema.isNamespaceMappingEnabled","true");
        prop.setProperty("phoenix.schema.mapSystemTablesToNamespace","true");
        ds.setConnectProperties(prop);
        return ds;
    }

    @Bean
    public SqlSessionFactory phoenixSqlSessionFactory(@Qualifier("phoenixDataSource") DataSource dataSource) throws Exception {
        SqlSessionFactoryBean bean = new SqlSessionFactoryBean();
        bean.setMapperLocations(new PathMatchingResourcePatternResolver().getResources(mapperLocation));
        bean.setDataSource(dataSource);
        return bean.getObject();
    }

    @Bean
    public DataSourceTransactionManager phoenixTransactionManager(@Qualifier("phoenixDataSource") DataSource dataSource) {
        return new DataSourceTransactionManager(dataSource);
    }

    @Bean("phoenixSqlSessionTemplate")
    public SqlSessionTemplate phoenixSqlSessionTemplate(@Qualifier("phoenixSqlSessionFactory") SqlSessionFactory sqlSessionFactory) throws Exception {
        return new SqlSessionTemplate(sqlSessionFactory);
    }

}
关于phoenix的一些特殊连接设置可以通过ds.setConnectProperties(prop)来进行特殊的配置。
@Value是读取的yml中设置的一些属性。
5.2.2 MysqlDataSourceConfig
MySql数据源的设置如下:
@Slf4j
@Configuration
@MapperScan(basePackages = "com.king.mapper.mysql", sqlSessionTemplateRef = "mysqlSqlSessionTemplate")
public class MysqlDataSourceConfig {

    @Value("${spring.datasource.mysql.mapper-locations}")
    private String mapperLocation;
    @Value("${spring.datasource.mysql.jdbc-url}")
    private String jdbcUrl;
    @Value("${spring.datasource.mysql.driver-class-name}")
    private String driverClassName;
    @Value("${spring.datasource.mysql.username}")
    private String username;
    @Value("${spring.datasource.mysql.password}")
    private String password;
//    @Value("${spring.datasource.ds1.initialSize}")
//    private int initialSize;
//    @Value("${spring.datasource.ds1.minIdle}")
//    private int minIdle;
//    @Value("${spring.datasource.ds1.maxActive}")
//    private int maxActive;


    @Bean
    @Primary
    @ConfigurationProperties(prefix = "spring.datasource.mysql")
    public DataSource mysqlDataSource() {
//        DataSource ds = DataSourceBuilder.create().build();
        log.info("init mysql data source");
        DruidDataSource ds = new DruidDataSource();
        ds.setUrl(jdbcUrl);
        ds.setDriverClassName(driverClassName);
        ds.setUsername(username);
        ds.setPassword(password);
        return ds;
    }

    @Bean
    @Primary
    public SqlSessionFactory mysqlSqlSessionFactory(@Qualifier("mysqlDataSource") DataSource dataSource) throws Exception {
        SqlSessionFactoryBean bean = new SqlSessionFactoryBean();
        bean.setDataSource(dataSource);
        //开启驼峰
        MybatisConfiguration configuration = new MybatisConfiguration();
        configuration.setMapUnderscoreToCamelCase(true);
        bean.setConfiguration(configuration);
        //指定当前数据源的mybatis的Xml文件的路径"
        bean.setMapperLocations(new PathMatchingResourcePatternResolver().getResources(mapperLocation));
        return bean.getObject();
    }

    @Bean
    @Primary
    public DataSourceTransactionManager mysqlTransactionManager(@Qualifier("mysqlDataSource") DataSource dataSource) {
        return new DataSourceTransactionManager(dataSource);
    }

    @Bean
    @Primary
    public SqlSessionTemplate mysqlSqlSessionTemplate(@Qualifier("mysqlSqlSessionFactory") SqlSessionFactory sqlSessionFactory) throws Exception {
        return new SqlSessionTemplate(sqlSessionFactory);
    }

}
关于springboot默认的数据源自动配置选项,最好排除掉,在当时测试时是不用手工关闭的,
后来过了一天又出现找不到@Value定义的变量,所以后来又加上了。
@SpringBootApplication(exclude = {DataSourceAutoConfiguration.class})
public class PhoenixApplication {

    public static void main(String[] args) {
        SpringApplication.run(PhoenixApplication.class, args);
    }
}
6. 完整的Pom
pom文件
<?xml version="1.0" encoding="UTF-8"?>
<project xmlns="http://maven.apache.org/POM/4.0.0"
         xmlns:xsi="http://www.w3.org/2001/XMLSchema-instance"
         xsi:schemaLocation="http://maven.apache.org/POM/4.0.0 http://maven.apache.org/xsd/maven-4.0.0.xsd">
    <parent>
        <artifactId>bigdata_study</artifactId>
        <groupId>com.king</groupId>
        <version>1.0.0</version>
    </parent>
    <modelVersion>4.0.0</modelVersion>

    <artifactId>phoenix_client</artifactId>

    <dependencies>
        <dependency>
            <groupId>org.springframework.boot</groupId>
            <artifactId>spring-boot-starter</artifactId>
        </dependency>
        <dependency>
            <groupId>org.springframework.boot</groupId>
            <artifactId>spring-boot-starter-web</artifactId>
        </dependency>
        <dependency>
            <groupId>org.springframework.boot</groupId>
            <artifactId>spring-boot-starter-test</artifactId>
        </dependency>
        <dependency>
            <groupId>com.baomidou</groupId>
            <artifactId>mybatis-plus-generator</artifactId>
            <version>3.4.1</version>
        </dependency>
        <dependency>
            <groupId>com.baomidou</groupId>
            <artifactId>mybatis-plus-boot-starter</artifactId>
            <version>3.4.1</version>
        </dependency>
        <dependency>
            <groupId>mysql</groupId>
            <artifactId>mysql-connector-java</artifactId>
        </dependency>
        <dependency>
            <groupId>org.apache.phoenix</groupId>
            <artifactId>phoenix-client-hbase</artifactId>
            <version>2.4.0-5.1.1</version>
        </dependency>
        <dependency>
            <groupId>com.alibaba</groupId>
            <artifactId>fastjson</artifactId>
            <version>1.2.73</version>
        </dependency>
        <dependency>
            <groupId>com.google.guava</groupId>
            <artifactId>guava</artifactId>
            <version>30.0-jre</version>
        </dependency>
        <dependency>
            <groupId>org.projectlombok</groupId>
            <artifactId>lombok</artifactId>
            <version>1.18.26</version>
        </dependency>
        <dependency>
            <groupId>org.apache.commons</groupId>
            <artifactId>commons-lang3</artifactId>
            <version>3.12.0</version>
        </dependency>
        <dependency>
            <groupId>com.alibaba</groupId>
            <artifactId>druid-spring-boot-starter</artifactId>
            <version>1.2.8</version>
        </dependency>
    </dependencies>

    <dependencyManagement>
        <dependencies>
            <dependency>
                <groupId>org.springframework.boot</groupId>
                <artifactId>spring-boot-dependencies</artifactId>
                <version>2.6.14</version>
                <type>pom</type>
                <scope>import</scope>
            </dependency>
        </dependencies>
    </dependencyManagement>

    <!--多环境配置优先级,默认配置dev -->
    <profiles>
        <profile>
            <id>dev</id>
            <properties>
                <profileActive>dev</profileActive>
            </properties>
            <activation>
                <activeByDefault>true</activeByDefault>
            </activation>
        </profile>
        <profile>
            <id>test</id>
            <properties>
                <profileActive>test</profileActive>
            </properties>
        </profile>
        <profile>
            <id>pro</id>
            <properties>
                <profileActive>pro</profileActive>
            </properties>
        </profile>
    </profiles>
    <build>
        <resources>
            <resource>
                <directory>src/main/resources</directory>
                <filtering>true</filtering>
            </resource>
        </resources>
    </build>

</project>
6. 测试
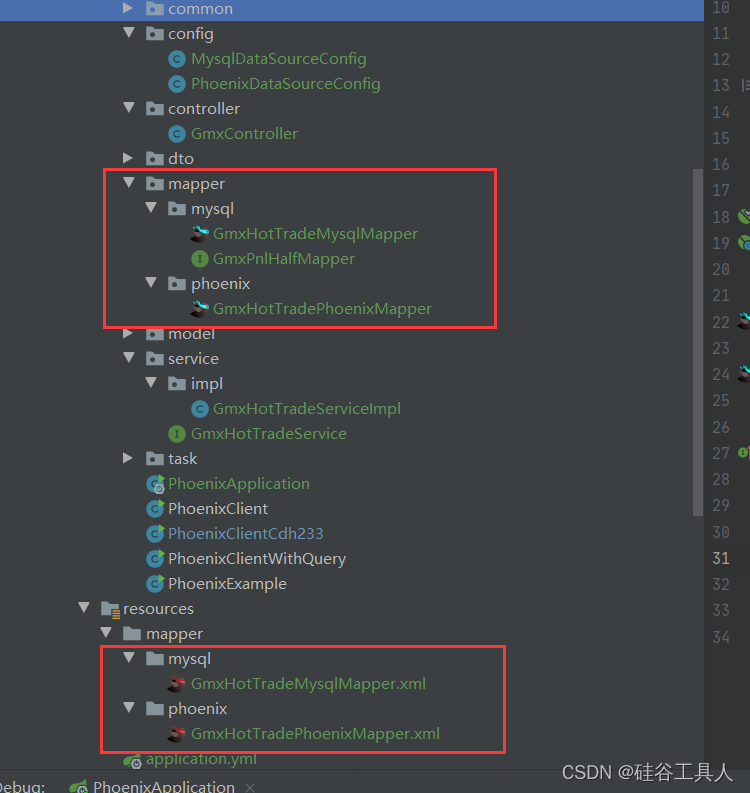
6.1 Mapper配置
根据不同的数据源,创建不同的目录,以及各自的查询方法。
6.2 方法调用
在Service中调用2个数据源查询,并将结果集合并一起。
@Service
public class GmxHotTradeServiceImpl extends ServiceImpl<GmxHotTradePhoenixMapper, GmxHotTradeDTO> implements GmxHotTradeService {

    @Autowired
    private GmxHotTradePhoenixMapper gmxHotTradePhoenixMapper;
    @Autowired
    private GmxHotTradeMysqlMapper gmxHotTradeMysqlMapper;

    @Override
    public List<GmxHotTradeDTO> queryList(String action,Integer time) {
        List<GmxHotTradeDTO> hotTradeList1 = gmxHotTradePhoenixMapper.queryHotTrade(action, time);
        List<GmxHotTradeDTO> hotTradeList2 = gmxHotTradeMysqlMapper.queryHotTrade(action, time);
        hotTradeList1.addAll(hotTradeList2);
        return hotTradeList1;
    }
}
6.3 查询
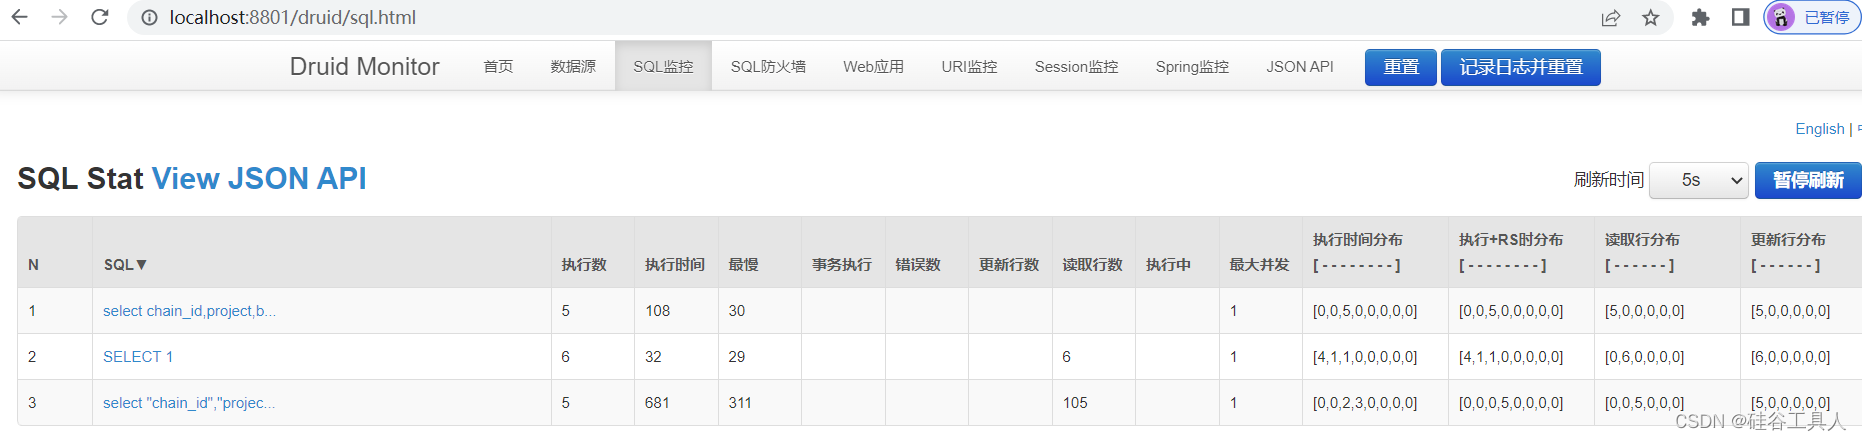
通过在前端查询Controller中的接口,可以在Druid的监控页面查询到请求的信息:
http://localhost:8801/druid/index.html
SQL监控:
URL请求:


 1万+
1万+


 被折叠的 条评论
为什么被折叠?
被折叠的 条评论
为什么被折叠?
 到【灌水乐园】发言


