


有了前一篇的基础后,为了定制出个性化的QMenu。很容易就可以知道,需要自己实现一个QStyle;而具体是实现哪些部分呢,这就需要知道
QMenu源码里面是调用QStyle的哪些接口来绘制的了;从QPushButton的paintEvent可以看出它是使用的drawControl(CE_PushButton...)画出来的。
而QMenu我们可以使用一样的方法,QMenu的paintEvent源码如下
void QMenu::paintEvent(QPaintEvent *e)
{
    Q_D(QMenu);
    d->updateActionRects();
    QPainter p(this);
    QRegion emptyArea = QRegion(rect());

    QStyleOptionMenuItem menuOpt;
    menuOpt.initFrom(this); //初始化
    menuOpt.state = QStyle::State_None;
    menuOpt.checkType = QStyleOptionMenuItem::NotCheckable;
    menuOpt.maxIconWidth = 0;
    menuOpt.tabWidth = 0;
    style()->drawPrimitive(QStyle::PE_PanelMenu, &menuOpt, &p, this);   //第一次绘画,画出了菜单背景面板

    //calculate the scroll up / down rect
    const int fw = style()->pixelMetric(QStyle::PM_MenuPanelWidth, 0, this);
    const int hmargin = style()->pixelMetric(QStyle::PM_MenuHMargin,0, this);
    const int vmargin = style()->pixelMetric(QStyle::PM_MenuVMargin, 0, this);

    QRect scrollUpRect, scrollDownRect;
    const int leftmargin = fw + hmargin + d->leftmargin;
    const int topmargin = fw + vmargin + d->topmargin;
    const int bottommargin = fw + vmargin + d->bottommargin;
    const int contentWidth = width() - (fw + hmargin) * 2 - d->leftmargin - d->rightmargin;
    if (d->scroll) {
        if (d->scroll->scrollFlags & QMenuPrivate::QMenuScroller::ScrollUp)
            scrollUpRect.setRect(leftmargin, topmargin, contentWidth, d->scrollerHeight());

        if (d->scroll->scrollFlags & QMenuPrivate::QMenuScroller::ScrollDown)
            scrollDownRect.setRect(leftmargin, height() - d->scrollerHeight() - bottommargin,
                                   contentWidth, d->scrollerHeight());
    }

    //calculate the tear off rect
    QRect tearOffRect;
    if (d->tearoff) {
        tearOffRect.setRect(leftmargin, topmargin, contentWidth,
                            style()->pixelMetric(QStyle::PM_MenuTearoffHeight, 0, this));
        if (d->scroll && d->scroll->scrollFlags & QMenuPrivate::QMenuScroller::ScrollUp)
            tearOffRect.translate(0, d->scrollerHeight());
    }

    //draw the items that need updating..
    QRect scrollUpTearOffRect = scrollUpRect.united(tearOffRect);
    for (int i = 0; i < d->actions.count(); ++i) {
        QAction *action = d->actions.at(i);
        QRect actionRect = d->actionRects.at(i);
        if (!e->rect().intersects(actionRect)
            || d->widgetItems.value(action))
           continue;
        //set the clip region to be extra safe (and adjust for the scrollers)
        emptyArea -= QRegion(actionRect);

        QRect adjustedActionRect = actionRect;
        if (!scrollUpTearOffRect.isEmpty() && adjustedActionRect.bottom() <= scrollUpTearOffRect.top())
            continue;

        if (!scrollDownRect.isEmpty() && adjustedActionRect.top() >=  scrollDownRect.bottom())
            continue;

        if (adjustedActionRect.intersects(scrollUpTearOffRect)) {
            if (adjustedActionRect.bottom() <= scrollUpTearOffRect.bottom())
                continue;
            else
                adjustedActionRect.setTop(scrollUpTearOffRect.bottom()+1);
        }

        if (adjustedActionRect.intersects(scrollDownRect)) {
            if (adjustedActionRect.top() >= scrollDownRect.top())
                continue;
            else
                adjustedActionRect.setBottom(scrollDownRect.top()-1);
        }

        QRegion adjustedActionReg(adjustedActionRect);
        p.setClipRegion(adjustedActionReg);

        QStyleOptionMenuItem opt;
        initStyleOption(&opt, action);
        opt.rect = actionRect;
        style()->drawControl(QStyle::CE_MenuItem, &opt, &p, this);  //第二次绘画,画出了菜单项。
    }

    emptyArea -= QRegion(scrollUpTearOffRect);
    emptyArea -= QRegion(scrollDownRect);

    if (d->scrollUpTearOffItem || d->scrollDownItem) {
        if (d->scrollUpTearOffItem)
            d->scrollUpTearOffItem->updateScrollerRects(scrollUpTearOffRect);
        if (d->scrollDownItem)
            d->scrollDownItem->updateScrollerRects(scrollDownRect);
    } else {
        //paint scroll up /down
        d->drawScroller(&p, QMenuPrivate::ScrollerTearOffItem::ScrollUp, scrollUpRect);
        d->drawScroller(&p, QMenuPrivate::ScrollerTearOffItem::ScrollDown, scrollDownRect);
        //paint the tear off..
        d->drawTearOff(&p, tearOffRect);
    }

    //draw border
    if (fw) {
        QRegion borderReg;
        borderReg += QRect(0, 0, fw, height()); //left
        borderReg += QRect(width()-fw, 0, fw, height()); //right
        borderReg += QRect(0, 0, width(), fw); //top
        borderReg += QRect(0, height()-fw, width(), fw); //bottom
        p.setClipRegion(borderReg);
        emptyArea -= borderReg;
        QStyleOptionFrame frame;
        frame.rect = rect();
        frame.palette = palette();
        frame.state = QStyle::State_None;
        frame.lineWidth = style()->pixelMetric(QStyle::PM_MenuPanelWidth);
        frame.midLineWidth = 0;
        style()->drawPrimitive(QStyle::PE_FrameMenu, &frame, &p, this); //第三次绘画,画出了菜单边框
    }

    //finally the rest of the spaces
    p.setClipRegion(emptyArea);
    menuOpt.state = QStyle::State_None;
    menuOpt.menuItemType = QStyleOptionMenuItem::EmptyArea;
    menuOpt.checkType = QStyleOptionMenuItem::NotCheckable;
    menuOpt.rect = rect();
    menuOpt.menuRect = rect();
    style()->drawControl(QStyle::CE_MenuEmptyArea, &menuOpt, &p, this);  //最后一次画出了剩余区域
由上我们便知道了,菜单的绘制过程;先画背景面板、然后菜单项、然后整个菜单边框、最后空白区域;但是真实的菜单还有分隔线,子菜单,上面怎么没有出现呢?
这是因为分隔线和子菜单也是一个菜单项QAction,用QMenu::menuAction()可以返回这个菜单的QAction。我们也可以来看一下源码处理,在第二步绘画菜单项的前面调用了
initStyleOption()这个函数,用于菜单项的初始化。
void QMenu::initStyleOption(QStyleOptionMenuItem *option, const QAction *action) const
{
    if (!option || !action)
        return;

    Q_D(const QMenu);
    option->initFrom(this);
    option->palette = palette();
    option->state = QStyle::State_None;

    if (window()->isActiveWindow())
        option->state |= QStyle::State_Active;
    if (isEnabled() && action->isEnabled()
            && (!action->menu() || action->menu()->isEnabled()))
        option->state |= QStyle::State_Enabled;
    else
        option->palette.setCurrentColorGroup(QPalette::Disabled);

    option->font = action->font().resolve(font());
    option->fontMetrics = QFontMetrics(option->font);

    if (d->currentAction && d->currentAction == action && !d->currentAction->isSeparator()) {
        option->state |= QStyle::State_Selected
                     | (d->mouseDown ? QStyle::State_Sunken : QStyle::State_None);
    }

    option->menuHasCheckableItems = d->hasCheckableItems;
    if (!action->isCheckable()) {
        option->checkType = QStyleOptionMenuItem::NotCheckable;
    } else {
        option->checkType = (action->actionGroup() && action->actionGroup()->isExclusive())
                            ? QStyleOptionMenuItem::Exclusive : QStyleOptionMenuItem::NonExclusive;
        option->checked = action->isChecked();
    }
    if (action->menu())
        option->menuItemType = QStyleOptionMenuItem::SubMenu;
    else if (action->isSeparator())
        option->menuItemType = QStyleOptionMenuItem::Separator;
    else if (d->defaultAction == action)
        option->menuItemType = QStyleOptionMenuItem::DefaultItem;
    else
        option->menuItemType = QStyleOptionMenuItem::Normal;
    if (action->isIconVisibleInMenu())
        option->icon = action->icon();
    QString textAndAccel = action->text();
#ifndef QT_NO_SHORTCUT
    if (textAndAccel.indexOf(QLatin1Char('\t')) == -1) {
        QKeySequence seq = action->shortcut();
        if (!seq.isEmpty())
            textAndAccel += QLatin1Char('\t') + seq.toString(QKeySequence::NativeText);
    }
#endif
    option->text = textAndAccel;
    option->tabWidth = d->tabWidth;
    option->maxIconWidth = d->maxIconWidth;
    option->menuRect = rect();
}
可以看到把菜单里的每一条内容都用QAction来表示,并根据QAction所属分类,对其menuItemType做了赋值,而这个值正是重写QStyle的菜单需要的枚举值。好了,了解了
这些就可以开始重写样式了。新建样式MyStyle其cpp如下,首先是画菜单背景面板,由于菜单边框也是同一个接口,所以可以一起介绍了。
void MyStyle::drawPrimitive(PrimitiveElement element, const QStyleOption *option,
                            QPainter *painter, const QWidget *widget) const
{
    switch (element) {
    case PE_FrameMenu: //整个菜单widget的边框色
        qDrawShadeRect(painter,option->rect,option->palette,option->state & State_Sunken,1);
        break;
    case PE_PanelMenu: //整个菜单widget的背景色
        qDrawShadePanel(painter,option->rect,option->palette,option->state & State_Sunken,0,&option->palette.brush(QPalette::Background));
        break;
    default:
        QProxyStyle::drawPrimitive(element,option,painter,widget);
        break;
    }
}用了QMenu的QPalette::Background做为背景色,边框的颜色查看文档可知是由QMenu的QPalette::Light和QPalette::Dark决定,前者代表左线和顶线,后者代表右线和底线。
当midLineWidth不为0时,其颜色为QPalette::Mid,这里我使用的默认0,未显示。
接下来就可以画菜单项了
void MyStyle::drawControl(ControlElement element, const QStyleOption *option,
                          QPainter *painter, const QWidget *widget) const
{
    switch (element) {
    case CE_MenuEmptyArea: //空白区域不处理,看源码可看见最后恢得成了整个菜单区域,有需要的可以处理如蒙上一层半透明
        break;
    case CE_MenuItem: //画菜单项
        if(const QStyleOptionMenuItem * menuItem = qstyleoption_cast<const QStyleOptionMenuItem*>(option)){
            painter->save();
            bool hover = menuItem->state & State_Selected && menuItem->state & State_Enabled;
            if(hover){ //鼠标滑过,先画一个矩形,使后面的文字不会被覆盖
                painter->setBrush(menuItem->palette.brush(QPalette::Foreground));
                painter->drawRect(menuItem->rect);
            }
            int leftW = qRound(25.2);
            if(menuItem->menuItemType == QStyleOptionMenuItem::Separator){ //画分隔线
                painter->setPen(QColor(Qt::white));
                painter->drawLine(leftW,menuItem->rect.center().y(),menuItem->rect.right(),menuItem->rect.center().y());
            }else if(menuItem->menuItemType == QStyleOptionMenuItem::SubMenu){ //画子菜单
                QRect textRect = menuItem->rect;
                textRect.moveLeft(leftW);
                painter->setPen(menuItem->palette.text().color());
                painter->drawText(textRect,Qt::AlignVCenter | Qt::TextShowMnemonic | Qt::TextSingleLine | Qt::TextDontClip, menuItem->text);
                int x,y,w,h;
                menuItem->rect.getRect(&x,&y,&w,&h);
                int dim = (h - 2 * 2) / 2;
                int xpos = x + w - 2 - 1 - dim;
                QRect  vSubMenuRect = visualRect(option->direction, menuItem->rect, QRect(xpos, y + h / 2 - dim / 2, dim, dim));
                painter->setBrush(menuItem->palette.brush(QPalette::Foreground));
                painter->drawEllipse(vSubMenuRect);
            }else{ //文字菜单项
                painter->setPen(menuItem->palette.color(QPalette::Text));
                QRect textRect = menuItem->rect;
                QFont font = menuItem->font;
                painter->setFont(font);
                int text_flags = Qt::AlignVCenter | Qt::TextShowMnemonic | Qt::TextDontClip | Qt::TextSingleLine;
                QString s = menuItem->text;
                QString shortcutText = s.mid(s.indexOf('\t') + 1);
                s = s.left(s.indexOf('\t'));
                if(!shortcutText.isEmpty()){ //画快捷键文字
                    int fw = menuItem->fontMetrics.width(shortcutText);
                    textRect.moveLeft(menuItem->rect.right() - fw);
                    textRect = visualRect(menuItem->direction,menuItem->rect,textRect);
                    painter->drawText(textRect,text_flags,shortcutText);
                }
                textRect.moveLeft(leftW);
                textRect = visualRect(menuItem->direction,menuItem->rect,textRect);
                painter->drawText(textRect,text_flags,s);
            }
            painter->restore();
        }
        break;
    default:
        QProxyStyle::drawControl(element,option,painter,widget);
        break;
    }
}
像上面这样,菜单样式就做好了,我们需要加载到QMenu中,
Widget::Widget(QWidget *parent)
    : QWidget(parent)
{   //加载Widget背景
    setAutoFillBackground(true);
    QPixmap pixmap("background.jpg");
    QPalette thisPal = palette();
    thisPal.setBrush(QPalette::Background,QBrush(pixmap));
    setPalette(thisPal);
    resize(pixmap.size());

    menu = new QMenu(this);
    QPalette pal = menu->palette();
    pal.setColor(QPalette::Background,QColor(250,0,0,100)); //100为背景透明度
    pal.setColor(QPalette::Foreground,QColor(0,188,255));
    pal.setColor(QPalette::Text,Qt::white);
    pal.setColor(QPalette::Highlight,Qt::blue);
    pal.setColor(QPalette::Light,Qt::yellow);
    pal.setColor(QPalette::Mid,Qt::gray);
    pal.setColor(QPalette::Dark,Qt::green);
    menu->setPalette(pal);
    setContextMenuPolicy(Qt::CustomContextMenu);
    QAction *act = new QAction("add");
    act->setShortcut(Qt::CTRL | Qt::Key_A);
    menu->addAction(act);
    menu->addSeparator();
    act = new QAction("delete");
    act->setShortcut(Qt::SHIFT | Qt::Key_T);
    menu->addAction(act);
    menu->addSeparator();
    act = new QAction("sell");
    act->setShortcut(Qt::CTRL | Qt::Key_F1);
    menu->addAction(act);
    QMenu *ot =new QMenu("other");
    ot->addAction("helol");
    ot->setPalette(pal);
    menu->addMenu(ot);

    menu->setLayoutDirection(Qt::LeftToRight);
    menu->setStyle(new MyStyle);
    ot->setStyle(new MyStyle);

    connect(this,&Widget::customContextMenuRequested,[&]{menu->move(QCursor::pos());menu->show();});
}
关于菜单如何弹出,就做过多介绍了,我使用的是信号方式。我们设置了菜单的颜色、快捷键,也使用了自定义的样式,这样我们可以看效果了
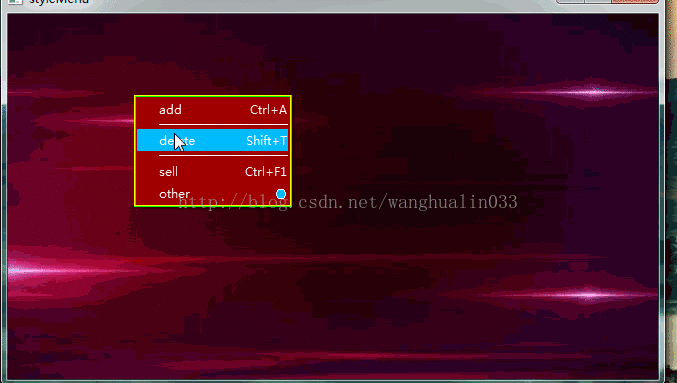
基本看似完成了,其实不然,细心的朋友可以看见,前面我们展示的是背景是半透明的,而文字和鼠标滑过的方块是不透明的。怎么解决这个问题呢,
做过透明的同学都应该知道,Qt中的透明可以通过setMask(),setAttribute(),setWindowFlag(),setWindowOpacity()这些函数设置,而QMenu是继承自
QWidget当然也就是用这些了;
1、setMask()中传入的区域会显示,其它直接没有;
2、setAttribute()传入WA_TranslucentBackground时为设置背景透明,但是在Windows平台还要配合setWindowFlag()传入FramelessWindowHint;
3、setWindowOpacity()为窗体和内容一起透明,透明度由传入参数设置
综上我选择了第二种,增加如下代码
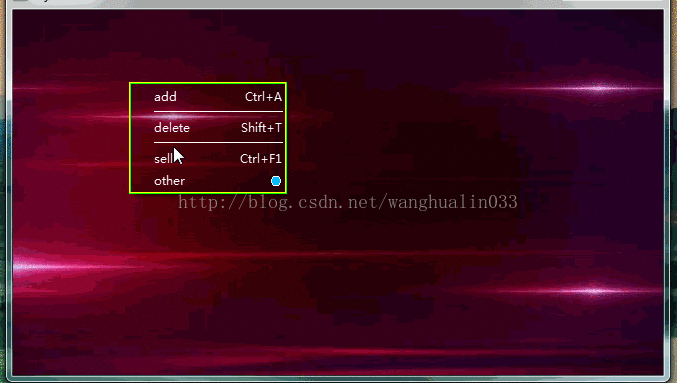
    ot->setAttribute(Qt::WA_TranslucentBackground);
    ot->setWindowFlag(Qt::FramelessWindowHint);
    //使菜单的大背景透明(只是背景),需要以下两个函数;setWindowOpacity(qreal)是包含标题栏和所有内容一起根据qreal值透明
    menu->setAttribute(Qt::WA_TranslucentBackground);
    menu->setWindowFlag(Qt::FramelessWindowHint);
有没有看到能够看见后面的白光了,这个背景色的透明是由QMenu的QPalette::Background的alpha值决定的,因为我们画背景是用的是Background的画刷
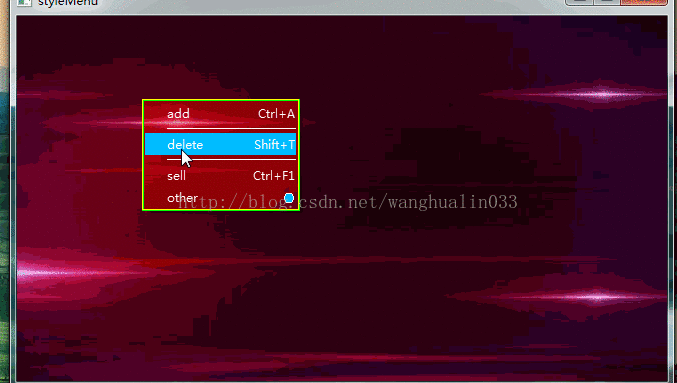
我将背景色的透明设置成了100,可以看代码。如果将QPalette::Background设置成(0,0,0,50)也就是黑色透明度为50,效果如下
效果就可清晰了,截图效果不佳,真实代码运行会更明显
整个工程源码在这里,图片需要自已加哦


 820
820

 被折叠的 条评论
为什么被折叠?
被折叠的 条评论
为什么被折叠?
 到【灌水乐园】发言


