


前沿
上一篇我们介绍了开源的无代码开发平台Brick, 在无代码开发中比较常见的一个功能是工作流设计器,工作流可以做流程审批设计,数据操作设计等。我们基于antv的x6
封装一个通用的能力,剩下的只需扩充节点类型就可以。
演示
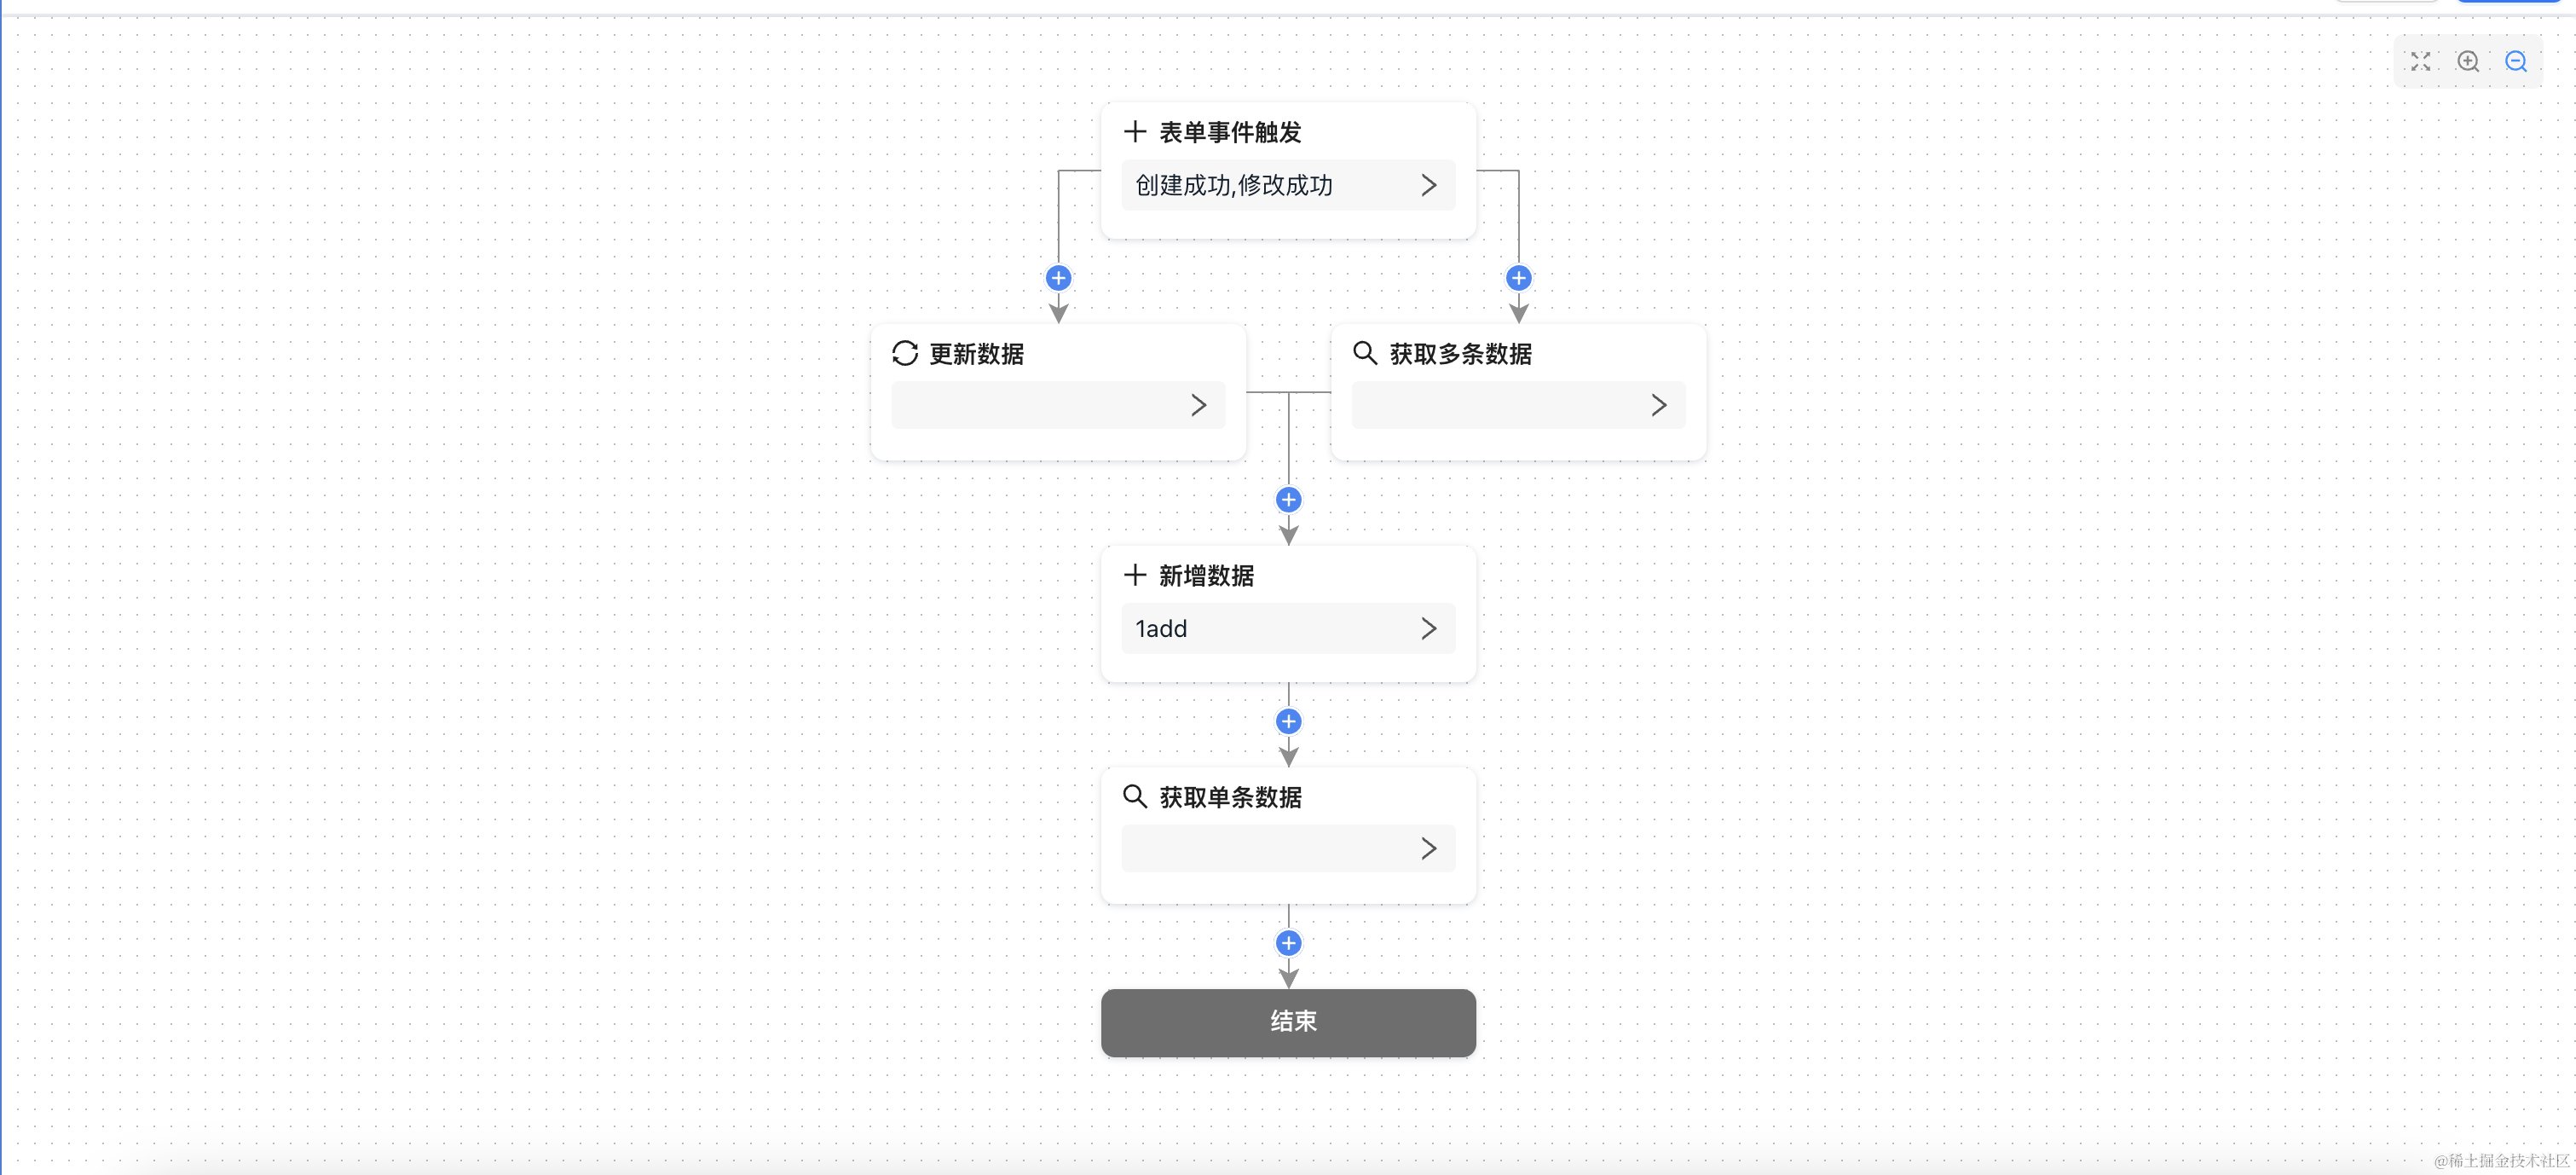

设计分析
我们看上面的演示功能,主要有三个核心模块。
- 工作流画布(Workflow)
- node节点设置 (NodeSetting)
- node节点显示 (Node)
工作流画布
画布初始化
- 初始化工作流,为了方便统一管理,我们使用一个自定义hooks去管理画布的初始化.
export const useWorkflowInit = (container: React.RefObject<HTMLDivElement>) => {

  const currGraphRef = useRef<Graph>();
  const update = useUpdate();

  useEffect(() => {
    const graph = new Graph({
      container: container.current,
      autoResize: true, //自动变更画布大小
      grid: true,
      panning: false, //可以拖拽画布
      // mousewheel: true, //滚轮缩放画布
      background: {
      },
      connecting: {},
      onEdgeLabelRendered: (args: any) => {
        const { selectors, edge } = args;
        const content = selectors.foContent as HTMLDivElement;
        if (content) {
          ReactDOM.render(<EdgeLabel edge={edge} />, content);
        }
      },
    });
    setWorkflowElement(container.current);
  }, [container.current]);

  return {
    graph: currGraphRef.current,
  };
};
- 使用hooks做初始化
export const Workflow: FC<IWorkflowProps> = ({ style, className, data }) => {
  const { graph } = useWorkflowInit(containerRef);
  return (
    <div style={style} className={classNameStr}>
      <div ref={containerRef} className={s.container} id="container"></div>
    </div>
  );
};
全局数据管理
- 我们使用context做数据管理,方便我们在组件内去使用相关信息和操作的相关功能等。
export class WorkflowAppProcessor {
  self: WorkflowAppProcessor;

  graphProcessor: GraphProcessor;

  workflowElement: HTMLElement | null;

  /**
   * node 节点相关内容
   */
  nodeModule: TNodeModuleMap;

  //工作留数据
  workflowData: Observable<IWorkflowEntity>;

  activeNode: Observable<IWorkflowNodeData | null>;

  constructor() {
    this.self = this;
    this.activeNode = observable(null);
    this.workflowData = observable({} as IWorkflowEntity);
    this.workflowElement = null;

    this.graphProcessor = createGraphProcessor().processor;
    this.nodeModule = getNodeModule();
  }

  setWorkflowElement = (element: HTMLDivElement) => {
    this.workflowElement = element;
  };

  /**
   * 设置workflow数据
   * @param data
   */
  setWorkflowData = (data: IWorkflowEntity) => {
    this.workflowData.set(data);
  };

  /**
   * 根据类型获取节点的默认数据
   * @param nodeType
   * @param defaultNodeData
   */
  _getDefaultNodeData = (nodeType: TNodeType, defaultNodeData?: Partial<IWorkflowNodeData>) => {

  };

  addNodeData = (nodeType: TNodeType, defaultNodeData?: Partial<IWorkflowNodeData>) => {
  };

  /**
   * 修改node data
   * @param nodeData
   */
  updateNodeData = (nodeData: IWorkflowNodeData) => {
     ...
  };
  ....
}
node节点和setting
我们看到节点类型会有很多,我们可以按照约定去注册使用节点。
注册
- 我们用两个类型举例
看下面的截图,为每个类型分别创建了三个文件。
entry.ts入口文件Setting.tsx节点设置器AddData.tsx ...节点显示组件
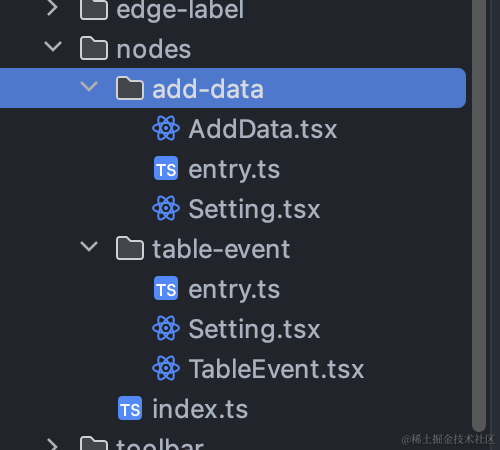
entry.ts入口文件功能
export class AddDataNode extends BaseNode {

  // 获取节点显示组件
  static getNodeElement = (): TLazyFunctionComponent => {
    return React.lazy(() => import('./AddData'));
  };

// 获取节点设计组件
  static getSettingPanel = (): TLazyFunctionComponent => {
    return React.lazy(() => import('./Setting'));
  };

  // 元数据信息
  static getMetadata = (): ISettingPanelMetaData => {
    return {
      name: '新增数据',
      type: ENodeType.AddData,
      icon: React.createElement(PlusOutlined),
    };
  };

 // 默认配置数据
  static getDefaultConfigData = () => {
    return {} as IAddDataNodeConfig;
  };
}
看到 AddDataNode继承了BaseNode,我们可以在BaseNode去做实现约束。在入口文件中的getNodeElement和getSettingPanel方法中使用了React.lazy,可以帮我们实现异步加载这些组件。
Setting.tsx节点设置器
在Setting中封装一个SettingFormItem,是对antd的FormItem做了封装,提供设置的变更
const Setting: FC<ISettingComponentProps<ENodeType.AddData>> = (props) => {
  const { nodeData } = props;
  return (
    <div>
      <SettingFormItem
        title={'选择表单'}
        formItemProps={{
          name: ['tableId'],
        }}
      >
        <AppTableCaseCadeSelect />
      </SettingFormItem>
    </div>
  );
};

export default Setting;
- 节点显示组件
通过props传递nodeData,可以方便的获取节点的数据来做显示
const TableEvent: FC<INodeComponentProps<ENodeType.TableEvent>> = (props) => {
  const { nodeData } = props;

  const triggerEvent = nodeData?.config?.triggerEvent;
  ....

  return <div>{text}</div>;
};

export default TableEvent;
- 获取节点信息,存储到全局对象中
import * as nodes from '../components/nodes';
export const getNodeModule = () => {
  const result: TNodeModuleMap = {} as TNodeModuleMap;

  Object.values(nodes).forEach((item) => {
    const metaData = item.getMetadata();
    const nodeType = metaData.type;

    const nodeModuleValue: INodeModuleValue = {
      nodeComponent: item.getNodeElement(),
      settingComponent: item.getSettingPanel(),
      metaData,
      defaultNodeConfigData: item.getDefaultConfigData?.() || {},
    };
    result[nodeType] = nodeModuleValue;
  });

  return result;
};
Setting和Node容器
- SettingContainer
主要从头全局状态中获取当前选中的node节点,根据节点的node类型去做对应的Setting展示。集成了antd的form组件,从而点确定的时候去更新全局需要存储的信息。
export interface ISettingContainerProps {}

export const SettingContainer: FC<ISettingContainerProps> = memo((props) => {
  const [activeNode, clearActiveNode, nodeModule, updateNodeData, nodeMap] = useWorkflowAppSelector(
    (s) => [s.activeNode, s.clearActiveNode, s.nodeModule, s.updateNodeData, s.workflowData.nodeMap]
  );

  const nodeId = activeNode?.id!;

  const [form] = Form.useForm();

  useEffect(() => {
    const values = nodeMap?.[nodeId] || {};
    form.setFieldsValue(values);
  }, [nodeId]);

  const onClose = useMemoizedFn(() => {
    clearActiveNode();
  });

  /**
   * 更新widget
   */
  const onOk = async () => {
    try {
      const values = await form.validateFields();

      updateNodeData({ ...values, id: nodeId });
      onClose();
    } catch (error: any) {
      const errMessage = error?.errorFields?.[0]?.errors?.[0];
      message.error(errMessage);

      return;
    }
  };

  const SettingComponent = nodeModule?.[activeNode?.type!]?.settingComponent;

  const Footer = () => {
    return (
      <div className={s.footer}>
        <Space>
          <Button onClick={onClose}>取消</Button>
          <Button type={'primary'} onClick={onOk}>
            确定
          </Button>
        </Space>
      </div>
    );
  };

  return (
    <Drawer
      title={activeNode?.name || '设置'}
      placement="right"
      bodyStyle={{
        padding: '24px 0',
      }}
      width={600}
      onClose={onClose}
      open={Boolean(activeNode)}
      footer={<Footer />}
    >
      <Form form={form}>
        <Suspense fallback={<div>Loading...</div>}>
          {SettingComponent && <SettingComponent nodeData={activeNode!} />}
        </Suspense>
      </Form>
    </Drawer>
  );
});
- NodeContainer
主要也是通过当前激活的节点,去做对应的容器渲染。
export const NodeContainer = ({ node }: { node: Node }) => {

  const NodeComponent = nodeModule?.[nodeType]?.nodeComponent;

  return (
    <div
      onClick={onNodeClick}
    >
      {!isEnd && (
        <div className={s.content}>
          <div className={s.left}>{NodeComponent && <NodeComponent nodeData={currNode!} />}</div>

        </div>
      )}
    </div>
  );
};
通过以上的设置,后续我们扩充节点只需要添加这三个文件就可以了。
画布操作
画布内的节点,连线等操作,我们封装一个通用的类来管理。
export class GraphProcessor extends BaseProcessor {
  // graph实例,不是
  graph: Graph | null;

  constructor() {
    super();
    this.graph = null;
    this.init();
  }

  private init = async () => {
    this.listeners();
  };

  /**
   * 设置graph实例
   * @param graph
   */
  setGraph = (graph: Graph) => {
    this.graph = graph;
    // @ts-ignore
    window._graph = graph;
  };

  /**
   * 添加node节点
   * @param nodeType
   * @param data
   */
  addNode = (nodeType: TNodeType, data: Node.Metadata) => {
    data.data = {
      ...data.data,
      type: nodeType,
    };
    if (!data.id) {
      data.id = uuid();
    }
    return this.graph?.addNode({ ...DEFAULT_NODE_ATTR, ...data });
  };

  addEdge = (source: string, target: string) => {
    return this.graph?.addEdge({
      source,
      target,
      attrs: {
        line: {
          stroke: '#8f8f8f',
          strokeWidth: 1,
        },
      },
      defaultLabel: {
        markup: Markup.getForeignObjectMarkup(),
        attrs: {
          fo: {
            width: 18,
            height: 18,
            x: -9,
            y: 0,
            // y: -(NODE_GAP / 2),
          },
        },
      },
      label: {
        // attrs: {
        //   text: {
        //     text: "s1"
        //   }
        // },
        position: {
          distance: -35,
          // distance: -(NODE_GAP / 2)
        },
      },
      router: {
        name: 'orth',
        args: {
          padding: {
            bottom: 10,
          },
        },
      },
    });
  };

  addNodeByEdge = ({
    nodeType,
    data,
    edge,
    isRedraw = true,
  }: {
    nodeType: TNodeType;
    data?: Node.Metadata;
    edge: Edge;
    isRedraw?: boolean;
  }) => {
    const sourceId = edge.getSourceCellId();
    const targetId = edge.getTargetCellId();

    this.addNode(nodeType, data!);
    // 当前线删除
    edge.remove();

    this.addEdge(sourceId, data!.id!);
    this.addEdge(data!.id!, targetId);

    if (isRedraw) {
      this.redraw();
    }
  };

  /**
   * 重新绘制实图
   */
  redraw = () => {
    const nodes = this.graph?.getNodes();
    const edges = this.graph?.getEdges();

    const graphArea = this.graph?.getGraphArea();
    // 画布宽度
    const graphWidth = graphArea?.width || 0;
    // 画布高度
    const graphHeight = graphArea?.height || 0;

    const connections =
      edges?.map((f) => ({
        sourceId: f.getSourceCellId(),
        targetId: f.getTargetCellId(),
      })) || [];

    // 1. 通过edges找出层级关系
    const treeLevelData = convertToLevelTree(connections);

    treeLevelData.forEach((currLevelData, level) => {
      // 当前级别数量
      const currLevenLength = currLevelData.length;

      // 当前级别node总宽度
      const nodeSumWidth = NODE_WIDTH * currLevenLength + NODE_GAP * (currLevenLength - 1);

      const currBeginX = (graphWidth - nodeSumWidth) / 2;

      currLevelData.forEach((nodeId, index) => {
        const currNode = this.graph?.getCellById(nodeId) as Node;

        if (currNode) {
          // const { width, height } = currNode.getSize();;

          currNode?.setPosition({
            x: currBeginX + (NODE_WIDTH + NODE_GAP) * index,
            y: NODE_GAP + (NODE_HEIGHT + NODE_GAP) * level,
          });
        }
      });
    });

    // 2. 根据层级关系重新渲染
  };

  /**
   * 删除node节点
   * @param node
   */
  removeNode = (node: Node) => {
    this.graph?.removeNode(node);
  };

  /**
   * 获取workflow数据
   */
  getData = () => {
    return this.graph?.toJSON();
  };

}
其中的一些细节就不做详细介绍了,有需要的可以直接看代码。
联系我
建立了一个微信交流群,请添加微信号brickmaster1,备注brick,我会拉你进群
总结
整个工作流的代码在 b-workflow,有需要的,可以直接去查看
大家觉得有帮助,请在github帮忙star一下。
如果你觉得该文章不错,不妨
1、点赞,让更多的人也能看到这篇内容
2、关注我,让我们成为长期关系
3、关注公众号「前端有话说」,里面已有多篇原创文章,和开发工具,欢迎各位的关注,第一时间阅读我的文章


 236
236


 被折叠的 条评论
为什么被折叠?
被折叠的 条评论
为什么被折叠?
 到【灌水乐园】发言


