


ROS2环境下如何在Gazebo环境下加载多台机器人可以分为以下三个步骤:第一,机器人模型配置;第二,设置命名空间;第三,运行验证
1.器人模型配置
robot1:
<!-- Gazebo plugin for mobile base -->
<gazebo>
  <plugin name="base_controller" filename="libgazebo_ros_planar_move.so">
    <ros>
      <!-- <namespace>/wpb</namespace> -->
      <namespace>robot1</namespace>
      <remapping>cmd_vel:=cmd_vel</remapping>
      <remapping>odom:=odom</remapping>
    </ros>
    <!-- Set control loop update rate -->
    <update_rate>100</update_rate>
    <!-- Set odom publish rate -->
    <publish_rate>20</publish_rate>
    <!-- Set if odom required -->
    <publish_odom>true</publish_odom>
    <publish_odom_tf>false</publish_odom_tf>
    <!-- Frame IDs -->
    <odometry_frame>robot1/odom</odometry_frame>
    <robot_base_frame>robot1/base_footprint</robot_base_frame>

    <tf_prefix>robot1</tf_prefix>
    <!-- Set odom covariance -->
    <covariance_x>0.0001</covariance_x>
    <covariance_y>0.0001</covariance_y>
    <covariance_yaw>0.01</covariance_yaw>
    <ros>
    <remapping>tf:=tf</remapping>
    <remapping>tf_static:=tf_static</remapping>
  </ros>
  </plugin>
</gazebo>
robot2:
<!-- Gazebo plugin for mobile base -->
<gazebo>
  <plugin name="base_controller" filename="libgazebo_ros_planar_move.so">
    <ros>
      <!-- <namespace>/wpb</namespace> -->
      <namespace>robot2</namespace>
      <remapping>cmd_vel:=cmd_vel</remapping>
      <remapping>odom:=odom</remapping>
    </ros>
    <!-- Set control loop update rate -->
    <update_rate>100</update_rate>
    <!-- Set odom publish rate -->
    <publish_rate>20</publish_rate>
    <!-- Set if odom required -->
    <publish_odom>true</publish_odom>
    <publish_odom_tf>false</publish_odom_tf>
    <!-- Frame IDs -->
    <odometry_frame>robot2/odom</odometry_frame>
    <robot_base_frame>robot2/base_footprint</robot_base_frame>

    <tf_prefix>robot2</tf_prefix>
    <!-- Set odom covariance -->
    <covariance_x>0.0001</covariance_x>
    <covariance_y>0.0001</covariance_y>
    <covariance_yaw>0.01</covariance_yaw>
    <ros>
    <remapping>tf:=tf</remapping>
    <remapping>tf_static:=tf_static</remapping>
  </ros>
  </plugin>
</gazebo>
在机器人模型文件中在标签<namespace>中给每个机器人的每个话题添加命名空间标识,如<namespace>robot1</namespace>,同时要将<publish_odom_tf>false</publish_odom_tf>这个标签内容改为false,否则后续检测topic list时,会出现不在任何机器人命名空间下面的/tf话题.此时机器人配置文件修改完成.(这里只截取了以下部分,大家可以根据自己的机器人模型修改)
2.启动文件编写
2.1加载机器人模型
urdf_path1 = os.path.join(
        get_package_share_directory('nav_pkg'),
        'models',
        'wpb_home_lidar.model'
    )
    with open(urdf_path1, 'r') as infp:
        robot_desc = infp.read()
        doc = xacro.parse(robot_desc)
        xacro.process_doc(doc)
        robot1_description = doc.toxml()

    urdf_path2 = os.path.join(
        get_package_share_directory('nav_pkg'),
        'models',
        'wpb_home_lidar_1.model'
    )
    with open(urdf_path2, 'r') as infp:
        robot_desc = infp.read()
        doc = xacro.parse(robot_desc)
        xacro.process_doc(doc)
        robot2_description = doc.toxml()
这段代码的主要作用是从指定路径加载两个不同的机器人URDF模型文件,并通过xacro解析处理,生成可供ROS 2系统使用的机器人描述数据。
2.2Gazebo服务端与客户端启动
pkg_gazebo_ros = get_package_share_directory('gazebo_ros')
use_sim_time = LaunchConfiguration('use_sim_time', default='true')
world = os.path.join(
        get_package_share_directory('nav_pkg'),
        'worlds',
        'wpb_simple.world'
    )

gzserver_cmd = IncludeLaunchDescription(
        PythonLaunchDescriptionSource(
            os.path.join(pkg_gazebo_ros, 'launch', 'gzserver.launch.py')
        ),
        launch_arguments={'world': world}.items()
    )

    gzclient_cmd = IncludeLaunchDescription(
        PythonLaunchDescriptionSource(
            os.path.join(pkg_gazebo_ros, 'launch', 'gzclient.launch.py')
        )
    )
此处获取 gazebo_ros 包的安装路径,用于后续定位Gazebo的启动脚本,gzserver用于启动Gazebo服务端,其负责物理仿真、传感器数据生成等后台计算,同时通过 launch_arguments={'world': world} 加载指定的世界文件.gzclient用于启动Gazebo图形界面,提供3D可视化.
2.3机器人状态发布与通过/spawn_entity服务将机器人实体发布到gazebo
robot1_state_publisher_cmd = Node(
            package='robot_state_publisher',
            executable='robot_state_publisher',
            name='robot_state_publisher',
            output='screen',
            namespace='robot1',
            remappings=[
                ('/tf', 'tf'),
                ('/tf_static', 'tf_static')],
            parameters=[{
                'robot_description': robot1_description,
                'frame_prefix': 'robot1',
                'use_tf_static': False,
                'use_sim_time':True

            }]
        )


    spawn_robot1_cmd = Node(
        package='gazebo_ros',
        executable='spawn_entity.py',
        name='spawn_entity',
        namespace='robot1',
        arguments=[
            '-topic', 'robot_description', #当节点在robot1命名空间下时,实际订阅的话题路径会自动变为 /robot1/robot_description
            '-entity', "robot1",  ##机器人在gazebo中的名称
            '-x', '1.0',
            '-y', '1.0',
            '-Y', '1.57'
        ],
        output='screen',
    )

    robot2_state_publisher_cmd = Node(
            package='robot_state_publisher',
            executable='robot_state_publisher',
            name='robot_state_publisher',
            output='screen',
            namespace='robot2',
            remappings=[
                ('/tf', 'tf'),
                ('/tf_static', 'tf_static')],
            parameters=[{
                'robot_description': robot2_description,
                'frame_prefix': 'robot2',
                'use_tf_static': False,
                'use_sim_time':True

            }]
        )
    spawn_robot2_cmd = Node(
        package='gazebo_ros',
        executable='spawn_entity.py',
        name='spawn_entity',
        namespace='robot2',
        arguments=[
            '-topic', 'robot_description',
            '-entity', "robot2",
            '-x', '0.0',
            '-y', '0.0',
            '-Y', '-1.57'
        ],
        output='screen',
    )
以上代码在坐标 (1.0, 1.0) 处生成名为 "robot1" 的Gazebo实体,和在(0,0)处生成名为 "robot2" 的Gazebo实体,分别使用 /robot1/robot_description 和/robot2/robot_description话题中的模型描述。同时,为机器人发布TF和关节状态,所有坐标系自动添加 robot2 前缀。
完整代码如下:
#!/usr/bin/env python3

import os
import xacro
from ament_index_python.packages import get_package_share_directory
from launch import LaunchDescription
from launch.actions import IncludeLaunchDescription
from launch.launch_description_sources import PythonLaunchDescriptionSource
from launch.substitutions import LaunchConfiguration
from launch_ros.actions import Node


def generate_launch_description():
    urdf_path1 = os.path.join(
        get_package_share_directory('nav_pkg'),
        'models',
        'wpb_home_lidar.model'
    )
    with open(urdf_path1, 'r') as infp:
        robot_desc = infp.read()
        doc = xacro.parse(robot_desc)
        xacro.process_doc(doc)
        robot1_description = doc.toxml()

    urdf_path2 = os.path.join(
        get_package_share_directory('nav_pkg'),
        'models',
        'wpb_home_lidar_1.model'
    )
    with open(urdf_path2, 'r') as infp:
        robot_desc = infp.read()
        doc = xacro.parse(robot_desc)
        xacro.process_doc(doc)
        robot2_description = doc.toxml()


    pkg_gazebo_ros = get_package_share_directory('gazebo_ros')

    use_sim_time = LaunchConfiguration('use_sim_time', default='true')

    world = os.path.join(
        get_package_share_directory('nav_pkg'),
        'worlds',
        'wpb_simple.world'
    )

    gzserver_cmd = IncludeLaunchDescription(
        PythonLaunchDescriptionSource(
            os.path.join(pkg_gazebo_ros, 'launch', 'gzserver.launch.py')
        ),
        launch_arguments={'world': world}.items()
    )

    gzclient_cmd = IncludeLaunchDescription(
        PythonLaunchDescriptionSource(
            os.path.join(pkg_gazebo_ros, 'launch', 'gzclient.launch.py')
        )
    )


    robot1_state_publisher_cmd = Node(
            package='robot_state_publisher',
            executable='robot_state_publisher',
            name='robot_state_publisher',
            output='screen',
            namespace='robot1',
            remappings=[
                ('/tf', 'tf'),
                ('/tf_static', 'tf_static')],
            parameters=[{
                'robot_description': robot1_description,
                'frame_prefix': 'robot1',
                'use_tf_static': False,
                'use_sim_time':True

            }]
        )


    spawn_robot1_cmd = Node(
        package='gazebo_ros',
        executable='spawn_entity.py',
        name='spawn_entity',
        namespace='robot1',
        arguments=[
            '-topic', 'robot_description', #当节点在robot1命名空间下时,实际订阅的话题路径会自动变为 /robot1/robot_description
            '-entity', "robot1",  ##机器人在gazebo中的名称
            '-x', '1.0',
            '-y', '1.0',
            '-Y', '1.57'
        ],
        output='screen',
    )

    robot2_state_publisher_cmd = Node(
            package='robot_state_publisher',
            executable='robot_state_publisher',
            name='robot_state_publisher',
            output='screen',
            namespace='robot2',
            remappings=[
                ('/tf', 'tf'),
                ('/tf_static', 'tf_static')],
            parameters=[{
                'robot_description': robot2_description,
                'frame_prefix': 'robot2',
                'use_tf_static': False,
                'use_sim_time':True

            }]
        )
    spawn_robot2_cmd = Node(
        package='gazebo_ros',
        executable='spawn_entity.py',
        name='spawn_entity',
        namespace='robot2',
        arguments=[
            '-topic', 'robot_description',
            '-entity', "robot2",
            '-x', '0.0',
            '-y', '0.0',
            '-Y', '-1.57'
        ],
        output='screen',
    )
ld = LaunchDescription()

    # Add the commands to the launch description
    ld.add_action(gzserver_cmd)
    ld.add_action(gzclient_cmd)

    ld.add_action(robot1_state_publisher_cmd)
    ld.add_action(robot2_state_publisher_cmd)
    ld.add_action(spawn_robot1_cmd)
    ld.add_action(spawn_robot2_cmd)
return ld
2.4 解决的问题
问题描述:
在编写机器生成节点 时候将arguments中的"-topic"时候对robot_description进行了修改,发现Gazebo根本没有任何机器人模型,查看topic list也没有机器人和雷达底盘等各种话题,如下所示:
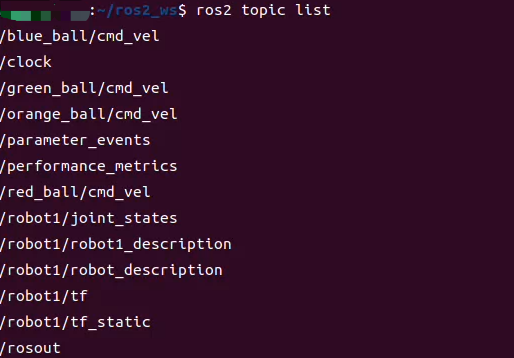
这是因为在ROS生态中,robot_description是约定俗成的标准话题名,robot_state_publisher节点默认从参数服务器读取robot_description参数,并通过/robot_description话题发布URDF数据。
3.运行验证

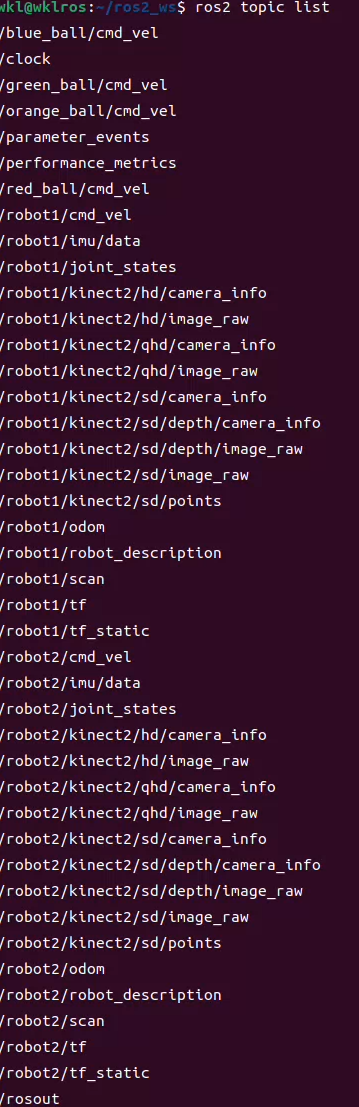
从图中可以看到在gazebo中成功加载了两台移动机器人,通过topic list也可以发现每个机器人都有独立的话题.大家也可以通过此方法将更多移动机器人加载到gazebo.
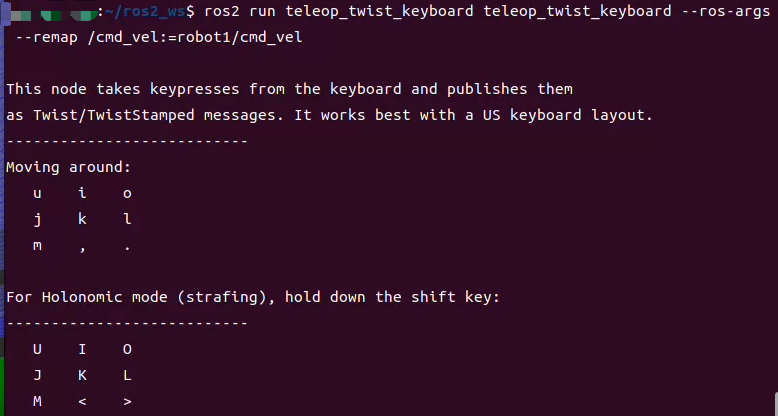 最后,可以通过ros2 run teleop_twist_keyboard teleop_twist_keyboard --ros-args --remap /cmd_vel:=robot1/cmd_vel和ros2 run teleop_twist_keyboard teleop_twist_keyboard --ros-args --remap /cmd_vel:=robot2/cmd_vel,将他eleop_twist_keyboard节点中的/cmd_vel话题分别映射到robot2/cmd_vel和robot2/cmd_vel,通过键盘控制两台机器人运动,查看效果.


 被折叠的 条评论
为什么被折叠?
被折叠的 条评论
为什么被折叠?
 到【灌水乐园】发言


