


1.介绍
IntentService extends Service,其中Service运行在UI主线程,当我们需要在后台运行繁重任务时需要开辟一个新的线程从而防止阻塞主线程,IntentService自身就维护了一个异步消息处理线程,使用也是美美哒的方便。想必大家在刚开始使用IntentService的时候会遇到这个问题:
public MyIntentService(String name) {
        super(name);
    }
忘记添加MyIntentService空构造从而引起错误,同时super(name)传递的字符串到底是用来干嘛的?带着这些疑问进入我们的主题。
2. 源码分析
- 错误分析
我们通常使用 startService(Intent)开启一个服务,该服务创建是由系统底层完成的,具体在ActivityThread的H类中处理。ActivityThread所在的线程就是我们平常说的UI主线程,其中H extends Handler,创建Service的工作自然就会放置在handleMessage()方法中
@Override
public void handleMessage(Message msg) {
    case CREATE_SERVICE:
             handleCreateService((CreateServiceData)msg.obj);
             break;
        }
下面我们再来看handleCreateService
private final void handleCreateService(CreateServiceData data) {
        // If we are getting ready to gc after going to the background, well
        // we are back active so skip it.
        Service service = null;
        try {
            java.lang.ClassLoader cl = packageInfo.getClassLoader();
            service = (Service) cl.loadClass(data.info.name).newInstance();
        } catch (Exception e) {
            if (!mInstrumentation.onException(service, e)) {
                throw new RuntimeException("Unable to instantiate service " + data.info.name + ": " + e.toString(), e);
            }
        }
    }
在此方法中我们发现其实Service是由系统底层通过反射Service的空构造函数而产生的实例,由于我们在自定义IntentService的时候忘记了添加空构造自然会看到熟悉的错误信息Unable to instantiate service………
2.关于构造函数传递的字符串
在自定义IntentService中调用super(name)所传递的字符串是干嘛用的,它是不是给该IntentService起的别名之类的,答案是给该IntentService所维护的消息处理模型所在线程起的别名,下面我们来看这个字符串的传递过程。该带参构造将我们传递的name赋值给一个本地属性mName
public IntentService(String name) {
        super();
        mName = name;
    }
然后在onCreate()方法中将mName赋值为HandlerThread的名字
@Override
public void onCreate() {
        super.onCreate();
        HandlerThread thread = new HandlerThread("IntentService[" + mName + "]");
        thread.start();
    }
3.HandlerThread分析
public class HandlerThread extends Thread {

    public void run() {
        mTid = Process.myTid();
        Looper.prepare();
        synchronized (this) {
            mLooper = Looper.myLooper();
            notifyAll();
        }
        Looper.loop();
    }

    public Looper getLooper() {
        if (!isAlive()) {
            return null;
        }

        // If the thread has been started, wait until the looper has been
        // created.
        synchronized (this) {
            while (isAlive() && mLooper == null) {
                try {
                    wait();
                } catch (InterruptedException e) {
                }
            }
        }
        return mLooper;
    }

}
在HandlerThread中比较重要的两个方法是run() 和 getLooper()方法,在run()方法中依次调用Looper.prepare()和Looper.loop()方法创建一个异步消息处理线程,其中
synchronized (this) {
            mLooper = Looper.myLooper();
            notifyAll();
        }
是为了在给mLooper正确赋值后放弃对象锁,防止getLooper()得到错误值。
4.IntentService内部调用
经过以上的初始化操作就具备了IntentService运行的必要条件,那下面我们看下IntentService内部函数的调用流程
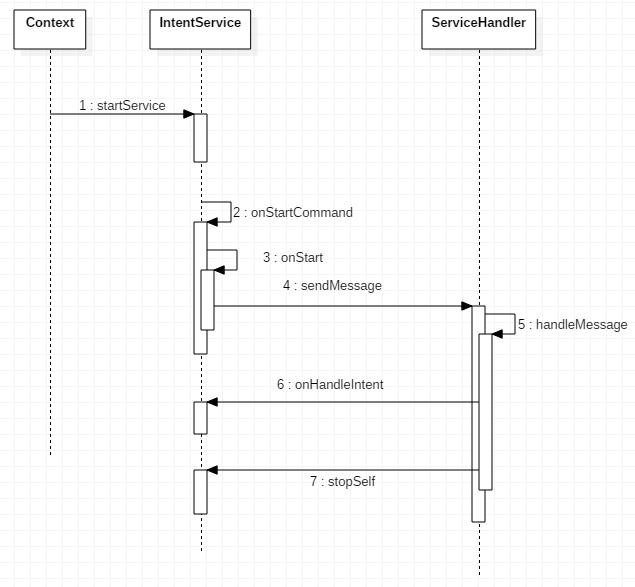
服务中自定义操作只需要重写onHandleIntent()方法即可,是不是很方便。


 139
139

 被折叠的 条评论
为什么被折叠?
被折叠的 条评论
为什么被折叠?
 到【灌水乐园】发言


