


开发工具:vs2022
以下Demo借鉴了以下两位博主的文章编写
http://t.csdnimg.cn/GwLJA
http://t.csdnimg.cn/xZguR
傻瓜式安装SDK

安装后在软件安装路径中找到DALSA.SaperaLT.SapClassBasic.dll文件,因为后续开发我们需要引用这个文件

接着引用halcon和OpenCvSharp,Oencv可以直接在VS中的NuGet包中下载引用
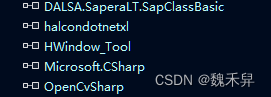
大致引用的文件如下:
初始化相机信息
private SapLocation m_ServerLocation; // 设备的连接地址
private SapAcqDevice m_AcqDevice; // 采集设备
private SapBuffer m_Buffers =new SapBuffer(); // 缓存对textBox3象
private SapAcqDeviceToBuf m_Xfer; // 传输对象

public bool GetCameraInfo(out string sCameraName, out int nIndex)//得到连接的相机信息,并将加入到ArrayList里面去
 {
     sCameraName = "";
     nIndex = 0;

     int serverCount = SapManager.GetServerCount();
     int GenieIndex = 0;
     System.Collections.ArrayList listServerNames = new System.Collections.ArrayList();

     bool bFind = false;
     string serverName = "";
     for (int serverIndex = 0; serverIndex < serverCount; serverIndex++)
     {
         if (SapManager.GetResourceCount(serverIndex, SapManager.ResourceType.AcqDevice) != 0)
         {
             serverName = SapManager.GetServerName(serverIndex);
             listServerNames.Add(serverName);
             GenieIndex++;
             bFind = true;
         }
     }

     int count = 1;
     string deviceName = "";
     foreach (string sName in listServerNames)
     {
         deviceName = SapManager.GetResourceName(sName, SapManager.ResourceType.AcqDevice, 0);
         count++;
     }

     sCameraName = serverName;
     nIndex = GenieIndex;

     return bFind;
 }

 private bool CreateNewObjects()//初始化设备
 {
     string name;
     int index;
     bool success = GetCameraInfo(out name, out index);
     if (!success)
     {
         MessageBox.Show("Get camera info failed!");
         return false;
     }

     m_ServerLocation = new SapLocation(name, 0);

     // 创建采集设备
     m_AcqDevice = new SapAcqDevice(m_ServerLocation);
     // 创建颜色转换对象

     if (!m_AcqDevice.Create())
     {
         DestroyObjects();
         DisposeObjects();
         return false;
     }

     // 创建缓存对象
     SapBuffer.MemoryType memoryType = SapBuffer.MemoryType.ScatterGather;
     if (!SapBuffer.IsBufferTypeSupported(m_ServerLocation, memoryType))
     {
         memoryType = SapBuffer.MemoryType.ScatterGatherPhysical;
     }
     m_Buffers = new SapBufferWithTrash(2, m_AcqDevice, memoryType);
     if (!m_Buffers.Create())
     {
         DestroyObjects();
         DisposeObjects();
         return false;
     }

     btn_getValue_Click(null, null);

     // 创建采集到缓冲区的对象
     m_Xfer = new SapAcqDeviceToBuf(m_AcqDevice, m_Buffers);
     m_Xfer.XferNotify += new SapXferNotifyHandler(m_Xfer_XferNotify);
     m_Xfer.XferNotifyContext = this;
     m_Xfer.Pairs[0].EventType = SapXferPair.XferEventType.EndOfFrame;
     m_Xfer.Pairs[0].Cycle = SapXferPair.CycleMode.NextWithTrash;
     if (m_Xfer.Pairs[0].Cycle != SapXferPair.CycleMode.NextWithTrash)
     {
         DestroyObjects();
         DisposeObjects();
         return false;
     }
     if (!m_Xfer.Create())
     {
         DestroyObjects();
         DisposeObjects();
         return false;
     }

     return true;
 }


private void btn_getValue_Click(object sender, EventArgs e)//获取相机属性的值
{
    string deviceModelName;
    string deviceUserId;
    string pixelFormat;
    string triggerMode;

    double acquisitionLineRate; //行频和曝光时间不能设置为int类型
    double exposureTime;
    double gain;
    int width;
    int height;
    int sensorWidth;
    int sensorHeight;

    m_AcqDevice.GetFeatureValue("DeviceModelName", out deviceModelName);
    m_AcqDevice.GetFeatureValue("DeviceUserID", out deviceUserId);
    m_AcqDevice.GetFeatureValue("PixelFormat", out pixelFormat);
    m_AcqDevice.GetFeatureValue("TriggerMode", out triggerMode);
    m_AcqDevice.GetFeatureValue("ExposureTime", out exposureTime);
    m_AcqDevice.GetFeatureValue("Gain", out gain);
    m_AcqDevice.GetFeatureValue("Width", out width);
    m_AcqDevice.GetFeatureValue("Height", out height);
    m_AcqDevice.GetFeatureValue("SensorWidth", out sensorWidth);
    m_AcqDevice.GetFeatureValue("SensorHeight", out sensorHeight);

}

 private void DestroyObjects()//销毁采集对象
 {
     if (m_Xfer != null && m_Xfer.Initialized)
         m_Xfer.Destroy();
     if (m_Buffers != null && m_Buffers.Initialized)
         m_Buffers.Destroy();
     if (m_AcqDevice != null && m_AcqDevice.Initialized)
         m_AcqDevice.Destroy();
 }

 private void DisposeObjects()//销毁缓存对象
 {
     if (m_Xfer != null)
     {
         m_Xfer.Dispose();
         m_Xfer = null;
     }
     if (m_Buffers != null)
     {
         m_Buffers.Dispose();
         m_Buffers = null;
     }
     if (m_AcqDevice != null)
     {
         m_AcqDevice.Dispose();
         m_AcqDevice = null;
     }
 }
获取相机最大最小值与显示采集实时帧率
private double GetMaxValue(string featureName)
{
    SapFeature feature = new SapFeature(m_ServerLocation);
    if (!feature.Create())
        return -1;
    if (!m_AcqDevice.GetFeatureInfo(featureName, feature))
        return -1;
    double maxValue = 0;
    if (!feature.GetValueMax(out maxValue))
        return -1;
    return maxValue;
}

private double GetMinValue(string featureName)
{
    SapFeature feature = new SapFeature(m_ServerLocation);
    if (!feature.Create())
        return -1;
    if (!m_AcqDevice.GetFeatureInfo(featureName, feature))
        return -1;
    int minValue = 0;
    if (!feature.GetValueMin(out minValue))
        return -1;
    return minValue;
}

private void UpdateFrameRate()//实时帧率
{
    if (m_Xfer.UpdateFrameRateStatistics())
    {
        float framerate = 0.0f;
        SapXferFrameRateInfo stats = m_Xfer.FrameRateStatistics;

        if (stats.IsBufferFrameRateAvailable)
            framerate = stats.BufferFrameRate;
        else if (stats.IsLiveFrameRateAvailable && !stats.IsLiveFrameRateStalled)
            framerate = stats.LiveFrameRate;

        m_Buffers.FrameRate = framerate;
    }
}
单次采集
private void btn_Snap_Click(object sender, EventArgs e)
{
    m_Xfer.Snap();
}
连续采集
 private void btn_grab_Click(object sender, EventArgs e)
 {
     m_Xfer.Grab();
 }
停止采集
 private void btn_freeze_Click(object sender, EventArgs e)
{
    m_Xfer.Freeze();
}
获取图像,不清楚得到的数据为什么是Mono8格式,需用转换方法,我在方法中使用了OpenCV将图像转换为BayerBG2RGB格式,然后通过MatToHImage方法将Mat对象转换为Hoject对象后使用Halcon显示图像
HObject ImageTemp1;
Mat imageOne =new Mat();
 void m_Xfer_XferNotify(object sender, SapXferNotifyEventArgs argsNotify)
 {
     try
     {
         //首先需判断此帧是否是废弃帧,若是则立即返回,等待下一帧(但这句话似乎有时候m_Xfer.Snap(n)时会导致丢帧,可以注释掉试试)
         if (argsNotify.Trash) return;
         IntPtr addr;
         m_Buffers.GetAddress(out addr);
         int count = m_Buffers.Count;
         double rate = m_Buffers.FrameRate;
         HTuple height = m_Buffers.Height;
         int pixd = m_Buffers.PixelDepth;
         Mat frame = new Mat(m_Buffers.Height, m_Buffers.Width, MatType.CV_8UC1, addr);//Opencv将黑白转为RGB
         Cv2.CvtColor(frame, imageOne, ColorConversionCodes.BayerBG2RGB);
          ImageTemp1 = MatToHImage(imageOne);
         //HObject ImageTemp;
         //显示实时帧率
         UpdateFrameRate();
         textBox2.BeginInvoke(new Action(() => { textBox2.Text = m_Buffers.FrameRate.ToString(); }));
         if (ImageTemp1.IsInitialized() && ImageTemp2.IsInitialized() && ImageTemp3.IsInitialized() && ImageTemp4.IsInitialized())
         {
             hWindowControl1.HalconWindow.SetPart(0, 0, (int)height, m_Buffers.Width);
             HOperatorSet.DispObj(ImageTemp1, hWindowControl1.HalconWindow);
         }
     }
     catch (Exception ex)
     {
         MessageBox.Show(ex.Message);
     }
     finally
     {
         ImageTemp1.Dispose();
     }
 }
//转换方法
public HObject MatToHImage(Mat mImage)
{
    try
    {
        HObject hImage;
        int matChannels = 0;   // 通道数
        Type matType = null;
        int width, height;   // 宽,高
        width = height = 0;  // 宽,高初始化

        // 获取通道数
        matChannels = mImage.Channels();
        if (matChannels == 0)
        {
            return null;
        }
        if (matChannels == 1)        // 单通道
        {
            IntPtr ptr;      // 灰度图通道
            Mat[] mats = mImage.Split();

            // 改自:Mat.GetImagePointer1(mImage, out ptr, out matType, out width, out height);    // ptr=2157902018096    cType=byte    width=830    height=822
            ptr = mats[0].Data;          // 取灰度图值
            matType = mImage.GetType();  // byte
            height = mImage.Rows;        // 高
            width = mImage.Cols;         // 宽

            // 改自:hImage = new HObject(new OpenCvSharp.Size(width, height), MatType.CV_8UC1, newScalar(0));
            byte[] dataGrayScaleImage = new byte[width * height];      //Mat dataGrayScaleImage = new Mat(new OpenCvSharp.Size(width, height), MatType.CV_8UC1);

            unsafe
            {
                fixed (byte* ptrdata = dataGrayScaleImage)
                {

                    #region 按行复制
                    CopyMemory((IntPtr)ptrdata, new IntPtr((long)ptr), width * height);
                    HOperatorSet.GenImage1(out hImage, "byte", width, height, (IntPtr)ptrdata);
                    #endregion
                }
            }
            return hImage;
        }
        else if (matChannels == 3)   // 三通道
        {
            IntPtr ptrRed;    // R通道图
            IntPtr ptrGreen;  // G通道图
            IntPtr ptrBlue;   // B通道图
            Mat[] mats = mImage.Split();

            ptrRed = mats[0].Data;    // 取R通道值
            ptrGreen = mats[1].Data;  // 取G通道值
            ptrBlue = mats[2].Data;   // 取B通道值
            matType = mImage.GetType();  // 类型
            height = mImage.Rows;        // 高
            width = mImage.Cols;         // 宽

            // 改自:hImage = new HObject(new OpenCvSharp.Size(width, height), MatType.CV_8UC1, new Scalar(0));
            byte[] dataRed = new byte[width * height];      //Mat dataGrayScaleImage = new Mat(new OpenCvSharp.Size(width, height), MatType.CV_8UC1);
            byte[] dataGreen = new byte[width * height];
            byte[] dataBlue = new byte[width * height];

            unsafe
            {
                fixed (byte* ptrdataRed = dataRed, ptrdataGreen = dataGreen, ptrdataBlue = dataBlue)
                {

                    #region 按行复制
                    CopyMemory((IntPtr)ptrdataRed, new IntPtr((long)ptrRed), width * height);        // 复制R通道
                    CopyMemory((IntPtr)ptrdataGreen, new IntPtr((long)ptrGreen), width * height);    // 复制G通道
                    CopyMemory((IntPtr)ptrdataBlue, new IntPtr((long)ptrBlue), width * height);      // 复制B通道
                    HOperatorSet.GenImage3(out hImage, "byte", width, height, (IntPtr)ptrdataRed, (IntPtr)ptrdataGreen, (IntPtr)ptrdataBlue);   // 合成
                    #endregion
                }
            }
            return hImage;
        }
        else
        {
            return null;
        }
    }
    catch (Exception ex)
    {
        throw ex;
    }

}


 1万+
1万+


 被折叠的 条评论
为什么被折叠?
被折叠的 条评论
为什么被折叠?
 到【灌水乐园】发言


