


20240101:增加当类中字段为接口类型时的处理方式。
在对象的拷贝中,很多初学者可能搞不清到底是拷贝了引用还是拷贝了对象。在拷贝中这里就分为引用拷贝、浅拷贝、深拷贝进行讲述。
引用拷贝
引用拷贝会生成一个新的对象引用地址,但是两个最终指向依然是同一个对象。如何更好的理解引用拷贝呢?很简单,就拿我们人来说,通常有个姓名,但是不同场合、人物对我们的叫法可能不同,但我们很清楚哪些名称都是属于 "我" 的!

通过一个代码示例让大家领略一下 (为了简便就不写 get、set 等方法):
class Son {

    String name;
    int age;

    public Son(String name, int age) {

        this.name = name;
        this.age = age;
    }
}

public class test {

    public static void main(String[] args) {

        Son s1 = new Son("son1", 12);
        Son s2 = s1;
        s1.age = 22;
        System.out.println(s1);
        System.out.println(s2);
        System.out.println("s1的age:" + s1.age);
        System.out.println("s2的age:" + s2.age);
        System.out.println("s1==s2" + (s1 == s2));//相等
    }
}
测试结果:
Son@135fbaa4
Son@135fbaa4
s1的age:22
s2的age:22
true
浅拷贝
如何创建一个对象,将目标对象的内容复制过来而不是直接拷贝引用呢?
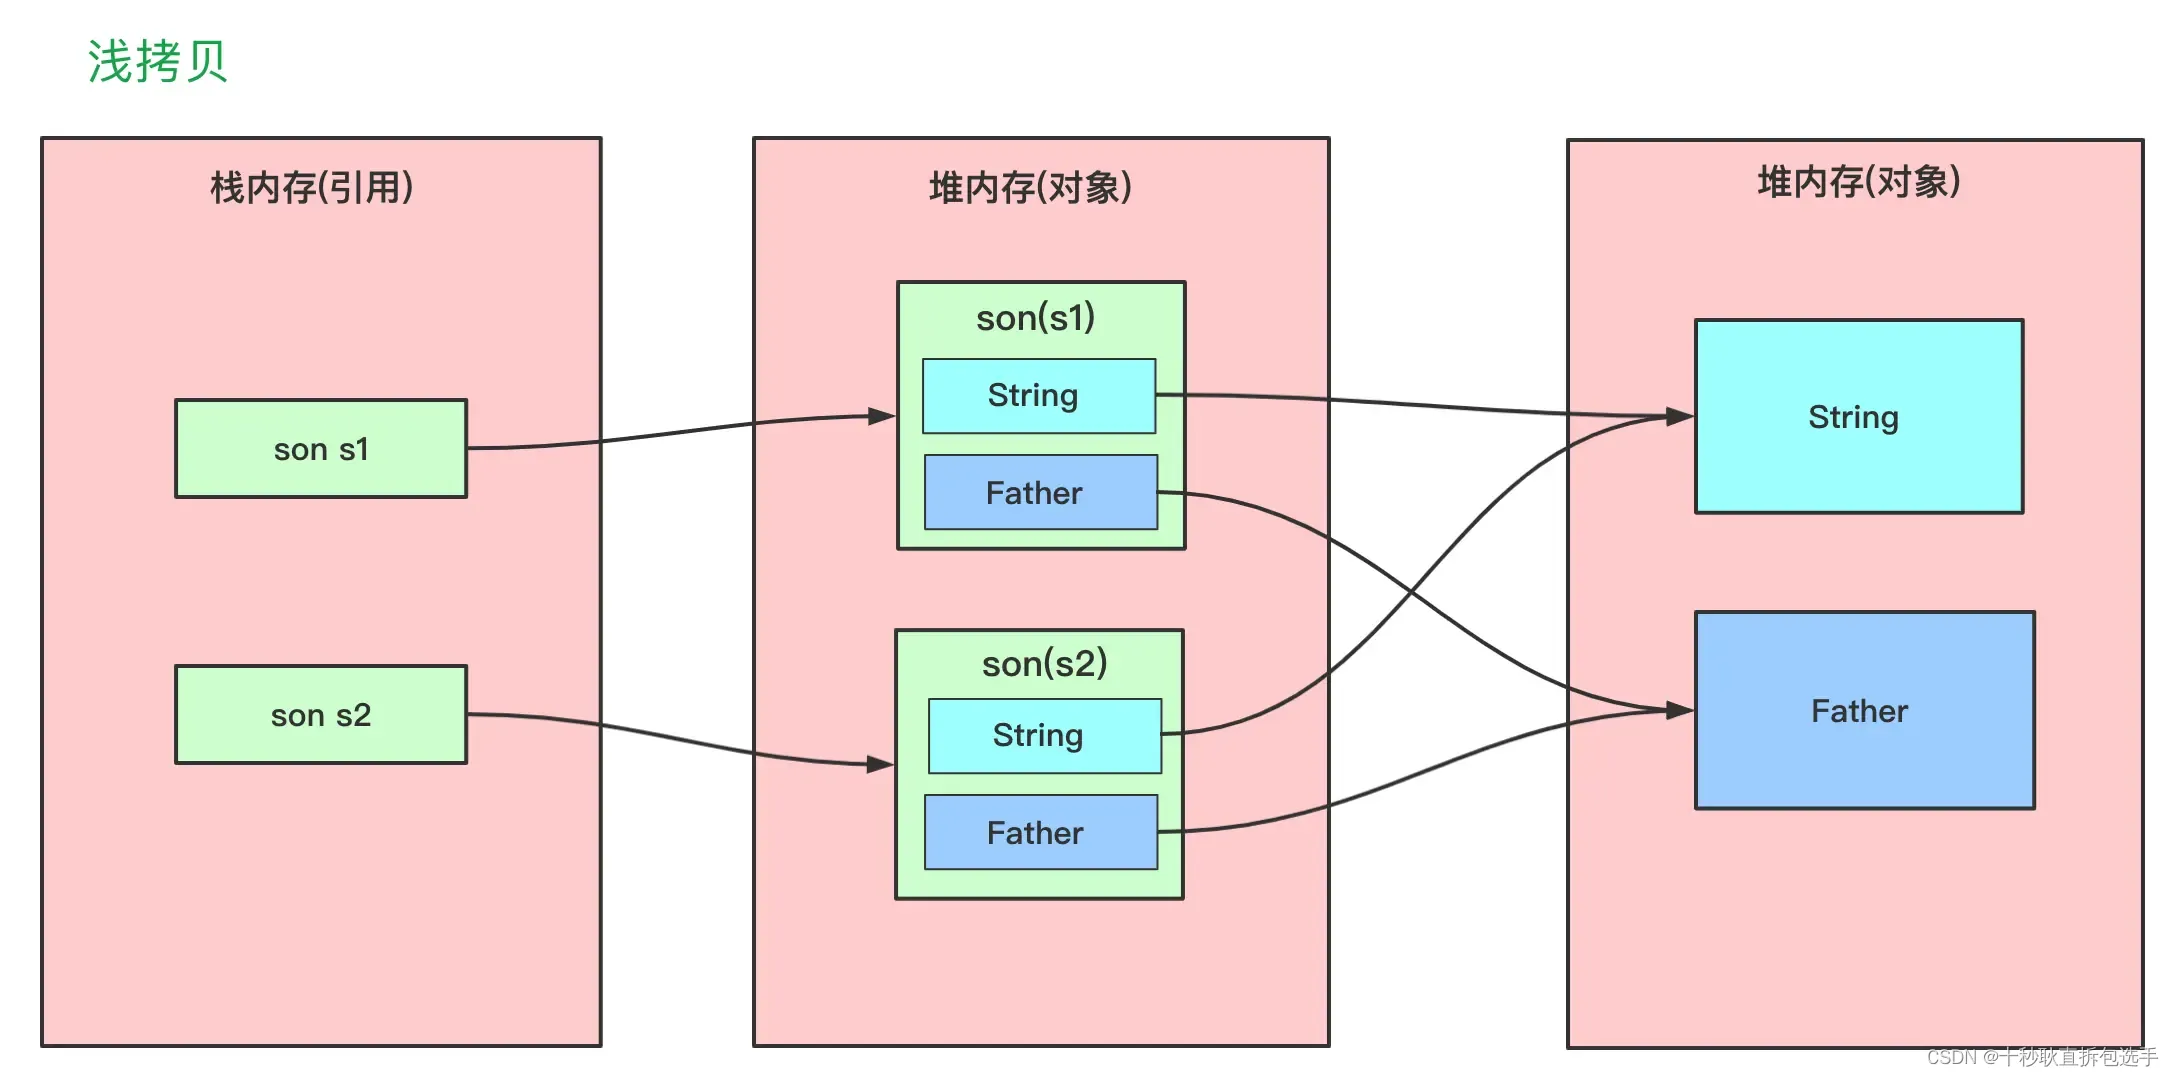
这里先讲一下浅拷贝,浅拷贝会创建一个新对象,新对象和原对象本身没有任何关系,新对象和原对象不等,但是新对象的属性和老对象相同。具体可以看如下区别:
-
如果属性是基本类型 (int,double,long,boolean 等),拷贝的就是基本类型的值;
-
如果属性是引用类型,拷贝的就是内存地址(即复制引用但不复制引用的对象) ,因此如果其中一个对象改变了这个地址,就会影响到另一个对象。
如果用一张图来描述一下浅拷贝,它应该是这样的:
如何实现浅拷贝呢?也很简单,就是在需要拷贝的类上实现 Cloneable 接口并重写其 clone () 方法。
@Override
protected Object clone() throws CloneNotSupportedException {

    return super.clone();
}
在使用的时候直接调用类的 clone () 方法即可。具体案例如下:
class Father{
String name;
public Father(String name) {
this.name=name;
}
@Override
public String toString() {
return "Father{" +
"name='" + name + '\'' +
'}';
}
}
class Son implements Cloneable {
int age;
String name;
Father father;
public Son(String name,int age) {
this.age=age;
this.name = name;
}
public Son(String name,int age, Father father) {
this.age=age;
this.name = name;
this.father = father;
}
@Override
public String toString() {
return "Son{" +
"age=" + age +
", name='" + name + '\'' +
", father=" + father +
'}';
}
@Override
protected Son clone() throws CloneNotSupportedException {
// 字段father指向同一个引用。
return (Son) super.clone();
}
}
public class test {
public static void main(String[] args) throws CloneNotSupportedException {
Father f=new Father("bigFather");
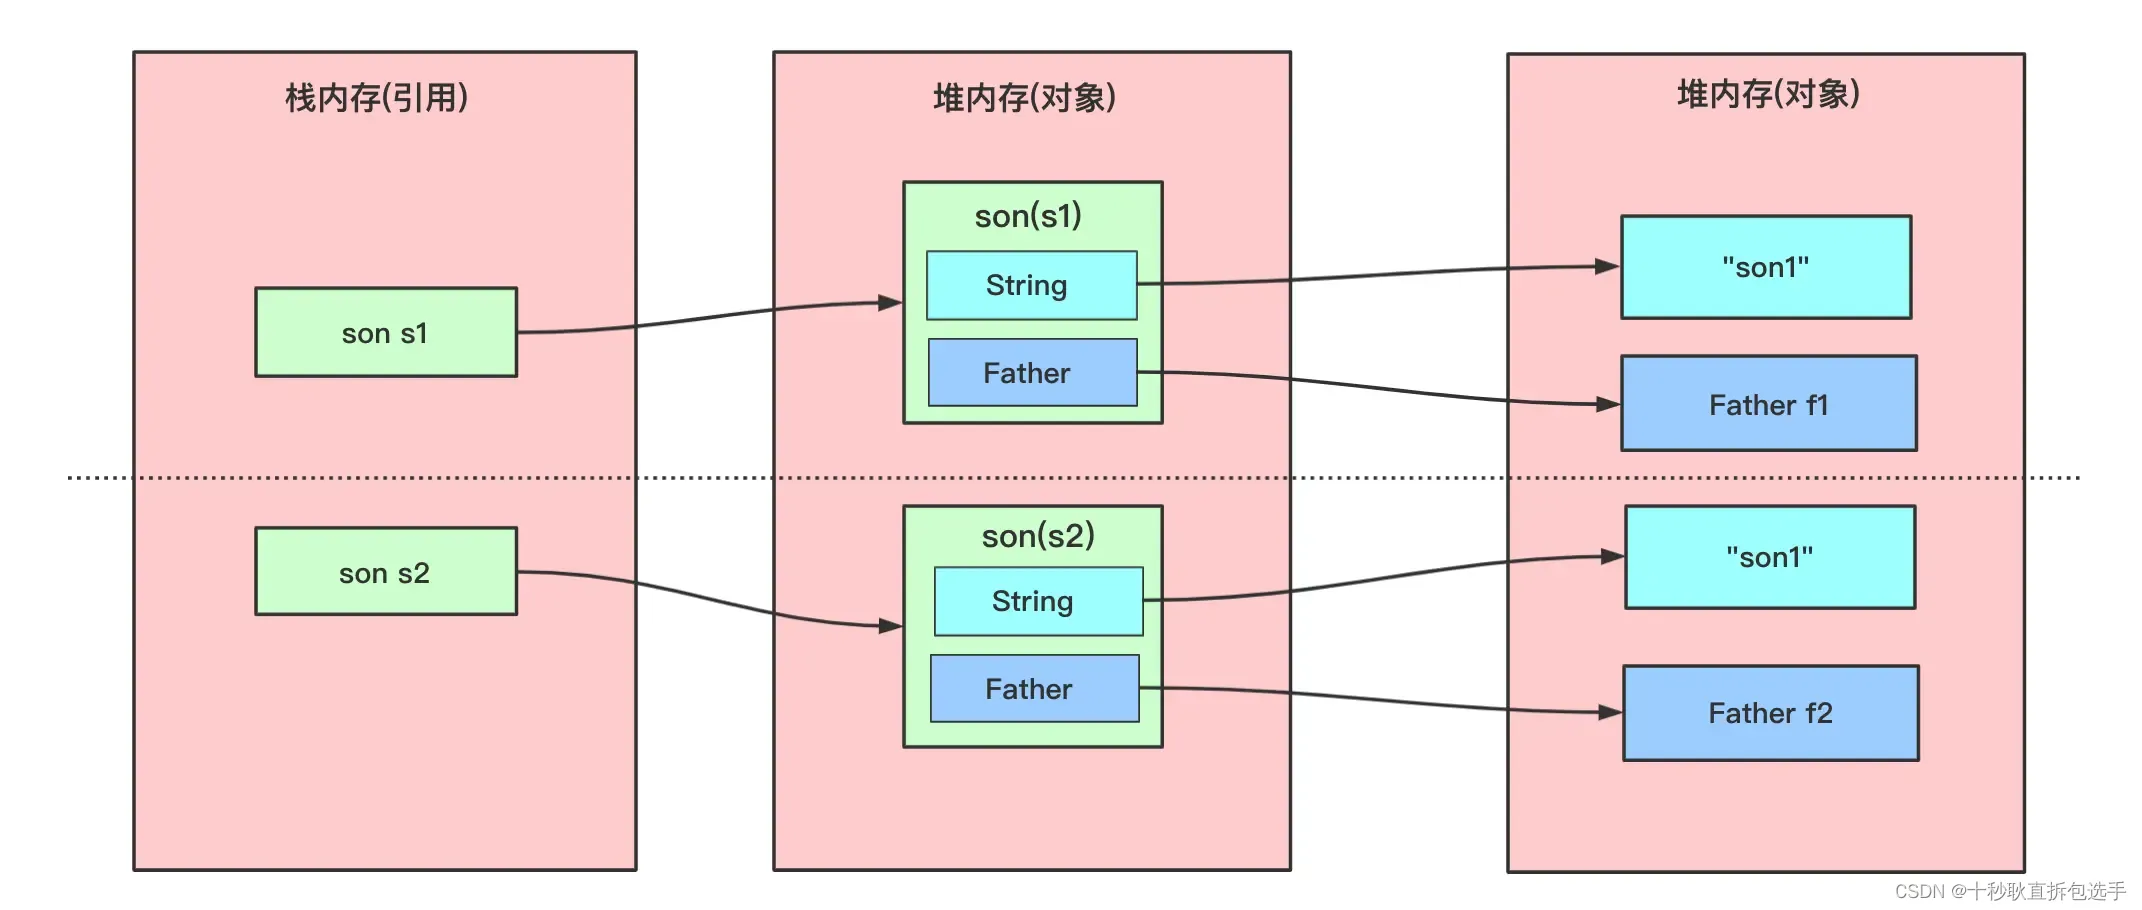
Son s1 = new Son("son1",13);
s1.father=f;
Son s2 = s1.clone();
System.out.println(s1);
System.out.println(s2);
System.out.println("s1==s2:"+(s1 == s2));//不相等
System.out.println("s1.name==s2.name:"+(s1.name == s2.name));//相等
System.out.println();
//但是他们的Father father 和String name的引用一样
s1.age=12;
s1.father.name="smallFather";//s1.father引用未变
s1.name="son222";//类似 s1.name=new String("son222") 引用发生变化
System.out.println("s1.Father==s2.Father:"+(s1.father == s2.father));//相等
System.out.println("s1.name==s2.name:"+(s1.name == s2.name));//不相等
System.out.println(s1);
System.out.println(s2);
}
}运行结果:
Son{age=13, name='son1', father=Father{name='bigFather'}}
Son{age=13, name='son1', father=Father{name='bigFather'}}
s1==s2:false
s1.name==s2.name:true//此时相等

s1.Father==s2.Father:true
s1.name==s2.name:false//修改引用后不等
Son{age=12, name='son222', father=Father{name='smallFather'}}
Son{age=13, name='son1', father=Father{name='smallFather'}}
不出意外,这种浅拷贝除了对象本身不同以外,各个零部件和关系和拷贝对象都是相同的,就好像双胞胎一样,是两个人,但是其开始的样貌、各种关系 (父母亲人) 都是相同的。需要注意的是其中 name 初始 == 是相等的,是因为初始浅拷贝它们指向一个相同的 String,而后 s1.name="son222" 则改变引用指向。

深拷贝
对于上述的问题虽然拷贝的两个对象不同,但其内部的一些引用还是相同的,怎么样绝对的拷贝这个对象,使这个对象完全独立于原对象呢?就使用我们的深拷贝了。深拷贝:在对引用数据类型进行拷贝的时候,创建了一个新的对象,并且复制其内的成员变量。
在具体实现深拷贝上,这里提供两个方式,重写 clone () 方法和序列法。
重写 clone () 方法
如果使用重写 clone () 方法实现深拷贝,那么要将类中所有自定义引用变量的类也去实现 Cloneable 接口实现 clone () 方法。对于字符类可以创建一个新的字符串实现拷贝。
对于上述代码,Father 类实现 Cloneable 接口并重写 clone () 方法。son 的 clone () 方法需要对各个引用都拷贝一遍。
//Father clone()方法
@Override
protected Father clone() throws CloneNotSupportedException {

    return (Father) super.clone();
}

//Son clone()方法
@Override
protected Son clone() throws CloneNotSupportedException {

    Son son= (Son) super.clone();//待返回克隆的对象
    son.name=new String(name);
    son.father=father.clone();
    return son;
}
其他代码不变,执行结果如下:
Son{age=13, name='son1', father=Father{name='bigFather'}}
Son{age=13, name='son1', father=Father{name='bigFather'}}
s1==s2:false
s1.name==s2.name:false

s1.Father==s2.Father:false
s1.name==s2.name:false
Son{age=12, name='son222', father=Father{name='smallFather'}}
Son{age=13, name='son1', father=Father{name='bigFather'}}
序列化
可以发现这种方式实现了深拷贝。但是这种情况有个问题,如果引用数量或者层数太多了怎么办呢?

不可能去每个对象挨个写 clone () 吧?那怎么办呢?借助序列化啊。
因为序列化后:将二进制字节流内容写到一个媒介(文本或字节数组),然后是从这个媒介读取数据,原对象写入这个媒介后拷贝给 clone 对象,原对象的修改不会影响 clone 对象,因为 clone 对象是从这个媒介读取。
熟悉对象缓存的知道我们经常将 Java 对象缓存到 Redis 中,然后还可能从 Redis 中读取生成 Java 对象,这就用到序列化和反序列化。一般可以将 Java 对象存储为字节流或者 json 串然后反序列化成 Java 对象。因为序列化会储存对象的属性但是不会也无法存储对象在内存中地址相关信息。所以在反序列化成 Java 对象时候会重新创建所有的引用对象。
在具体实现上,自定义的类需要实现 Serializable 接口。在需要深拷贝的类 (Son) 中定义一个函数返回该类对象:
protected Son deepClone() throws IOException, ClassNotFoundException {

      Son son=null;
      //在内存中创建一个字节数组缓冲区,所有发送到输出流的数据保存在该字节数组中
      //默认创建一个大小为32的缓冲区
      ByteArrayOutputStream byOut=new ByteArrayOutputStream();
      //对象的序列化输出
      ObjectOutputStream outputStream=new ObjectOutputStream(byOut);//通过字节数组的方式进行传输
      outputStream.writeObject(this);  //将当前student对象写入字节数组中

      //在内存中创建一个字节数组缓冲区,从输入流读取的数据保存在该字节数组缓冲区
      ByteArrayInputStream byIn=new ByteArrayInputStream(byOut.toByteArray()); //接收字节数组作为参数进行创建
      ObjectInputStream inputStream=new ObjectInputStream(byIn);
      son=(Son) inputStream.readObject(); //从字节数组中读取
      return  son;
}
使用时候调用我们写的方法即可,其他不变,实现的效果为:
Son{age=13, name='son1', father=Father{name='bigFather'}}
Son{age=13, name='son1', father=Father{name='bigFather'}}
s1==s2:false
s1.name==s2.name:false

s1.Father==s2.Father:false
s1.name==s2.name:false
Son{age=12, name='son222', father=Father{name='smallFather'}}
Son{age=13, name='son1', father=Father{name='bigFather'}}
注:2023/07/01 对重写clone方法示例。
package learnjavafx8;

import javafx.beans.property.IntegerProperty;
import javafx.beans.property.SimpleIntegerProperty;

/**
 * @copyright 2023-2022
 * @package   learnjavafx8
 * @file      Person.java
 * @date      2023-07-01 14:34
 * @author    qiao wei
 * @version   1.0
 * @brief
 * @history
 */
public class Person implements Cloneable {

	public static void main(String[] args) {
		Person p01 = new Person(10, 20, true);
		System.out.println(p01);

		Person p02 = (Person) p01.clone();
		p02.firstIntegerProperty.set(-233);
		p02.secondIntegerProperty.set(666);
		p02.flag = false;

		System.out.println(p01);
		System.out.println(p02);
	}

	public Person() {
		firstIntegerProperty = new SimpleIntegerProperty();
		secondIntegerProperty = new SimpleIntegerProperty();

		flag = false;
	}

	public Person(int first, int second, boolean flag) {
		firstIntegerProperty = new SimpleIntegerProperty(first);
		secondIntegerProperty = new SimpleIntegerProperty(second);

		this.flag = flag;
	}

	@Override
	protected Object clone() {
		Person person = null;

		try {
			person = (Person) super.clone();

			person.firstIntegerProperty =
				new SimpleIntegerProperty(this.firstIntegerProperty.get());
			person.secondIntegerProperty =
				new SimpleIntegerProperty(this.secondIntegerProperty.get());
			person.flag = this.flag;
		} catch (CloneNotSupportedException exception) {
			exception.printStackTrace();
		} finally {
			return person;
		}
	}

	@Override
	public String toString() {
		return "Person{" +
			"firstIntegerProperty=" + firstIntegerProperty +
			", secondIntegerProperty=" + secondIntegerProperty +
			", flag=" + flag +
			'}';
	}

	public IntegerProperty firstIntegerProperty = null;

	public IntegerProperty secondIntegerProperty = null;

	public boolean flag = false;
}
测试结果,对p02引用字段的修改并没有影响到p01引用字段。进行了深拷贝。
Person{firstIntegerProperty=IntegerProperty [value: 10], secondIntegerProperty=IntegerProperty [value: 20], flag=true}
Person{firstIntegerProperty=IntegerProperty [value: 10], secondIntegerProperty=IntegerProperty [value: 20], flag=true}
Person{firstIntegerProperty=IntegerProperty [value: -233], secondIntegerProperty=IntegerProperty [value: 666], flag=false}

Process finished with exit code 0
修改Person类中clone方法,将深拷贝改为浅拷贝(删除引用类型数据copy内容),其余代码不变:
	@Override
	protected Object clone() {
		Person person = null;

		try {
			person = (Person) super.clone();

//			person.firstIntegerProperty =
//				new SimpleIntegerProperty(this.firstIntegerProperty.get());
//			person.secondIntegerProperty =
//				new SimpleIntegerProperty(this.secondIntegerProperty.get());
//			person.flag = this.flag;
		} catch (CloneNotSupportedException exception) {
			exception.printStackTrace();
		} finally {
			return person;
		}
	}
运行结果:
Person{firstIntegerProperty=IntegerProperty [value: 10], secondIntegerProperty=IntegerProperty [value: 20], flag=true}
Person{firstIntegerProperty=IntegerProperty [value: -233], secondIntegerProperty=IntegerProperty [value: 666], flag=true}
Person{firstIntegerProperty=IntegerProperty [value: -233], secondIntegerProperty=IntegerProperty [value: 666], flag=false}

Process finished with exit code 0
p02引用字段的修改影响到p01的引用字段内容。
类中字段为接口时,深拷贝处理方式:
如果字段是接口类型,则字段在拷贝时需要考虑接口实例的真实类型。通过获取真实类型创建实例,然后将实例赋值给深拷贝对象。

- 将当前对象进行拷贝赋值给字段cloned,注意此时的引用字段都是浅拷贝。
- 获取接口字段所持有真实类类型,并通过默认构造方法创造接口字段对应的真实类型实例。
- 对真实类型实例进行赋值,最后将真实类型实例赋值给拷贝对象(将拷贝对象原来持有的实例替代)。
具体实现代码,课程类Physics和类Mathematics继承ICourse接口,学生类Student持有课程接口course,课程接口持有具体的课程类实例。当进行深拷贝时通过读取课程类实例的具体类型获取。
课程接口类
package course;


/**
 * @copyright 2003-2023
 * @package   course
 * @file      ICourse.java
 * @date      2023-12-04
 * @author    qiao wei
 * @version   1.0
 * @brief     课程接口。
 * @history
 */
public interface ICourse {

    void setBookName(String name);

    String bookName();

    void setBookISBN(String ISBN);

    String bookISBN();

    void setBookPrice(double price);

    double bookPrice();
}
Mathematics课程类:
package course;


/**
 * @copyright 2003-2024
 * @author    qiao wei
 * @date      2024-01-01 12:36
 * @version   1.0
 * @brief     数学课程。继承Cloneable接口,IBook接口。clone方法对所有变量(基础数据)进行拷贝。
 * @history
 */
public class Mathematics implements Cloneable, ICourse {

    public Mathematics() {}

    public Mathematics(String name, String isbn, double price) {
        this.name = name;
        this.isbn = isbn;
        this.price = price;
    }

    @Override
    protected Mathematics clone() {
        Mathematics cloned = null;

        try {
            cloned = (Mathematics) super.clone();
            cloned.name = this.name;
            cloned.isbn = this.isbn;
            cloned.price = this.price;
        } catch (CloneNotSupportedException exception) {
            exception.printStackTrace();
        } finally {
            return cloned;
        }
    }

    @Override
    public void setBookName(String name) {
        this.name = name;
    }

    @Override
    public String bookName() {
        return name;
    }

    @Override
    public void setBookISBN(String ISBN) {
        this.isbn = ISBN;
    }

    @Override
    public String bookISBN() {
        return isbn;
    }

    @Override
    public void setBookPrice(double price) {
        this.price = price;
    }

    @Override
    public double bookPrice() {
        return price;
    }

    private String name;

    private String isbn;

    private double price;
}
学生类,持有课程类实例:
package course;


/**
 * @copyright 2003-2024
 * @author    qiao wei
 * @date      2024-01-01 13:57
 * @version   1.0
 * @brief
 * @history
 */
public class Student implements Cloneable {

    public Student() {
        this("No name", null);
    }

    public Student(String name, ICourse course) {
        this.name = name;
        this.course = course;
    }

    @Override
    protected Student clone() {
        Student cloned = null;

        try {
            cloned = (Student) super.clone();

            // 根据实例course获取其真实类型,创建新实例。
            Class clonedClass = course.getClass();
            ICourse course = (ICourse) clonedClass.getDeclaredConstructor().newInstance();

            // 设置实例course的字段。
            course.setBookName(this.course.bookName());
            course.setBookISBN(this.course.bookISBN());
            course.setBookPrice(this.course.bookPrice());

            cloned.course = course;
        } catch (CloneNotSupportedException exception) {
            exception.printStackTrace();
        } finally {
            return cloned;
        }
    }

    public ICourse getCourse() {
        return course;
    }

    public void setCourse(ICourse course) {
        this.course = course;
    }

    public String getName() {
        return name;
    }

    public void setName(String name) {
        this.name = name;
    }

    private ICourse course;

    private String name;
}
运行测试类:
package course;


/**
 * @copyright 2003-2023
 * @package   course
 * @file      MainClass.java
 * @date      2023-12-04
 * @author    qiao wei
 * @version   1.0
 * @brief     测试浅拷贝、深拷贝。
 * @history
 */
public class MainClass {

    public static void main(String[] args) {
        test04();
    }

    private static void test04() {
        Student student01 = new Student("ABC", new Mathematics("数学", "12345", 55.7d));

        Student student02 = student01.clone();
        student02.setName("OOO");
        student01.getCourse().setBookISBN("ABCDE");
        System.out.println("Student01's ISBN: " + student01.getCourse().bookISBN() +
            ", Student01's Name: " + student01.getName());
        System.out.println("Student02's ISBN: " + student02.getCourse().bookISBN() +
            ", Student02's Name: " + student02.getName());
    }
}
运行结果,类Student的两个实例持有的课程类已分离。
Student01's ISBN: ABCDE, Student01's Name: ABC
Student02's ISBN: 12345, Student02's Name: OOO


 472
472


 被折叠的 条评论
为什么被折叠?
被折叠的 条评论
为什么被折叠?
 到【灌水乐园】发言


