


01 设置鼠标在控件上显示图标:
Button控件调用Cursor的枚举类型创建鼠标图标:
Button showAlertButton = new Button("Show Alert");
showAlertButton.setCursor(Cursor.WAIT);
对Scene实例调用Cursor的静态方法cursor创建鼠标图标实例:
Cursor waitCur = Cursor.cursor("WAIT")
scene.setCursor(waitCur);
02 获取显示屏幕尺寸、设置主窗体位置、尺寸:
private Stage setScreenDetails(Stage stage) {
        // 获取显示屏尺寸。
        Rectangle2D rectangle2D = Screen.getPrimary().getBounds();
        double width = rectangle2D.getWidth();
        double height = rectangle2D.getHeight();

        // 设置主窗体坐标
        stage.setX(width / 5);
        stage.setY(height / 5);

        // 设置主窗体尺寸。
        stage.setWidth(width * 3 / 5);
        stage.setHeight(height * 3 / 5);
        stage.setResizable(true);
        stage.setMinWidth(300);
        stage.setMinHeight(400);
//        primaryStage.setMaxWidth(width / 2);
//        primaryStage.setMaxHeight(height / 2);

        return stage;
    }
03 设置控件的属性Effect,包括阴影,旋转,平移。
private void start02(Stage primaryStage) throws Exception {
        // 设置阴影。
        Button button = new Button("Close");
        button.setEffect(new DropShadow());

        // 无设置。
        Button button1 = new Button("Start");

        // 设置平移、旋转。
        CheckBox checkBox = new CheckBox("CheckBox Test");
        checkBox.setEffect(new DropShadow());
        checkBox.getTransforms().addAll(new Translate(150, 150), new Rotate(30));

        VBox root = new VBox(3);
        root.getChildren().addAll(button, button1, checkBox);

        Scene scene = new Scene(root);
        primaryStage.setScene(scene);
        primaryStage.setTitle("Testing LayoutBounds");
        primaryStage.show();

        // 打印控件属性。
        System.out.println("button(layoutBounds)  = " + button.getLayoutBounds());
        System.out.println("button(boundsInLocal) = " + button.getBoundsInLocal());

        System.out.println("button1(layoutBounds)  = " + button1.getLayoutBounds());
        System.out.println("button1(boundsInLocal) = " + button1.getBoundsInLocal());

        System.out.println("checkBox(layoutBounds)  = " + checkBox.getLayoutBounds());
        System.out.println("checkBox(boundsInLocal) = " + checkBox.getBoundsInLocal());
    }
运行结果: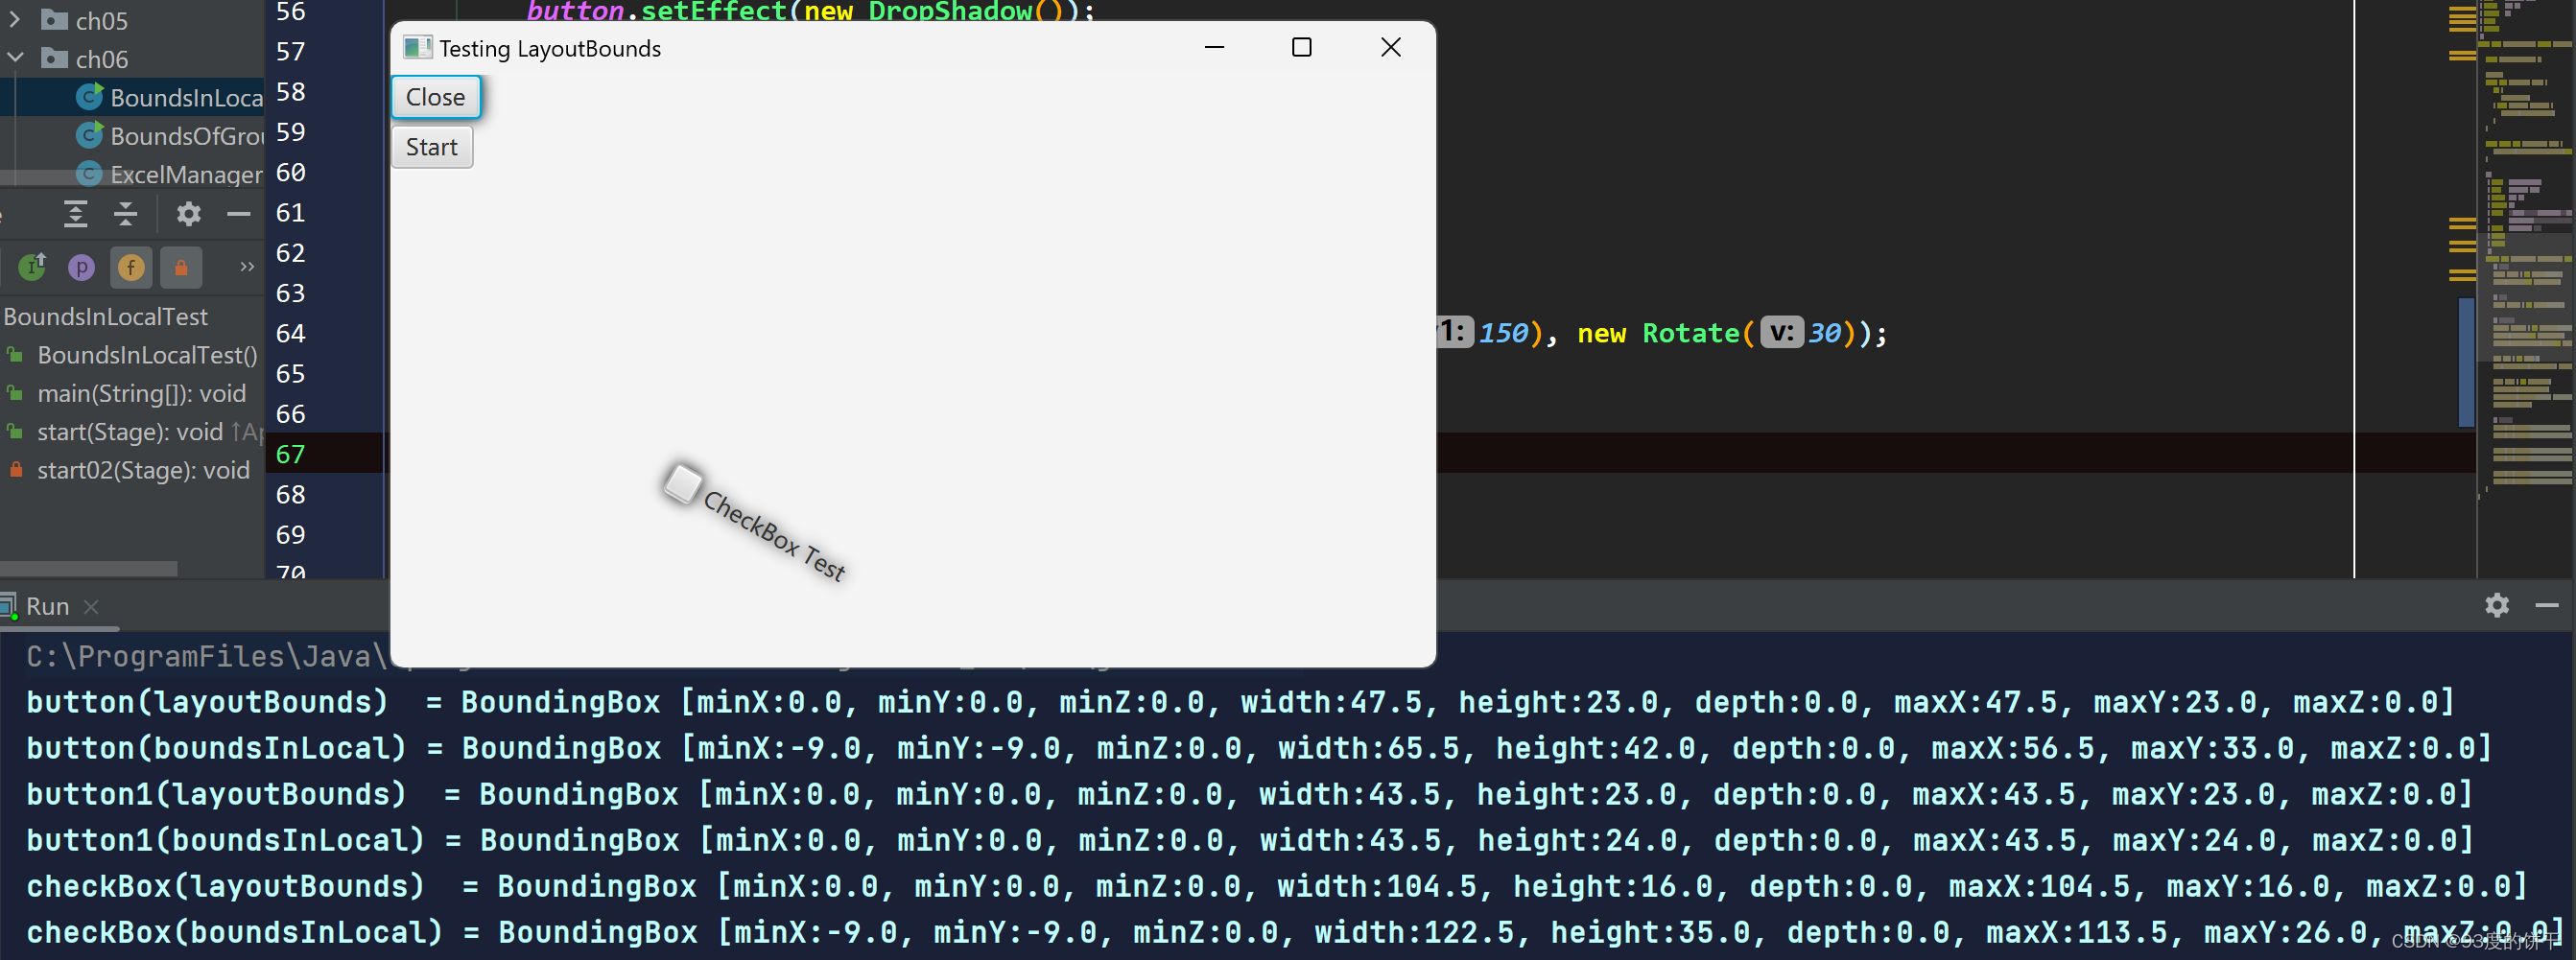
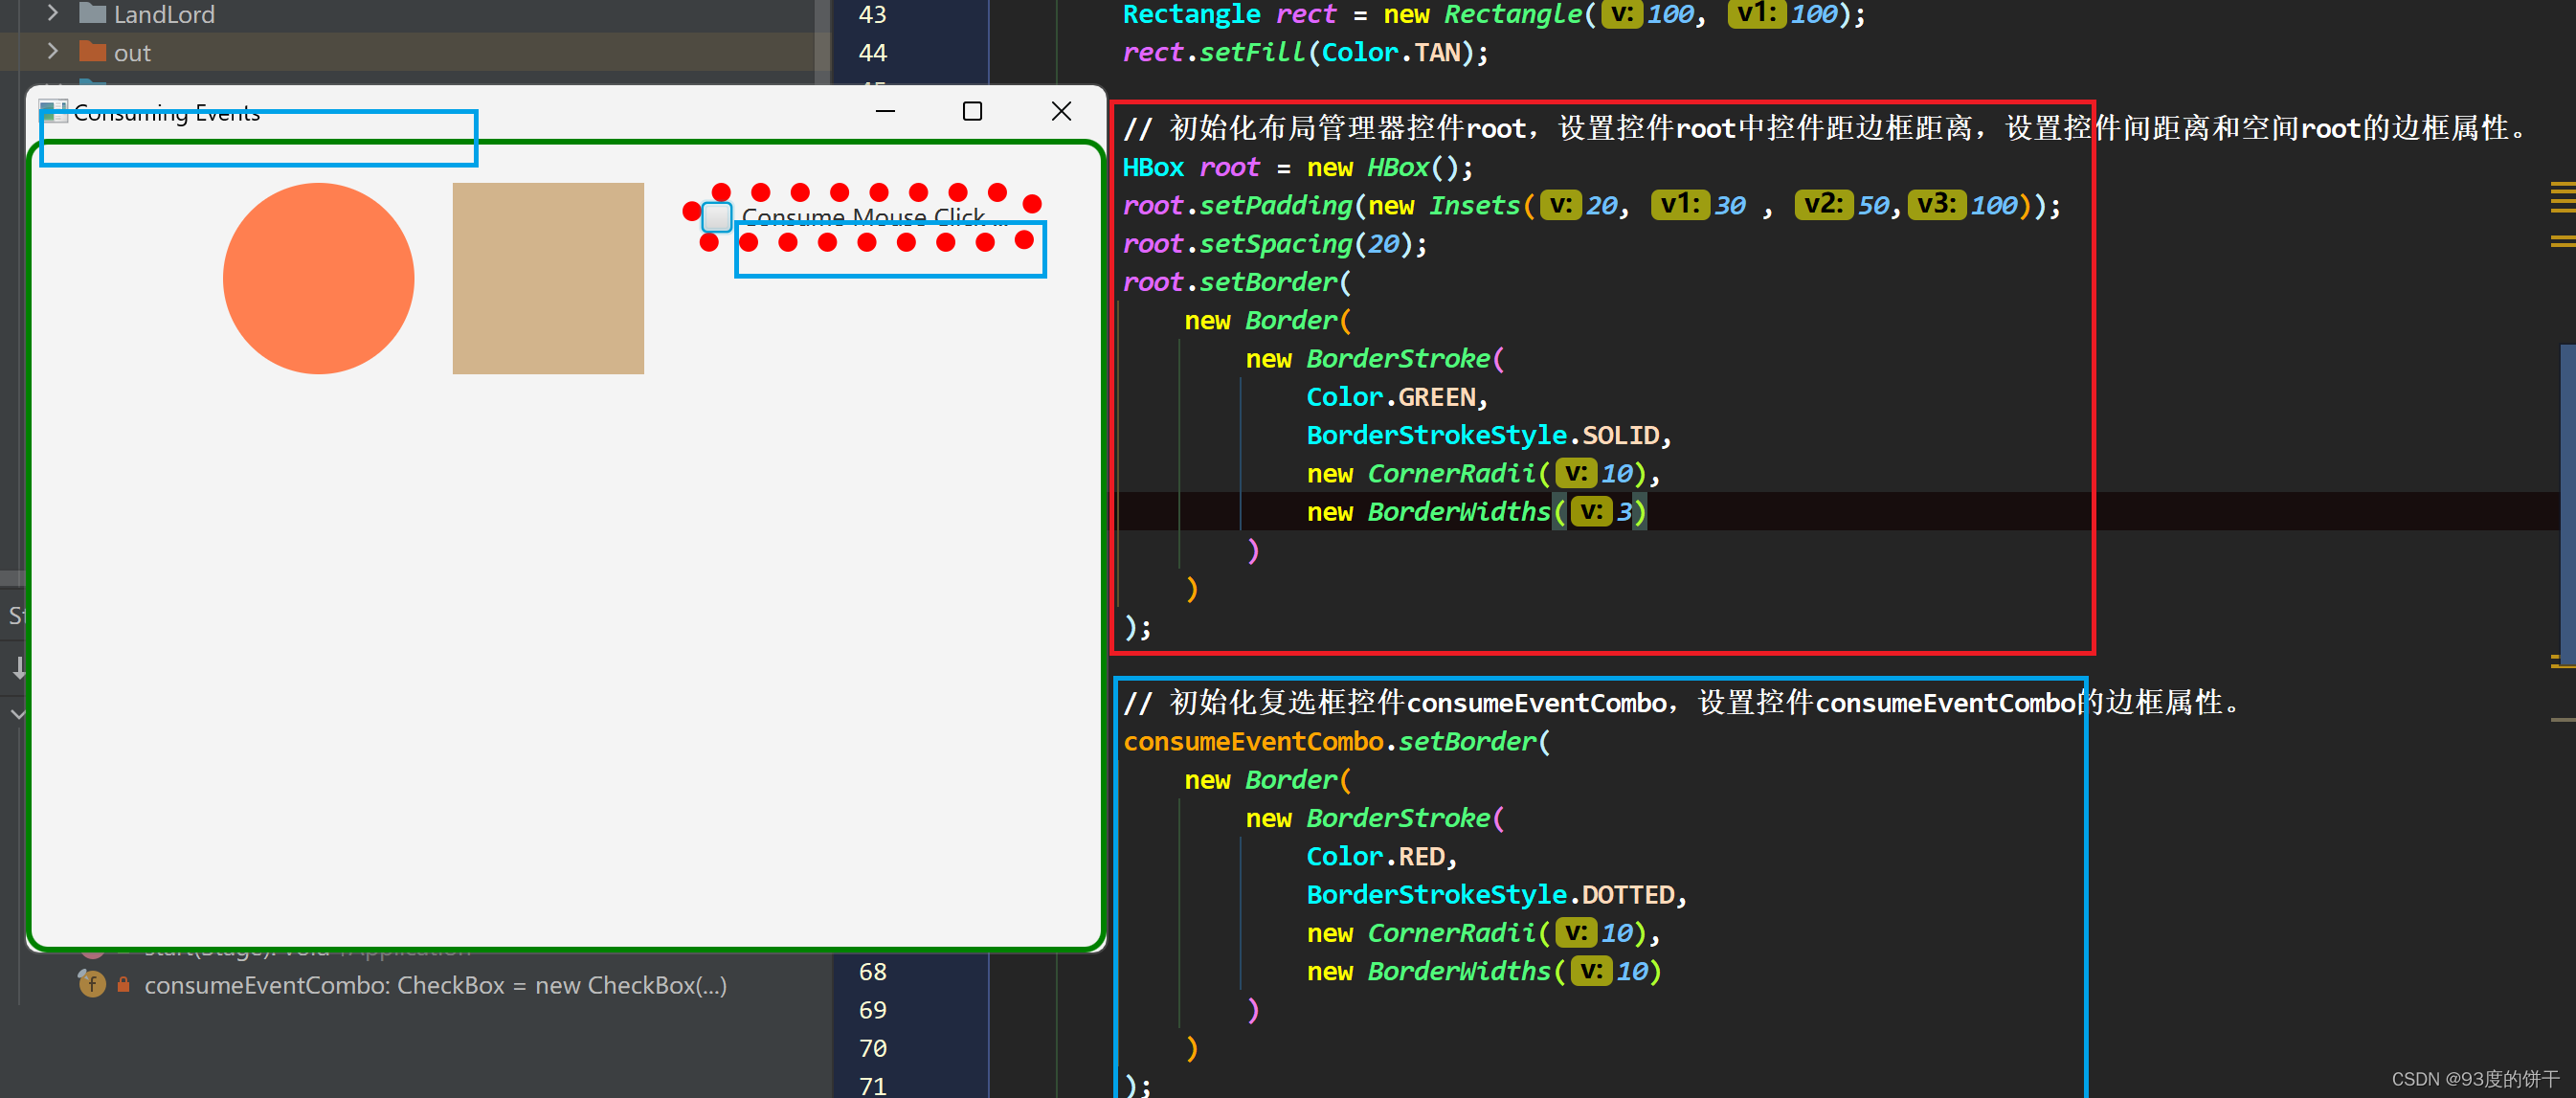
04 设置控件的边框,边框类型、宽度、颜色。
能够设置边框属性的控件必须是类Region的实例或其子类的实例。
package javafx8.ch09;


import static javafx.scene.input.MouseEvent.MOUSE_CLICKED;

import javafx.application.Application;
import javafx.event.EventHandler;
import javafx.geometry.Insets;
import javafx.scene.Scene;
import javafx.scene.control.CheckBox;
import javafx.scene.input.MouseEvent;
import javafx.scene.layout.Border;
import javafx.scene.layout.BorderStroke;
import javafx.scene.layout.BorderStrokeStyle;
import javafx.scene.layout.BorderWidths;
import javafx.scene.layout.CornerRadii;
import javafx.scene.layout.HBox;
import javafx.scene.paint.Color;
import javafx.scene.shape.Circle;
import javafx.scene.shape.Rectangle;
import javafx.stage.Stage;


/**
 * @copyright 2023-2022
 * @package   javafx8.ch09
 * @file      ConsumingEvents1.java
 * @date      2023-06-22 15:18
 * @author    qiao wei
 * @version   1.0
 * @brief     调用consume方法,终止Event Filter或Event Handler的事件链。
 * @history
 */
public class ConsumingEvents extends Application {

    public ConsumingEvents() {}

    @Override
    public void start(Stage primaryStage) throws Exception {
        // Initialize widget.
        Circle circle = new Circle (50, 50, 50);
        circle.setFill(Color.CORAL);
        Rectangle rect = new Rectangle(100, 100);
        rect.setFill(Color.TAN);

        // 初始化布局管理器控件root,设置控件root中控件距边框距离,设置控件间距离和空间root的边框属性。
        HBox root = new HBox();
        root.setPadding(new Insets(20, 30 , 50,100));
        root.setSpacing(20);
        root.setBorder(
            new Border(
                new BorderStroke(
                    Color.GREEN,
                    BorderStrokeStyle.SOLID,
                    new CornerRadii(10),
                    new BorderWidths(3)
                )
            )
        );

        // 初始化复选框控件consumeEventCombo,设置控件consumeEventCombo的边框属性。
        consumeEventCombo.setBorder(
            new Border(
                new BorderStroke(
                    Color.RED,
                    BorderStrokeStyle.DOTTED,
                    new CornerRadii(10),
                    new BorderWidths(10)
                )
            )
        );
        root.getChildren().addAll(circle, rect, consumeEventCombo);
        Scene scene = new Scene(root);

        // Register mouse-clicked event handlers to all nodes, except the rectangle and checkbox.
        EventHandler<MouseEvent> handler = event -> handleEvent(event);
        EventHandler<MouseEvent> circleMeHandler = event -> handleEventForCircle(event);

        // 使用方法addEventHandler()注册点击鼠标事件。事件处理顺序为Bubbling。
        primaryStage.addEventHandler(MOUSE_CLICKED, handler);
//        scene.addEventHandler(MOUSE_CLICKED, circleMeHandler);
        root.addEventHandler(MOUSE_CLICKED, handler);
//        root.addEventHandler(MOUSE_CLICKED, circleMeHandler);
//        scene.addEventHandler(MOUSE_CLICKED, handler);
        scene.addEventHandler(MOUSE_CLICKED, circleMeHandler);
//        circle.addEventHandler(MOUSE_CLICKED, circleMeHandler);
        circle.addEventHandler(MOUSE_CLICKED, handler);

        primaryStage.setScene(scene);
        primaryStage.setTitle("Consuming Events");
        primaryStage.show();
    }

    public static void main(String[] args) {
        try {
            Application.launch(ConsumingEvents.class, args);
        } catch (Exception exception) {
            exception.printStackTrace();
        }
    }

    private void handleEvent(MouseEvent event) {
        System.out.println("--------------------event handler");
        print(event);
        System.out.println("--------------------event handler\n");
    }

    private void handleEventForCircle(MouseEvent event) {
        print(event);

        // Consume event chain after the checkbox is selected
        if (consumeEventCombo.isSelected()) {
            System.out.println("event consume function^^^^^^^^^^^^^^^^^^^^^^^^^^");
            event.consume();
            System.out.println("event consume function^^^^^^^^^^^^^^^^^^^^^^^^^^\n");
        }
    }

    private void print(MouseEvent event) {
        String type = event.getEventType().getName();
        String source = event.getSource().getClass().getSimpleName();
        String target = event.getTarget().getClass().getSimpleName();

        // Get coordinates of the mouse cursor relative to the event source
        double x = event.getX();
        double y = event.getY();

        System.out.println(
            "Type = " + type +
            ", Target = " + target +
            ", Source = " + source +
            ", Location(" + x + ", " + y + ")"
        );
    }

    private final CheckBox consumeEventCombo = new CheckBox("Consume Mouse Click at Circle");
}
运行结果:


 9197
9197


 被折叠的 条评论
为什么被折叠?
被折叠的 条评论
为什么被折叠?
 到【灌水乐园】发言


