


Last year, an article was released on Artistic style transfer using Tensorflow Lite where the style of a content image is changed based on any style you like. It is super fun and very easy to use. You just need to specify the path of images and you are done. It uses two TfLite models, one to predict the style and the other to transform.
去年, 使用Tensorflow Lite发布了有关艺术风格转换的文章,其中内容图像的样式会根据您喜欢的任何样式进行更改。 它非常有趣,而且非常易于使用。 您只需要指定图像的路径即可。 它使用两个TfLite模型,一个模型预测样式,另一个模型进行转换。

So it works great at transferring a single style on to the content image but how can we transfer more than one style? This is what you will find out in this article.
因此,它非常适合将一种样式转移到内容图像上,但是如何才能转移多种样式呢? 这就是您将在本文中找到的内容。
目录 (Table of Contents)
- Artistic style transfer explained 艺术风格转移的解释
- Combining Styles 组合样式
- In equal quantities 等量
- Style of one and color of one 一种风格,一种颜色
- One dominant over other 一个占主导地位
艺术风格转移的解释 (Artistic style transfer explained)
In this section, I will explain how style transfer works. If you already know about it and just want to combine different styles, feel free to move on to the next section. Make the necessary imports like TensorFlow, NumPy, and Matplotlib. Set the paths of content and style images and download the required Tensorflow Lite models.
在本节中,我将解释样式转换的工作原理。 如果您已经知道它,并且只想组合不同的样式,请随时进入下一部分。 进行必要的导入,例如TensorFlow,NumPy和Matplotlib。 设置内容和样式图像的路径,然后下载所需的Tensorflow Lite模型。
import tensorflow as tf
import matplotlib.pyplot as plt
import matplotlib as mpl
mpl.rcParams['figure.figsize'] = (12,12)
mpl.rcParams['axes.grid'] = False
import numpy as npcontent_path = content.jpg
style_path = style.jpgstyle_predict_path = tf.keras.utils.get_file('style_predict.tflite', 'https://tfhub.dev/google/lite-model/magenta/arbitrary-image-stylization-v1-256/int8/prediction/1?lite-format=tflite')
style_transform_path = tf.keras.utils.get_file('style_transform.tflite', 'https://tfhub.dev/google/lite-model/magenta/arbitrary-image-stylization-v1-256/int8/transfer/1?lite-format=tflite')
With the images and models loaded we need to preprocess them. The images should be in RGB format of float32 values and the pixel values need to be between 0 and 1 inclusive. The style image should be of dimensions (1, 256, 256, 3) and the content image should be of dimensions (1, 384, 384, 3). In the Tensorflow blog, the smaller dimension of width and height is made equal to 256 or 384 depending on the style or content image respectively, and then centrally cropped.
加载图像和模型后,我们需要对其进行预处理。 图像应为float32值的RGB格式,像素值必须介于0和1之间(含0和1)。 样式图像的尺寸应为(1,256,256,3),内容图像的尺寸应为(1,384,384,3)。 在Tensorflow博客中,分别根据样式或内容图像使宽度和高度的较小尺寸等于256或384,然后在中央进行裁剪。
# Function to load an image from a file, and add a batch dimension.
def load_img(path_to_img):
img = tf.io.read_file(path_to_img)
img = tf.io.decode_image(img, channels=3)
img = tf.image.convert_image_dtype(img, tf.float32)
img = img[tf.newaxis, :] return img# Function to pre-process by resizing an central cropping it.
def preprocess_image(image, target_dim):
# Resize the image so that the shorter dimension becomes 256px.
shape = tf.cast(tf.shape(image)[1:-1], tf.float32)
short_dim = min(shape)
scale = target_dim / short_dim
new_shape = tf.cast(shape * scale, tf.int32)
image = tf.image.resize(image, new_shape) # Central crop the image.
image = tf.image.resize_with_crop_or_pad(image, target_dim, target_dim) return image# Load the input images.
content_image = load_img(content_path)
style_image = load_img(style_path)# Preprocess the input images.
preprocessed_content_image = preprocess_image(content_image, 384)
preprocessed_style_image = preprocess_image(style_image, 256)print('Style Image Shape:', preprocessed_style_image.shape)
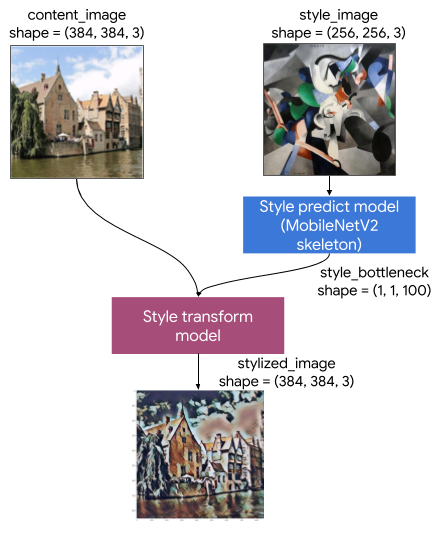
print('Content Image Shape:', preprocessed_content_image.shape)Now we need to predict the style on the style image using our loaded model. You can have a look at this article if you want to how to work with Tensorflow Lite in Python. Create an interpreter of the model and get its output. The style model outputs a style bottleneck that has a shape of (1, 1, 1, 100) with whom we will be tinkering with to combine multiple styles.
现在,我们需要使用已加载的模型来预测样式图像上的样式。 如果您想了解如何在Python中使用Tensorflow Lite,可以看一下本文。 创建模型的解释器并获取其输出。 样式模型输出一个形状为(1、1、1、100)的样式瓶颈 ,我们将与之进行修补以合并多个样式。
# Function to run style prediction on preprocessed style image.
def run_style_predict(preprocessed_style_image):
  # Load the model.
  interpreter = tf.lite.Interpreter(model_path=style_predict_path)  # Set model input.
  interpreter.allocate_tensors()
  input_details = interpreter.get_input_details()
  interpreter.set_tensor(input_details[0]["index"], preprocessed_style_image)  # Calculate style bottleneck.
  interpreter.invoke()
  style_bottleneck = interpreter.tensor(
      interpreter.get_output_details()[0]["index"]
      )()  return style_bottleneck# Calculate style bottleneck for the preprocessed style image.
style_bottleneck = run_style_predict(preprocessed_style_image)
print('Style Bottleneck Shape:', style_bottleneck.shape)
After this, we need to apply this style bottleneck on our content image to change its style so we use the other loaded model for this.
此后,我们需要在内容图像上应用此样式瓶颈以更改其样式,因此我们为此使用了另一个加载的模型。
# Run style transform on preprocessed style image
def run_style_transform(style_bottleneck, preprocessed_content_image):
  # Load the model.
  interpreter = tf.lite.Interpreter(model_path=style_transform_path)  # Set model input.
  input_details = interpreter.get_input_details()
  interpreter.allocate_tensors()  # Set model inputs.
  interpreter.set_tensor(input_details[0]["index"], preprocessed_content_image)
  interpreter.set_tensor(input_details[1]["index"], style_bottleneck)
  interpreter.invoke()  # Transform content image.
  stylized_image = interpreter.tensor(
      interpreter.get_output_details()[0]["index"]
      )()  return stylized_image# Stylize the content image using the style bottleneck.
stylized_image = run_style_transform(style_bottleneck, preprocessed_content_image)# Visualize the output.
stylized_image = tf.squeeze(stylized_image, axis=0)
plt.imshow(stylized_image)
plt.title('Stylized Image')
This flowchart again from that article best outlines the procedure.
该文章再次提供的该流程图最好地概述了该过程。
组合样式 (Combining Styles)
The images I will be working with are shown below.
我将使用的图像如下所示。

Anyone’s first guess at combining them would be to apply a style first and then apply the second style on the resulting image. Let’s see the results we get through that.
任何人将它们组合在一起的第一个猜测就是首先应用一种样式,然后在结果图像上应用第二种样式。 让我们来看看我们得到的结果。

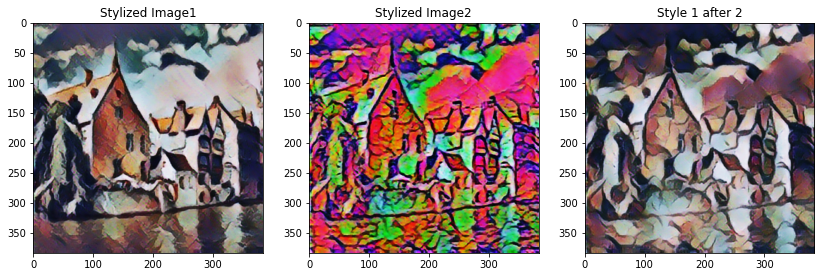
The results this way are not very good. The results look a little clumsy and only have the colors of the final style that was applied to it. So let’s play with the style bottlenecks and see what happens.
这样的结果不是很好。 结果看起来有些笨拙,并且仅具有应用于其的最终样式的颜色。 因此,让我们处理样式瓶颈,看看会发生什么。
等量 (In equal quantities)
To give equal weightage to both the styles we can take the mean of the style bottlenecks.
为了使两种样式的权重相等,我们可以取样式瓶颈的均值。
style_bottleneck = style_bottleneck1.copy()
for i in range(100):
    style_bottleneck[0, 0, 0, i] += style_bottleneck2[0, 0, 0, i]
    style_bottleneck[0, 0, 0, i] /= 2
This looks way better than the results we had got earlier and combines the colors way better.
这看起来比我们之前获得的结果更好,并且更好地结合了颜色。
一种风格,一种颜色 (Style of one and color of one)
This result was completely unexpected and a consequence of goofing around. It’s not like the other style won’t have any say in the color of the image like the first results we had obtained after which we moved on to style bottlenecks but it would be subtle and tone down the other style as well. Place the style of whose color you want at all the even indexes and whose texture you want at the odd indices.
这个结果是完全出乎意料的,并且是无聊的结果。 就像我们获得的第一个结果之后,其他风格在图像的颜色上没有发言权一样,此后我们进入了风格瓶颈,但它也会变得微妙并淡化了其他风格。 在所有偶数索引处放置所需颜色的样式,在奇数索引处放置所需纹理的样式。
style_bottleneck = style_bottleneck1.copy()
for i in range(100):
    if i % 2 == 0: # change 0 to 1 for second image
        style_bottleneck[0, 0, 0, i] = style_bottleneck2[0, 0, 0, i]

一个占主导地位 (One dominant over other)
We know the size of style bottleneck is (1, 1, 1, 100). So if we take the first 50 of one style and the last 50 of another style then the style whose first 50 values were taken should be more dominant.
我们知道样式瓶颈的大小是(1、1、1、100)。 因此,如果我们采用一种样式的前50个,而采用另一种样式的后50个,则采用前50个值的样式应更具优势。
style_bottleneck = style_bottleneck1.copy()
for i in range(50, 100): #change to (50) for second image
    style_bottleneck[0, 0, 0, i] = style_bottleneck2[0, 0, 0, i]

I tried combining two styles in an image. You can try and combine more than two and see how it looks like. The complete code is shown below.
我尝试在图像中组合两种样式。 您可以尝试将两个以上结合起来,看看它是什么样子。 完整的代码如下所示。
翻译自: https://towardsdatascience.com/combining-numerous-artistic-styles-in-tensorflow-6e12a99b103f


 1万+
1万+


 被折叠的 条评论
为什么被折叠?
被折叠的 条评论
为什么被折叠?
 到【灌水乐园】发言


