


If you haven't read Part 1, please read it first since this article assumes you have read Part 1 already.
如果您尚未阅读第1部分 ,请先阅读,因为本文假定您已经阅读了第1部分。
Now assuming you have read Part 1, let’s go on.
现在,假设您已经阅读了第1部分,让我们继续。
步骤5在Pinterest数据库和作物上运行更快的R-CNN (Step 5 Run Faster R-CNN on Pinterest Database and Crop)
After gathering the Pinterest database, now we can perform inference on these images using our previously trained Faster R-CNN. But before we do that, we need to first add the functionality where we will crop the detected object and save the resulting image, since this functionality is not provided right out of the box. You can do this by going to the github repo of this project and download the vis.py . Then, navigate to detectron/utils and replace the existing vis.py with the downloaded version. The new vis.py is the same with the one already provided but with one major difference — crop the object detected and save it in a directory.
收集Pinterest数据库之后,现在我们可以使用我们以前训练的Faster R-CNN对这些图像进行推理。 但是在执行此操作之前,我们需要首先添加该功能,在该功能中我们将裁剪检测到的对象并保存生成的图像 ,因为此功能并未立即提供。 您可以通过转到该项目的github存储库并下载vis.py来做到这vis.py 。 然后,导航至detectron/utils并将现有的vis.py替换为下载的版本。 新的vis.py与已经提供的vis.py相同,但有一个主要区别-裁剪检测到的对象并将其保存在目录中。
The added code predicts the category for the detected object, and if the category is “Full” meaning full-body clothing, then it will crop the image and save it in the directory specified. We only save full-body clothing because we want to be able to generate full-body clothing as well, not only simple shirts or skirts.
添加的代码将预测检测到的对象的类别,如果类别为“ Full”(表示全身衣服),则它将裁剪图像并将其保存在指定的目录中。 我们只保存全身衣服是因为我们也希望能够生成全身衣服,而不仅仅是简单的衬衫或裙子。
After tiny modifications, we are ready to run our model on the Pinterest dataset! We can run inference on our Faster R-CNN previously trained by:
经过微小的修改后,我们准备在Pinterest数据集上运行我们的模型! 我们可以对先前受过以下训练的Faster R-CNN进行推断:
python tools/infer.py \
   --im [path/to/image.jpg] \
   --rpn-pkl [path/to/rpn/model.pkl] \
   --rpn-cfg
   --output-dir [path/to/output/dir]
The [path/to/image.jpg] is the directory where we store our Pinterest images, --rpn-pkl is where we previously saved our model .pkl file, --rpn-cfg is where we stored our configs file, and finally, --output-dir is where we want to save our predictions. However, this --output-dir is not that important as it will contain the uncropped images with the predictions. Where we want to look for is the directory we specified in vis.py because that’s where the cropped images will be saved.
[path/to/image.jpg]是我们存储Pinterest图像的目录,-- --rpn-pkl是我们先前存储模型.pkl文件的位置,-- --rpn-cfg是我们存储配置文件的位置,以及最后,-- --output-dir是我们要保存预测的位置。 但是,此--output-dir并不重要,因为它将包含未裁剪的图像以及预测。 我们要查找的是我们在vis.py指定的目录,因为这是裁剪图像的保存位置。
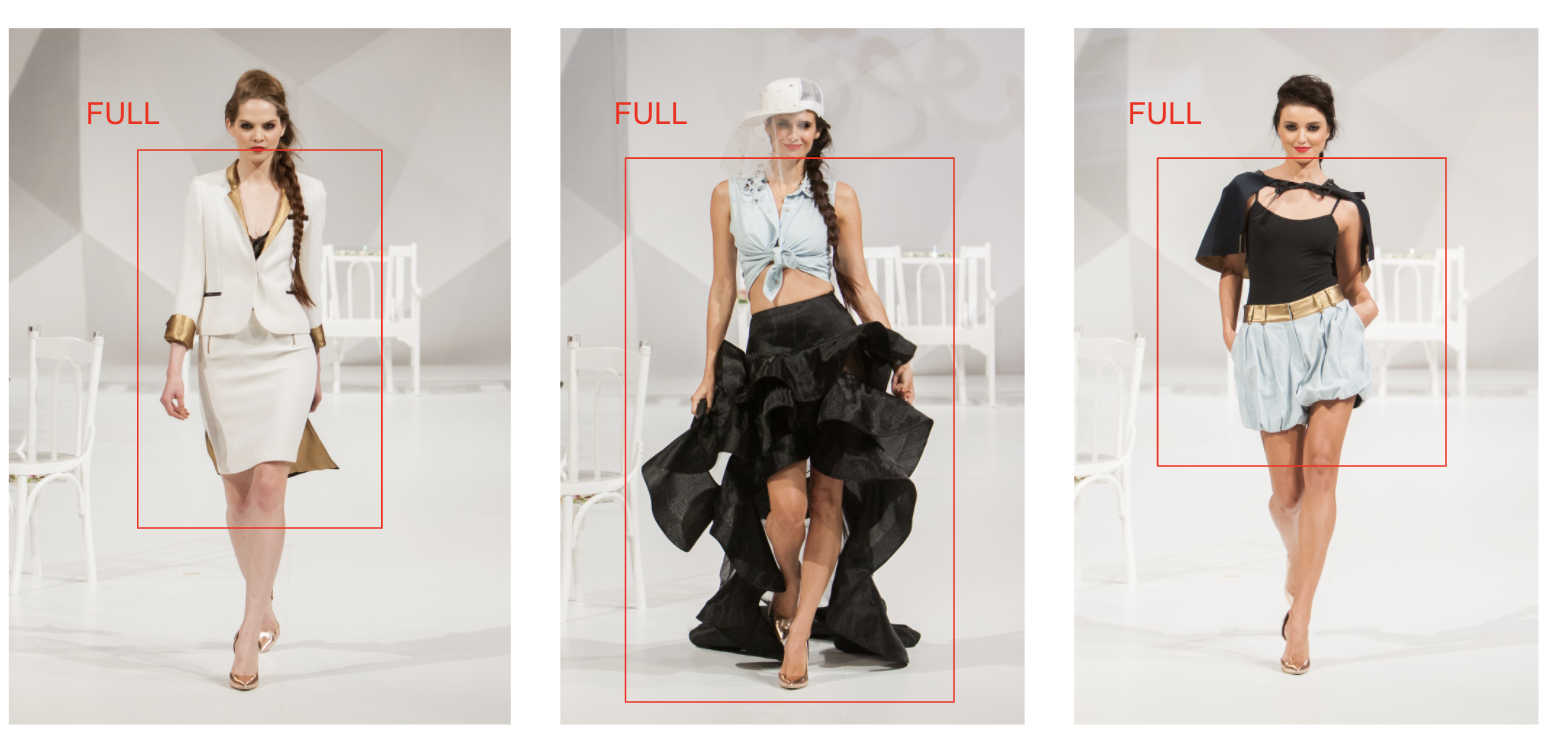
After performing inference on the model, we should get the cropped images with the clothing centered, and the model, as well as the background, mostly removed. Even though there is still some noise, what we have is already good enough.
在对模型进行推断之后,我们应该获取裁剪后的图像,其中衣服要居中,并且大部分移除模型以及背景。 即使仍然有些噪音,我们所拥有的已经足够好了。

步骤6将预测和图像传递给DCGAN以进行生成 (Step 6 Pass Predictions and Images to DCGAN for Generation)
Now that we finally have our high-quality clothing images, we can start building the DCGAN model!
现在我们终于有了高质量的服装图像,我们可以开始构建DCGAN模型了!
Note: The code is based on the official DCGAN tutorial from Pytorch where you access from here. The code won’t be explained in too detail, you can refer to the tutorial for more detailed explanations.
注意:该代码基于Pytorch的官方DCGAN教程,您可以从 此处 访问 。 不会对代码进行太详细的解释,您可以参考该教程以获取更详细的解释。
Let’s begin. First we have to import all the necessary libraries:
让我们开始。 首先,我们必须导入所有必需的库:
Next, we set up all the variables that we’ll need later on:
接下来,我们设置稍后将需要的所有变量:
After setting up the variables, we now create the dataset and dataloader which we will feed into our model later. We resize the images, center crop them to the desired image size, and normalize them. Our image size is set to 64 because smaller sizes are normally more consistent.
设置完变量后,我们现在创建数据集和数据加载器,稍后将它们输入模型中。 我们调整图像的大小,将其中心裁剪为所需的图像大小,然后对其进行归一化。 我们的图像尺寸设置为64,因为通常较小的尺寸会更一致。
We also plot some training images to visualize:
我们还绘制了一些训练图像以可视化:

After that, we define the weights initialization on the generator and discriminator about the be built:
之后,我们在生成器和鉴别器上定义要构建的权重初始化:
We build the generator:
我们构建生成器:

And the discriminator!
和鉴别器!

Then we define the training process. We use BCELoss function because the job of the discriminator is identifying whether an image is real or fake. We setup Adam optimizers for both the generator and the discriminator. Then, we update both networks batch-by-batch:
然后我们定义培训过程。 我们使用BCELoss函数是因为鉴别器的工作是识别图像是真实的还是伪造的。 我们为生成器和鉴别器设置了Adam优化器。 然后,我们逐批更新两个网络:
This will start the training process. The output is:
这将开始培训过程。 输出为:

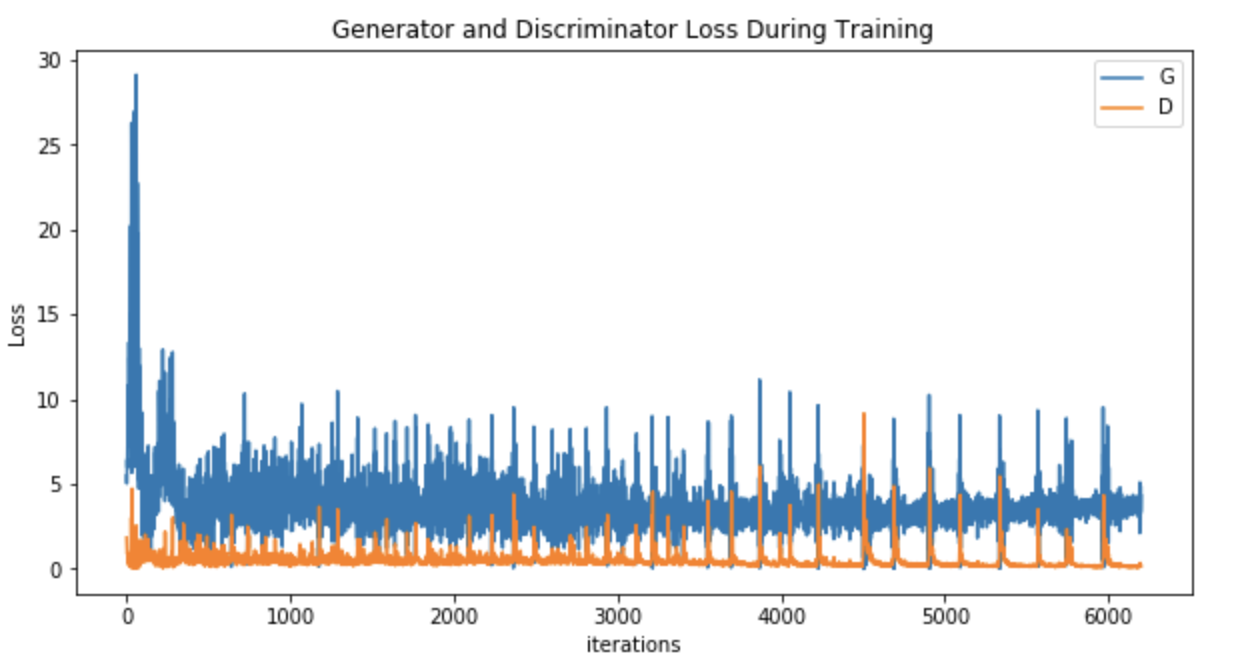
The training process will take a while. After training, we can plot the generator and discriminator loss during training:
培训过程将需要一段时间。 训练后,我们可以绘制训练过程中的生成器和鉴别器损失:
Then after all this work, this is the last step — to save the images to local hard disk:
然后,完成所有这些工作,这是最后一步-将图像保存到本地硬盘:
结果 (Results)
And finally guys, after all this work! We get to see the generated results:
终于,伙计们,完成了所有这些工作! 我们可以看到生成的结果 :
Now we can plot and compare between the real images from our dataset and generated images, side-by-side.
现在,我们可以并排绘制和比较数据集中的真实图像和生成的图像。

Not bad right? The fake images are not that far off from real images. In fact, some actually look quite high-fashion to my eyes 😁.
还不错吧? 假图像与真实图像相差不远。 实际上,有些东西在我眼中看起来颇为时尚 。
And that’s it guys! Hope you all enjoy my article and hope to see you again. Again, the entire code shown in this article as well as the paper I wrote can be accessed in my github repo! If you like my content, please follow me on Medium, I will post regularly about topics on deep learning!
就是这样! 希望大家喜欢我的文章,并希望再次与您见面。 同样,可以在我的github repo中访问本文中显示的整个代码以及我编写的论文 ! 如果您喜欢我的内容,请在Medium上关注我,我将定期发布有关深度学习的主题!
翻译自: https://towardsdatascience.com/deepstyle-part-2-4ca2ae822ba0


 1448
1448


 被折叠的 条评论
为什么被折叠?
被折叠的 条评论
为什么被折叠?
 到【灌水乐园】发言


