


静态分发用ngix
模块化iOS (Modular iOS)
Great software also has a great installation experience. If the software is too hard to install few will use it.
出色的软件也具有出色的安装经验。 如果该软件太难安装,将很少使用它。
Installing and integrating with compiled iOS static frameworks has some caveats. How does an integrator know when you release a new version of your static framework — especially one with bug fixes? What happens when newer versions of your compiled static frameworks require changes in the integrators build configuration? When the installation changes does that become a breaking change too?
安装并与已编译的iOS静态框架集成需要注意一些事项。 当您发布静态框架的新版本(尤其是具有错误修复的版本)时,集成商如何知道? 当较新版本的已编译静态框架需要在集成商的构建配置中进行更改时,会发生什么情况? 当安装更改时,这也将成为一项重大更改吗?
There is a way to simplify the installation and maintenance experience for integrators of your compiled static framework. There are tools that help integrators manage 3rd party frameworks and libraries in their apps. These tools help integrators install new versions of their dependencies effortlessly with a run of a single command. These tools are called dependency managers. The most popular for iOS is Cocoapods.
有一种方法可以简化已编译的静态框架的集成商的安装和维护体验。 有一些工具可以帮助集成商在其应用程序中管理第三方框架和库。 这些工具可帮助集成商通过运行单个命令轻松地安装其依赖关系的新版本。 这些工具称为依赖管理器。 iOS上最受欢迎的是Cocoapods 。
For this post I assume you are familiar with iOS frameworks, static libraries and static frameworks. I also assume you have basic Swift and iOS app development knowledge. Addtionally you must also have knowledge of Git version control.
在本文中,我假设您熟悉iOS框架 , 静态库和静态框架 。 我还假设您具有基本的Swift和iOS应用程序开发知识。 另外,您还必须具备有关Git版本控制的知识。
I have used Swift 5.2.4 and Xcode 11.5 whilst writing this post.
在撰写本文时,我使用了Swift 5.2.4和Xcode 11.5。
为什么要使用Cocoapods? (Why use Cocoapods?)
Let’s say an integrator of your compiled static framework finds a bug — let’s say 1.0.0. They report it to you. You fix it. You release a new version — 1.0.1. You let the integrator know the new version is out. The integrator downloads and installs the new version.
假设您的已编译静态框架的集成商发现了一个错误-假设是1.0.0 。 他们向您报告。 您修复它。 您发布了一个新版本1.0.1 。 您让集成商知道新版本已经发布。 集成商下载并安装新版本。
Let’s take a look how the same scenario would work with Cocoapods. The integrator declares to Cocoapods that they wish to use any version of 1.x.x. On installation Cocoapods will install the latest version — whether it’s 1.0.1 or 1.1.0. You no longer need to reach to every integrator to upgrade.
让我们看看相同的场景如何与Cocoapods一起工作。 集成商向Cocoapods声明他们希望使用1.xx任何版本。 安装时,Cocoapods将安装最新版本-无论是1.0.1还是1.1.0 。 您不再需要联系每个集成商进行升级。
Additionally when the integrator uses your static framework they must keep a copy in their repository so that all of developers have a copy. Otherwise each developer must install it themselves. Not only for your static framework but all that are not managed by a dependency manager.
另外,当集成商使用您的静态框架时,他们必须在其存储库中保留一个副本,以便所有开发人员都拥有一个副本。 否则,每个开发人员都必须自己安装它。 不仅适用于您的静态框架,而且所有这些都不由依赖项管理器管理。
With Cocoapods, however, the developer must only run a single command. Cocoapods will take care of the rest: download, install and configure the framework into their app.
但是,对于Cocoapods,开发人员必须只运行一个命令。 Cocoapods将负责其余的工作:将框架下载,安装并配置到他们的应用程序中。
Cocoapods如何运作? (How does Cocoapods work?)
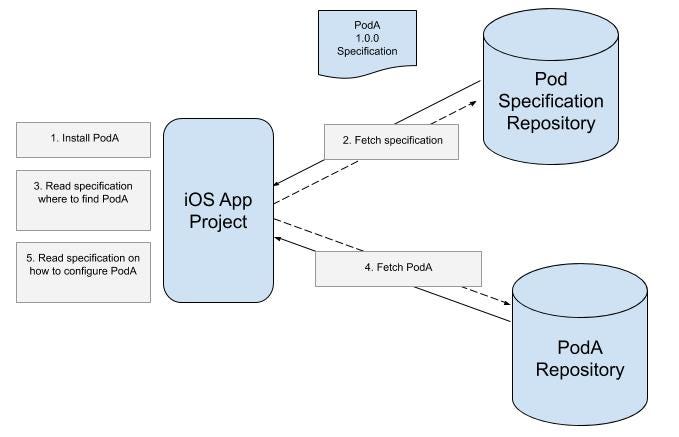
In simple terms a pod (a framework or library) publisher to Cocoapods has to publish a file known as Cocoapods specification or podspec to a repository that holds these. The specification holds information on how to install and configure the pod.
简而言之,Cocoapods的pod (框架或库)发布者必须将一个名为Cocoapods规范或podspec的文件发布到保存这些文件的存储库中。 该规范包含有关如何安装和配置Pod的信息。

When the integrator decides to install your pod they declare the name of pod and optionally the version (if not specified then it will take the specification for the latest version) in its list of pods to be installed. Cocoapods then fetches the specification from the respository and installs the pod according to the specification.
当集成商决定安装您的Pod时,他们会在要安装的Pod列表中声明Pod的名称以及可选的版本(如果未指定,则采用最新版本的规范)。 然后,Cocoapods从存储库中获取规范,并根据该规范安装容器。
如何通过Cocoapods分发已编译的静态框架 (How to distribute compiled static frameworks through Cocoapods)
We’ll start off by downloading an exiting project containing an existing static library project. I have included a script in the project that wraps the static library in a static framework.The download also includes an iOS app which we’ll use in the next section to consume the distributed static framework through Cocoapods.
我们将从下载一个包含现有静态库项目的退出项目开始。 我在项目中包含了一个脚本,该脚本将静态库包装在一个静态框架中。下载还包括一个iOS应用程序,我们将在下一部分中使用它通过Cocoapods使用分布式静态框架。
Before we get staterted open the Terminal app. All of the steps in this section will require it.
在我们获得状态之前,请打开“终端”应用程序。 本节中的所有步骤都将需要它。
The steps we’ll take:
我们将采取的步骤:
- Download the starter project 下载入门项目
- Build the static framework 建立静态框架
- Store the static framework in a local git repository 将静态框架存储在本地git存储库中
- Install Cocoapods 安装Cocoapods
- Create Cocoapods specification repository 创建Cocoapods规范存储库
- Create specification file 创建规格文件
- Publish static framework specification to the specification repository 将静态框架规范发布到规范存储库
1.下载入门项目 (1. Download the starter project)
Let’s start by downloading the starter project. We’ll be using Terminal to carry out this task. Execute the following commands:
让我们从下载入门项目开始。 我们将使用终端执行此任务。 执行以下命令:
cd $HOME
curl https://github.com/anuragajwani/compiled_swift_static_lib/archive/completed.zip -o compiled_swift_static_lib.zip -L -s
unzip -q compiled_swift_static_lib.zip
cd compiled_swift_static_lib-completed/MyStaticLib
2.构建静态框架 (2. Build the static framework)
Let’s build the static framework that we’ll publish later. There is a script already included in the project to do so. Execute the following command:
让我们构建稍后将发布的静态框架。 为此,项目中已经包含一个脚本。 执行以下命令:
sh build_static_framework.shThe command above will output a directory named MyStaticLib.framework. This will be the artefact to publish to our integrators.
上面的命令将输出一个名为MyStaticLib.framework的目录。 这将是发布给我们集成商的人工制品。

3.将静态框架存储在本地git存储库中 (3. Store the static framework in a local git repository)
Next we’ll create a git repository to store and track versions of the compiled static framework. This will be the place where Cocoapods will fetch the framework from. Execute the following commands:
接下来,我们将创建一个git存储库来存储和跟踪已编译的静态框架的版本。 这将是Cocoapods从中获取框架的地方。 执行以下命令:
cd ~
mkdir MyFrameworkDistribution.git
cd MyFrameworkDistribution.git
git init --bare
git clone ~/MyFrameworkDistribution.git ~/MyFrameworkDistribution
cd ~/MyFrameworkDistribution
touch README.md
git add README.md
git commit -m "Initial commit"
git push origin -u master
Next we’ll copy the generated static framework into the repository, commit and tag it. Execute the following commands:
接下来,我们将生成的静态框架复制到存储库中,提交并标记它。 执行以下命令:
cp -r ~/compiled_swift_static_lib-completed/MyStaticLib/MyStaticLib.framework ~/MyFrameworkDistribution
git add MyStaticLib.framework
git commit -m "Added MyStaticLib.framework"
git tag -a 1.0.0 -m "Version 1.0.0"
git push origin master
git push origin --tags
Above we have tagged the commit containing MyStaticLib.framework with 1.0.0. This is how Cocoapods will find the right version when the integrator specifies that they want to install version 1.0.0 of our static framework.
上面我们用1.0.0标记了包含MyStaticLib.framework的提交。 当集成商指定他们要安装静态框架的1.0.0版本时,这就是Cocoapods如何找到正确版本的方法。
4.安装Cocoapods (4. Install Cocoapods)
Before we can publish the specification we need to install Cocoapods. If you already have Cococapods installed feel free to skip this step. Otherwise execute the following command:
在发布规范之前,我们需要安装Cocoapods 。 如果您已经安装了Cococapods,则可以跳过此步骤。 否则执行以下命令:
sudo gem install cocoapods5.创建Cocoapods规范存储库 (5. Create Cocoapods specification repository)
Next we’ll create a local git repository to hold Cocoapods specification files. We’ll also tell Cocoapods to register the specification repository in its list. Execute the following commands:
接下来,我们将创建一个本地git存储库来保存Cocoapods规范文件。 我们还将告诉Cocoapods在其列表中注册规范存储库。 执行以下命令:
cd ~
mkdir MySpecs.git
cd MySpecs.git
git init --bare
git clone ~/MySpecs.git ~/MySpecs
cd ~/MySpecs
touch README.md
git add README.md
git commit -m "Initial commit"
git push origin -u master
pod repo add my-specs ~/MySpecs.git
6.创建规格文件 (6. Create specification file)
Next we’ll create a specification file for the framework. The specification must tell Cocoapods where to fetch the framework from and how to configure it. Execute the following command:
接下来,我们将为框架创建一个规范文件。 规范必须告诉Cocoapods从何处获取框架以及如何配置框架。 执行以下命令:
cat > ~/compiled_swift_static_lib-completed/MyStaticLib/MyStaticLib.podspec <<-EOF
Pod::Spec.new do |s|
    s.name         = "MyStaticLib"
    s.version      = "1.0.0"
    s.summary      = "A brief description of MyStaticLib project."
    s.description  = <<-DESC
    An extended description of MyStaticLib project.
    DESC
    s.homepage     = "http://your.homepage/here"
    s.license = { :type => 'Copyright', :text => <<-LICENSE
                   Copyright 2020
                   Permission is granted to...
                  LICENSE
                }
    s.author             = { "$(git config user.name)" => "$(git config user.email)" }
    s.source       = { :git => "$HOME/MyFrameworkDistribution.git", :tag => "#{s.version}" }
    s.vendored_frameworks = "MyStaticLib.framework"
    s.platform = :ios
    s.swift_version = "5.2"
    s.ios.deployment_target  = '12.0'
    s.user_target_xcconfig = {
      'SWIFT_INCLUDE_PATHS' => '"\$(PODS_ROOT)/MyStaticLib/MyStaticLib.framework"'
    }
end
EOF
Note s.source. This property tells Cocoapods where to fetch the framework from. Also note:
注意 s.source 。 此属性告诉Cocoapods从何处获取框架。 另请注意:
s.user_target_xcconfig = {
      'SWIFT_INCLUDE_PATHS' => '"\$(PODS_ROOT)/MyStaticLib/MyStaticLib.framework"'
    }
The property above tells Cocoapods to configure SWIFT_INCLUDE_PATHS build setting of the integrator to include the path to the framework’s .swiftmodule directory. The directory contains the public interface for the framework. These files are required for the compiler to know what code the integrator can access from the framework.
上面的属性告诉Cocoapods配置集成器的SWIFT_INCLUDE_PATHS构建设置,以包括指向框架的.swiftmodule目录的路径。 该目录包含框架的公共接口。 编译器需要这些文件才能知道集成商可以从框架访问哪些代码。
7.将静态框架规范发布到规范存储库 (7. Publish static framework specification to the specification repository)
Finally we need to publish the specification to the specification repository. Execute the following command:
最后,我们需要将规范发布到规范存储库。 执行以下命令:
pod repo push my-specs ~/compiled_swift_static_lib-completed/MyStaticLib/MyStaticLib.podspecThat’s it. The pod is ready to be consumed.
而已。 吊舱已准备好被消费。

消耗通过Cocoapods分发的已编译静态框架 (Consuming compiled static frameworks distributed through Cocoapods)
In this section we’ll be installing and consuming the static framework through Cocoapods. We’ll be making use of an already existing app that is included in the starter project.
在本节中,我们将通过Cocoapods安装和使用静态框架。 我们将利用Starter项目中包含的现有应用程序。
The steps we’ll take:
我们将采取的步骤:
- Create Podfile 创建播客文件
- Install dependencies 安装依赖项
- Consume the static framework 消耗静态框架
1.创建Podfile (1. Create Podfile)
Before we can install any dependencies to the app we must create a file named Podfile. A Podfile holds information on the dependencies Cocoapods must install for a target in the Xcode project.
在将任何依赖项安装到应用程序之前,我们必须创建一个名为Podfile的文件。 Podfile包含有关Cocoapods必须为Xcode项目中的目标安装的依赖项的信息。
Let’s create the Podifle. Execute the following command:
让我们创建Podifle。 执行以下命令:
cd ~/compiled_swift_static_lib-completed/MyApp
cat > Podfile <<-EOF
target 'MyApp' do
    use_frameworks!
    pod 'MyStaticLib', '1.0.0', :source => "$HOME/MySpecs.git"
end
EOF
Above we have declared MyStaticLib as dependency of MyApp target. Also we specified that we’ll be using version 1.0.0 and where to find the specification file (:source).
上面我们已经声明MyStaticLib为MyApp目标的依赖项。 我们还指定了将使用1.0.0版以及在何处可以找到规范文件( :source )。
2.安装依赖项 (2. Install dependencies)
Next we have to tell Cococapods to install dependencies declared in the targets specified. Execute the following command:
接下来,我们必须告诉Cococapods安装在指定目标中声明的依赖项。 执行以下命令:
pod install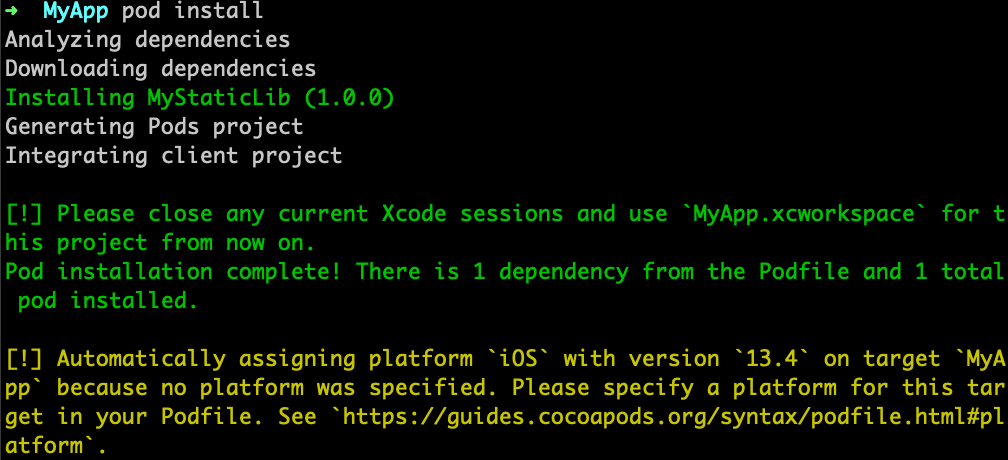
3.消耗静态框架 (3. Consume the static framework)
In this step we’ll be adding some code to the project. First let’s open the project in Xcode. Execute the following command:
在这一步中,我们将向项目添加一些代码。 首先,让我们在Xcode中打开项目。 执行以下命令:
open -a Xcode MyApp.xcworkspaceWithin Xcode open ViewController.swift. First let’s import the framework. Under import UIKit add the following line:
在Xcode中,打开ViewController.swift 。 首先,让我们导入框架。 在import UIKit添加以下行:
import MyStaticLibNext let’s consume the code included in the framework. Add the following code to viewDidLoad function:
接下来,让我们使用框架中包含的代码。 将以下代码添加到viewDidLoad函数:
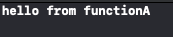
functionA()functionA lives inside the static framework and prints hello to console. Run the app and see the message printed to console! 🎉
functionA驻留在静态框架中,并向控制台输出问候。 运行该应用程序,然后查看打印到控制台的消息! 🎉
摘要 (Summary)
In this post we learnt:
在这篇文章中,我们学习了:
- how to distribute compiled static frameworks through Cocoapods 如何通过Cocoapods分发已编译的静态框架
- how to consume compiled static frameworks using Cocoapods 如何使用Cocoapods使用已编译的静态框架
最后说明 (Final Notes)
Compiled frameworks are a bit of hack. It allows us to build a single universal iOS static library artefact. However static frameworks are not supported by Apple.
编译框架有点麻烦。 它使我们能够构建单个通用的iOS静态库工件。 但是,Apple不支持静态框架。
Being not fully supported by Apple, the workability of static frameworks in the current form is not guaranteed. They might not work at all in the future. I have been using compiled static frameworks in the current form for many years without a change though.
没有得到Apple的完全支持,不能保证当前形式的静态框架的可操作性。 他们将来可能根本无法工作。 多年来,我一直使用当前形式的已编译静态框架,但没有进行任何更改。
That said Apple has introduced a potential solution to replace this hacky mechanism through their new module format known as XCFrameworks. I will share my findings in a future post.
也就是说,苹果公司已经推出了一种潜在的解决方案,可通过其称为XCFrameworks的新模块格式来取代这种黑客机制。 我将在以后的文章中分享我的发现。
静态分发用ngix


 1万+
1万+

 被折叠的 条评论
为什么被折叠?
被折叠的 条评论
为什么被折叠?
 到【灌水乐园】发言


