


 本文详细介绍了如何使用C语言编译适用于iOS的静态库,并通过Cocoapods将其打包为XCFrameworks进行分发,以便在iOS项目中方便地引用和管理。
c 编译ios静态库
模块化iOS (Modular iOS)
Until recently building and distributing compiled iOS static libraries that were compatible with the iOS devices and simulators was hard. There was no official way of building and distributing universal compiled static libraries. That is until Apple introduced XCFrameworks.
直到最近,构建和分发与iOS设备和模拟器兼容的已编译iOS静态库仍然很困难。 没有建立和分发通用编译静态库的官方方法。 直到苹果推出XCFrameworks。
With XCFrameworks we can wrap multiple build variants of static libraries in a single artefact. That means we can now include the build variant for simulators and the variant for devices in a single artefact.
使用XCFrameworks,我们可以在单个工件中包装静态库的多个构建变体 。 这意味着我们现在可以将仿真器的构建变体和设备的变体包括在单个工件中。
Furthermore we are now able to distribute XCFrameworks through Swift Package Manager now. However at the time of writing the most popular iOS dependency manager is Cocoapods.
此外,我们现在能够通过Swift Package Manager分发XCFrameworks 。 但是,在撰写本文时,最受欢迎的iOS依赖性管理器是Cocoapods。
In this post I will show you how to distribute a static library as XCFramework through Cocoapods.
在这篇文章中,我将向您展示如何通过Cocoapods将静态库作为XCFramework分发。
I assume you are already familiar with XCFrameworks, static libraries, Cocoapods and Git version control. I also assume you are familiar with the basics of Swift and iOS development.
我认为您已经熟悉XCFrameworks , 静态库 , Cocoapods和Git版本控制 。 我还假设您熟悉Swift和iOS开发的基础知识。
I have used Swift 5.2.4 and Xcode 11.6 whilst writing this article.
在撰写本文时,我使用了Swift 5.2.4和Xcode 11.6。
通过Cocoapods将静态库作为XCFramework分发 (Distributing static library as XCFramework through Cocoapods)
In this section we’ll distribute the static library as an XCFramework through Cocoapods.
在本节中,我们将通过Cocoapods将静态库作为XCFramework分发。
First we’ll download a starter pack. The starter pack contains a iOS static library project and an iOS app. We’ll build an XCFramework from the static library and distribute it through Cocoapods. In the next section we’ll consume the distributed XCFramework through Cocoapods.
首先,我们将下载一个入门包。 入门包包含一个iOS静态库项目和一个iOS应用程序。 我们将从静态库中构建一个XCFramework,然后通过Cocoapods进行分发。 在下一节中,我们将通过Cocoapods使用分布式XCFramework。
The steps we’ll take:
我们将采取的步骤:
- Download the starter pack 下载入门包
- Build an XCFramework 建立一个XCFramework
- Create git repo to store and version the XCFramework 创建git repo来存储和版本化XCFramework
- Install Cocoapods 安装Cocoapods
- Create git repo for specification files 为规范文件创建git repo
- Create specification file 创建规格文件
- Publish the specification file 发布规范文件
1.下载入门包 (1. Download the starter pack)
Let’s start by downloading the starter pack. Open Terminal app and execute the following commands:
让我们从下载入门包开始。 打开终端应用程序并执行以下命令:
cd $HOME
curl https://github.com/anuragajwani/distributing-static-lib-xcframework-cocoapods/archive/starter.zip -o static_lib.zip -L -s
unzip -q static_lib.zip
mv distributing-static-lib-xcframework-cocoapods-starter distributing-static-lib-xcframework-cocoapods
We’ll only be using the Terminal app for this section of the post. Make sure to keep it open.
在本节的这一部分中,我们将仅使用Terminal应用程序。 确保保持打开状态。
2.建立一个XCFramework (2. Build an XCFramework)
Next let’s build the XCFramework from the static library project. This is the artefact that we’ll distribute later. In terminal execute the following command:
接下来,让我们从静态库项目中构建XCFramework。 这是我们稍后将分发的人工制品。 在终端中执行以下命令:
cd ~/distributing-static-lib-xcframework-cocoapods/MyStaticLib
sh build_xcframework.sh
The command above will generate MyStaticLib.xcframework inside the build folder.
上面的命令将在build文件夹中生成MyStaticLib.xcframework 。
I won’t cover how to build an XCFramework from a static library in this post as that is out of the scope for this post.
在本文中,我将不介绍如何从静态库构建XCFramework,因为这超出了本文的范围。
3.创建git repo来存储和版本化XCFramework (3. Create git repo to store and version the XCFramework)
Next let’s create a git repo where to host our XCFramework. Let’s create an empty repo. Execute the following commands:
接下来,让我们创建一个git repo来托管我们的XCFramework。 让我们创建一个空的仓库。 执行以下命令:
cd ~/distributing-static-lib-xcframework-cocoapods
mkdir XCFrameworkDistribution.git
cd XCFrameworkDistribution.git
git init --bare
git clone ~/distributing-static-lib-xcframework-cocoapods/XCFrameworkDistribution.git ~/distributing-static-lib-xcframework-cocoapods/XCFrameworkDistribution
cd ~/distributing-static-lib-xcframework-cocoapods/XCFrameworkDistribution
touch README.md
git add README.md
git commit -m "Initial commit"
git push origin -u master
Next let’s copy the XCFramework into the repository and let’s save it. Execute the following commands:
接下来,让我们将XCFramework复制到存储库中并保存它。 执行以下命令:
cp -r ~/distributing-static-lib-xcframework-cocoapods/MyStaticLib/build/MyStaticLib.xcframework ~/distributing-static-lib-xcframework-cocoapods/XCFrameworkDistribution
git add MyStaticLib.xcframework
git commit -m "Added MyStaticLib.xcframework"
git tag -a 1.0.0 -m "Version 1.0.0"
git push origin master
git push origin --tags
Above we have tagged the commit containing MyStaticLib.xcframework with 1.0.0. This is how Cocoapods will find the right version when the integrator specifies that they want to install version 1.0.0 of our xcframework.
上面我们用1.0.0标记了包含MyStaticLib.xcframework的提交。 当集成商指定他们要安装xcframework的1.0.0版本时,这就是Cocoapods会找到正确版本的方式。
4.安装Cocoapods (4. Install Cocoapods)
We’re now ready to distribute our XCFramework through Cocoapods. Execute the following command:
现在,我们准备通过Cocoapods分发XCFramework。 执行以下命令:
gem install cocoapods -v 1.10.0.beta.1If you already have Cocoapods installed then make sure its 1.10.0.beta.1 or newer. Cocoapods supports XCFramework from 1.9.0. However 1.10.0.beta.1 fixes a bug which made 1.9.x not work with static XCFrameworks.
如果您已经安装了1.10.0.beta.1确保其版本为1.10.0.beta.1或更高。 Cocoapods从1.9.0.开始支持XCFramework 1.9.0. 但是1.10.0.beta.1修复了使1.9.x 无法与静态XCFrameworks一起使用的错误 。
You can find the Cocoapods version running by running the following command:
您可以通过运行以下命令找到正在运行的Cocoapods版本:
pod --version5.为规范文件创建git repo (5. Create git repo for specification files)
Next we’ll create a local git repository to hold Cocoapods specification files. We’ll also tell Cocoapods to register the specification repository in its list. Execute the following commands:
接下来,我们将创建一个本地git存储库来保存Cocoapods规范文件 。 我们还将告诉Cocoapods在其列表中注册规范存储库。 执行以下命令:
cd ~/distributing-static-lib-xcframework-cocoapods/
mkdir MySpecs.git
cd MySpecs.git
git init --bare
git clone ~/distributing-static-lib-xcframework-cocoapods/MySpecs.git ~/distributing-static-lib-xcframework-cocoapods/MySpecs
cd ~/distributing-static-lib-xcframework-cocoapods/MySpecs
touch README.md
git add README.md
git commit -m "Initial commit"
git push origin -u master
pod repo add my-specs ~/distributing-static-lib-xcframework-cocoapods/MySpecs.git
A specification repository holds files on dependencies and their versions. The file contains information on how to install and configure the dependency in the project to be installed. You can find more on how Cocoapods works in a previous post of mine.
规范存储库保存有关依赖项及其版本的文件。 该文件包含有关如何在要安装的项目中安装和配置依赖项的信息。 在我的上一篇文章中,您可以找到有关Cocoapods如何工作的更多信息 。
6.创建规格文件 (6. Create specification file)
Next we’ll create a specification file for the framework. The specification must tell Cocoapods where to fetch the framework from and how to configure it. Execute the following command:
接下来,我们将为框架创建一个规范文件。 规范必须告诉Cocoapods从何处获取框架以及如何配置框架。 执行以下命令:
cat > ~/distributing-static-lib-xcframework-cocoapods/MyStaticLib.podspec <<-EOF
Pod::Spec.new do |s|
    s.name         = "MyStaticLib"
    s.version      = "1.0.0"
    s.summary      = "A brief description of MyFramework project."
    s.description  = <<-DESC
    An extended description of MyFramework project.
    DESC
    s.homepage     = "http://your.homepage/here"
    s.license = { :type => 'Copyright', :text => <<-LICENSE
                   Copyright 2018
                   Permission is granted to...
                  LICENSE
                }
    s.author             = { "$(git config user.name)" => "$(git config user.email)" }
    s.source       = { :git => "$HOME/distributing-static-lib-xcframework-cocoapods/XCFrameworkDistribution.git", :tag => "#{s.version}" }
    s.vendored_frameworks = "MyStaticLib.xcframework"
    s.platform = :ios
    s.swift_version = "4.2"
    s.ios.deployment_target  = '12.0'
end
EOF
7.发布规范文件 (7. Publish the specification file)
Finally we’ll publish the specification file to the specification repository we created in step 5. Execute the following command:
最后,我们将规范文件发布到在步骤5中创建的规范库中。执行以下命令:
pod repo push my-specs ~/distributing-static-lib-xcframework-cocoapods/MyStaticLib.podspecThat’s it. The XCFramework is now ready to be consumed using Cocoapods.
而已。 现在可以使用Cocoapods来使用XCFramework。
如何使用Cocoapods消费XCFrameworks (How to consume XCFrameworks using Cocoapods)
In this section we’ll be installing and consuming the XCFramework from the previous section using Cocoapods. We’ll be making use of an already existing app that is included in the starter project.
在本节中,我们将使用Cocoapods安装和使用上一节中的XCFramework。 我们将利用Starter项目中包含的现有应用程序。
The steps we’ll take:
我们将采取的步骤:
- Create Podfile 创建播客文件
- Install dependencies 安装依赖项
- Consume XCFramework 消耗XCFramework
1.创建Podfile (1. Create Podfile)
Before we can install any dependencies to the app we must create a file named Podfile. A Podfile holds information on the dependencies Cocoapods must install for a target in the Xcode project.
在将任何依赖项安装到应用程序之前,我们必须创建一个名为Podfile的文件。 Podfile包含有关Cocoapods必须为Xcode项目中的目标安装的依赖项的信息。
Let’s create the Podifle. Execute the following command:
让我们创建Podifle。 执行以下命令:
cd ~/distributing-static-lib-xcframework-cocoapods/StaticLibXCFrameworkDemo
cat > Podfile <<-EOF
target 'StaticLibXCFrameworkDemo' do
    use_frameworks!
    pod 'MyStaticLib', '1.0.0', :source => "$HOME/distributing-static-lib-xcframework-cocoapods/MySpecs.git"
end
EOF
Above we have declared MyStaticLib as dependency of StaticLibXCFrameworkDemo target. Also we specified that we’ll be using version 1.0.0 and where to find the specification file (:source).
上面我们已经声明MyStaticLib为StaticLibXCFrameworkDemo目标的依赖StaticLibXCFrameworkDemo 。 我们还指定了将使用1.0.0版以及在何处可以找到规范文件( :source )。
2.安装依赖项 (2. Install dependencies)
Next we have to tell Cococapods to install dependencies declared in the targets specified. Execute the following command:
接下来,我们必须告诉Cococapods安装在指定目标中声明的依赖项。 执行以下命令:
pod install3.消耗XCFramework (3. Consume XCFramework)
Let’s consume the code within MyStaticLib.
让我们使用MyStaticLib的代码。
Before we can access the code, the integrator must make some changes to their build settings.
在访问代码之前,集成商必须对其构建设置进行一些更改。
First open the project. Execute the following command:
首先打开项目。 执行以下命令:
open -a Xcode ~/distributing-static-lib-xcframework-cocoapods/StaticLibXCFrameworkDemo/StaticLibXCFrameworkDemo.xcworkspaceNext, open project configuration settings (the one that says StaticLibXCFrameworkDemo with a blue icon to its left on the project navigator). Select StaticLibXCFrameworkDemo under targets in the editor area. Then select Build Settings tab. Search for Import Paths which lives under Swift Compiler — Search Paths.
接下来,打开项目配置设置(在项目导航器上StaticLibXCFrameworkDemo带有StaticLibXCFrameworkDemo图标的StaticLibXCFrameworkDemo设置)。 在编辑器区域中的目标下,选择StaticLibXCFrameworkDemo 。 然后选择“ 构建设置”选项卡。 搜索位于Swift编译器下的导入路径 -搜索路径 。

Add the following values:
添加以下值:
$(SRCROOT)/Pods/MyStaticLib/MyStaticLib.xcframework/ios-x86_64-simulator$(SRCROOT)/Pods/MyStaticLib/MyStaticLib.xcframework/ios-x86_64-simulator$(SRCROOT)/Pods/MyStaticLib/MyStaticLib.xcframework/ios-arm64$(SRCROOT)/Pods/MyStaticLib/MyStaticLib.xcframework/ios-arm64
Add the above two values to the build setting Library Search Paths too.
也将以上两个值添加到构建设置“ 库搜索路径”中 。
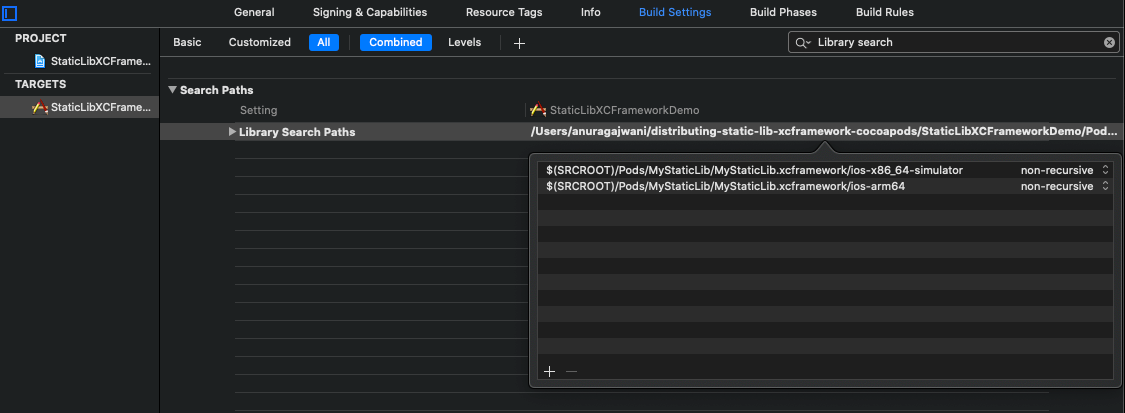
In this case we have added the path static library artefacts for each variant. You’ll have to do so for each build variant you support.
在这种情况下,我们为每个变体添加了路径静态库伪像。 对于支持的每个构建变体,您都必须这样做。
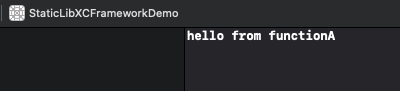
Next open ViewController.swift. Before consuming the code of the static library we need to import it within the file we want to consume it. At the top let’s import the static library. Under import UIKit add the following line of code:
接下来打开ViewController.swift 。 在使用静态库的代码之前,我们需要将其导入要使用的文件中。 在顶部,让我们导入静态库。 在import UIKit添加以下代码行:
import MyStaticLibNow let’s consume the code. In the viewDidLoad function add the following line of code:
现在,让我们使用代码。 在viewDidLoad函数中,添加以下代码行:
functionA()That’s it! Run the app in a simulator or device and watch the console to get the message from functionA() in the static library.
而已! 在模拟器或设备中运行应用程序,并观看控制台以从静态库中的functionA()获取消息。
摘要 (Summary)
In this post we learnt:
在这篇文章中,我们学习了:
- How to distribute static library XCFrameworks through Cocoapods 如何通过Cocoapods分发静态库XCFrameworks
- How to consume static library XCFrameworks through Cocoapods 如何通过Cocoapods使用静态库XCFrameworks
最后说明 (Final Notes)
In the last step when consuming the static library XCFramework we found that the integrator has to do some configuration to their build settings. Unfortunately this is currently the same with or without Cocoapods. I was quite surprised to find that these do not automatically configure. Hopefully Apple will fix this in a future release of Xcode🤞🏽.
在使用静态库XCFramework的最后一步,我们发现集成商必须对其构建设置进行一些配置。 不幸的是,无论有无可可足目,目前都是一样的。 我很惊讶地发现它们没有自动配置。 希望苹果公司将在以后的Xcode future版本中解决此问题。
c 编译ios静态库


 3459
3459

 被折叠的 条评论
为什么被折叠?
被折叠的 条评论
为什么被折叠?
 到【灌水乐园】发言


