


ios小部件
Note: This is part 1 of a 3-part tutorial. Find part 2 here, and part 3 here.
During WWDC 2020, Apple announced the introduction of app widgets for iOS (as well as iPadOS and MacOS). With the new WidgetKit framework, you can build widgets that can be added to your home screen to let you see important information at a glance. While you may be familiar with widgets in other operating systems, they are a completely new addition to iOS, and developers are already starting to build very exciting widgets using WidgetKit.
在WWDC 2020期间,Apple宣布推出适用于iOS(以及iPadOS和MacOS)的应用程序小部件。 使用新的WidgetKit框架,您可以构建可添加到主屏幕的小部件,以使您一目了然地看到重要信息。 虽然您可能熟悉其他操作系统中的小部件,但是它们是iOS的全新功能,并且开发人员已经开始使用WidgetKit构建非常令人兴奋的小部件。
So let’s go ahead and build a new widget. We’re going to create a simple app I like to call Emojibook; this app will display a list of emoji along with their names, as well as more details about the emoji whenever one of them is tapped. We will create a widget that you can add to your homescreen to display an emoji, which will be updated randomly every hour or so.
因此,让我们继续构建一个新的小部件。 我们将创建一个我喜欢称呼Emojibook的简单应用; 此应用程序将显示一个表情符号列表以及它们的名称,以及每当点击其中一个表情符号时的更多详细信息。 我们将创建一个小部件,您可以将其添加到主屏幕上以显示表情符号,该表情符号会每小时左右随机更新。
Note: You’ll need Xcode 12 Beta 2 or higher to follow this tutorial.
注意: 您需要Xcode 12 Beta 2或更高版本才能遵循本教程。
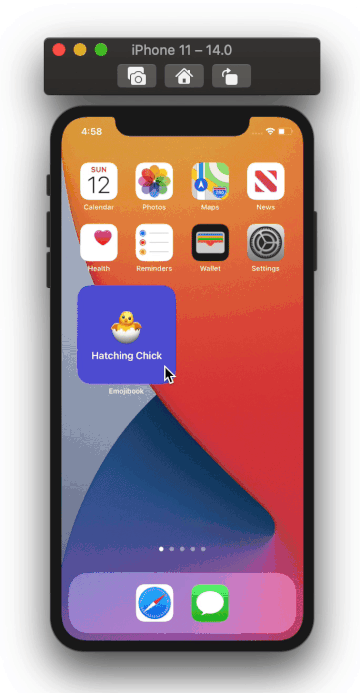
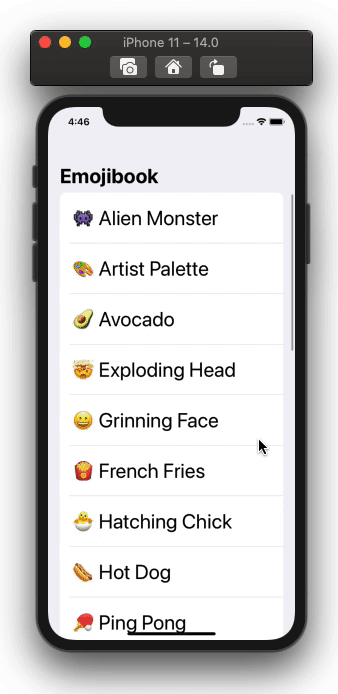
This is what our app will look like:
这是我们的应用程序的外观:
基于列表的简单应用 (Simple List-based App)
Let’s start by building our simple list-based app. Open up Xcode and create a new iOS App project called Emojibook; make sure SwiftUI is selected in the Interface options and SwiftUI App is selected in the Life Cycle options.
让我们从构建简单的基于列表的应用程序开始。 打开Xcode并创建一个名为Emojibook的新iOS App项目; 确保SwiftUI在界面选项中选择和SwiftUI应用在生命周期的选项中选择。

Most of our code will be in ContentView.swift, which we will rename to have a more descriptive name. Change the name of this file to EmojibookListView.swift, and rename the ContentView struct to EmojibookListView, making sure to update its usage wherever it’s necessary (see my Xcode tricks article to learn how to do this with one click).
我们的大多数代码将位于ContentView.swift ,我们将其重命名为更具描述性的名称。 将此文件的名称更改为EmojibookListView.swift ,并将ContentView struct重命名为EmojibookListView ,确保在需要时更新其用法(请参阅我的Xcode技巧文章 ,了解如何一键操作)。
In the body section of EmojibookListView we will add the content of our app. We will embed the content in a NavigationView, and inside it we will add a List, inside our List we will add the emoji.
在EmojibookListView的body部分,我们将添加应用程序的内容。 我们将内容嵌入到NavigationView ,并在其中添加List ,在List添加表情符号。
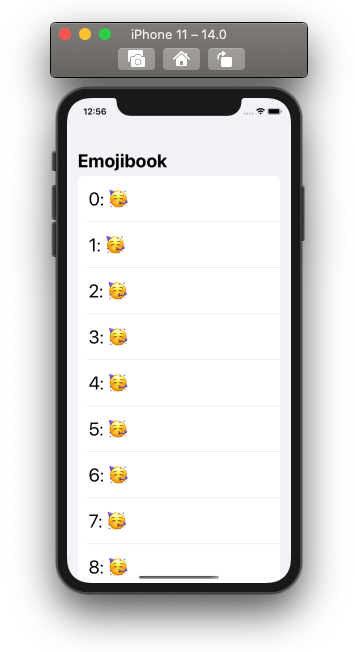
If you run your app, it will look something like this:
如果您运行应用程序,它将看起来像这样:
It looks good, but we want to display a different emoji on each row along with its name, not a number. To do this, we will first add an EmojiDetails struct that will include the emoji itself, its name, and its description (we will use this description later on). Create a new file called EmojiDetails and add the following code:
看起来不错,但我们想在每行上显示不同的表情符号及其名称,而不是数字。 为此,我们将首先添加一个EmojiDetails结构,其中将包含表情符号本身,其名称及其描述(稍后将使用此描述)。 创建一个名为EmojiDetails的新文件,并添加以下代码:
The Identifiable extension is necessary to be able to identify each EmojiDetails element when we add them to our list with the ForEach struct. Since we will display different emoji, the emoji string itself can be used as the id.
当我们使用ForEach struct将它们添加到列表中时, Identifiable扩展对于识别每个EmojiDetails元素是必需的。 由于我们将显示不同的表情符号,因此表情符号字符串本身可以用作id。
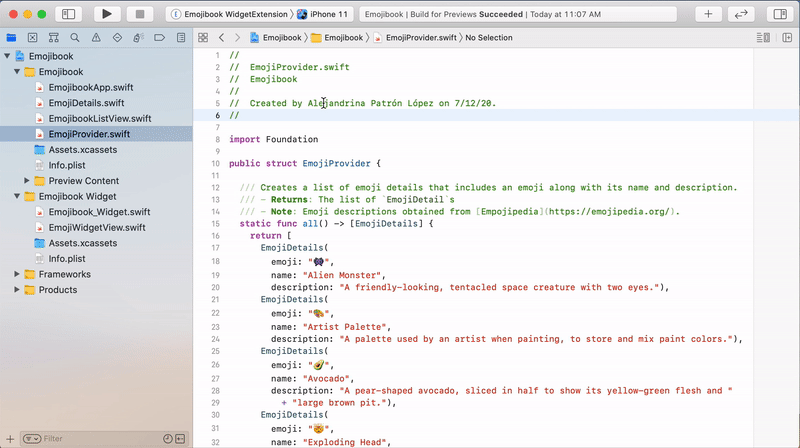
Now we need to create a list of EmojiDetails to be displayed in our app. Let’s create another file called EmojiProvider, here we will add any methods needed to get the emoji data for our app. I’ve gone ahead and created a list that includes 26 distinct emoji, you can always modify it to include any emoji you want.
现在我们需要创建一个EmojiDetails列表以显示在我们的应用程序中。 让我们创建另一个名为EmojiProvider文件,在这里我们将添加获取应用程序表情符号数据所需的任何方法。 我已经创建了一个列表,其中包含26个不同的表情符号,您可以随时对其进行修改以包括所需的任何表情符号。
In our EmojibookListView file let’s add a reusable view called EmojiItemView that will be used for each row of our List.
在我们的EmojibookListView文件中,我们添加一个称为EmojiItemView的可重用视图,该视图将用于List每一行。
Now we can use our EmojiProvider to get the list of all EmojiDetails, and modify the ForEach section of our List like so:
现在,我们可以使用EmojiProvider获取所有EmojiDetails的列表,并像下面这样修改List的ForEach部分:
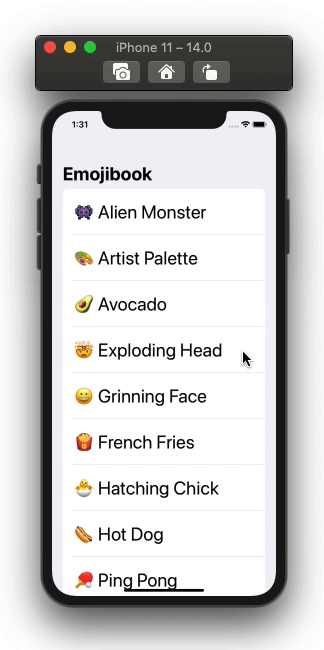
Let’s run our app again and see how it looks.
让我们再次运行我们的应用程序,看看它的外观。
Nice! Now let’s add a view to display an emoji’s description.
真好! 现在,我们添加一个视图来显示表情符号的描述。
表情符号详细信息表 (Emoji Details Sheet)
To show all details about an emoji, we will use SwiftUI’s sheet component. Our sheet will look like this:
为了显示有关表情符号的所有详细信息,我们将使用SwiftUI的工作表组件。 我们的工作表将如下所示:
Let’s first add a reusable view called EmojiDetailsView that will display emoji details and will be used as the sheet’s content, similar to the EmojiItemView we added before.
首先,我们添加一个名为EmojiDetailsView的可重用视图,该视图将显示表情符号详细信息并将其用作工作表的内容,类似于我们之前添加的EmojiItemView 。
To display the sheet, we will need to add a boolean binding to determine whether the sheet should be visible. We will also need to handle taps on items in our List, and show the EmojiDetailsView whenever a tap on an item is detected.
要显示工作表,我们需要添加一个布尔绑定来确定工作表是否应可见。 我们还需要处理List的项目的轻EmojiDetailsView ,并且每当检测到某个项目的轻EmojiDetailsView时就显示EmojiDetailsView 。
To handle taps on an EmojiItemView we should first embed it in a Button, whose action will be to toggle the showingDetail boolean, and whose label will be the EmojiItemView. Next we can add our sheet, bound to the showingDetail boolean, and whose content is an EmojiDetailsView showing details of the tapped emoji.
要处理EmojiItemView上的EmojiItemView我们首先应将其嵌入Button ,其动作将是切换showingDetail布尔值,其标签将为EmojiItemView 。 接下来,我们可以添加绑定到showingDetail布尔值的工作表,该工作showingDetail的内容是EmojiDetailsView显示了被窃听的表情符号的详细信息。
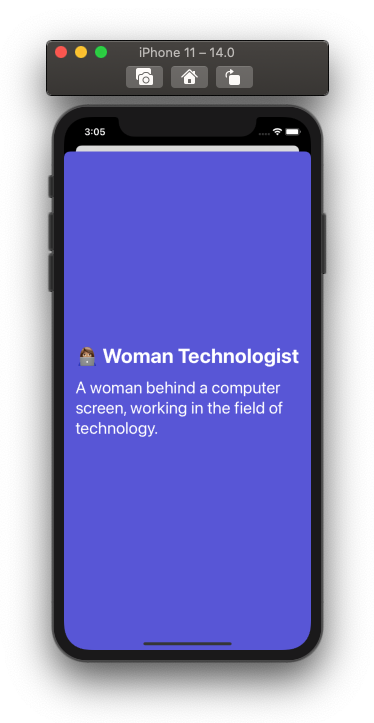
Now if you run your app, you should be able to tap on any emoji item and see its details:
现在,如果您运行应用程序,则应该可以点击任何表情符号项目并查看其详细信息:
Cool, we can finally start working on our widget!
太酷了,我们终于可以开始使用我们的小部件了!
随机表情符号小部件 (Random Emoji Widget)
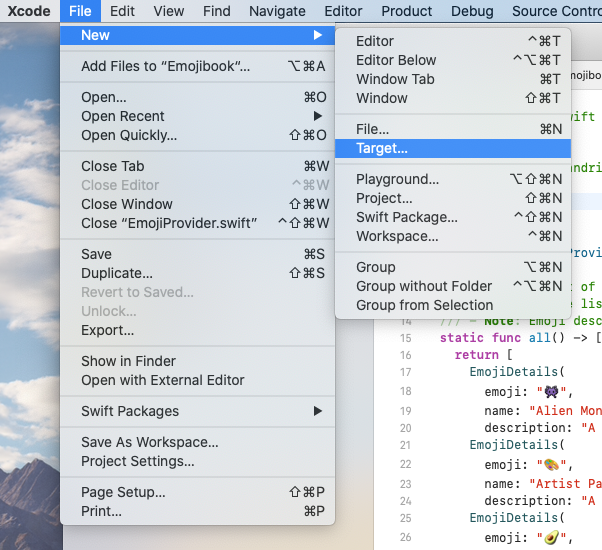
Now that our simple app is done, we can finally add our emoji widget. To get started, we first need to add a Widget Extension target to our app. To do this open the File menu, select New and then select Target.
现在,我们的简单应用已完成,我们终于可以添加表情符号小部件了。 首先,我们首先需要向我们的应用添加Widget扩展目标。 为此,请打开“ 文件”菜单,选择“ 新建” ,然后选择“ 目标” 。
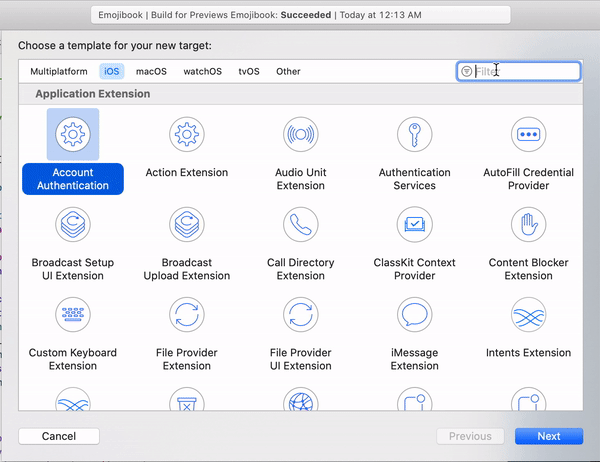
Once the menu opens up, search for ‘Widget’ and select Widget Extension. Press Next, name your widget ‘Emojibook Widget’, and make sure the Include Configuration Intent option is not selected. Press Finish and activate the widget extension scheme when prompted.
菜单打开后,搜索“窗口小部件”并选择“窗口小部件扩展” 。 按“ 下一步” ,将小部件命名为“ Emojibook Widget”,并确保未选中“ 包括配置意图”选项。 按完成并在出现提示时激活窗口小部件扩展方案。
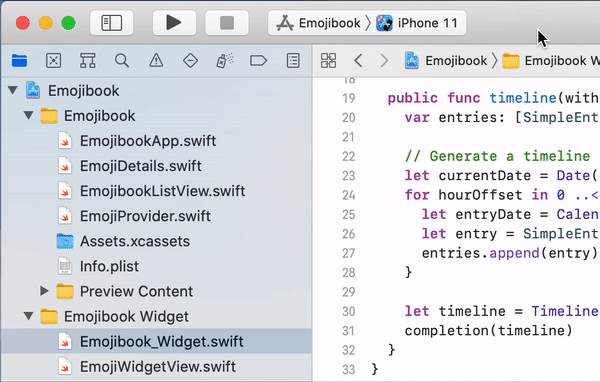
On the Project Navigator you can now see that Xcode created the Emojibook Widget folder. Go ahead and open the Emojibook_Widget.swift file. This file includes the skeleton code required to build a widget.
现在,在Project Navigator上,您可以看到Xcode创建了Emojibook Widget文件夹。 继续并打开Emojibook_Widget.swift文件。 该文件包含构建窗口小部件所需的框架代码。
One important thing to know is that the data of your widget will be provided through a TimelineEntry, which can be updated based on your app’s use case. For example, a stock market widget that displays stock prices will probably update very frequently throughout the day.
要知道的一件事很重要,那就是小部件的数据将通过TimelineEntry提供,可以根据应用程序的使用案例进行更新。 例如,显示股票价格的股票市场小部件可能会在一天内非常频繁地更新。
The first thing you should see in Emojibook_Widget.swift is a TimelineProvider. The snapshot method is used to quickly provide a TimelineEntry to present a widget view that is used in transient situations, for example, in the widget gallery.
您应该在Emojibook_Widget.swift看到的第一件事是TimelineProvider 。 snapshot方法用于快速提供TimelineEntry来呈现在瞬态情况下(例如,在小部件库中)使用的小部件视图。
Then you should see the timeline method. Through this method, you can provide an array of timeline entries, one for the present time, and others for future times based on your widget’s update interval. We will be updating our widget with a new emoji every hour, so our timeline entries will be an hour apart from each other.
然后,您应该看到timeline方法。 通过这种方法,您可以根据小部件的更新间隔提供一组时间轴条目,一个用于当前时间,另一个用于将来时间。 我们将每小时更新一个带有新表情符号的窗口小部件,因此我们的时间轴条目将相距一个小时。
Below that is the code that defines our TimelineEntry, which we will be updating later. Then we have a PlaceholderView struct used by iOS to display our widget on the lock screen and before rendering the widget’s content. Next is the Emojibook_WidgetEntryView defining the visual interface of our widget. Finally we see the Emojibook_Widget struct marked with the @main annotation, this means that this is where the entry point of our widget is. Here we provide a WidgetConfiguration, basically everything the operating system needs to know to display our widget: what the timeline is, how the placeholder view should look, how the actual widget should look, and our widget’s name and description.
在下面的代码定义了我们的TimelineEntry ,稍后我们将对其进行更新。 然后,我们有一个iOS使用的PlaceholderView结构,以在锁定屏幕上以及呈现小部件的内容之前显示小部件。 接下来是Emojibook_WidgetEntryView定义我们小部件的可视界面。 最后,我们看到Emojibook_Widget结构标有@main批注,这意味着这是我们小部件的入口点。 在这里,我们提供了一个WidgetConfiguration ,基本上是操作系统显示该窗口小部件所需了解的一切:时间线是什么,占位符视图应如何显示,实际窗口小部件应如何显示以及窗口小部件的名称和描述。
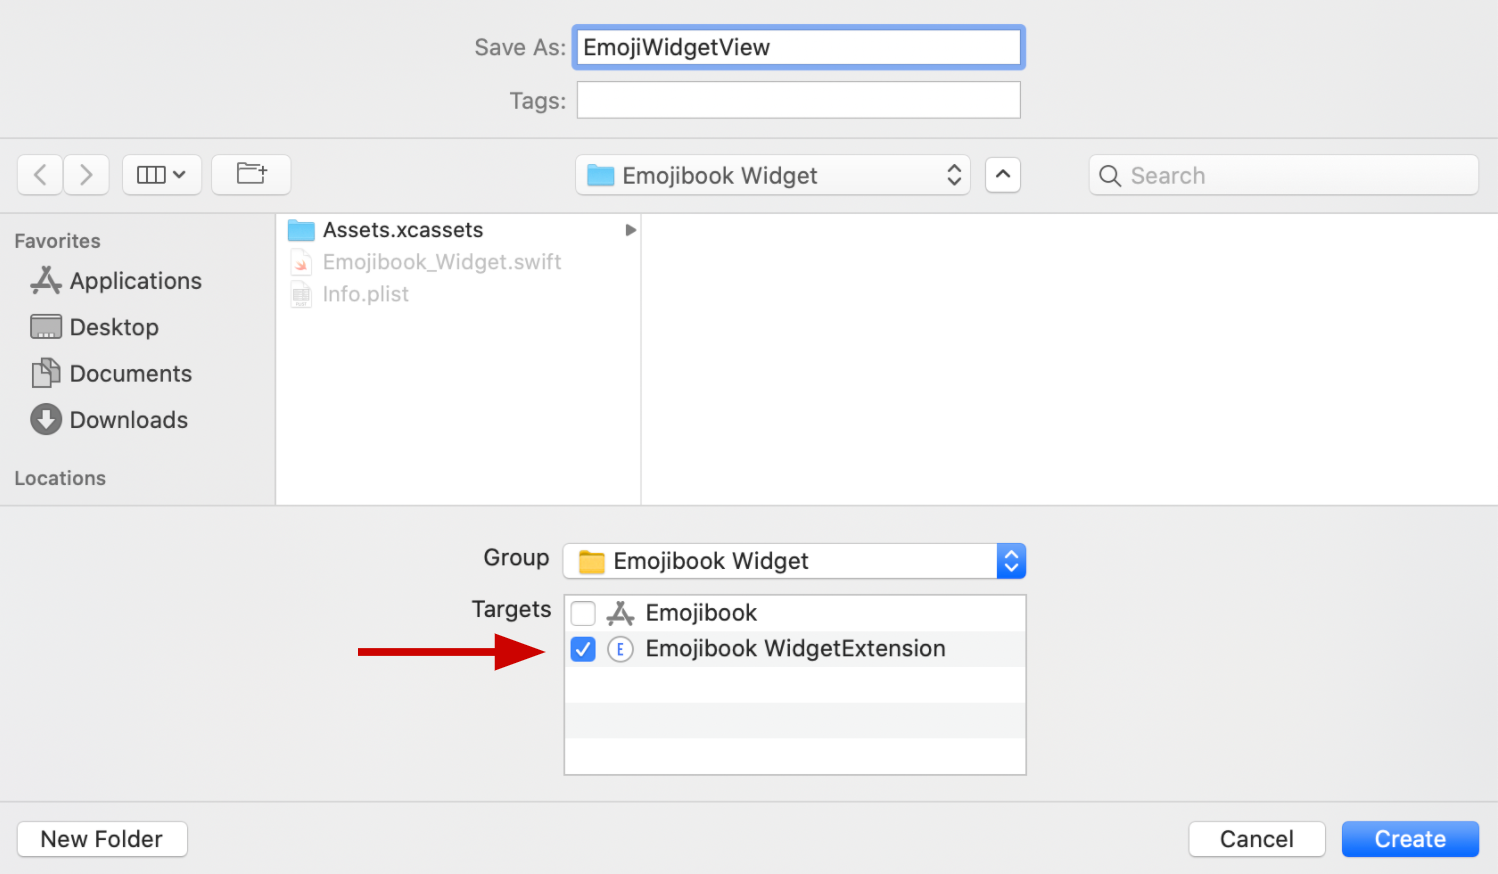
Let’s first start by making sure we can use EmojiDetails and EmojiProvider in our widget by adding them to our WidgetExtension target. We can do this by selecting the file, and opening the inspector, then selecting the widget target:
首先,通过将我们的EmojiDetails和EmojiProvider添加到WidgetExtension目标中,确保可以在我们的窗口小部件中使用它们。 我们可以通过选择文件,打开检查器,然后选择小部件目标来实现:
Now we can define the UI of our widget. To better organize our code, we will be putting this in a separate swift file. So go ahead and create a new swift file and name it EmojiWidgetView.swift, making sure it’s added as part of the Emojibook WidgetExtension target.
现在,我们可以定义小部件的UI。 为了更好地组织代码,我们将其放在一个单独的快速文件中。 因此,继续创建一个新的swift文件,并将其命名为EmojiWidgetView.swift ,确保将其添加为Emojibook WidgetExtension目标的一部分。
Let’s add the content of our widget, like so:
让我们添加小部件的内容,如下所示:
We can now go back to Emojibook_Widget.swift and use the view we just defined to display our widget. But before we do this, let’s add a new method in our EmojiProvider that will give us a random EmojiDetails object from our list of emoji. We will use this method to get a random emoji to display in our widget.
现在,我们可以返回Emojibook_Widget.swift并使用我们刚刚定义的视图来显示小部件。 但是在执行此操作之前,让我们在EmojiProvider中添加一个新方法,该方法将为我们提供来自表情符号列表的随机EmojiDetails对象。 我们将使用此方法获取随机表情符号以显示在我们的小部件中。
We can now modify our TimelineEntry so that it includes an instance of EmojiDetails.
现在,我们可以修改TimelineEntry ,使其包含EmojiDetails实例。
We will have to update our code so that we provide an EmojiDetails instance wherever we create a TimelineEntry–this should include the snapshot method, the timeline method, and the PreviewProvider if you’re using live previews. This is also where we will use our EmojiProvider.random() method.
我们将必须更新代码,以便在创建TimelineEntry任何地方都提供一个EmojiDetails实例-如果您使用实时预览,则该实例应包括snapshot方法, timeline方法和PreviewProvider 。 这也是我们将使用EmojiProvider.random()方法的地方。
SimpleEntry(date: entryDate, emojiDetails: EmojiProvider.random())
SimpleEntry(date: entryDate, emojiDetails: EmojiProvider.random())
Now, in Emojibook_WidgetEntryView, we will replace the default Text component and use our EmojiWidgetView, getting the EmojiDetails from the entry.
现在,在Emojibook_WidgetEntryView ,我们将替换默认的Text组件,并使用我们的EmojiWidgetView ,从条目中获取EmojiDetails 。
Finally, let’s update our widget’s name and description. We can do this by updating the StaticConfiguration under Emojibook_Widget. We will only support small widgets for now, so let’s update our configuration to reflect this by adding the supportedFamilies modifier as well.
最后,让我们更新小部件的名称和描述。 我们可以通过更新Emojibook_Widget下的StaticConfiguration Emojibook_Widget 。 我们目前仅支持小型窗口小部件,因此,我们也通过添加supportedFamilies修饰符来更新配置以反映这一点。
To test our widget in the simulator we should first set our active scheme to be the Emojibook WidgetExtension.
为了在模拟器中测试我们的小部件,我们应该首先将活动方案设置为Emojibook WidgetExtension 。
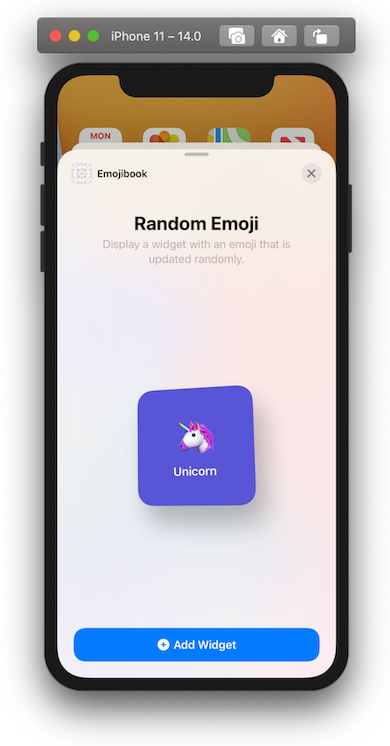
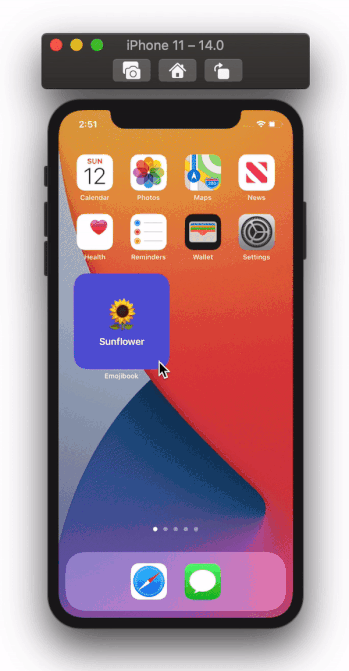
Now run your app, you should be able to see the widget in the simulator, and pressing it will open the Emojibook app.
现在运行您的应用程序,您应该能够在模拟器中看到该小部件,然后按它将打开Emojibook应用程序。
Thanks for reading! I hope you enjoyed this article and found it useful. You can find the completed part 1 app on GitHub. Part 2 is available here; you can find part 3 here.
谢谢阅读! 我希望您喜欢这篇文章并觉得它有用。 您可以在GitHub上找到完整的第1部分应用程序。 第2部分在这里可用; 您可以在此处找到第3部分 。
Next up: In part 2 of this tutorial, I will show you how to support different widget sizes and adjust the widget’s content based on its size, as well as how to create deep links that open a specific view of your app when tapping on the widget. In part 3, I will show you how to use SiriKit intents to make user-configurable widgets.
下一步:在本教程的第2部分中,我将向您展示如何支持不同的小部件尺寸,并根据其尺寸调整小部件的内容,以及如何创建深层链接,从而在点击应用程序时打开应用程序的特定视图。小部件。 在第3部分中 ,我将向您展示如何使用SiriKit意图制作用户可配置的小部件。
To learn more about WidgetKit, make sure to use Apple’s awesome resources:
要了解有关WidgetKit的更多信息,请确保使用Apple的出色资源:
翻译自: https://medium.com/swlh/build-your-first-ios-widget-part-1-d2cecdd4020a
ios小部件


 1287
1287

 被折叠的 条评论
为什么被折叠?
被折叠的 条评论
为什么被折叠?
 到【灌水乐园】发言


