


浏览网页 get
Different, powerful, easy!
与众不同,功能强大,操作简单!
为什么不同? (Why different?)
This is not your average navigation article
这不是您的一般导航文章
Three questions probably came to your mind when you read that title:
阅读标题时,您可能会想到三个问题:
- With so many great articles on Flutter navigation out there, did we really need another one? 有这么多关于Flutter导航的精彩文章,我们真的需要另一篇吗?
- Doesn’t this person know Navigation 2.0 is coming so will all change anyway? 此人是否不知道Navigation 2.0即将面世,所以一切都会改变吗?
- There are code generators to handle this stuff, why not use one of those? 有代码生成器可以处理这些问题,为什么不使用其中之一?
All excellent questions, here are my answers:
所有出色的问题,这是我的答案:
The way to do things with Get is a little different, so this article doesn’t cover the usual syntax
使用Get处理事务的方式略有不同,因此本文不介绍常规语法
Get wraps navigation in a microframework, so your code is insulated from any changes made to the underlying platform
在微框架中获取自动换行导航,因此您的代码不会受到对基础平台所做的任何更改的影响
Get is very easy to use, with transformations, nested routes, and other very useful features built-in, so maybe that code generator isn’t needed.
Get具有转换,嵌套路由和其他内置的非常有用的功能,非常易于使用,因此也许不需要代码生成器。
为什么强大? (Why powerful?)
The introduction to the package says it all…
包装的介绍说明了一切……
Get is an extra-light and powerful library for Flutter that will give you superpowers and increase your productivity.
Get是Flutter的轻量级功能强大的库,它将为您提供超能力并提高您的生产率。
Get can also manage navigation, state, dependency injection, present dialogs, snackbars, bottom sheets, and remove a lot of boilerplate.
Get还可以管理导航,状态,依赖项注入,显示对话框,小吃栏,底部工作表,并删除很多样板。
Plus, Get let’s us manage our navigation from inside of a controller, model or BLoC, and remove it completely from our pages for a clear separation of responsibilities.
另外, Get让我们从控制器,模型或BLoC内部管理导航,并将其完全从页面中删除,以明确划分职责。
There’s a lot more. Here’s some background on dependency injection and other Get features to get you started.
还有更多。 这是有关依赖项注入和其他Get功能的背景知识,以帮助您入门。
为什么这么容易? (Why so easy?)
It’s all in the syntax
全部用语法
Get comes with two different syntaxes for navigation.
Get带有两种不同的导航语法。
The first closely resembles standard Navigation syntax, but without context. This is great for easy conversion of an existing project, or if you want the benefits of Get navigation without deviating too far from standard code. We won’t be covering this today, but you can check out the documentation for more information
第一个非常类似于标准Navigation语法,但是没有context 。 这对于轻松转换现有项目非常有用,或者如果您希望获得导航的好处而又不偏离标准代码太多的话。 我们今天不会讨论这个问题,但是您可以查看文档以获取更多信息
The second is far more concise and easy to read. We’ll be working with this style for the rest of the article.
第二个要简洁得多,而且易于阅读。 在本文的其余部分中,我们将使用这种样式。
Here’s what route navigation to, and from a page looks like using standard Flutter Navigation:
这是使用标准Flutter导航到页面和从页面导航的路线:
Navigator.push(
    context,
    MaterialPageRoute(builder: (context) => SecondRoute()),
  );Navigator.pop(context);
And here’s the same thing with Get:
这与Get相同:
Get.to(SecondRoute());Get.back();Spot the difference?
指出不同?
And it’s the same for every navigation call in Flutter, there’s always a much easier syntax in Get. We won’t go through them all, but you can find the list in the Get documentation, and the translations between normal and Get syntax is straight forward.
而且对于Flutter中的每个导航调用都是一样的,在Get中总是有一个更容易的语法。 我们不会全部介绍它们,但是您可以在Get文档中找到列表,并且普通语法和Get语法之间的转换是 直截了当。
Another thing that makes Get so easy to use is that it doesn’t need context, so we can make our navigation calls from anywhere.
使Get变得易于使用的另一件事是它 不需要context ,因此我们可以从任何地方进行导航。

我们将介绍的内容 (What we’ll cover)
We will be working with simple examples that showcase overall patterns, rather than going through every possible scenario available.
我们将使用简单的示例来展示整体模式,而不是研究所有可能的情况。
However, if there’s a call in standard Navigation you’d like to use, you can be sure Get has an easier alternative with the same functionality.
但是,如果您要使用标准导航中的通话,则可以确保Get具有相同功能的更简便替代方法。
We’re going to try out the two options for navigation in Flutter, but with our new navigation superpowers.
我们将尝试使用Flutter中的两个导航选项,但使用新的导航超级功能。
First, we’ll work with unnamed routes.
首先 ,我们将使用未命名的路线。
Second, we’ll use the same examples with named routes.
其次 ,我们将对命名路由使用相同的示例。
Again, I’ve assumed you understand Flutter navigation basics. Let’s start looking at code.
同样,我假设您了解Flutter导航基础知识。 让我们开始看代码。
未命名的路线 (Unnamed routes)
Unnamed routes are more convenient to use than Named routes, but navigation functionality tends to get spread throughout our App. There’s a lot less of it with Get though, so that won’t be as great a concern.
未命名的路线比命名的路线更易于使用,但是导航功能倾向于在我们的应用程序中传播。 尽管Get的功能要少得多,所以不必担心。
前往第2页 (Trip to Page2)
Here’s the routing to Page2 passing two parameters (message and status) using Get. As you can see, it’s familiar, but much cleaner than standard Flutter navigation.
这是使用Get传递两个参数( message和status )的Page2的路由。 如您所见,它很熟悉,但是比标准Flutter导航要干净得多。

We also added a nice rotate transition, and slowed it down to 500 milliseconds for our demo. That would normally require 50–60 lines of code per transition, or a separate package.
我们还添加了一个不错的旋转过渡,并为我们的演示将其减慢到500毫秒。 通常,每个转换需要50-60行代码,或者使用单独的程序包。
We’ve done route transition animations in 2 lines!!
我们已经完成了2行的路线过渡动画!
You also may have noticed the Get.snackbar() call in that code. It’s cleaner than standard Flutter, and we didn’t require a Builder or context.
您可能还已经注意到该代码中的Get.snackbar()调用。 它比标准Flutter干净,而且我们不需要Builder或context 。
The ‘pop’ is also simple, and we pass back a nice message for Page1 to display in our snackbar.
“弹出”也很简单,我们传回了一个好消息,供Page1显示在小吃栏中。

前往第3页 (Trip to Page3)
The call to Page3 shows off another way Get can pass arguments without needing to add them to the class constructor, and Page3 has some new tricks for us.
对Page3的调用展示了Get可以传递参数而无需将其添加到类构造函数的另一种方式,而Page3为我们提供了一些新技巧。
Here’s the routing to Page3, this time passing arguments. I’ve used a string, but this could easily be a list, map, or even an object.
这是到Page3的路由,这次传递了arguments 。 我使用了一个字符串,但这很容易是列表,地图甚至是对象。

First, we’ll instantiate Page3Controller, then display a message from the controller in the getMessage() method call. To make this happen we used GetBuilder to manage the lifecycle of the controller. This code should look familiar if you’ve used something like Provider, but it’s substantially different in the way it works.
首先,我们将实例化Page3Controller ,然后在getMessage()方法调用中显示来自控制器的消息。 为此,我们使用GetBuilder来管理控制器的生命周期。 如果您使用了诸如Provider之类的代码,则该代码看起来应该很熟悉,但是它的工作方式却大不相同。
We can display the argument sent to Page3 using Get.arguments. You can see this in the first line after the Widget build.
我们可以显示发送使用第3页的说法Get.arguments 。 您可以在小部件构建后的第一行中看到此内容。

When the Return button is pressed, the controller is called again, and navigates back to Page1 on behalf of the Page3. No context required!
当按下Return按钮时,控制器将再次被调用,并代表Page3导航回到Page1 。 无需context !
Here’s a look at the controller. There’s an onInit() method that GetController grants us, which is run when the controller is instantiated. We can also use Get.arguments or any other Get function here, so this is brilliant for things like retrieving an initial list of data from an external source, security checks, or doing some setup work before a page is presented. You’ll be able to do a lot with this feature!
这是控制器的外观。 有一个GetController授予我们的onInit()方法,该方法在实例化控制器时运行 。 我们还可以在此处使用Get.arguments或任何其他Get函数,因此,这对于从外部源中检索数据的初始列表,安全性检查或在显示页面之前进行一些设置工作来说非常有用。 您将可以使用此功能完成很多工作!
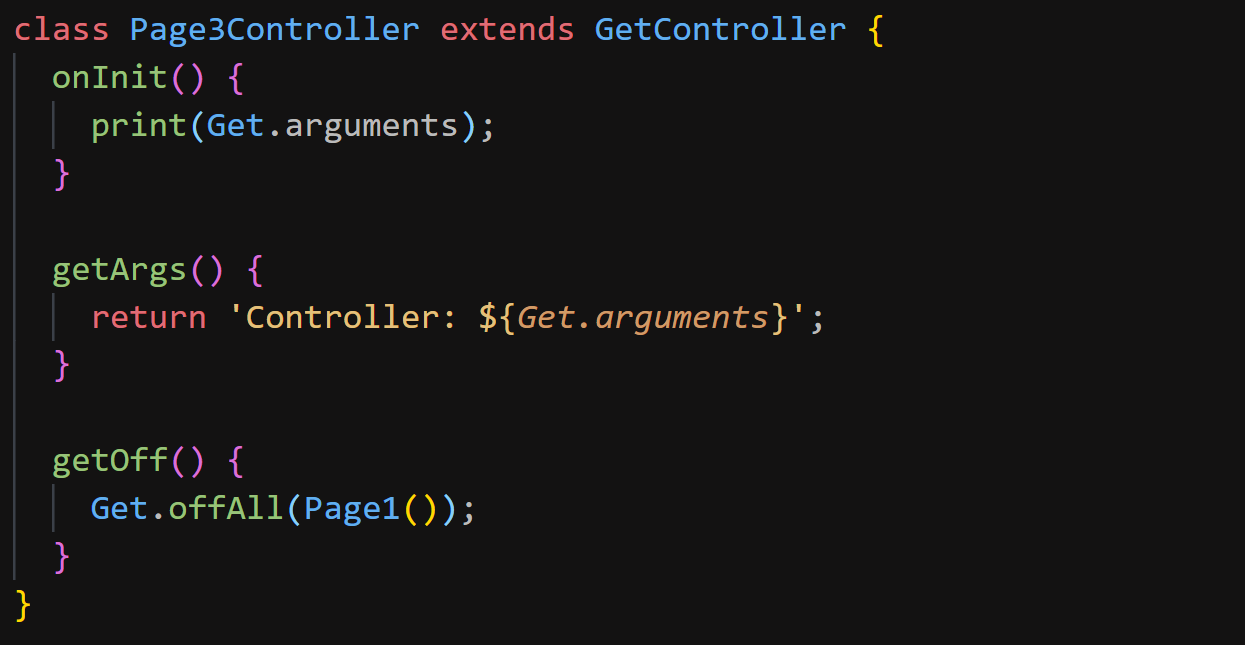
We used Get.offAll(Page1()); to return. That’s the equivalent of the following standard Flutter code:
我们使用了Get.offAll(Page1()); 回来。 这等效于以下标准Flutter代码:
Navigator.pushAndRemoveUntil(context,
MaterialPageRoute(builder: (BuildContext context) => Page1()), ModalRoute.withName(‘/’),
);
We also could have navigated to another page, or simply used Get.back(), all without context, and all from outside of our page.
我们还可以导航到另一个页面,或者仅使用Get.back() ,而这些都没有context ,并且全部来自页面外部。
You can find a gist of the code for Unnamed routes here.
您可以在此处找到未命名路线的代码要点。
命名路线 (Named routes)
Named routes put all route definitions in one place. However, passing parameters has traditionally been more complex as you’ll need to send them indirectly. Get has a few tricks to help us out here.
命名路线将所有路线定义放在一个地方。 但是,传递参数通常比较复杂,因为您需要间接发送参数。 Get有一些技巧可以帮助我们。
Let’s start by defining our routes. Again, it’s similar to standard Flutter, but we can also define our transitions. The Page3 definition also has a new parameter, we’ll get to that later.
让我们从定义路线开始。 同样,它类似于标准Flutter,但我们也可以定义过渡。 Page3定义也有一个新参数,我们将在后面介绍。

前往第2页 (Trip to Page2)
Here’s the routing to Page2 with our two parameters. This time, it’s very different, but also very familiar if you’ve ever done any web development. Our parameters are embedded in the string after the question mark exactly like a web URL string. The parameters are named and separated by the ampersand.
这是使用我们的两个参数到Page2的路由。 这次,这是非常不同的,但是如果您曾经做过任何Web开发,也非常熟悉。 我们的参数完全像Web URL字符串一样嵌入在问号后的字符串中。 参数以与号命名并分隔。

Very, very cool.
非常非常酷
前往第3页 (Trip to Page3)
Here’s our call to Page3. We’ve passed arguments to Page3 and Page3Controller without having to retrieve the data in initState or send it to the controller from our page! This is a fantastic way to simplify our code.
这是我们对Page3的调用。 我们已经通过arguments到第三页和Page3Controller 而无需检索数据 initState或者从我们的网页发送到控制器! 这是简化我们代码的绝佳方法。

For our return, the controller uses the Get syntax:
对于我们的返回,控制器使用Get语法:
Get.offAllNamed(‘Page1’);
Get.offAllNamed('Page1');
You can find a gist of the code for Named routes here.
您可以在此处找到命名路线的代码要点。
额外功能! (Bonus features!)
绑定 (Bindings)
Get now fully implements a Bindings interface for:
现在获取,完全实现了Bindings接口,用于:
full integration of routes, state manager and dependency manager
路由,状态管理器和依赖管理器的完全集成
This will take us 3 steps:
这将使我们采取3个步骤:
Step 1, create our Binding class
步骤1 ,创建我们的Binding类

Step 2, add the binding to the route definition — we saw that in the route definitions snip.
第2步 ,将绑定添加到路由定义-我们在路由定义片段中看到了这一点。

Step 3, remove the creation of our Page3Controller from GetBuilder as this will now be managed by Page3Binding.
第3步 ,从GetBuilder删除我们的Page3Controller的创建,因为这现在将由Page3Binding管理。

So, why is it good to use bindings? To quote the Get documentation again:
那么,为什么使用绑定好呢? 要再次引用“ 获取”文档:
When a route is removed from the Stack, all controllers, variables, and instances of objects related to it are removed from memory. If you are using streams or timers, they will be closed automatically, and you don’t have to worry about any of that.
从堆栈中删除路由后,所有与其相关的控制器,变量和对象实例将从内存中删除。 如果您使用的是流或计时器,它们将自动关闭,您不必为此担心。
Bindings may well become a star attraction for Get. It will be very interesting to see where creative programmers will take this functionality!
绑定很可能成为Get的明星吸引力。 看到创意程序员将在何处使用此功能将非常有趣!
嵌套路线 (Nested Routes)
Get gives us an easy way to nest routes using a unique id to identify groups of routes. Nesting is a complete topic of its own, but the code would look something like this:
Get为我们提供了一种使用唯一ID标识路线组的嵌套路线的简便方法。 嵌套本身就是一个完整的主题,但是代码看起来像这样:

那我们怎么办呢? (So how did we do?)
Was it different to normal navigation? Yes, but in a good way!
与普通导航有什么不同吗? 是的,但是很好!
Was it powerful? Absolutely.
它强大吗? 绝对。
Was it easy? Yep, easier to read, easier to write.
容易吗? 是的,更容易阅读,更容易编写。
Plus we got those bonus features.
另外,我们还提供了这些奖励功能。
Enjoy.
请享用。
翻译自: https://medium.com/swlh/flutter-fast-navigation-with-get-5412ab84b390
浏览网页 get


 349
349


 被折叠的 条评论
为什么被折叠?
被折叠的 条评论
为什么被折叠?
 到【灌水乐园】发言


