


swift3转swift5
The places where Swift isn’t so intuitive.
Swift不太直观的地方。
It usually is. Intuitive, that is. Usually Swift is intuitive, with optionals and drag-and-drop kind of building of GUI elements.
通常是这样。 直观,就是这样。 通常,Swift是直观的,带有可选的和拖放式的GUI元素构建。
But other times it isn’t intuitive at all. It redefines keywords from popular languages like C++ and Python , and the division between Storyboards and code can be incredibly confusing.
但是有时它根本不是直观的。 它从流行的语言(例如C++和Python重新定义了关键字,并且Storyboard和代码之间的区分可能令人难以置信。
Here are 5 places that confused me when I started out. We will use Swift 5 in Xcode 11.5 using Storyboards — note that SwiftUI redefines the wheel again, but maybe for the better.
当我刚开始时,有5个地方让我感到困惑。 我们将使用Storyboards在Xcode 11.5中使用Swift 5-请注意,SwiftUI再次重新定义了方向盘,但也许会更好。
- Classes persist, structs do not 类持续存在,结构不存在
- Segues and unwind segues are done differently Segues和Unwind Segues的处理方式不同
- Protocol and delegate magic 协议和委托魔术
- Prevent inheritance with final 用final阻止继承
- Public, internal, fileprivate and private, but no protected 公共,内部,文件私有和私有,但不受保护
1.类持续存在,结构不存在 (1. Classes persist, structs do not)
Never mind what C++ has already established about the meanings of classes and structs (structs are classes with no private members). Just forget everything that already exists and learn it again — the Swift way.
没关系, C++对于类和结构的含义已经建立了什么(结构是没有私有成员的类)。 只需忘记已经存在的一切,然后再次学习即可Swift方法。
Instead, in Swift, the key difference is: structs are passed by value, while classes are passed by reference.
相反,在Swift ,关键区别在于: 结构通过值传递 ,而类通过引用传递 。
Let’s take a look at an example using structs :
让我们来看一个使用structs的示例:
This fails to compile in the method that modifies the struct, because it is passed by value, and therefore cannot be modified:
这无法在修改该结构的方法中进行编译,因为它是通过值传递的,因此无法修改:

Changing struct to class, on the other hand, works just fine:
另一方面,将struct更改为class可以正常工作:
2. Segues和Unwind Segues的处理方式不同 (2. Segues and unwind segues are done differently)
- The first step in defining a normal segue is done in the storyboard. 定义常规Segue的第一步是在情节提要中完成。
- The first step in defining an unwind segues is done in code. 定义展开序的第一步是用代码完成的。
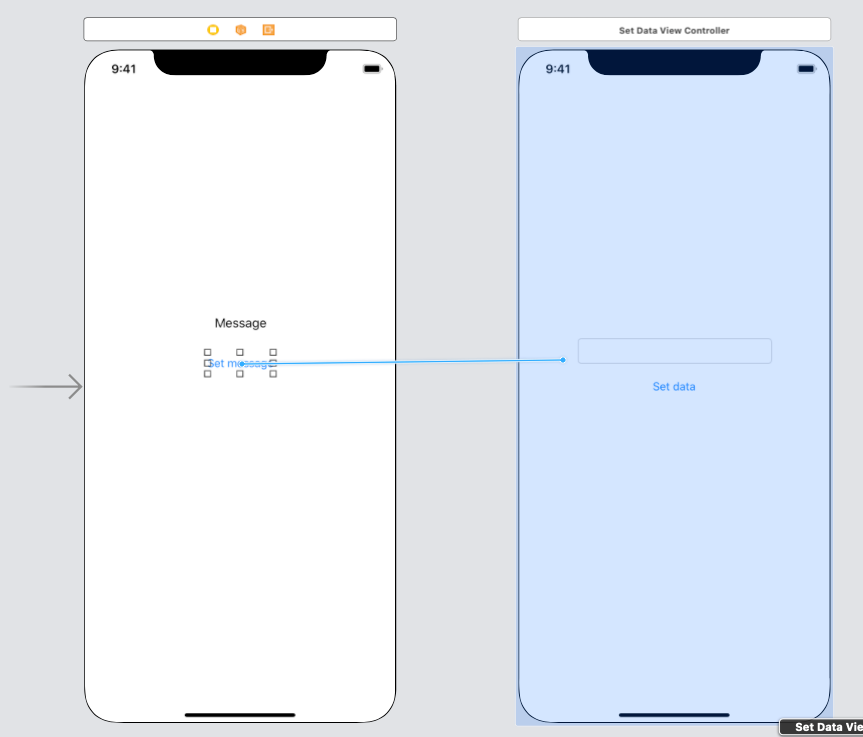
Let’s start by creating two view controllers: MainViewController and SetDataViewController .
让我们从创建两个视图控制器开始: MainViewController和SetDataViewController 。
MainViewControllerhas a simple message text field and a button.MainViewController有一个简单的消息文本字段和一个按钮。SetDataViewControllerhas a text field and a button.SetDataViewController有一个文本字段和一个按钮。

Let’s hook it up such that pressing the button goes to the SetDataViewController . Click and drag from the button to the view controller to create a segue.
我们将其连接起来,以便按下按钮进入SetDataViewController 。 单击并从按钮拖动到视图控制器以创建序列。

We can now name the segue:
现在,我们可以将segue命名为:

And then add additional logic in the navigation section in MainViewController :
然后在MainViewController的导航部分中添加其他逻辑:
That works for the forward segue —but what about an unwind segue to go back?
这适用于向前搜索-但是退后一步可以返回吗?
To unwind, you start in the code. In the destination view controller MainViewController, add a returned method:
要展开,请从代码开始。 在目标视图控制器MainViewController ,添加一个returned方法:
Then in the storyboard, hook up the unwind segue in the SetDataViewController . Click and drag from the button to the Exit at the top:
然后,在情节 SetDataViewController ,在SetDataViewController中连接展开SetDataViewController 。 单击并从按钮拖动到顶部的Exit :

and select the returned method:
并选择returned方法:

You can find the segue in the left hand side, and give it a name like returnedSegue as before:
您可以在左侧的SEGUE,并给它一个名称,如returnedSegue像以前一样:

That’s it!
而已!
- For normal segues, first add the segue in the Storyboard. You can add an identity and modify it by name later in the code. 对于常规片段,请首先在情节提要中添加片段。 您可以在以后的代码中添加标识并通过名称进行修改。
- For unwind segues, first add the unwind function in the code in the destination view controller, then hook it up in the Storyboard. 对于解散,首先在目标视图控制器的代码中添加解散功能,然后将其连接到情节提要中。
3.协议和委托魔术 (3. Protocol and delegate magic)
Very frequently you will want to call a method of one view controller from another view controller. This is best done using protocols and delegates. If you are used to the idea of abstract base classes in C++ or Python, protocols are like an interface that a class promises to implement.
很多时候,您会想从另一个视图控制器调用一个视图控制器的方法。 最好使用协议和委托来完成。 如果您习惯了C++或Python的抽象基类的想法,那么protocols就像一个类承诺实现的接口。
Let’s use the example from the last section.
让我们使用上一节中的示例。
First define a new protocol called
MainProtocol, which declares a methodhandleData. It inherites fromAnyObjectsuch that only classes can inherit from it.首先定义一个称为
MainProtocol的新协议,该协议声明一个handleData方法。 它继承自AnyObject,因此只有类可以继承。
2. Then let MainViewController inherit from MainProtocol , and add an implementation for handleData .
2.然后让MainViewController从MainProtocol继承,并为handleData添加一个实现。
3. Add an optional weak delegate in SetDataViewController , and call it in the navigation code for the returnedSegue. Note that it must be weak to break the strong reference cycle (if you don’t use weak, the reference counts of the view controllers do not reach zero, so they don’t get deallocated).
3.添加一个optional weak delegate在SetDataViewController ,并调用它的导航代码returnedSegue 。 请注意,打破强引用循环必须是弱的(如果不使用weak ,则视图控制器的引用计数不会达到零,因此不会被释放)。
4. Finally, hook up the delegate in the MainViewController navigation:
4.最后,在MainViewController导航中连接delegate :
This is the most general and powerful method for calling methods in different view controllers and passing data back and forth. The final MainViewController looks like this:
这是在不同的视图控制器中调用方法并来回传递数据的最通用,最强大的方法。 最终的MainViewController如下所示:
4.用final防止继承 (4. Prevent inheritance with final)
By default, you can inherit from any class you wish. The open keyword makes this explicit (but redundant):
默认情况下,您可以从所需的任何类继承。 open关键字使它变得明确(但多余):
The console will show Goodbye . We can change open to final to prevent inheritance:
控制台将显示Goodbye 。 我们可以将open更改为final以防止继承:
This will prevent inheritance:
这将阻止继承:
You can also apply it to a method rather than a whole class:
您还可以将其应用于方法而不是整个类:
This allows inheritance but prevents override of the say method:
这允许继承,但防止override say方法:

Using open and final you can control closely how your classes can be reused.
使用open和final可以紧密控制类的重用方式。
5.公共,内部,文件私有和私有,但不受保护 (5. Public, internal, fileprivate and private, but no protected)
InPython you may be used to import statements, or include in C++ to include headers defining different methods.
在Python你可以用于import语句,或include在C++对包括定义不同的方法标头。
Well it turns out in Swift , by default everything is just internal p̵u̵b̵l̵i̵c̵, meaning every class/method you define is available from any other file in your project (although not outside a module). Obviously, this is almost never what you want!
在Swift ,事实证明,默认情况下,所有内容都只是internal p̵u̵b̵l̵i̵c̵,这意味着您定义的每个类/方法都可以从项目中的任何其他文件中获得(尽管不是在模块外部)。 显然,这几乎永远不是您想要的!
Even if you don’t care about it explicitly, note that leaving everything as internal increases compilation time. So it’s worthwhile using the other access levels appropriately: public, internal, fileprivate , and private .
即使您并不在乎它,也请注意,将所有内容保留为内部会增加编译时间。 因此值得适当地使用其他访问级别: public , internal , fileprivate和private 。
publico̵r̵ ̵n̵o̵t̵ ̵g̵i̵v̵i̵n̵g̵ ̵a̵n̵y̵ ̵a̵c̵c̵e̵s̵s̵ ̵l̵e̵v̵e̵l means the method/class is available from anywhere in the project.public或不给予任何访问级别意味着该方法/类可从该项目的任何地方。internalor not giving any access level means things can only be used from within the same module.internal或不提供任何访问级别意味着只能在同一模块内使用东西。fileprivatemeans that things can only be used from within the same file.fileprivate表示只能在同一文件中使用东西。privatemeans you can only access it from within the same class you defined it in.private意味着您只能从定义它的同一个类中访问它。
Note that private also has the usual meaning from C++ for classes, in that subclasses cannot access private attributes.
请注意, private也具有C++中类的通常含义,因为子类无法访问private属性。

If you are wondering what the equivalent of the protected keyword from C++ is (protected attributes can only be accessed from an inherited class): there is none. It’s just public and private because…. Yep.
如果您想知道C++中的protected关键字的等效项是什么(只能从继承的类中访问protected属性):没有。 它是public和private因为…。 是的
最后的想法 (Final thoughts)
Yes, Swift has lots of nice features and makes iOS programming like a breeze. Yes, it feels like Swift reinvented the wheel sometimes, and redefines keywords you already know. Yes, simple things can be so unintuitive between code and storyboards.
是的,Swift具有许多不错的功能,并使iOS编程变得轻而易举。 是的,感觉就像Swift有时重新发明了轮子,并重新定义了您已经知道的关键字。 是的,简单的事情在代码和情节提要之间可能太不直观了。
And yes, I wish I had known these things sooner.
是的,我希望我早知道这些事。
翻译自: https://medium.com/practical-coding/5-things-i-wish-i-knew-sooner-about-swift-ad69505217c0
swift3转swift5


 1495
1495


 被折叠的 条评论
为什么被折叠?
被折叠的 条评论
为什么被折叠?
 到【灌水乐园】发言


