


long值使用常量池最大
You can use padding() and Spacer() to create some spacing between views. This can work well when you don’t have a lot of subviews to adjust inside your app.
您可以使用padding()和Spacer()在视图之间创建一些间距。 当您在应用程序内部没有太多要调整的子视图时,这可以很好地工作。
填充 (Padding)
Padding alone will give you decent spacing between your views. If you keep the edge and length parameters nil, the system will calculate the amount of space applied to all the edges.
单独填充将使您的视图之间具有适当的间距。 如果将edge和length参数保持为零,则系统将计算应用于所有边缘的空间量。


垫片 (Spacer)
Spacer adds flexible spacing that expands along its container’s axis. Inside HStack, the spacing will be horizontal. Inside VStack, it will be vertical. If the Spacer is not contained in a stack, then the system will add spacing to both axes.
Spacer增加了沿其容器轴扩展的灵活间距。 在HStack内部,间隔将是水平的。 在VStack内部,它将是垂直的。 如果Spacer不包含在堆栈中,则系统将在两个轴上增加间距。


Now let’s have a more complex view by adding some graphs.
现在,我们通过添加一些图形来获得更复杂的视图。
圆图 (Circle graph)

条状图 (Bar graph)

几何阅读器 (GeometryReader)
Now we can see that we are depending on a lot of constant numbers. Spacer() and padding() won’t be enough. Let’s fix the circle graph. First, remove the padding from the RoundedRectangle and add it to the ZStack instead for both the circle and bar graphs.
现在我们可以看到我们依赖许多常数。 Spacer()和padding()不够。 让我们修复圆形图。 首先,从RoundedRectangle删除填充,然后将其添加到ZStack中,而不是圆形图和条形图。
Adjust the frame’s width for both circles to cover only 40% of the view:
调整两个圆圈的框架宽度,使其仅覆盖视图的40%:


For the bar graph, let’s change the frame’s width to take 45% and the height to take 80% of the view on both capsules:
对于条形图,我们将两个胶囊的视图的框宽更改为45%,将高度更改为80%:

Remove the spacing between the bars:
删除条之间的间距:


We need to normalize the height value for the second capsule to make it able to take any random value without affecting the view:
我们需要标准化第二个胶囊的高度值,以使其能够采用任何随机值而不会影响视图:

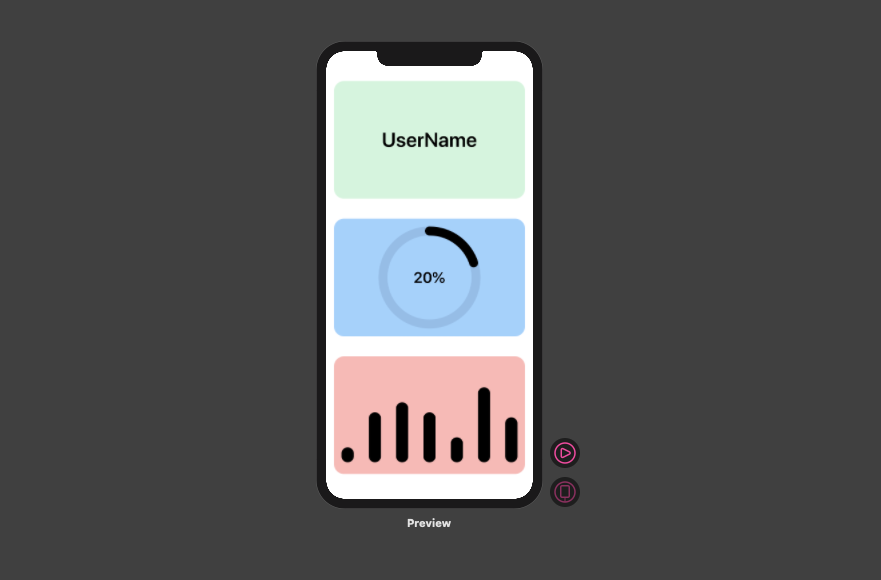
We can add the views to our ContentView and see how everything looks in our app:
我们可以将视图添加到ContentView并查看应用程序中所有内容的外观:
结论 (Conclusion)
I hope that was helpful. Thanks for reading!
我希望这会有所帮助。 谢谢阅读!
翻译自: https://medium.com/better-programming/how-to-avoid-using-constant-values-with-swiftui-7296a7c44c83
long值使用常量池最大


 457
457

 被折叠的 条评论
为什么被折叠?
被折叠的 条评论
为什么被折叠?
 到【灌水乐园】发言


