


Connecting your Phone to your Watch to send data has never been easier! Follow this easy step-by-step guide, to discover how to pair them as well as what are the most common errors you might encounter.
将手机连接到手表以发送数据从未如此简单! 请遵循这份简单的分步指南,以了解如何将它们配对以及您可能会遇到的最常见错误。
So how does it actually work? First of all create a project in Xcode that has both the iOS app and the Watch App (you can also add the Watch App to an existing project simply by adding a target).
那么它实际上是如何工作的呢? 首先,用Xcode创建一个既有iOS应用又有Watch App的项目( 您也可以通过添加target来将Watch App添加到现有项目中 )。

Now let’s get started with some code to pass a random array from the Phone to the Watch (complete copyable code at the end of the article)!
现在让我们开始一些代码,将随机数组从手机传递到手表 ( 文章末尾完整的可复制代码 )!
1. For starters, go to your ViewController and add import WatchConnectivity.
1.对于初学者,请转到您的ViewController并添加导入WatchConnectivity 。
import WatchConnectivityThen we will need to add an extension WCSessionDelegate with its functions (you should get an error that then will give you automatically these functions):
然后,我们需要添加一个扩展WCSessionDelegate及其功能( 您应该得到一个错误,然后将自动为您提供这些功能 ):

2. Now add a variable var session: WCSession? and then we will create our function to activate the session (and of course add it to the viewDidLoad):
2.现在添加一个变量var session:WCSession? 然后我们将创建我们的函数来激活会话(当然,并将其添加到viewDidLoad ):

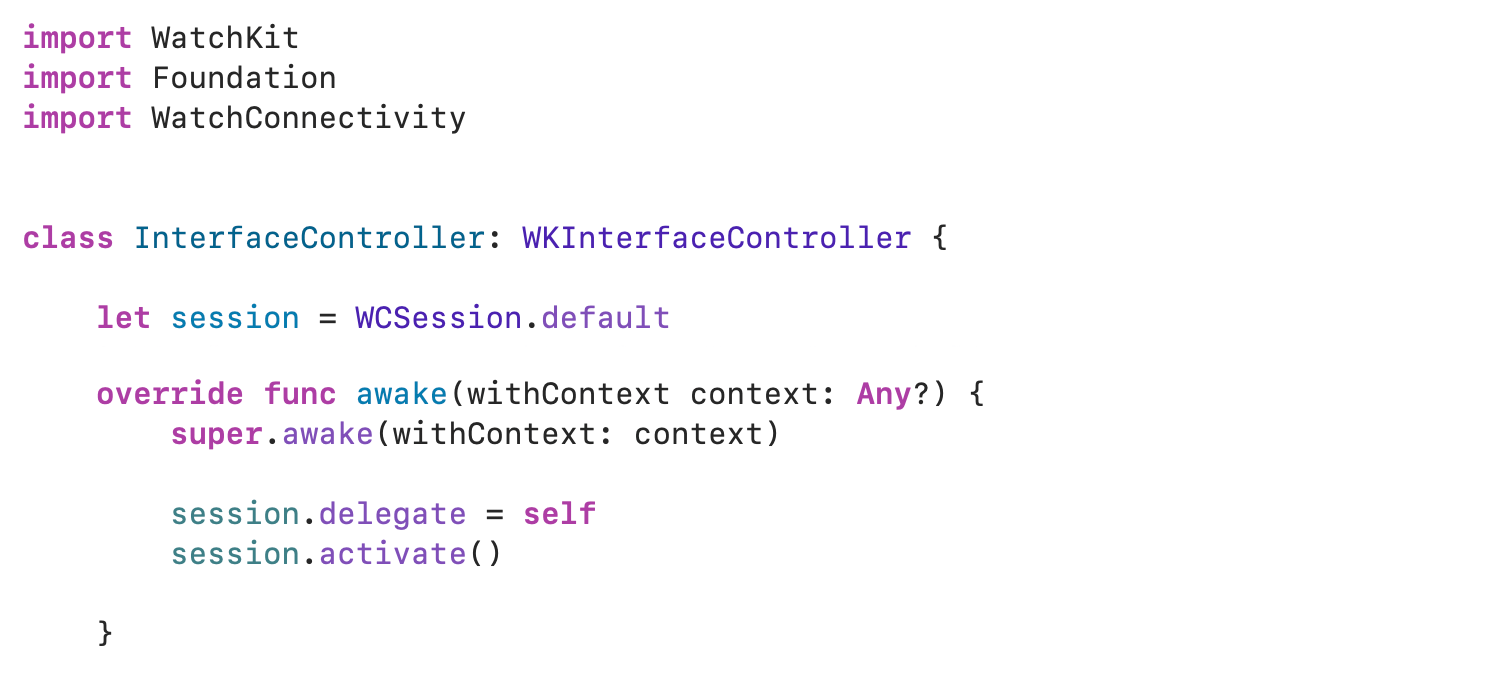
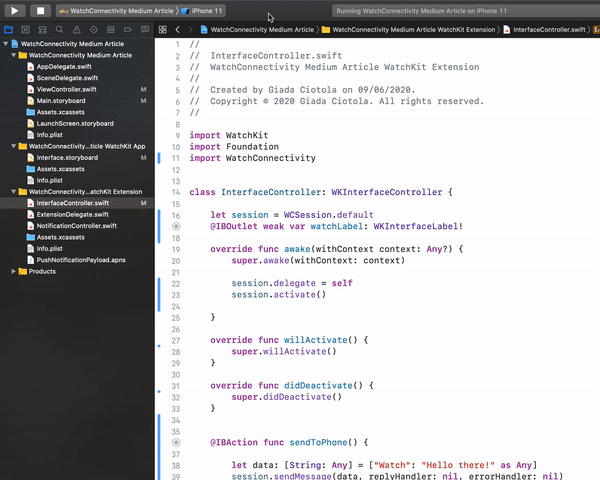
3. Let’s do the same for our InterfaceController. First always type import WatchConnectivity, then add the extension (with a didReceiveMessage function), and finally a WCSession constant:
3.让我们对InterfaceController做同样的事情。 一是始终键入进口WatchConnectivity,然后添加扩展名 (用didReceiveMessage功能),最后一个WCSession常数:

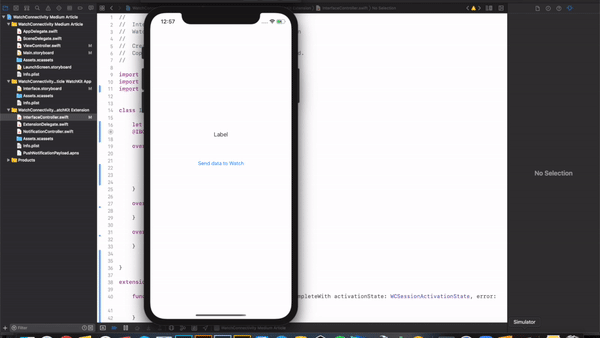
4. But now we actually need some labels and buttons. So let’s open the Storyboard and add them!
4.但是现在我们实际上需要一些标签和按钮 。 因此,让我们打开情节提要并添加它们!

5. As next step we need to connect all the Outlets and Actions. Control drag both labels and buttons to your code and let’s see what to write inside them:
5.下一步,我们需要连接所有插座和操作 。 控件将标签和按钮都拖到您的代码中,让我们看看在其中写什么:

Same for the InterfaceController, which also needs a way to get the message (by filling the didReceiveMessage function):
与InterfaceController相同,它也需要一种获取消息的方式(通过填充didReceiveMessage函数):


And it’s done! Well almost, because when then you run your app, you might not see your Watch Simulator at first and you’ll most likely get one of these 2 errors:
完成了! 差不多了,因为当您运行应用时,您可能一开始可能看不到Watch Simulator ,并且很可能会遇到以下两个错误之一 :


So now it’s the time to stop looking at your code and start messing around with your Simulators!
因此,现在是时候停止查看您的代码并开始与您的 模拟器混为一谈了 !
The first error says that the WCSession is not paired, while the second error states that WCSession counterpart app not installed.
第一个错误指出WCSession未配对 ,而第二个错误则指出未安装WCSession对应应用程序 。
But what does this all mean? In the first place, Xcode is telling you that if your iPhone simulator doesn’t have it’s own paired watch simulator there is no way to pass data!
但这一切意味着什么? 首先,Xcode告诉您,如果您的iPhone模拟器没有它自己的配对手表模拟器,则无法传递数据!
So from Xcode, when going to choose a simulator, instead of picking an iPhone 11 or 8, click Add Additional Simulators and with the + go add the watch to the iPhone simulator of your choice.
因此,从Xcode中选择模拟器时,无需选择iPhone 11或8,而是单击Add Additional Simulators,然后使用+将手表添加到您选择的iPhone模拟器中。
Open both simulators, click the crown to see the main Watch interface with all the apps, and then start the pairing by clicking on the Watch app on your Phone (it should start automatically but sometimes you might need to close both Simulators and re-run the app).
打开两个模拟器,单击表冠以查看所有应用程序的主“监视”界面,然后通过单击手机上的“监视”应用程序开始配对 ( 它应自动启动,但有时您可能需要关闭两个模拟器并重新运行该应用程序 )。
Even if you already have an iPhone paired with a Watch, though, there is still something you’ll need to do: installing the app on the watch from the phone (always from the Watch app). Once that’s done folks, it’s really done!
即使你已经拥有一部iPhone与手表配对,不过,仍然有一些你需要做的:从手机上安装手表应用程序 ( 总是从监视应用程序 )。 伙计们完成后, 就真的完成了!
Now when you run your code, you will be able to send your data from the iPhone to the Watch!
现在,当您运行代码时,就可以将数据从iPhone发送到Watch了 !
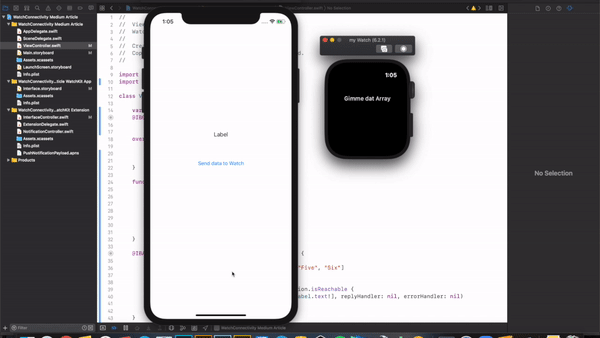
P.S.: If you instead want to send only a String, just substitute the phoneLabel.text with “which ever string you want to send”:
PS:如果您只想发送一个String ,只需将phoneLabel.text替换为“ 您要发送的字符串 ”:
if let validSession = self.session, validSession.isReachable {validSession.sendMessage(["iPhone": "Like me! I am a String"], replyHandler: nil, errorHandler: nil)}COMPLETE CODE
完整代码
ViewController
ViewController
import UIKitimport WatchConnectivityclass ViewController: UIViewController {var session: WCSession?@IBOutlet weak var phoneLabel: UILabel!override func viewDidLoad() {super.viewDidLoad()createWCSession()}func createWCSession() {if WCSession.isSupported() {session = WCSession.defaultsession?.delegate = selfsession?.activate() }}@IBAction func sendDataToWatch(_ sender: UIButton) {let myArray = ["One", "Two", "Three", "Four", "Five", "Six"]phoneLabel.text = myArray.randomElement()if let validSession = self.session, validSession.isReachable {validSession.sendMessage(["iPhone": phoneLabel.text!], replyHandler: nil, errorHandler: nil) } }}extension ViewController: WCSessionDelegate {func session(_ session: WCSession, activationDidCompleteWith activationState: WCSessionActivationState, error: Error?) { }func sessionDidBecomeInactive(_ session: WCSession) { }func sessionDidDeactivate(_ session: WCSession) { }}InterfaceController
接口控制器
import WatchKitimport Foundationimport WatchConnectivityclass InterfaceController: WKInterfaceController {let session = WCSession.default@IBOutlet weak var watchLabel: WKInterfaceLabel!override func awake(withContext context: Any?) {super.awake(withContext: context)session.delegate = selfsession.activate()}override func willActivate() {super.willActivate() }override func didDeactivate() {super.didDeactivate() }}extension InterfaceController: WCSessionDelegate {func session(_ session: WCSession, activationDidCompleteWith activationState: WCSessionActivationState, error: Error?) { }func session(_ session: WCSession, didReceiveMessage message: [String : Any]) {if let value = message["iPhone"] as? String {self.watchLabel.setText(value) } }}Thank you for the attention! Be sure to leave some feedback and let me know if you also what to learn how to send a message from the Watch to the Phone.
感谢您的关注! 请务必留下一些反馈 ,如果您也了解如何将手表中的消息发送到手机 ,请告诉我。


 1509
1509


 被折叠的 条评论
为什么被折叠?
被折叠的 条评论
为什么被折叠?
 到【灌水乐园】发言


