


{Core} This topic shows how Open Mainframe Project’s Zowe CLI can be used to run any COBOL program from a native macOS application and display the output on the application’s screen. We’ll also see how modern Swift language can be integrated into classic COBOL development and learn how we can automate Zowe with Swift to dynamically upload, job-submit and finally view COBOL code execution results in a simple UI application.
{Core}本主题展示了如何使用Open Mainframe Project的 Zowe CLI从本地macOS应用程序运行任何COBOL程序,并在应用程序的屏幕上显示输出。 我们还将看到如何将现代Swift语言集成到经典的COBOL开发中,并了解如何使用Swift使Zowe自动化,以在一个简单的UI应用程序中动态上传,提交作业并最终查看COBOL代码执行结果。
先决条件: (Pre-requisites:)
macOS 10.14.6 or newer
macOS 10.14.6或更高版本
Xcode 10.3 or higher
Xcode 10.3或更高版本
Your personal Mainframe ID (i e
Z99998), provided in terms of COBOL Programming with VSCode course (here is the perfect landing page for Mainframe, z/OS and Zowe)您的个人大型机ID(即
Z99998), 以VSCode课程进行COBOL编程提供 ( 这是大型机,z / OS和Zowe的理想登录页面)Zowe CLI installed
安装Zowe CLI
Zowe CLI
zosmfprofile created and configured (general way to check it is runningzowe zosmf check statuscommand in Terminal - if you can see error-free output, you can go ahead and follow this guide)创建和配置Zowe CLI
zosmf配置文件 (在终端中检查其是否正常运行的常规方法zowe zosmf check status命令-如果您看到无错误输出,则可以继续按照本指南进行操作)
In the first part, we’ll take a detailed look at the process of UI setup and configuration. We’ll create the project, get to know Storyboard, add the UI element, and bind it to the code. The second part covers coding and is dedicated to COBOL-Swift interaction and demonstrates how that kind of communication can be achieved with Zowe CLI.
在第一部分中,我们将详细介绍UI设置和配置的过程。 我们将创建项目,了解Storyboard,添加UI元素,并将其绑定到代码。 第二部分介绍编码,专门讨论COBOL - Swift交互,并演示如何使用Zowe CLI实现这种通信。
第1部分。设置应用程序UI (Part 1. Setting up application UI)
Step 1. Open Xcode IDE and click Create a new Xcode project.
步骤1.打开Xcode IDE,然后单击Create a new Xcode project 。

In a new window choose macOS and App, click Next.
在新窗口中,选择macOS和App ,然后单击下一步 。

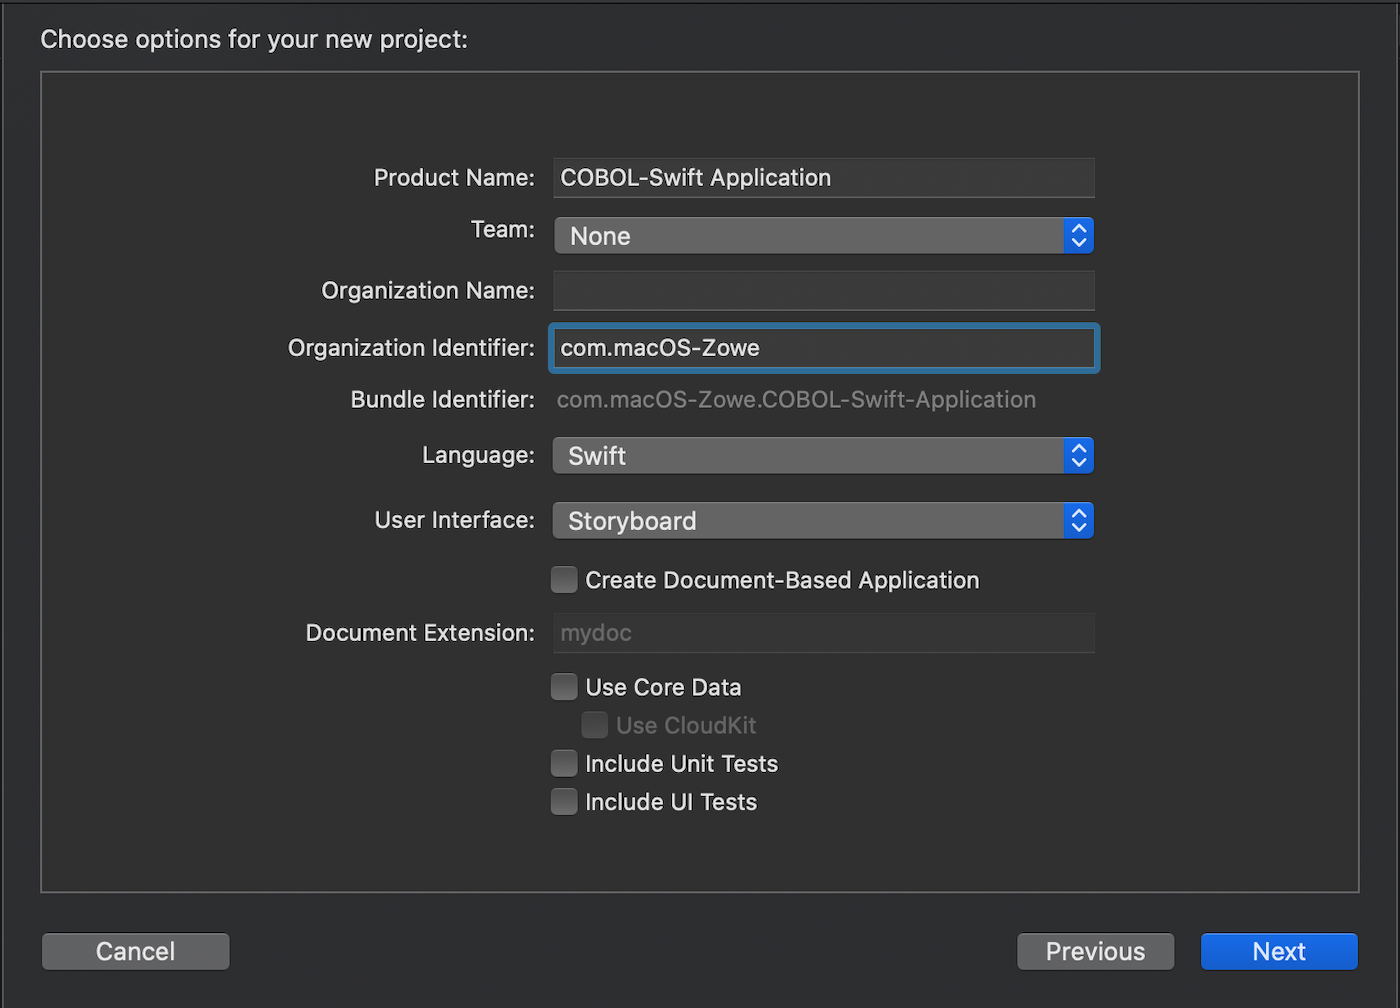
Enter COBOL-Swift Application for Product Name, verify Language is set to Swift, and User Interface is Storyboard. Leave all checkboxes empty and click Next.
输入COBOL-Swift Application作为产品名称 ,确认语言设置为Swift,并且用户界面为Storyboard 。 将所有复选框保留为空,然后单击“ 下一步” 。
Choose the project’s folder and click Create.
选择项目的文件夹,然后点击创建 。

Step 2. In Project Navigator on the left, locate and click ViewController.swift class.
步骤2.在左侧的Project Navigator中,找到并单击ViewController.swift class。

This class represents the code for the very first screen, showing up right after our application’s launch. It has some default methods, added to it. We will use one of them later. Now you can click ▶ button in the upper-left corner of Xcode window to build and run the application, it will show the empty screen.
此类表示第一个屏幕的代码,该代码在应用程序启动后立即显示。 它添加了一些默认方法。 稍后我们将使用其中之一。 现在,您可以单击Xcode窗口左上角的▶按钮来构建并运行该应用程序,它将显示一个空白屏幕。

Click ◾ button to stop the application from running.
单击◾按钮停止运行该应用程序。
Step 3. Next, we’re going to add an interactive UI element to the application’s screen so that our future data have some area to be displayed. In Project Navigator on the left, locate and click Main.storyboard class. This can be referred to as our application’s UI “map”.
第3步。接下来,我们将向应用程序的屏幕添加一个交互式UI元素,以便将来的数据具有某些要显示的区域。 在左侧的项目浏览器中,找到并单击Main.storyboard类。 这可以称为我们应用程序的UI“地图”。

TIP. If you’re just curious, Storyboard is a simple XML file under the hood and is rendered as a UI sketch by Xcode IDE. You can right-click the file in Project Navigator and choose Open As -> Source Code to see it in a plain XML mode, then right-click it again and choose Open As -> Interface Builder - Storyboard to switch back to UI mode.
小费。 如果您只是好奇,Storyboard是一个简单的XML文件,可以通过Xcode IDE渲染为UI草图。 您可以在Project Navigator中右键单击该文件,然后选择Open As- > Source Code以纯XML模式查看它,然后再次右键单击该文件并选择Open As- > Interface Builder-Storyboard以切换回UI模式。
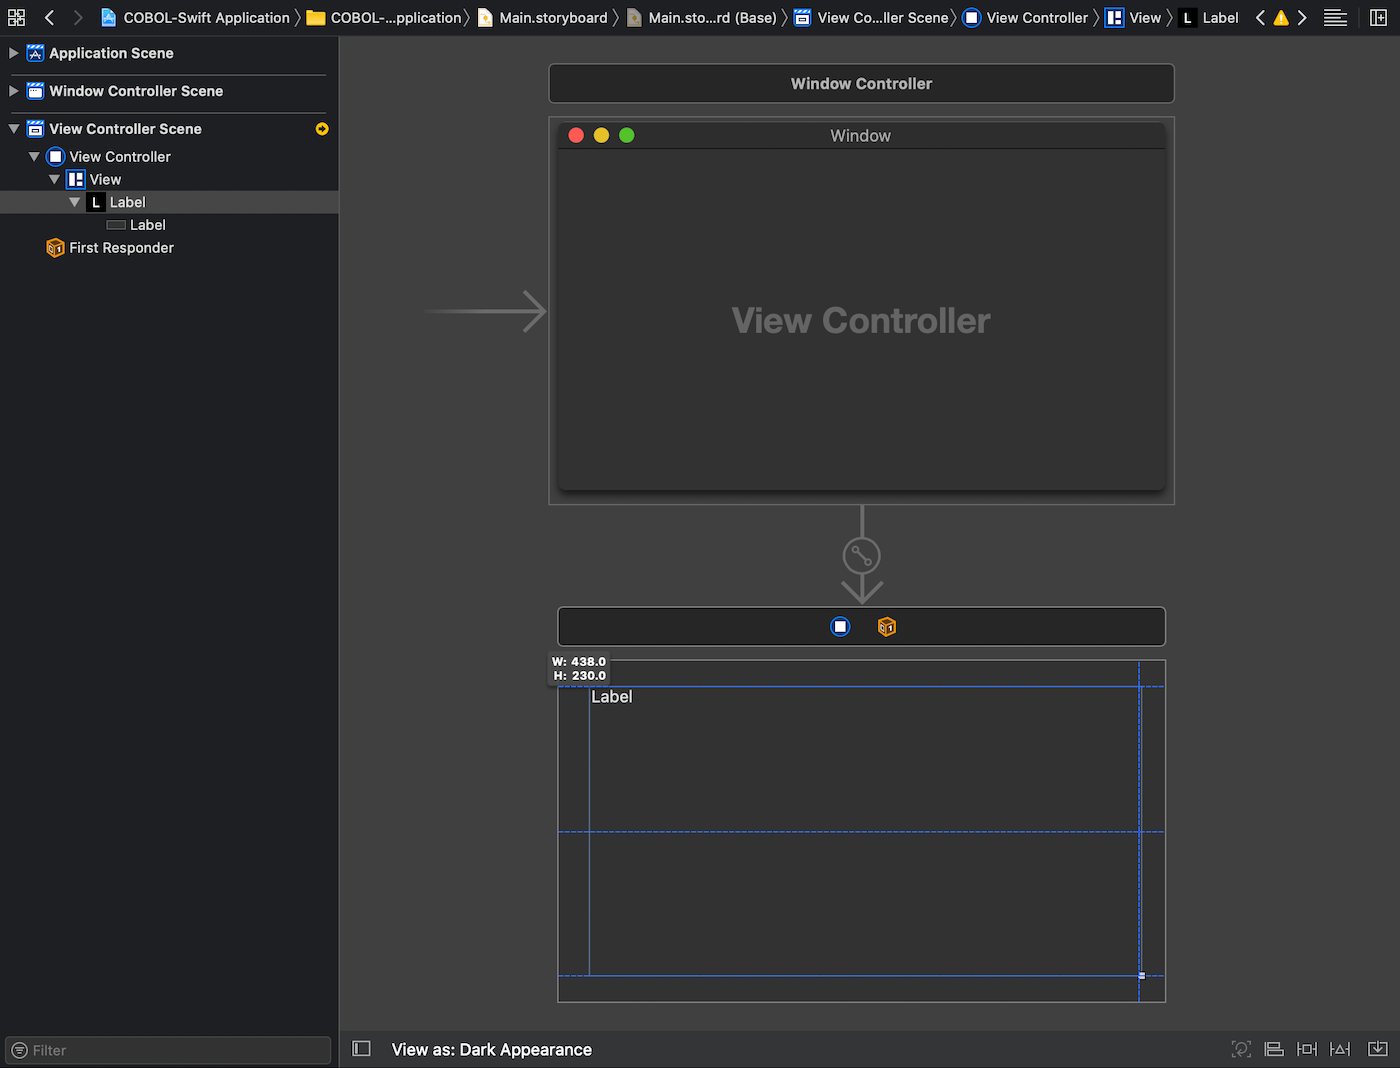
There are two screens: the upper one is for application’s Window Controller and the lower one is a UI counterpart of application’s ViewController.swift, which code we saw in the previous step. Click ➕ button in the upper-right corner of Xcode window. Objects Library window appears. Type Label to filter for necessary UI elements.
有两个屏幕:上一个屏幕用于应用程序的Window Controller,下一个屏幕是应用程序的ViewController.swift的UI对应部分,我们在上一步中看到了这些代码。 单击Xcode窗口右上角的➕按钮。 出现“对象库”窗口。 键入Label以过滤必要的UI元素。

Click and hold to drag-and-drop it onto the Storyboard’s lower ViewController screen and place it in the center of it.
单击并按住以将其拖放到情节提要的下部ViewController屏幕上,并将其放置在其中央。

While the label is selected and focused, click on its upper-left corner to stretch it towards the window’s upper-left edge. Do the same for its lower-right corner and stretch it towards the window’s lower-right edge.
选择并聚焦标签后,单击其左上角以将其向窗口的左上边缘拉伸。 对它的右下角执行相同的操作,并将其向窗口的右下边缘拉伸。
Let’s change the label text color to green. In Attributes Inspector on the right click Text Color and choose System Green Color from the drop-down menu.
让我们将标签文本颜色更改为绿色。 在右侧的“属性检查器”中,单击“ 文本颜色”,然后从下拉菜单中选择“ 系统绿色” 。

Step 4. Now we need to bind the label to ViewController.swift class. It will allow us to have control over the UI element in code and assign various text to it programmatically later.
步骤4.现在,我们需要将标签绑定到ViewController.swift类。 这将使我们能够控制代码中的UI元素,并在以后以编程方式为其分配各种文本。
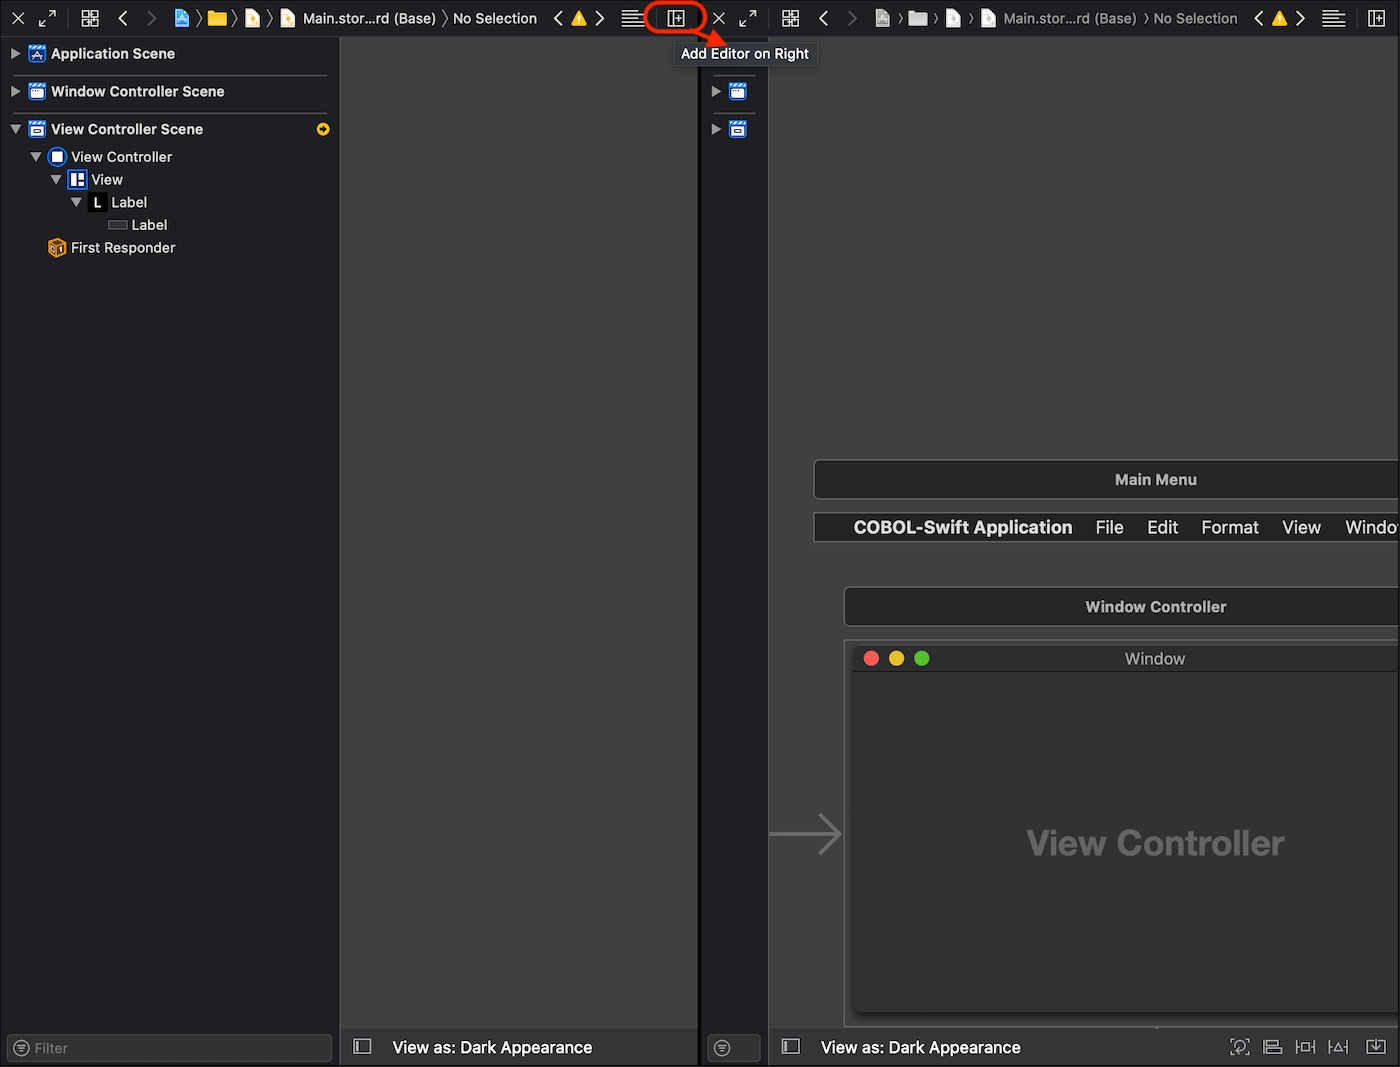
Click Add Editor on the Right button in the upper-right corner to split the Editor into two views.
单击右上角“向右”按钮上的“添加编辑器”,将编辑器分为两个视图。
In Project Navigator on the left, locate and click ViewController.swift class, so that one Editor view shows ViewController’s code and the other one - its Storyboard’s component.
在左侧的Project Navigator中,找到并单击ViewController.swift类,以便一个“编辑器”视图显示ViewController的代码,而另一个视图显示其Storyboard的组件。

Select the text label in the second Editor, and click Show the Connections Inspector button in the upper-right corner of Xcode window. Locate Referencing Outlets section just below that button, click and hold to stretch a thread out to ViewController.swift code.
在第二个编辑器中选择文本标签,然后单击Xcode窗口右上角的Show the Connections Inspector按钮。 在该按钮下方找到“ 引用出口”部分,单击并按住以将线程延伸到ViewController.swift代码。

Release it right underclass ViewController: NSViewController { line. Once the connection dialog appeared, type cobolOutputLabel, and click Connect.
在class ViewController: NSViewController {下释放它class ViewController: NSViewController {行。 连接对话框出现后,键入cobolOutputLabel ,然后单击Connect 。

The cobolOutputLabel is our text label’s name to reference in the code later. If you can see
cobolOutputLabel是我们文本标签的名称,供以后在代码中引用。 如果你看到
import Cocoaclass ViewController: NSViewController {
  @IBOutlet var cobolOutputLabel: NSTextField!
line appeared, then UI element’s binding to the code is done successfully and you can now assign any values to it programmatically.
行出现,则UI元素到代码的绑定成功完成,您现在可以通过编程为其分配任何值。
Step 5. Click the right-most ✖ button to close the second Editor view for Storyboard. In the remaining Editor with ViewController.swift code, locate viewDidLoad method - it can be considered as the entry point to our application’s main screen because it is called right after the ViewController’s view has been loaded into memory. Add the following code:
步骤5.单击最右侧的✖按钮以关闭第二个Storyboard的Editor视图。 在剩下的带有ViewController.swift代码的Editor中,找到viewDidLoad方法-可以将其视为应用程序主屏幕的入口点,因为它是在ViewController的视图加载到内存中后立即调用的。 添加以下代码:
override func viewDidLoad() {
  super.viewDidLoad()  updateCobolOutputLabel(with: "Preparing to load COBOL output...")
}private func updateCobolOutputLabel(with text: String) {
  DispatchQueue.main.async { [weak self] in
    self?.cobolOutputLabel.stringValue = text
  }
}
Here we define a new function to assign some text to cobolOutputLabel and immediately call it from viewDidLoad method. We put the label-related code into Swift DispatchQueue.main closure to ensure that UI update process is always performed in the main thread. We’ll see why it is important in the next part.
在这里,我们定义了一个新函数,将一些文本分配给cobolOutputLabel并立即从viewDidLoad方法中调用它。 我们将与标签相关的代码放入Swift DispatchQueue.main闭包中,以确保始终在主线程中执行UI更新过程。 我们将在下一部分中看到为什么它很重要。
Now build and run again - the application’s main window is showing the text you’ve just entered in code.
现在,再次构建并运行-应用程序的主窗口将显示您刚刚在代码中输入的文本。

Now since we’re done with UI setup, we can stop the build and get down to coding!
现在,由于我们完成了UI设置,因此可以停止构建并开始编写代码!
第2部分。设置COBOL-Swift代码交互 (Part 2. Setting up COBOL - Swift code interaction)
Zowe can significantly simplify our communication with the COBOL-running IBM environment. If we want to use Zowe CLI programmatically, we can effectively script it with bash (look here and there for some examples), zsh or any other scripting language. We can easily use even Swift as a scripting language, but when it comes to the level of modern powerful user-responsive desktop application…
Zowe可以大大简化我们与运行COBOL的 IBM环境之间的通信。 如果我们想以编程方式使用Zowe CLI,则可以使用bash ( 在此处和此处查看一些示例), zsh或任何其他脚本语言有效地对其进行脚本编写。 我们甚至可以轻松地将Swift用作脚本语言 ,但是就现代功能强大的用户响应桌面应用程序而言……
Well, using macOS built-in Process and Pipe classes combined with Zowe CLI invocations lets us “extend” the scripting way to that level. As per Apple’s documentation:
好吧,结合使用macOS内置的Process和Pipe类以及Zowe CLI调用,我们可以将脚本方式“扩展”到该级别。 根据Apple的文档 :
Using the Process class, your program can run another program as a subprocess and can monitor that program’s execution.
使用Process类,您的程序可以将另一个程序作为子进程运行,并可以监视该程序的执行。
Sounds exactly like what we need to apply to automate actions for Zowe CLI routines: those like data sets creation/uploading/deletion, job submission/cancellation/viewing, etc.
听起来完全像我们需要为Zowe CLI例程自动执行的操作:诸如数据集的创建/上传/删除,作业提交/取消/查看等。
Step 1. In Project Navigator, locate and click COBOL_Swift_Application.entitlements file. Click on the most right ⬍ button for App Sandbox entitlements field, you’ll see a dropdown menu with YES and NO values. Choose NO.
步骤1.在Project Navigator中,找到并单击COBOL_Swift_Application.entitlements文件。 单击“ App Sandbox权利字段中最右边的⬍按钮,您将看到一个包含YES和NO值的下拉菜单。 选择NO 。

Step 2. Get back to ViewController.swift and create a new method with a few lines of code:
步骤2.返回ViewController.swift并使用几行代码创建一个新方法:
private func run(_ zoweCLI: String) -> Data {
  let processId = ProcessInfo.processInfo.processIdentifier
  let pipe = Pipe()
  let subprocess = Process()
  subprocess.standardOutput = pipe
  subprocess.standardError = pipe  let exportPath = "export PATH=\"$PATH:\"/usr/local/bin"
  subprocess.arguments = ["-c", exportPath + "; " + zoweCLI]
  subprocess.launchPath = "/bin/zsh"  subprocess.launch()
  subprocess.waitUntilExit()  let file = pipe.fileHandleForReading
  let outputData = file.readDataToEndOfFile()  return outputData
}
This method will be responsible for running our Zowe commands. It is a simple function, which takes a single Zowe command as a String parameter, performs it in the nested code, and returns Zowe outputData as an execution result. Let’s take a closer look.
此方法将负责运行我们的Zowe命令。 这是一个简单的函数,它将单个Zowe命令作为String参数,在嵌套代码中执行它,然后返回Zowe outputData作为执行结果。 让我们仔细看看。
First, we create a subprocess and an interface for accessing pipe. Then we define necessary properties to enable communication with the subprocess through the pipe. To access Zowe CLI, we have put it inside the $PATH, or we can easily access it by defining the path in /etc/paths. We assign zsh (as per my personal choice) as a shell to run the input from arguments property, but you can feel free and change it to bash (/bin/bash) or any other shell of your choice. After that, we launch the subprocess and wait for the completion of its execution. Finally, we read the output data from the pipe and return the data to the calling function. The code is pretty self-descriptive.
首先,我们创建一个子进程和一个用于访问pipe的接口。 然后,我们定义必要的属性,以允许通过管道与子流程进行通信。 要访问Zowe CLI,我们将其放在$PATH ,或者可以通过在/etc/paths定义路径来轻松访问它。 我们将zsh (根据我个人的选择)指定为外壳程序,以运行arguments属性的输入,但是您可以随意将其更改为bash ( /bin/bash )或您选择的任何其他外壳程序 。 之后,我们启动子流程并等待其执行完成。 最后,我们从管道读取输出数据,并将数据返回给调用函数。 该代码具有很强的自我描述性。
Step 3. Time to add our first Zowe command that will be run by the method added in the previous step. Scroll back to viewDidLoad and add below cobolOutputLabel assignment:
步骤3.是时候添加我们的第一个Zowe命令,该命令将由上一步中添加的方法运行。 滚动回viewDidLoad并在下面添加cobolOutputLabel分配:
override func viewDidLoad() {
  super.viewDidLoad()  updateCobolOutputLabel(with: "Preparing to load COBOL output...")  DispatchQueue.global(qos: .utility).async { [weak self] in
    self?.launchZoweCommands()
  }
}private func launchZoweCommands() {
  // Check connection
  let zoweCommand = "zowe zosmf check status --rfj"
  let zoweData = run(zoweCommand)}
We create a separate function to launch Zowe commands. Since we first need to check if the user is connected and the system is on, we pass zowe zosmf check status --rfj to our run method as a simple String parameter and save the return value to zoweData object.
我们创建了一个单独的函数来启动Zowe命令。 由于首先需要检查用户是否已连接并且系统已打开,因此我们将zowe zosmf check status --rfj作为简单的String参数zowe zosmf check status --rfj给我们的run方法,并将返回值保存到zoweData对象。
We put launchZoweCommands() method in DispatchQueue.global closure to launch it in the background thread, and not in the main thread. The main thread is the thread where all UI-related events and updates are happening and we have to keep it unblocked so that our application doesn’t actually “freeze” while waiting and processing time-consuming Zowe operations.
我们将launchZoweCommands()方法放在DispatchQueue.global闭包中,以在后台线程而不是主线程中启动它。 主线程是所有与UI相关的事件和更新都在发生的线程,我们必须使其不受阻塞,以便我们的应用程序在等待和处理耗时的Zowe操作时实际上不会“冻结”。
IMPORTANT: Don’t forget to suffix each Zowe command with
--rfjor--response-format-jsonglobal option. It orders Zowe to produce JSON formatted data output. It is what our next step heavily relies on.重要提示:不要忘记在每个Zowe命令后缀
--rfj或--response-format-json全局选项。 它命令Zowe生成JSON格式的数据输出。 这是我们下一步要高度依靠的。
Since we got our data, we can go ahead and verify its validity by checking its data fields.
既然获得了数据,我们就可以通过检查其数据字段来验证其有效性。
Step 4. Next, we need to create a method to parse the return JSON data. Like COBOL, Swift allows us to use a very brief and convenient way to parse JSON into the struct fields (aka items within a group item). Let’s add the definition for the following structs to our ViewController.swift:
步骤4.接下来,我们需要创建一种方法来解析返回的JSON数据。 像COBOL一样, Swift允许我们使用一种非常简短便捷的方式将JSON解析为struct字段(也称为组项目中的项目)。 让我们将以下struct的定义添加到我们的ViewController.swift :
import Cocoaclass ViewController: NSViewController {
  @IBOutlet var cobolOutputLabel: NSTextField!  private struct ZoweCLIResponse<T: Decodable>: Decodable {
    let success: Bool
    let exitCode: Int
    let message: String
    let stdout: String
    let stderr: String
    let data: T

    func isValid() -> Bool {
      switch data {
      case is Jobs:
        return success && exitCode == 0 && (data as? Jobs)?.retcode == "CC 0000"
      case is Files:
        return success && exitCode == 0 && (data as? Files)?.success == true
      default:
        return success && exitCode == 0
      }
    }
  }  private struct ZOSMF: Decodable {
    let zos_version: String
  }  private struct Jobs: Decodable {
    let jobid: String
    let retcode: String
  }  private struct Files: Decodable {
    let success: Bool
    let commandResponse: String
  }
Here we define the main (but not all of) JSON fields from different Zowe responses. Below is an example of a common response for zowe zosmf check status --rfj command:
在这里,我们定义了来自不同Zowe响应的主要(但不是全部) JSON字段。 以下是zowe zosmf check status --rfj命令的常见响应示例:
The success, exitCode, message, stdout and stderr fields are always there for any kind of Zowe command. But pay attention to a data field. This one is tricky and does have various fields inside of it, depending on Zowe command type (i e zowe zosmf ..., zowe jobs ..., zowe files ..., etc). That’s why we apply Swift generics for data field type to make it possible to dynamically identify those nested fields and parse them into an appropriate struct type (i e ZOSMF, Jobs, Files).
success , exitCode , message , stdout和stderr字段对于任何类型的Zowe命令始终都存在。 但是要注意一个data字段。 根据Zowe命令类型(即zowe zosmf ... , zowe jobs ... , zowe files ...等等),这是一个棘手的问题,并且其中确实包含多个字段。 这就是为什么我们将Swift泛型应用于data字段类型,以便可以动态标识那些嵌套字段并将其解析为适当的struct类型(即ZOSMF , Jobs和Files )。
We also provide a convenient function to validate the response. We must check success boolean field for being true and exitCode integer field for being 0, at least, for any type of response. And we should check more additional fields for some specific responses.
我们还提供了方便的功能来验证响应。 至少对于任何类型的响应,我们都必须检查success布尔值字段是否为true以及exitCode整数字段是否为0 。 并且我们应该检查更多其他字段以获取一些特定的响应。
Now to actually parse the data and have all values on the right places, we only need to add one more line of code in viewDidLoad right after zoweData assignment:
现在要实际解析数据并将所有值放在正确的位置,我们只需要在zoweData分配后zoweData在viewDidLoad添加一行代码:
private func launchZoweCommands() {
  // Check connection
  let zoweCommand = "zowe zosmf check status --rfj"
  let zoweData = run(zoweCommand)
  let zoweResponse = try? JSONDecoder().decode(ZoweCLIResponse<ZOSMF>.self, from: zoweData)
}
Optional error throwing with try? here, ignores any parsing exceptions to keep things simple. Error handling is a separate topic, but in case of an error we’ll just have nil inside of optional zoweResponse object. This response object will be checked for its value in the next step. Note that we explicitly tell JSONDecoder which response subtype to apply for data field by writing ZoweCLIResponse<ZOSMF>.
try?抛出可选错误try? 在这里,忽略任何解析异常以使事情保持简单。 错误处理是一个单独的主题,但是如果发生错误,我们将在可选的 zoweResponse对象内使用nil 。 下一步将检查此响应对象的值。 请注意,我们通过编写ZoweCLIResponse<ZOSMF>明确告诉JSONDecoder哪个响应子类型适用于data字段。
Step 5. It might be helpful for us to log typical command output somewhere for debugging purposes. Let’s include the following two lines before parsing the response data:
步骤5.对于我们将典型命令输出记录在某处以进行调试可能会有所帮助。 在解析响应数据之前,让我们包括以下两行:
private func launchZoweCommands() {
  // Check connection
  let zoweCommand = "zowe zosmf check status --rfj"
  let zoweData = run(zoweCommand)
  let zoweJson = String(data: zoweData, encoding: .utf8)!
  print("Response for " + zoweCommand + ":\n" + zoweJson)
  let zoweResponse = try? JSONDecoder().decode(ZoweCLIResponse<ZOSMF>.self, from: zoweData)
}
First we perform JSON data conversion to String and assign it to zoweJson variable. It returns the optional value and we apply ! at the end of line to perform force unwrapping of the expression result. This should be used with caution and only when we know for sure that the optional value can not be nil and must contain some value. The print statement outputs raw JSON response to Xcode console.
首先,我们将JSON数据转换为String并将其分配给zoweJson变量。 它返回可选值,我们应用! 在行尾执行强制展开表达式结果。 仅当我们确定可选值不能为nil并且必须包含某些值时,才应谨慎使用此选项。 print语句将原始JSON响应输出到Xcode控制台。
It’s time to verify the validity of the response fields for the given zowe zosmf check status --rfj command. Add some more lines with if else chain:
现在该验证给定的zowe zosmf check status --rfj命令的响应字段的有效性。 使用if else链添加更多行:
private func launchZoweCommands() {
  // Check connection
  let zoweCommand = "zowe zosmf check status --rfj"
  let zoweData = run(zoweCommand)
  let zoweJson = String(data: zoweData, encoding: .utf8)!
  print("Response for " + zoweCommand + ":\n" + zoweJson)
  let zoweResponse = try? JSONDecoder().decode(ZoweCLIResponse<ZOSMF>.self, from: zoweData)
  if zoweResponse?.isValid() == true {
    updateCobolOutputLabel(with: "Connection established.")
  } else {
    updateCobolOutputLabel(with: "Failure: " + zoweJson)
  }
}
The response validation is done by the function we provided in the previous step. Using zoweResponse with ? is called optional chaining in Swift and falls to else section if zoweResponse is nil (that has no data inside). We then call our updateCobolOutputLabel method with a new String value and let the user know about either successful completion of the Zowe invocation or error occurred.
响应验证是通过上一步中提供的功能完成的。 将zoweResponse与? 在Swift中称为“ 可选链接” ,如果zoweResponse为nil (内部没有数据),则zoweResponse为else节。 然后,我们调用我们的updateCobolOutputLabel方法用一个新字符串值,然后让用户了解Zowe调用或错误发生的任何成功完成。
Let’s build and run before we go on. We should see the following screen at the end of the execution.
在继续之前,让我们构建并运行。 执行结束后,我们应该看到以下屏幕。

Go ahead and check Xcode console just below the Editor on the right. Scroll it up to see the debug message we’ve just added:
继续并检查右侧Editor下方的Xcode控制台。 向上滚动以查看我们刚刚添加的调试消息:
NOTE: If something goes wrong and you don’t have the same results, I recommend you to open Terminal application and run
zowe zosmf check statusin it. In case of success in Terminal output, you need to review all the steps again and check your code input to Xcode IDE. In case of failure in Terminal output, you need to resolve Zowe setup or credentials issue. Some helpful advices can be found here.注意:如果出了什么问题而您没有相同的结果,建议您打开终端应用程序并在其中运行
zowe zosmf check status。 如果终端输出成功,则需要再次检查所有步骤,并检查输入到Xcode IDE的代码。 如果终端输出失败,则需要解决Zowe设置或凭据问题。 一些有用的建议可以在这里找到。
Step 6. Now we get down to the most interesting part - COBOL and JCL getting uploaded and run from Swift. Define the following string constants at the top of ViewController.swift class and put COBOL and JCL source code there:
第6步。现在,我们进入最有趣的部分-从Swift上载并运行COBOL和JCL 。 在ViewController.swift类的顶部定义以下字符串常量,并将COBOL和JCL源代码放在此处:
import Cocoaclass ViewController: NSViewController {
  @IBOutlet var cobolOutputLabel: NSTextField!  private enum Const {
    static let kUserId = "Z99998"
    static let kProgId = "CBLSWIFT"
  }private let sourceCBL = """
000000*A-1-B--+----2----+----3----+----4----+----5----+----6----+----7-|--+----8
000100*------------------------------
000200 IDENTIFICATION DIVISION.
000300*------------------------------
000400 PROGRAM-ID. \(Const.kProgId).
000500 AUTHOR.     \(Const.kUserId).
000600*------------------------------
000700 PROCEDURE DIVISION.
000800     DISPLAY 'This is output from \(Const.kUserId).CBL(\(Const.kProgId)) program!'.
000900     STOP RUN.
"""private let sourceJCL = """
//\(Const.kProgId) JOB  1,NOTIFY=&SYSUID
//COBRUN      EXEC IGYWCLG,SRC=\(Const.kProgId)
"""
NOTE: Make certain you’ve changed
Z99998value to your personal Mainframe ID, provided in terms of COBOL Programming with VSCode course.注意:确保已将
Z99998值更改为您的个人Mainframe ID ,这是使用VSCode课程进行COBOL编程提供的 。IMPORTANT: Each line of both COBOL and JCL source must start from the very beginning of the line, that is at first column! Additional attention for this needed because simple copy-paste into Xcode Editor adds default indentation, so be careful about that.
重要信息: COBOL和JCL源代码的每一行都必须从该行的开头开始,也就是第一列! 需要额外注意这一点,因为简单地复制粘贴到Xcode Editor中会添加默认缩进,因此请注意这一点。
Here we apply three double quotes """ to use strings that take up multiple lines. We also perform String interpolation with kProgId and kUserId constants to enable dynamic substitution for PROGRAM-ID and AUTHOR values and DISPLAY message in COBOL source code. You can see kProgId in the JCL as well, which might make us think of automating JCL source creation in the mist... Now if want to change the name of our COBOL program and its JCL, we can assign a different value to kProgId constant in a single place instead of going through the source code and changing all instances there. The same technics can be addressed when working with filenames in COBOL (i e for SELECT and ASSIGN TO clauses in FILE-CONTROL paragraph, FILE SECTION definitions, OPEN INPUT and OPEN OUTPUT, READ, CLOSE, etc)
在这里,我们使用三个双引号"""来使用占用多行的字符串。我们还使用kProgId和kUserId常量执行字符串插值,以对COBOL源代码中的PROGRAM-ID和AUTHOR值以及DISPLAY消息进行动态替换。 JCL中的 kProgId也是如此,这可能使我们想到在薄雾中自动创建JCL源...现在,如果要更改我们的COBOL程序及其JCL的名称,我们可以在一个单一的kProgId常量中分配一个不同的值而不是遍历源代码并更改所有实例。在COBOL中使用文件名时,可以解决相同的技术(即FILE-CONTROL段落中的SELECT和ASSIGN TO子句, FILE SECTION定义, OPEN INPUT和OPEN OUTPUT , READ , CLOSE等)
Add two more shortcode blocks to automate two more Zowe commands next to the previous if chain:
在前面的if链旁边添加另外两个shortcode块,以自动化另外两个Zowe命令:
private func launchZoweCommands() {
  // Check connection
  let zoweCommand = "zowe zosmf check status --rfj"
  let zoweData = run(zoweCommand)
  let zoweJson = String(data: zoweData, encoding: .utf8)!
  print("Response for " + zoweCommand + ":\n" + zoweJson)
  let zoweResponse = try? JSONDecoder().decode(ZoweCLIResponse<ZOSMF>.self, from: zoweData)
  if zoweResponse?.isValid() == true {
    updateCobolOutputLabel(with: "Connection established. Uploading CBL data set member...")
  } else {
    updateCobolOutputLabel(with: "Failure: " + zoweJson)
  }  // Upload COBOL source from stdin
  let uploadCblCommand = "echo \"\(sourceCBL)\" | zowe files upload stdin-to-data-set \"\(Const.kUserId).CBL(\(Const.kProgId))\" --rfj"
  let uploadCblData = run(uploadCblCommand)
  let uploadCblJson = String(data: uploadCblData, encoding: .utf8)!
  print("Response for " + uploadCblCommand + ":\n" + uploadCblJson)
  let uploadCblResponse = try? JSONDecoder().decode(ZoweCLIResponse<Files>.self, from: uploadCblData)
  if uploadCblResponse?.isValid() == true {
    updateCobolOutputLabel(with: "Upload COBOL source done. Uploading JCL data set member...")
  } else {
    updateCobolOutputLabel(with: "Failure: " + uploadCblJson)
  }  // Upload JCL source from stdin
  let uploadJclCommand = "echo \"\(sourceJCL)\" | zowe files upload stdin-to-data-set \"\(Const.kUserId).JCL(\(Const.kProgId))\" --rfj"
  let uploadJclData = run(uploadJclCommand)
  let uploadJclJson = String(data: uploadJclData, encoding: .utf8)!
  print("Response for " + uploadJclCommand + ":\n" + uploadJclJson)
  let uploadJclResponse = try? JSONDecoder().decode(ZoweCLIResponse<Files>.self, from: uploadJclData)
  if uploadJclResponse?.isValid() == true {
    updateCobolOutputLabel(with: "Upload JCL source done.")
  } else {
    updateCobolOutputLabel(with: "Failure: " + uploadJclJson)
  }
}
Looks very similar to the previous step, but we use different Zowe commands - this time they are for uploading:
看起来与上一步非常相似,但是我们使用了不同的Zowe命令-这次它们是用于上传的 :
zowe files upload stdin-to-data-set "Z99998.CBL(CBLSWIFT)" --rfjzowe files upload stdin-to-data-set "Z99998.JCL(CBLSWIFT)" --rfjAnother trick here is using echo and pipes | to redirect COBOL and JCL source code into stdin for uploading it with Zowe (just like in Zowe CLI docs here). The String interpolation is used again to substitute Zowe data set and data set member names with the user’s constant values. Note that we keep updating cobolOutputLabel with the current status change.
这里的另一个技巧是使用echo和管道| 重定向COBOL和JCL源代码转换为标准输入与Zowe上传(就像在Zowe CLI文档在这里 )。 再次使用字符串插值法将Zowe数据集和数据集成员名称替换为用户的常量值。 请注意,我们将使用当前状态更改不断更新cobolOutputLabel 。
Feel free to build and run. Since Z99998.CBL / Z99998.JCL data sets exist by default for your personal Mainframe ID, we can upload/reupload our CBLSWIFT data set members as many times as we want.
随意构建和运行。 由于您的个人大型机ID默认存在Z99998.CBL / Z99998.JCL数据集,因此我们可以根据需要多次上载/重新上传CBLSWIFT数据集成员。

If we take a look at Xcode console again we’ll see the updated debug message for our fresh Zowe upload JSON responses:
如果再次查看Xcode控制台,我们将看到新的Zowe上传JSON响应的更新的调试消息:
NOTE: We’ve placed COBOL and JCL source code to the regular constants here, but you can go ahead and optionally use real
.CBLand.JCLfiles instead. In this case, you’ll have to handle their upload withzowe files upload file-to-data-set ....注意:我们在此处将COBOL和JCL源代码放置到常规常量中,但是您可以继续进行,并可以选择使用实际的
.CBL和.JCL文件。 在这种情况下,您将不得不使用zowe files upload file-to-data-set ...处理它们的上传。zowe files upload file-to-data-set ...
Step 7. Finally, it’s time to add code for programming two last Zowe commands:
第7步。最后,是时候添加用于编写最后两个Zowe命令的代码了:
zowe jobs submit data-set "Z99998.JCL(CBLSWIFT)" --wfo --rfjzowe jobs view spool-file-by-id JOB00001 104 --rfjThe first one just launches COBOL code on the mainframe and waits for its output to become available, while the second one grabs the output and returns it as JSON data. Add them right below the last if blocks:
第一个只是在大型机上启动COBOL代码,并等待其输出变为可用,而第二个则获取输出并将其作为JSON数据返回。 将它们添加到最后一个if块的正下方:
  // Upload JCL source from stdin
  let uploadJclCommand = "echo \"\(sourceJCL)\" | zowe files upload stdin-to-data-set \"\(Const.kUserId).JCL(\(Const.kProgId))\" --rfj"
  let uploadJclData = run(uploadJclCommand)
  let uploadJclJson = String(data: uploadJclData, encoding: .utf8)!
  print("Response for " + uploadJclCommand + ":\n" + uploadJclJson)
  let uploadJclResponse = try? JSONDecoder().decode(ZoweCLIResponse<Files>.self, from: uploadJclData)
  if uploadJclResponse?.isValid() == true {
    updateCobolOutputLabel(with: "Upload JCL source done. Submitting job for execution...")
  } else {
    updateCobolOutputLabel(with: "Failure: " + uploadJclJson)
  }  // Submit JCL job
  let submitJobCommand = "zowe jobs submit data-set \"\(Const.kUserId).JCL(\(Const.kProgId))\" --wfo --rfj"
  var optionalJobId: String?
  let submitJobData = run(submitJobCommand)
  let submitJobJson = String(data: submitJobData, encoding: .utf8)!
  print("Response for " + submitJobCommand + ":\n" + submitJobJson)
  let submitJobResponse = try? JSONDecoder().decode(ZoweCLIResponse<Jobs>.self, from: submitJobData)
  if submitJobResponse?.isValid() == true {
    updateCobolOutputLabel(with: "Submit job done. Loading view spool file with id 104...")
    optionalJobId = submitJobResponse?.data.jobid
  } else {
    updateCobolOutputLabel(with: "Failure: " + submitJobJson)
  }  guard let jobId = optionalJobId else {
    return
  }  // View job output
  let viewOutputCommand = "zowe jobs view spool-file-by-id \(jobId) 104 --rfj"
  let viewOutputData = run(viewOutputCommand)
  let viewOutputJson = String(data: viewOutputData, encoding: .utf8)!
  print("Response for " + viewOutputCommand + ":\n" + viewOutputJson)
  let viewOutputResponse = try? JSONDecoder().decode(ZoweCLIResponse<String>.self, from: viewOutputData)
  if viewOutputResponse?.isValid() == true {
    updateCobolOutputLabel(with: viewOutputResponse!.data)
  } else {
    updateCobolOutputLabel(with: "Failure: " + viewOutputJson)
  }
}
The first Zowe command here returns jobid value, which is contained in its response’s data field as a nested jobid subfield. This jobid parameter is required by the second Zowe invocation. That’s why we make sure jobid is retrieved and is not nil (that is it has some data inside), by unwrapping it with Swift guard let optional binding. In case jobid is not retrieved and is nil thereby, we return from the function and do not proceed.
这里的第一个Zowe命令返回jobid值,该值包含在响应的data字段中作为嵌套的jobid子字段。 第二个Zowe调用需要此jobid参数。 这就是为什么我们通过使用Swift guard let 可选binding来解包jobid并确保它不是nil (即其中包含一些数据)的原因。 如果没有检索到jobid并因此为nil ,则我们从函数返回并且不继续。
For the last Zowe response, we make JSONDecoder parse its data field as a String by writing ZoweCLIResponse<String>. Thus we retrieve an actual output for executed COBOL code, assign it to cobolOutputLabel and display it on the application’s screen.
在过去的Zowe响应,我们做出JSONDecoder分析它data字段作为一个字符串写入ZoweCLIResponse<String> 。 因此,我们检索已执行的COBOL代码的实际输出,并将其分配给cobolOutputLabel 并将其显示在应用程序的屏幕上。
Build and run. You should see the sequential change of Zowe status and final ”This is output from Z99998.CBL(CBLSWIFT) program!” message from our COBOL program.
生成并运行。 您应该看到Zowe状态的顺序更改和最终的“这是Z99998.CBL(CBLSWIFT)程序的输出!” 来自我们的COBOL程序的消息。

Xcode console keeps our logs for the two last Zowe JSON responses:
Xcode控制台保留最后两个Zowe JSON响应的日志:
That’s it! After all, here is what our final ViewController.swift class should look like:
而已! 毕竟,这是我们最终的ViewController.swift类应该是什么样的:
That same way we can execute any other COBOL code in our Swift application and view various spool files output by their id. We can go a step forward, create our own Swift Zowe CLI wrapper class and use an enum-based constructor to build some more complicated Zowe command objects. Check this repository for a more sophisticated version of this sample project.
同样,我们可以在Swift应用程序中执行任何其他COBOL代码,并查看由其id输出的各种后台打印文件 。 我们可以向前走,创建自己的Swift Zowe CLI包装器类,并使用基于枚举的构造函数来构建一些更复杂的Zowe命令对象。 检查此存储库以获取此示例项目的更复杂的版本。
Zowe is owned and managed by the Open Mainframe Project that is a Linux Foundation project.
Zowe由Linux基金会项目Open Mainframe Project拥有和管理。
Click the links to learn more about Zowe and more Zowe blogs.
P.S. Inspired by Jessielaine Punongbayan’s COBOL Challenge: Covid-19 Reports and Michael Bauer. Thank you so much for giving me this great opportunity to contribute!
PS受Jessielaine Punongbayan的COBOL挑战:Covid-19 Reports和Michael Bauer的启发。 非常感谢您给我这个巨大的贡献机会!
翻译自: https://medium.com/zowe/cobol-swift-app-with-zowe-cli-59af2100110c


 3009
3009

 被折叠的 条评论
为什么被折叠?
被折叠的 条评论
为什么被折叠?
 到【灌水乐园】发言


