


A geofence is a virtual perimeter set on a real geographic area. Combining a user position with a geofence perimeter, it is possible to know if the user is inside the geofence or if he is exiting or entering the area.
地理围栏是在真实地理区域上设置的虚拟边界。 将用户位置与地理围栏范围相结合,可以知道用户是否在地理围栏内,或者他是否正在离开或进入该区域。
In this article, we will discuss how to use the geofence to notify the user when the device enters/exits an area using the HMS Location Kit in a Xamarin.Android application. We will also add and customize HuaweiMap, which includes drawing circles, adding pointers, and using nearby searches in search places. We are going to learn how to use the below features together:
在本文中,我们将讨论如何使用Xamarin.Android应用程序中的HMS位置套件,在设备进入/退出区域时使用地理围栏通知用户。 我们还将添加和自定义HuaweiMap,其中包括绘图圆,添加指针以及在搜索位置中使用附近的搜索。 我们将学习如何一起使用以下功能:
- Geofence 地理围栏
- Reverse Geocode反向地理编码
- HuaweiMap华为地图
- Nearby Search附近搜寻
项目设置(Project Setup)
First of all, you need to be a registered Huawei Mobile Developer and create an application in Huawei App Console in order to use HMS Map Location and Site Kits. You can follow these steps to complete the configuration that required for development:
首先,您需要注册为Huawei Mobile Developer并在Huawei App Console中创建一个应用程序,才能使用HMS Map Location和Site Kit。 您可以按照以下步骤完成开发所需的配置:
When we create our Xamarin.Android application in the above steps, we need to make sure that the package name is the same as we entered the Console. Also, don’t forget the enable them in Console.
在上述步骤中创建Xamarin.Android应用程序时,我们需要确保程序包名称与输入控制台时的名称相同。 另外,不要忘记在控制台中启用它们。
清单和权限 (Manifest & Permissions)
We have to update the application’s manifest file by declaring permissions that we need as shown below.
我们必须通过声明所需的权限来更新应用程序的清单文件,如下所示。
<uses-permission android:name="android.permission.ACCESS_COARSE_LOCATION" />
<uses-permission android:name="android.permission.ACCESS_FINE_LOCATION" />
<uses-permission android:name="android.permission.INTERNET" />
<uses-permission android:name="android.permission.WRITE_EXTERNAL_STORAGE" />
<uses-permission android:name="android.permission.ACCESS_NETWORK_STATE" />
<uses-permission android:name="android.permission.ACCESS_BACKGROUND_LOCATION" />
Also, add a meta-data element to embed your app id in the application tag, it is required for this app to authenticate on the Huawei’s cloud server. You can find this id in agconnect-services.json file.
另外,添加一个元数据元素以将您的应用程序ID嵌入到应用程序标签中,此应用程序需要在华为的云服务器上进行身份验证。 您可以在agconnect-services.json文件中找到此ID。
<meta-data android:name="com.huawei.hms.client.appid" android:value="appid=YOUR_APP_ID" />请求位置权限 (Request location permission)
Request runtime permissions in our app in order to use Location and Map Services. The following code checks whether the user has granted the required location permissions in Main Activity.
在我们的应用程序中请求运行时权限,以使用位置和地图服务。 以下代码检查用户是否已在“主要活动”中授予所需的位置权限。
private void RequestPermissions()
{
   if (ContextCompat.CheckSelfPermission(this, Manifest.Permission.AccessCoarseLocation) != (int)Permission.Granted ||
    ContextCompat.CheckSelfPermission(this, Manifest.Permission.AccessFineLocation) != (int)Permission.Granted ||
    ContextCompat.CheckSelfPermission(this, Manifest.Permission.WriteExternalStorage) != (int)Permission.Granted ||
    ContextCompat.CheckSelfPermission(this, Manifest.Permission.ReadExternalStorage) != (int)Permission.Granted ||
    ContextCompat.CheckSelfPermission(this, Manifest.Permission.Internet) != (int)Permission.Granted)
   {
       ActivityCompat.RequestPermissions(this,
           new System.String[]
           {
               Manifest.Permission.AccessCoarseLocation,
               Manifest.Permission.AccessFineLocation,
               Manifest.Permission.WriteExternalStorage,
               Manifest.Permission.ReadExternalStorage,
               Manifest.Permission.Internet
           },
           100);
   }
   else
       GetCurrentPosition();


}


public override void OnRequestPermissionsResult(int requestCode, string[] permissions, [GeneratedEnum] Android.Content.PM.Permission[] grantResults)
{
     if (requestCode == 100)
     {
         foreach (var item in permissions)
         {
             if (ContextCompat.CheckSelfPermission(this, item) == Permission.Denied)
             {
                 if (ActivityCompat.ShouldShowRequestPermissionRationale(this, permissions[0]) || ActivityCompat.ShouldShowRequestPermissionRationale(this, permissions[1]))
                     Snackbar.Make(FindViewById<RelativeLayout>(Resource.Id.mainLayout), "You need to grant permission to use location services.", Snackbar.LengthLong).SetAction("Ask again", v => RequestPermissions()).Show();
                 else
                     Toast.MakeText(this, "You need to grant location permissions in settings.", ToastLength.Long).Show();
             }
             else
                 GetCurrentPosition();
         }
     }
     else
     {
         base.OnRequestPermissionsResult(requestCode, permissions, grantResults);
     }
}新增地图(Add a Map)
Within our UI, a map will be represented by either a MapFragment or MapView object. We will use the MapFragment object in this sample.
在我们的UI中,地图将由MapFragment或MapView对象表示。 我们将在此示例中使用MapFragment对象。
Add a <fragment> element to your activity’s layout file, activity_main.xml. This element defines a MapFragment to act as a container for the map and to provide access to the HuaweiMap object.
将<fragment>元素添加到活动的布局文件activity_main.xml中。 该元素定义一个MapFragment,以充当地图的容器并提供对HuaweiMap对象的访问。
Also, let’s add other controls to use through this sample. That is two Button and a SeekBar. One button for clearing the map and the other for searching nearby locations. And seekbar is helping us to create a radius for the geofence.
另外,让我们添加其他控件以在此示例中使用。 那是两个Button和一个SeekBar。 一个按钮用于清除地图,另一个按钮用于搜索附近的位置。 搜寻杆正在帮助我们为地理围栏创建半径。
<RelativeLayout
    xmlns:android="http://schemas.android.com/apk/res/android"
    xmlns:app="http://schemas.android.com/apk/res-auto"
    xmlns:map="http://schemas.android.com/apk/res-auto"
    xmlns:tools="http://schemas.android.com/tools"
    android:id="@+id/mainLayout"
    android:layout_width="match_parent"
    android:layout_height="match_parent">
    <fragment
        android:id="@+id/mapfragment"
        class="com.huawei.hms.maps.MapFragment"
        android:layout_width="match_parent"
        android:layout_height="match_parent"/>
   <LinearLayout
        android:orientation="vertical"
       android:layout_width="wrap_content"
       android:layout_height="match_parent">
         <Button
        android:text="Get Geofence List"
        android:layout_width="wrap_content"
        android:layout_height="wrap_content"
        android:layout_margin="5dp"
        android:padding="5dp"
        android:background="@drawable/abc_btn_colored_material"
        android:textColor="@android:color/white"
        android:id="@+id/btnGetGeofenceList" />
     <Button
        android:text="Clear Map"
        android:layout_width="wrap_content"
        android:layout_height="wrap_content"
        android:layout_margin="5dp"
        android:background="@drawable/abc_btn_colored_material"
        android:textColor="@android:color/white"
        android:id="@+id/btnClearMap" />
    </LinearLayout>
    <SeekBar
        android:visibility="invisible"
        android:min="30"
        android:layout_alignParentBottom="true"
        android:layout_marginBottom="20dp"
        android:layout_width="match_parent"
        android:layout_height="wrap_content"
        android:id="@+id/radiusBar" />
</RelativeLayout>
In our activity’s OnCreate method, set the layout file as the content view, load AGConnectService, set button’s click events, and initialize FusedLocationProviderClient. Get a handle to the map fragment by calling FragmentManager.FindFragmentById. Then use GetMapAsync to register for the map callback.
在我们活动的OnCreate方法中,将布局文件设置为内容视图,加载AGConnectService,设置按钮的click事件,并初始化FusedLocationProviderClient。 通过调用FragmentManager.FindFragmentById获取地图片段的句柄。 然后使用GetMapAsync注册地图回调。
Also, implement the IOnMapReadyCallback interface to MainActivity and override OnMapReady method which is triggered when the map is ready to use.
另外,对MainActivity实现IOnMapReadyCallback接口,并覆盖在准备好使用地图时触发的OnMapReady方法。
public class MainActivity : AppCompatActivity, IOnMapReadyCallback
 {
        MapFragment mapFragment;
        HuaweiMap hMap;
        Marker marker;
        Circle circle;
        SeekBar radiusBar;


        FusedLocationProviderClient fusedLocationProviderClient;
        GeofenceModel selectedCoordinates;
        List<Marker> searchMarkers;
        private View search_view;
        private AlertDialog alert;


        public static LatLng CurrentPosition { get; set; }
        protected override void OnCreate(Bundle savedInstanceState)
        {
            base.OnCreate(savedInstanceState);
            Xamarin.Essentials.Platform.Init(this, savedInstanceState);
            SetContentView(Resource.Layout.activity_main);


            AGConnectServicesConfig config = AGConnectServicesConfig.FromContext(ApplicationContext);
            fusedLocationProviderClient = LocationServices.GetFusedLocationProviderClient(this);
            mapFragment = (MapFragment)FragmentManager.FindFragmentById(Resource.Id.mapfragment);
            mapFragment.GetMapAsync(this);


            FindViewById<Button>(Resource.Id.btnGeoWithAddress).Click += btnGeoWithAddress_Click;
            FindViewById<Button>(Resource.Id.btnClearMap).Click += btnClearMap_Click;
            radiusBar = FindViewById<SeekBar>(Resource.Id.radiusBar);
            radiusBar.ProgressChanged += radiusBar_ProgressChanged; ;
            RequestPermissions();
        }

        public void OnMapReady(HuaweiMap map)
        {
           hMap = map;
           hMap.UiSettings.MyLocationButtonEnabled = true;
           hMap.UiSettings.CompassEnabled = true;
           hMap.UiSettings.ZoomControlsEnabled = true;
           hMap.UiSettings.ZoomGesturesEnabled = true;
           hMap.MyLocationEnabled = true;
           hMap.MapClick += HMap_MapClick;

           if (selectedCoordinates == null)
               selectedCoordinates = new GeofenceModel { LatLng = CurrentPosition, Radius = 30 };
        }
}
As you can see above, with the UiSettings property of the HuaweiMap object we set my location button, enable compass, etc. Other properties like below:
如上所示,通过HuaweiMap对象的UiSettings属性,我们设置了我的位置按钮,启用指南针等。其他属性如下:
public bool CompassEnabled { get; set; }
public bool IndoorLevelPickerEnabled { get; set; }
public bool MapToolbarEnabled { get; set; }
public bool MyLocationButtonEnabled { get; set; }
public bool RotateGesturesEnabled { get; set; }
public bool ScrollGesturesEnabled { get; set; }
public bool ScrollGesturesEnabledDuringRotateOrZoom { get; set; }
public bool TiltGesturesEnabled { get; set; }
public bool ZoomControlsEnabled { get; set; }
public bool ZoomGesturesEnabled { get; set; }
Now when the app launch, directly get the current location and move the camera to it. In order to do that we use FusedLocationProviderClient that we instantiated and call LastLocation API.
现在,当应用启动时,直接获取当前位置并将相机移动到该位置。 为此,我们使用实例化的FusedLocationProviderClient并调用LastLocation API。
LastLocation API returns a Task object that we can check the result by implementing the relevant listeners for success and failure.In success listener we are going to move the map’s camera position to the last known position.
LastLocation API返回一个Task对象,我们可以通过实现相关的侦听器是否成功来检查结果。在成功的侦听器中,我们将地图的摄像头位置移动到最后一个已知位置。
private void GetCurrentPosition()
{
    var locationTask = fusedLocationProviderClient.LastLocation;
    locationTask.AddOnSuccessListener(new LastLocationSuccess(this));
    locationTask.AddOnFailureListener(new LastLocationFail(this));
}


...


public class LastLocationSuccess : Java.Lang.Object, IOnSuccessListener
    {
        private MainActivity mainActivity;


        public LastLocationSuccess(MainActivity mainActivity)
        {
            this.mainActivity = mainActivity;
        }


        public void OnSuccess(Java.Lang.Object location)
        {
            Toast.MakeText(mainActivity, "LastLocation request successful", ToastLength.Long).Show();
            if (location != null)
            {
                MainActivity.CurrentPosition = new LatLng((location as Location).Latitude, (location as Location).Longitude);
                mainActivity.RepositionMapCamera((location as Location).Latitude, (location as Location).Longitude);
            }
        }


    }
To change the position of the camera, we must specify where we want to move the camera, using a CameraUpdate. The Map Kit allows us to create many different types of CameraUpdate using CameraUpdateFactory.
要更改相机的位置,我们必须使用CameraUpdate指定要移动相机的位置。 Map Kit允许我们使用CameraUpdateFactory创建许多不同类型的CameraUpdate 。
public static CameraUpdate NewCameraPosition(CameraPosition p0);
public static CameraUpdate NewLatLng(LatLng p0);
public static CameraUpdate NewLatLngBounds(LatLngBounds p0, int p1);
public static CameraUpdate NewLatLngBounds(LatLngBounds p0, int p1, int p2, int p3);
public static CameraUpdate NewLatLngZoom(LatLng p0, float p1);
public static CameraUpdate ScrollBy(float p0, float p1);
public static CameraUpdate ZoomBy(float p0);
public static CameraUpdate ZoomBy(float p0, Point p1);
public static CameraUpdate ZoomIn();
public static CameraUpdate ZoomOut();
public static CameraUpdate ZoomTo(float p0);
There are some methods for the camera position changes as we see above. Simply these are:
如上所述,有一些方法可以更改相机的位置。 简单来说就是:
1. NewLatLng: Change camera’s latitude and longitude, while keeping other properties
1. NewLatLng:更改相机的纬度和经度,同时保留其他属性
2. NewLatLngZoom: Changes the camera’s latitude, longitude, and zoom, while keeping other properties
2. NewLatLngZoom:更改相机的纬度,经度和缩放,同时保留其他属性
3. NewCameraPosition: Full flexibility in changing the camera position
3. NewCameraPosition :完全灵活地更改相机位置
We are going to use NewCameraPosition. A CameraPosition can be obtained with a CameraPosition.Builder. And then we can set target, bearing, tilt and zoom properties.
我们将使用NewCameraPosition 。 可以使用CameraPosition.Builder获得CameraPosition 。 然后我们可以设置目标,方位,倾斜和缩放属性。
public void RepositionMapCamera(double lat, double lng)
{
     var cameraPosition = new CameraPosition.Builder();
     cameraPosition.Target(new LatLng(lat, lng));
     cameraPosition.Zoom(1000);
     cameraPosition.Bearing(45);
     cameraPosition.Tilt(20);
     CameraUpdate cameraUpdate = CameraUpdateFactory.NewCameraPosition(cameraPosition.Build());
     hMap.MoveCamera(cameraUpdate);
}
创建地理围栏(Creating Geofence)
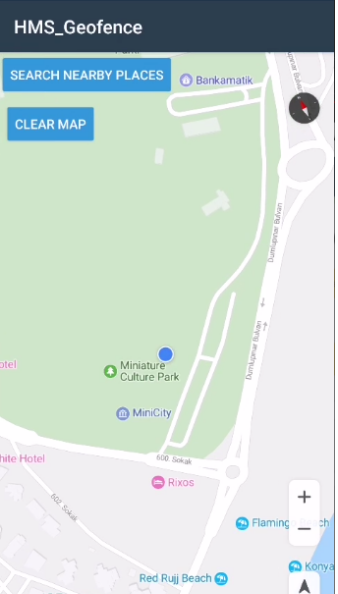
Now that we’ve created the map, we can now start to create geofences using it. In this article, we will choose the location where we want to set geofence in two different ways. The first is to select the location by clicking on the map, and the second is to search for nearby places by keyword and select one after placing them on the map with the marker.
现在,我们已经创建了地图,现在可以开始使用它来创建地理围栏了。 在本文中,我们将以两种不同的方式选择要设置地理围栏的位置。 第一种是通过在地图上单击来选择位置,第二种是通过关键字搜索附近的地点,然后用标记将其放置在地图上后选择一个。
通过单击地图设置地理围栏位置 (Set the geofence location by clicking on the map)
It is always easier to select a location by seeing it. After this section, we are able to set a geofence around the clicked point when the map’s clicked. We attached the Click event to our map in the OnMapReady method. In this Click event, we will add a marker to the clicked point and draw a circle around it.
通过查看位置来选择位置总是比较容易的。 在此部分之后,我们可以在单击地图时在单击的点周围设置地理围栏。 我们在OnMapReady方法中将Click事件附加到了我们的地图上。 在此Click事件中,我们将向单击的点添加一个标记,并在其周围绘制一个圆圈。
After clicking the map, we will add a circle, a marker, and a custom info window to that point like this:
单击地图后,我们将在该点添加一个圆圈,一个标记和一个自定义信息窗口,如下所示:
Also, we will use the Seekbar at the bottom of the page to adjust the circle radius.
另外,我们将使用页面底部的搜索栏来调整圆半径。
We set selectedCoordinates variable when adding the marker. Let’s create the following method to create the marker:
添加标记时,我们设置了selectedCoordinates变量。 让我们创建以下方法来创建标记:
private void HMap_MapClick(object sender, HuaweiMap.MapClickEventArgs e)
{
   selectedCoordinates.LatLng = e.P0;
   if (circle != null)
   {
       circle.Remove();
       circle = null;
   }
   AddMarkerOnMap();
}


void AddMarkerOnMap()
{
    if (marker != null) marker.Remove();
    var markerOption = new MarkerOptions()
        .InvokeTitle("You are here now")
        .InvokePosition(selectedCoordinates.LatLng);


    hMap.SetInfoWindowAdapter(new MapInfoWindowAdapter(this));
    marker = hMap.AddMarker(markerOption);
    bool isInfoWindowShown = marker.IsInfoWindowShown;
    if (isInfoWindowShown)
        marker.HideInfoWindow();
    else
        marker.ShowInfoWindow();
}
With MarkerOptions we can set the title and position properties. And for creating a custom info window, there is SetInfoWindowAdapter method. Adding MapInfoWindowAdapter class to our project for rendering the custom info model. And implement HuaweiMap.IInfoWindowAdapter interface to it.
使用MarkerOptions,我们可以设置标题和位置属性。 为了创建自定义信息窗口,提供了SetInfoWindowAdapter方法。 将MapInfoWindowAdapter类添加到我们的项目中以呈现自定义信息模型。 并为其实现HuaweiMap.IInfoWindowAdapter接口。
This interface provides a custom information window view of a marker and contains two methods:
该界面提供了标记的自定义信息窗口视图,并包含两种方法:
View GetInfoContents(Marker marker);View GetInfoWindow(Marker marker);When an information window needs to be displayed for a marker, methods provided by this adapter are called in any case.
当需要显示标记的信息窗口时,无论如何都将调用此适配器提供的方法。
Now let’s create a custom info window layout and named it as map_info_view.xml
现在,让我们创建一个自定义信息窗口布局,并将其命名为map_info_view.xml。
<?xml version="1.0" encoding="utf-8"?>
<LinearLayout xmlns:android="http://schemas.android.com/apk/res/android"
    android:orientation="vertical"
    android:layout_width="match_parent"
    android:layout_height="match_parent">
    <Button
        android:text="Add geofence"
        android:width="100dp"
        style="@style/Widget.AppCompat.Button.Colored"
        android:layout_width="wrap_content"
        android:layout_height="wrap_content"
        android:id="@+id/btnInfoWindow" />
</LinearLayout>
And return it after customizing it in GetInfoWindow() method. The full code of the adapter is below:
并在GetInfoWindow()方法中对其进行自定义后将其返回。 适配器的完整代码如下:
internal class MapInfoWindowAdapter : Java.Lang.Object, HuaweiMap.IInfoWindowAdapter
{
    private MainActivity activity;
    private GeofenceModel selectedCoordinates;
    private View addressLayout;


    public MapInfoWindowAdapter(MainActivity currentActivity)
    {
        activity = currentActivity;
    }
    public View GetInfoContents(Marker marker)
    {
        return null;
    }


    public View GetInfoWindow(Marker marker)
    {
        if (marker == null)
            return null;


        //update everytime, drawcircle need it
        selectedCoordinates = new GeofenceModel { LatLng = new LatLng(marker.Position.Latitude, marker.Position.Longitude) };
        View mapInfoView = activity.LayoutInflater.Inflate(Resource.Layout.map_info_view, null);


        var radiusBar = activity.FindViewById<SeekBar>(Resource.Id.radiusBar);
        if (radiusBar.Visibility == Android.Views.ViewStates.Invisible)
        {
            radiusBar.Visibility = Android.Views.ViewStates.Visible;
            radiusBar.SetProgress(30, true);
        }


        activity.FindViewById<SeekBar>(Resource.Id.radiusBar)?.SetProgress(30, true);
        activity.DrawCircleOnMap(selectedCoordinates);
        Button button = mapInfoView.FindViewById<Button>(Resource.Id.btnInfoWindow);
        button.Click += btnInfoWindow_ClickAsync;


        return mapInfoView;
    }
}
Now we create a method to arrange a circle around the marker that representing the geofence radius. Create a new DrawCircleOnMap method in MainActivity for this. To construct a circle, we must specify the Center and Radius. Also, I set other properties like StrokeColor etc.
现在,我们创建一种方法来围绕表示地理围栏半径的标记排列一个圆。 为此,在MainActivity中创建一个新的DrawCircleOnMap方法。 要构造一个圆,我们必须指定中心和半径。 另外,我设置其他属性,例如StrokeColor等。
public void DrawCircleOnMap(GeofenceModel geoModel)
{
     if (circle != null)
     {
         circle.Remove();
         circle = null;
     }
     CircleOptions circleOptions = new CircleOptions()
   .InvokeCenter(geoModel.LatLng)
   .InvokeRadius(geoModel.Radius)
   .InvokeFillColor(Color.Argb(50, 0, 14, 84))
   .InvokeStrokeColor(Color.Yellow)
   .InvokeStrokeWidth(15);
     circle = hMap.AddCircle(circleOptions);
}


private void radiusBar_ProgressChanged(object sender, SeekBar.ProgressChangedEventArgs e)
{
  selectedCoordinates.Radius = e.Progress;
  DrawCircleOnMap(selectedCoordinates);
}
We will use SeekBar to change the radius of the circle. As the value changes, the drawn circle will expand or shrink. For this reason, we will update the radius and re-draw the circle in SeekBar’s change event.
我们将使用SeekBar更改圆的半径。 随着值的更改,绘制的圆圈将扩大或缩小。 因此,我们将更新半径并在SeekBar的change事件中重新绘制圆。
反向地理编码 (Reverse Geocoding)
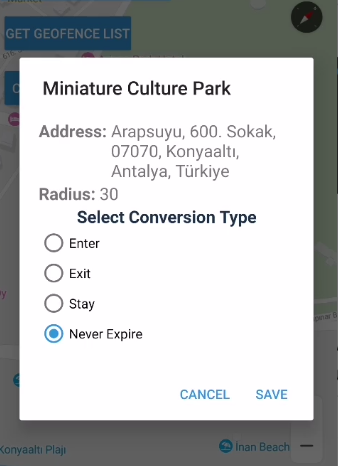
Now let’s handle the click event of the info window. We have the coordinates of the selected location and we want to bring up the alert dialog with the formatted address of this coordinates and radio group of Geofence conversions like below.
现在,让我们处理信息窗口的click事件。 我们具有所选位置的坐标,我们想用该坐标的格式地址和Geofence转换单选组打开警报对话框,如下所示。
But before open that window, we need to reverse geocoding selected coordinates to getting a formatted address.
但是在打开该窗口之前,我们需要对选定的坐标进行反向地理编码,以获取格式化的地址。
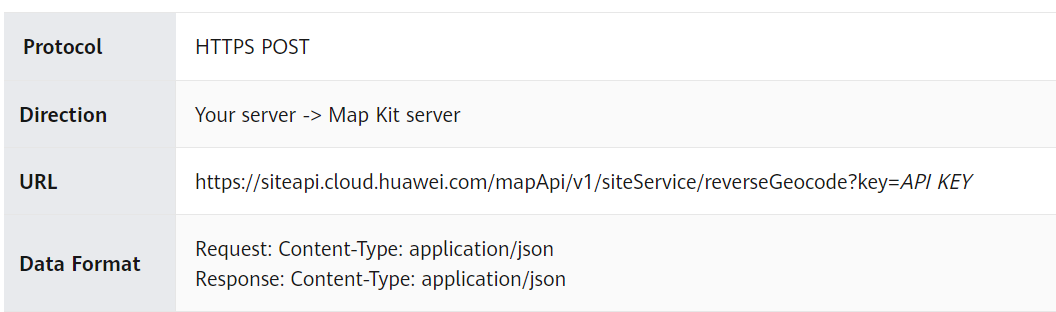
HUAWEI Site Kit provides us a set of HTTP API including the one that we need, reverseGeocode.
HUAWEI Site Kit为我们提供了一组HTTP API,其中包括我们需要的HTTP API, reverseGeocode 。
In the sample project, for convenience, I created the functions from different services in different classes. In GeocodeManager managing geocoding functions and in GeofenceManager managing geofence functions. So let’s add the GeocodeManager class to our project and update it as follows:
在示例项目中,为了方便起见,我从不同类的不同服务创建了函数。 在GeocodeManager中管理地理编码功能,在GeofenceManager中管理地理栅栏功能。 因此,让我们将GeocodeManager类添加到我们的项目中,并如下进行更新:
class GeocodeManager
{
    public const string ApiKey = "YOUR_API_KEY”
    private MainActivity activity;
    public GeocodeManager(MainActivity activity)
    {
        this.activity = activity;
    }


    public async Task<Site> ReverseGeocode(double lat, double lng)
    {
        string result = "";
        using (var client = new HttpClient())
        {
            MyLocation location = new MyLocation();
            location.Lat = lat;
            location.Lng = lng;
            var root = new ReverseGeocodeRequest();
            root.Location = location;


            var settings = new JsonSerializerSettings();
            settings.ContractResolver = new LowercaseSerializer();
            var json = JsonConvert.SerializeObject(root, Formatting.Indented, settings);


            var data = new StringContent(json, Encoding.UTF8, "application/json");
            var url = "https://siteapi.cloud.huawei.com/mapApi/v1/siteService/reverseGeocode?key=" + Android.Net.Uri.Encode(ApiKey);
            var response = await client.PostAsync(url, data);
            result = response.Content.ReadAsStringAsync().Result;
        }


        return JsonConvert.DeserializeObject<ReverseGeocodeResponse>(result).sites.FirstOrDefault();
    }
}
In the above code, we request the address corresponding to a given latitude/longitude. Also specified that the output must be in JSON format.
在上面的代码中,我们请求与给定纬度/经度相对应的地址。 还指定输出必须为JSON格式。
https://siteapi.cloud.huawei.com/mapApi/v1/siteService/reverseGeocode?key=API KEY
https://siteapi.cloud.huawei.com/mapApi/v1/siteService/reverseGeocode?key=API密钥
You can get API key in our agconnect-services.json file or Console.
您可以在我们的agconnect-services.json文件或控制台中获取API密钥。
Request model:
要求型号:
public class MyLocation
{
    public double Lat { get; set; }
    public double Lng { get; set; }
}


public class ReverseGeocodeRequest
{
    public MyLocation Location { get; set; }
}
The response return from ReverseGeocode API looks like this:
来自ReverseGeocode API的响应返回如下所示:
{
   "returnCode":"0",
   "sites":[
      {
         "formatAddress":"Arapsuyu, 600. Sokak, 07070, Konyaaltı, Antalya, Türkiye",
         "address":{
            "country":"Türkiye",
            "countryCode":"TR",
            "subLocality":"Arapsuyu",
            "postalCode":"07070",
            "locality":"Konyaaltı",
            "adminArea":"Antalya",
            "subAdminArea":"Konyaaltı",
            "thoroughfare":"600. Sokak"
         },
         "viewport":{
            "southwest":{
               "lng":30.656440070240773,
               "lat":36.875268166794406
            },
            "northeast":{
               "lng":30.659619929759227,
               "lat":36.87781183320559
            }
         },
         "name":"Miniature Culture Park",
         "siteId":"6EBE1448D8235A19B9BBBCB3D3432D07",
         "location":{
            "lng":30.65803,
            "lat":36.87654
         },
         "poi":{
            "hwPoiTypes":[
               "IMPORTANT_TOURIST_ATTRACTION"
            ],
            "poiTypes":[
               "TOURIST_ATTRACTION"
            ],
            "rating":0.0,
            "internationalPhone":"",
            "openingHours":{


            },
            "hwPoiTranslatedTypes":[
               "Important Tourist Attraction"
            ]
         },
         "matchedLanguage":"tr"
      }
   ],
   "returnDesc":"OK"
}
Note that the JSON response contains three root elements:
请注意,JSON响应包含三个根元素:
- “returnCode”: For details, please refer to Result Codes. “ returnCode”:有关详细信息,请参阅结果代码。
- “returnDesc”: description “ returnDesc”:说明
- “sites” contains an array of geocoded address information“站点”包含一组经过地址解析的地址信息
Generally, only one entry in the “sites” array is returned for address lookups, though the geocoder may return several results when address queries are ambiguous.
通常,尽管地址解析器可能会返回一些结果,但地址解析器可能会返回多个结果,因此通常只会返回“ sites”数组中的一个条目用于地址查找。
Add the following codes to our MapInfoWindowAdapter where we get results from the Reverse Geocode API and set the UI elements.
将以下代码添加到我们的MapInfoWindowAdapter中,从中获取反向地理编码API的结果并设置UI元素。
private async void btnInfoWindow_ClickAsync(object sender, System.EventArgs e)
{
     addressLayout = activity.LayoutInflater.Inflate(Resource.Layout.reverse_alert_layout, null);
    //reverse geocode
    GeocodeManager geocodeManager = new GeocodeManager(activity);
    var addressResult = await geocodeManager.ReverseGeocode(selectedCoordinates.LatLng.Latitude, selectedCoordinates.LatLng.Longitude);


    if (addressResult.ReturnCode != 0)
        return;


    var address = addressResult.Sites.FirstOrDefault();


    //set ui components
    var txtAddress = addressLayout.FindViewById<TextView>(Resource.Id.txtAddress);
    var txtRadius = addressLayout.FindViewById<TextView>(Resource.Id.txtRadius);
    txtAddress.Text = address.FormatAddress;
    txtRadius.Text = selectedCoordinates.Radius.ToString();


    //create alert dialog
    AlertDialog.Builder builder = new AlertDialog.Builder(activity);
    builder.SetView(addressLayout);
    builder.SetTitle(address.Name);
    builder.SetPositiveButton("Save", (sender, arg) =>
    {
        selectedCoordinates.Conversion = GetSelectedConversion();
        GeofenceManager geofenceManager = new GeofenceManager(activity);
        geofenceManager.AddGeofences(selectedCoordinates);
    });
    builder.SetNegativeButton("Cancel", (sender, arg) => { builder.Dispose(); });
    AlertDialog alert = builder.Create();
    alert.Show();
}


///Get selected conversion type from radio button group
private int GetSelectedConversion()
{
    var radioButtonId = (addressLayout.FindViewById<RadioGroup>(Resource.Id.radio_group)).CheckedRadioButtonId;
    switch (radioButtonId)
    {
        case Resource.Id.radio_enter:
            return (int)Geofence.EnterGeofenceConversion;
        case Resource.Id.radio_exit:
            return (int)Geofence.ExitGeofenceConversion;
        case Resource.Id.radio_dwell:
            return (int)Geofence.DwellGeofenceConversion;
        case Resource.Id.radio_never_expire:
            return 5;
        default:
            return 5;
    }
}
Now, after selecting the conversion, we can complete the process by calling the AddGeofence method in the GeofenceManager class by pressing the save button in the dialog window.
现在,选择转换后,我们可以通过在对话框窗口中按保存按钮来调用GeofenceManager类中的AddGeofence方法来完成此过程。
class GeofenceManager
{
        public MainActivity activity;
        public GeofenceManager(MainActivity activity)
        {
            this.activity = activity;
        }


        private PendingIntent CreatePendingIntent()
        {
            Intent intent = new Intent(activity, typeof(GeofenceBroadcastReceiver));
            intent.SetAction(GeofenceBroadcastReceiver.ActionGeofence);
            return PendingIntent.GetBroadcast(activity, 0, intent, PendingIntentFlags.UpdateCurrent);
        }


        public void AddGeofences(GeofenceModel geofenceModel)
        {
            //Set parameters
            geofenceModel.Id = Guid.NewGuid().ToString();
            if (geofenceModel.Conversion == 5) //Expiration value that indicates the geofence should never expire.
                geofenceModel.Timeout = Geofence.GeofenceNeverExpire;
            else
                geofenceModel.Timeout = 10000;


            List<IGeofence> geofenceList = new List<IGeofence>();


            //Geofence Service
            GeofenceService geofenceService = LocationServices.GetGeofenceService(activity);
            PendingIntent pendingIntent = CreatePendingIntent();
            GeofenceBuilder somewhereBuilder = new GeofenceBuilder()
                 .SetUniqueId(geofenceModel.Id)
                 .SetValidContinueTime(geofenceModel.Timeout)
                 .SetRoundArea(geofenceModel.LatLng.Latitude, geofenceModel.LatLng.Longitude, geofenceModel.Radius)
                 .SetDwellDelayTime(10000)
                 .SetConversions(geofenceModel.Conversion); ;


            //Create geofence request
            geofenceList.Add(somewhereBuilder.Build());
            GeofenceRequest geofenceRequest = new GeofenceRequest.Builder()
                .CreateGeofenceList(geofenceList)
                .Build();


            //Register geofence
            var geoTask = geofenceService.CreateGeofenceList(geofenceRequest, pendingIntent);
            geoTask.AddOnSuccessListener(new CreateGeoSuccessListener(activity));
            geoTask.AddOnFailureListener(new CreateGeoFailListener(activity));
        }
    }
}
In the AddGeofence method, we need to set the geofence request parameters, like the selected conversion, unique Id and timeout according to conversion, etc. with GeofenceBuilder.
在AddGeofence方法,我们需要设置地理围栏请求参数,如所选择的转换,唯一的ID,并根据转换等带超时GeofenceBuilder 。
Geofence conversion can be set one of these:
地理围栏转换可以设置为以下之一:
public const int DwellGeofenceConversion = 4;
public const int EnterGeofenceConversion = 1;
public const int ExitGeofenceConversion = 2;
public const long GeofenceNeverExpire = -1;
To add geofences to a point we must create GeofenceService from LocationService and use CreateGeofenceList method with PendingIntent. When we created this intent we use a broadcast receiver because we need to notify whenever geofence conversions occur. So we create GeofenceBroadcastReceiver and display a toast message when a geofence action occurs.
要将地理围栏添加到一个点,我们必须从LocationService创建GeofenceService ,并将CreateGeofenceList方法与PendingIntent一起使用。 创建此意图时,我们使用广播接收器,因为我们需要在发生地理围栏转换时通知。 因此,我们创建了GeofenceBroadcastReceiver并在发生地理围栏动作时显示一条敬酒消息。
[BroadcastReceiver(Enabled = true)]
[IntentFilter(new[] { "com.huawei.hms.geofence.ACTION_PROCESS_ACTIVITY" })]
class GeofenceBroadcastReceiver : BroadcastReceiver
{
    public static readonly string ActionGeofence = "com.huawei.hms.geofence.ACTION_PROCESS_ACTIVITY";
    public override void OnReceive(Context context, Intent intent)
    {
        if (intent != null)
        {
            var action = intent.Action;
            if (action == ActionGeofence)
            {
                GeofenceData geofenceData = GeofenceData.GetDataFromIntent(intent);
                if (geofenceData != null)
                {
                    Toast.MakeText(context, "Geofence triggered: " + geofenceData.ConvertingLocation.Latitude +"\n" + geofenceData.ConvertingLocation.Longitude + "\n" + geofenceData.Conversion.ToConversionName(), ToastLength.Long).Show();
                }
            }
        }
    }
}
After that in CreateGeoSuccessListener and CreateGeoFailureListener that we implement IOnSuccessListener and IOnFailureListener respectively, we display a toast message to the user like this:
之后,在分别实现IOnSuccessListener和IOnFailureListener的CreateGeoSuccessListener和CreateGeoFailureListener中,我们向用户显示敬酒消息,如下所示:
public class CreateGeoFailListener : Java.Lang.Object, IOnFailureListener
{
      private Activity mainActivity;


      public CreateGeoFailListener(Activity mainActivity)
      {
          this.mainActivity = mainActivity;
      }


      public void OnFailure(Java.Lang.Exception ex)
      {
       Toast.MakeText(mainActivity, "Geofence request failed: " + GeofenceErrorCodes.GetErrorMessage((ex as ApiException).StatusCode), ToastLength.Long).Show();
      }
}


public class CreateGeoSuccessListener : Java.Lang.Object, IOnSuccessListener
{
     private Activity mainActivity;
     public CreateGeoSuccessListener(Activity mainActivity)
     {
         this.mainActivity = mainActivity;
     }
     public void OnSuccess(Java.Lang.Object data)
     {
        Toast.MakeText(mainActivity, "Geofence request successful", ToastLength.Long).Show();
     }
}
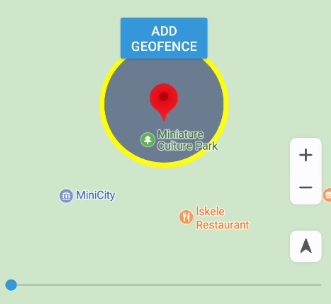
使用附近搜索设置地理围栏位置(Set geofence location using Nearby Search)
In this section, we will implement the Huawei Site Kit’s Nearby Search API. And after using it to search for a location, we will display the results on the map with markers. The user can select one of these locations to add a geofence around them.
在本节中,我们将实现华为站点工具包的附近搜索API。 在使用它搜索位置后,我们将在地图上用标记显示结果。 用户可以选择这些位置之一以在其周围添加地理围栏。
On the main layout when the user clicks the Search Nearby Places button, a search dialog like below appears:
当用户单击“搜索附近的地方”按钮时,在主布局上,将显示如下搜索对话框:

Create search_alert_layout.xml with a search input :
使用搜索输入创建search_alert_layout.xml:
<LinearLayout
    xmlns:android="http://schemas.android.com/apk/res/android"
    android:orientation="vertical"
    android:layout_width="match_parent"
    android:layout_height="match_parent"
    android:padding="20dp"
    android:minWidth="25px"
    android:minHeight="25px">
    <EditText
        android:layout_width="match_parent"
        android:layout_height="wrap_content"
        android:inputType="textMultiLine"
        android:scrollHorizontally="false"
        android:lines="6"
        android:hint="Address"
        android:id="@+id/txtSearch">
    </EditText>
    <Button
        android:text="Search"
        android:layout_width="match_parent"
        android:layout_height="wrap_content"
        android:id="@+id/btnSearch" />
</LinearLayout>
In Main Activity, create click event of that button and open an alert dialog after it’s view is set to search_alert_layout. And make NearbySearch when clicking the Search button:
在“主要活动”中,创建该按钮的click事件,并在其视图设置为search_alert_layout后打开一个警报对话框。 点击“搜索”按钮,然后进行NearestSearch:
private void btnGeoWithAddress_Click(object sender, EventArgs e)
{
   search_view = base.LayoutInflater.Inflate(Resource.Layout.search_alert_layout, null);
   AlertDialog.Builder builder = new AlertDialog.Builder(this);
   builder.SetView(search_view);
   builder.SetTitle("Search Location");
   builder.SetNegativeButton("Cancel", (sender, arg) => { builder.Dispose(); });
   search_view.FindViewById<Button>(Resource.Id.btnSearch).Click += btnSearchClicked;
   alert = builder.Create();
   alert.Show();
}


private void btnSearchClicked(object sender, EventArgs e)
{
   string searchText = search_view.FindViewById<TextView>(Resource.Id.txtSearch).Text;
   GeocodeManager geocodeManager = new GeocodeManager(this);
   geocodeManager.NearbySearch(CurrentPosition, searchText);
}
We pass search text and Current Location into the GeocodeManager NearbySearch method as parameters. We need to modify GeoCodeManager class and add nearby search method to it.
我们将搜索文本和当前位置作为参数传递给GeocodeManager附近的搜索方法。 我们需要修改GeoCodeManager类,并向其添加附近的搜索方法。
public void NearbySearch(LatLng currentLocation, string searchText)
{
     ISearchService searchService = SearchServiceFactory.Create(activity, Android.Net.Uri.Encode("YOUR_API_KEY"));
     NearbySearchRequest nearbySearchRequest = new NearbySearchRequest();
     nearbySearchRequest.Query = searchText;
     nearbySearchRequest.Language = "en";
     nearbySearchRequest.Location = new Coordinate(currentLocation.Latitude, currentLocation.Longitude);
     nearbySearchRequest.Radius = (Integer)2000;
     nearbySearchRequest.PageIndex = (Integer)1;
     nearbySearchRequest.PageSize = (Integer)5;
     nearbySearchRequest.PoiType = LocationType.Address;
     searchService.NearbySearch(nearbySearchRequest, new QuerySuggestionResultListener(activity as MainActivity));
}
Let’s review this code. First of all, we create an ISearchService interface based on context and API Key with SearchServiceFactory class. This is the entry interface of the HUAWEI Site Kit. With the help of this interface, we are going to be able to use search services. In this case that would be NearbySearch. Before searching, we need to create an customize a NearbySearchRequest.
让我们回顾一下这段代码。 首先,我们基于上下文和带有SearchServiceFactory类的API密钥创建ISearchService接口。 这是HUAWEI Site Kit的输入界面。 借助该界面,我们将能够使用搜索服务。 在这种情况下,它将是NearestSearch。 在搜索之前,我们需要创建一个自定义的NearestSearchRequest 。
And to handle the result we must create a listener and implement the ISearchResultListener interface to it.
为了处理结果,我们必须创建一个侦听器并对其实现ISearchResultListener接口。
public class NearbySearchResultListener : Java.Lang.Object, ISearchResultListener
{
    private MainActivity context;


    public NearbySearchResultListener(MainActivity context)
    {
        this.context = context;
    }


    public void OnSearchError(SearchStatus status)
    {
        Toast.MakeText(context, "Error Code: " + status.ErrorCode + " Error Message: " + status.ErrorMessage, ToastLength.Long);


    }


    public void OnSearchResult(Java.Lang.Object results)
    {
        NearbySearchResponse nearbySearchResponse = (NearbySearchResponse)results;
        if (nearbySearchResponse != null && nearbySearchResponse.TotalCount > 0)
            context.SetSearchResultOnMap(nearbySearchResponse.Sites);
    }
}
In OnSearchResult method, NearbySearchResponse object return. We will insert markers to the mapper element in this response. The map will look like this:
在OnSearchResult方法中, NearbySearchResponse对象返回。 我们将在此响应中将标记插入mapper元素。 该地图将如下所示:
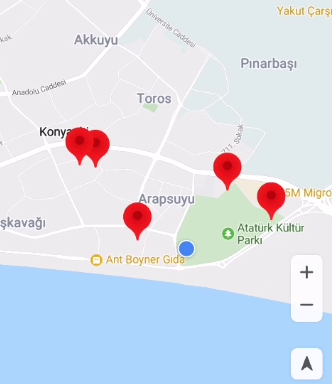
In Main Activity create a method named SetSearchResultOnMap and pass IList<Site> as a parameter to insert multiple markers on the map.
在“主活动”中,创建一个名为SetSearchResultOnMap的方法,并将IList <Site>作为参数传递,以在地图上插入多个标记。
public void SetSearchResultOnMap(IList<Com.Huawei.Hms.Site.Api.Model.Site> sites)
{
    hMap.Clear();
    if (searchMarkers != null && searchMarkers.Count > 0)
        foreach (var item in searchMarkers)
            item.Remove();
    searchMarkers = new List<Marker>();
    for (int i = 0; i < sites.Count; i++)
    {
        MarkerOptions marker1Options = new MarkerOptions()
                .InvokePosition(new LatLng(sites[i].Location.Lat, sites[i].Location.Lng))
                .InvokeTitle(sites[i].Name).Clusterable(true);
        hMap.SetInfoWindowAdapter(new MapInfoWindowAdapter(this));
        var marker1 = hMap.AddMarker(marker1Options);
        searchMarkers.Add(marker1);
        RepositionMapCamera(sites[i].Location.Lat, sites[i].Location.Lng);
    }
    hMap.SetMarkersClustering(true);
    alert.Dismiss();
}
Now, we add markers as we did above. But here we use SetMarkersClustering(true) to consolidates markers into clusters when zooming out of the map.
现在,我们像上面一样添加标记。 但是这里我们使用SetMarkersClustering(true)在缩小地图时将标记合并为群集。

You can download the source code from here. Also if you have any questions, ask away in Huawei Developer Forums.
您可以从此处下载源代码。 另外,如果您有任何疑问,请在华为开发者论坛中提问。
失误 (Errors)
- If your location permission set “Allowed only while in use instead” of ”Allowed all the time” below exception will be thrown.如果将您的位置权限设置为“仅在使用时允许”而不是“一直允许”,则会抛出以下异常。
int GEOFENCE_INSUFFICIENT_PERMISSION
int GEOFENCE_INSUFFICIENT_PERMISSION
Insufficient permission to perform geofence-related operations.
权限不足,无法执行与地理围栏相关的操作。


 248
248

 被折叠的 条评论
为什么被折叠?
被折叠的 条评论
为什么被折叠?
 到【灌水乐园】发言


