


 本文介绍如何使用easy_localization插件实现Flutter应用的国际化,包括在pubspec.yaml文件中添加依赖、创建语言翻译文件、在代码中配置多语言环境及通过下拉菜单切换语言。
Since app localization is very common with mobile app development I thought to write about one of my favorite flutter plugins. App internationalization is really fast and easy with easy_localization plugin. Specially with the latest update. I will guide you to create a simple app page with change language functionality.
由于应用本地化在移动应用开发中非常普遍,因此我想写一个我最喜欢的flutter插件。 借助easy_localization插件,应用程序国际化确实非常快捷。 特别是最新更新。 我将指导您创建一个具有更改语言功能的简单应用程序页面。
To get started add the plugin dependency to your pubspec.yaml file and run packages get command.
首先,将插件依赖项添加到您的pubspec.yaml文件中,然后运行package get命令。
dependencies:
  easy_localization: ^2.3.3
I used the above version. Always make sure you got the latest version of the plugin. Import the plugin to your dart file.
我使用了以上版本。 始终确保您获得了最新版本的插件。 将插件导入到您的dart文件中。
import 'package:easy_localization/easy_localization.dart';In the main method add the following code. I have created assets folder inside my root folder and created the locales folder with my language translation files. (en-UK.json and es-SP.json). Give the path and supported locales correctly as you saved them. And also add you localization assets to your pubspec.yaml assets.
在main方法中,添加以下代码。 我已经在根文件夹中创建了Assets文件夹,并使用我的语言翻译文件创建了locales文件夹。 (en-UK.json和es-SP.json)。 保存它们时,请正确提供路径和支持的语言环境。 并将您的本地化资产添加到pubspec.yaml资产中。
void main() => runApp(
    EasyLocalization(
        path: 'assets/locales',
        supportedLocales: [Locale('en', 'UK'), Locale('es', 'SP')],
        child: MyApp())
);
To run the code in iOS add the language keys to the info.plist file.
要在iOS中运行代码,请将语言键添加到info.plist文件中。
<key>CFBundleLocalizations</key>
<array>
	<string>en</string>
	<string>es</string>
</array>
Let’s see how we should add the MaterialApp.
让我们看看如何添加MaterialApp。
import 'package:flutter/material.dart';
import 'package:easy_localization/easy_localization.dart';


class MyApp extends StatelessWidget {
  @override
  Widget build(BuildContext context) {
    return MaterialApp(
      debugShowCheckedModeBanner: false,
      title: 'Localization Demo',
      localizationsDelegates: context.localizationDelegates,
      supportedLocales: context.supportedLocales,
      locale: context.locale,
      home: TranslationDemo(),
    );
  }
}
Now your app is ready to change the language. You can create the TranslationDemo class as a stateful widget with, widgets you want and a preferred Ui design. In your language json files add the words that you need to translate. Add as much as json files you want and add the language to supported locales. The keys that I used for my demo are as follows.
现在,您的应用已准备好更改语言。 您可以将TranslationDemo类创建为有状态的小部件,其中包含所需的小部件和首选的Ui设计。 在您的语言json文件中添加您需要翻译的单词。 添加所需的json文件,然后将语言添加到支持的语言环境。 我用于演示的键如下。
en-UK.json
en-UK.json
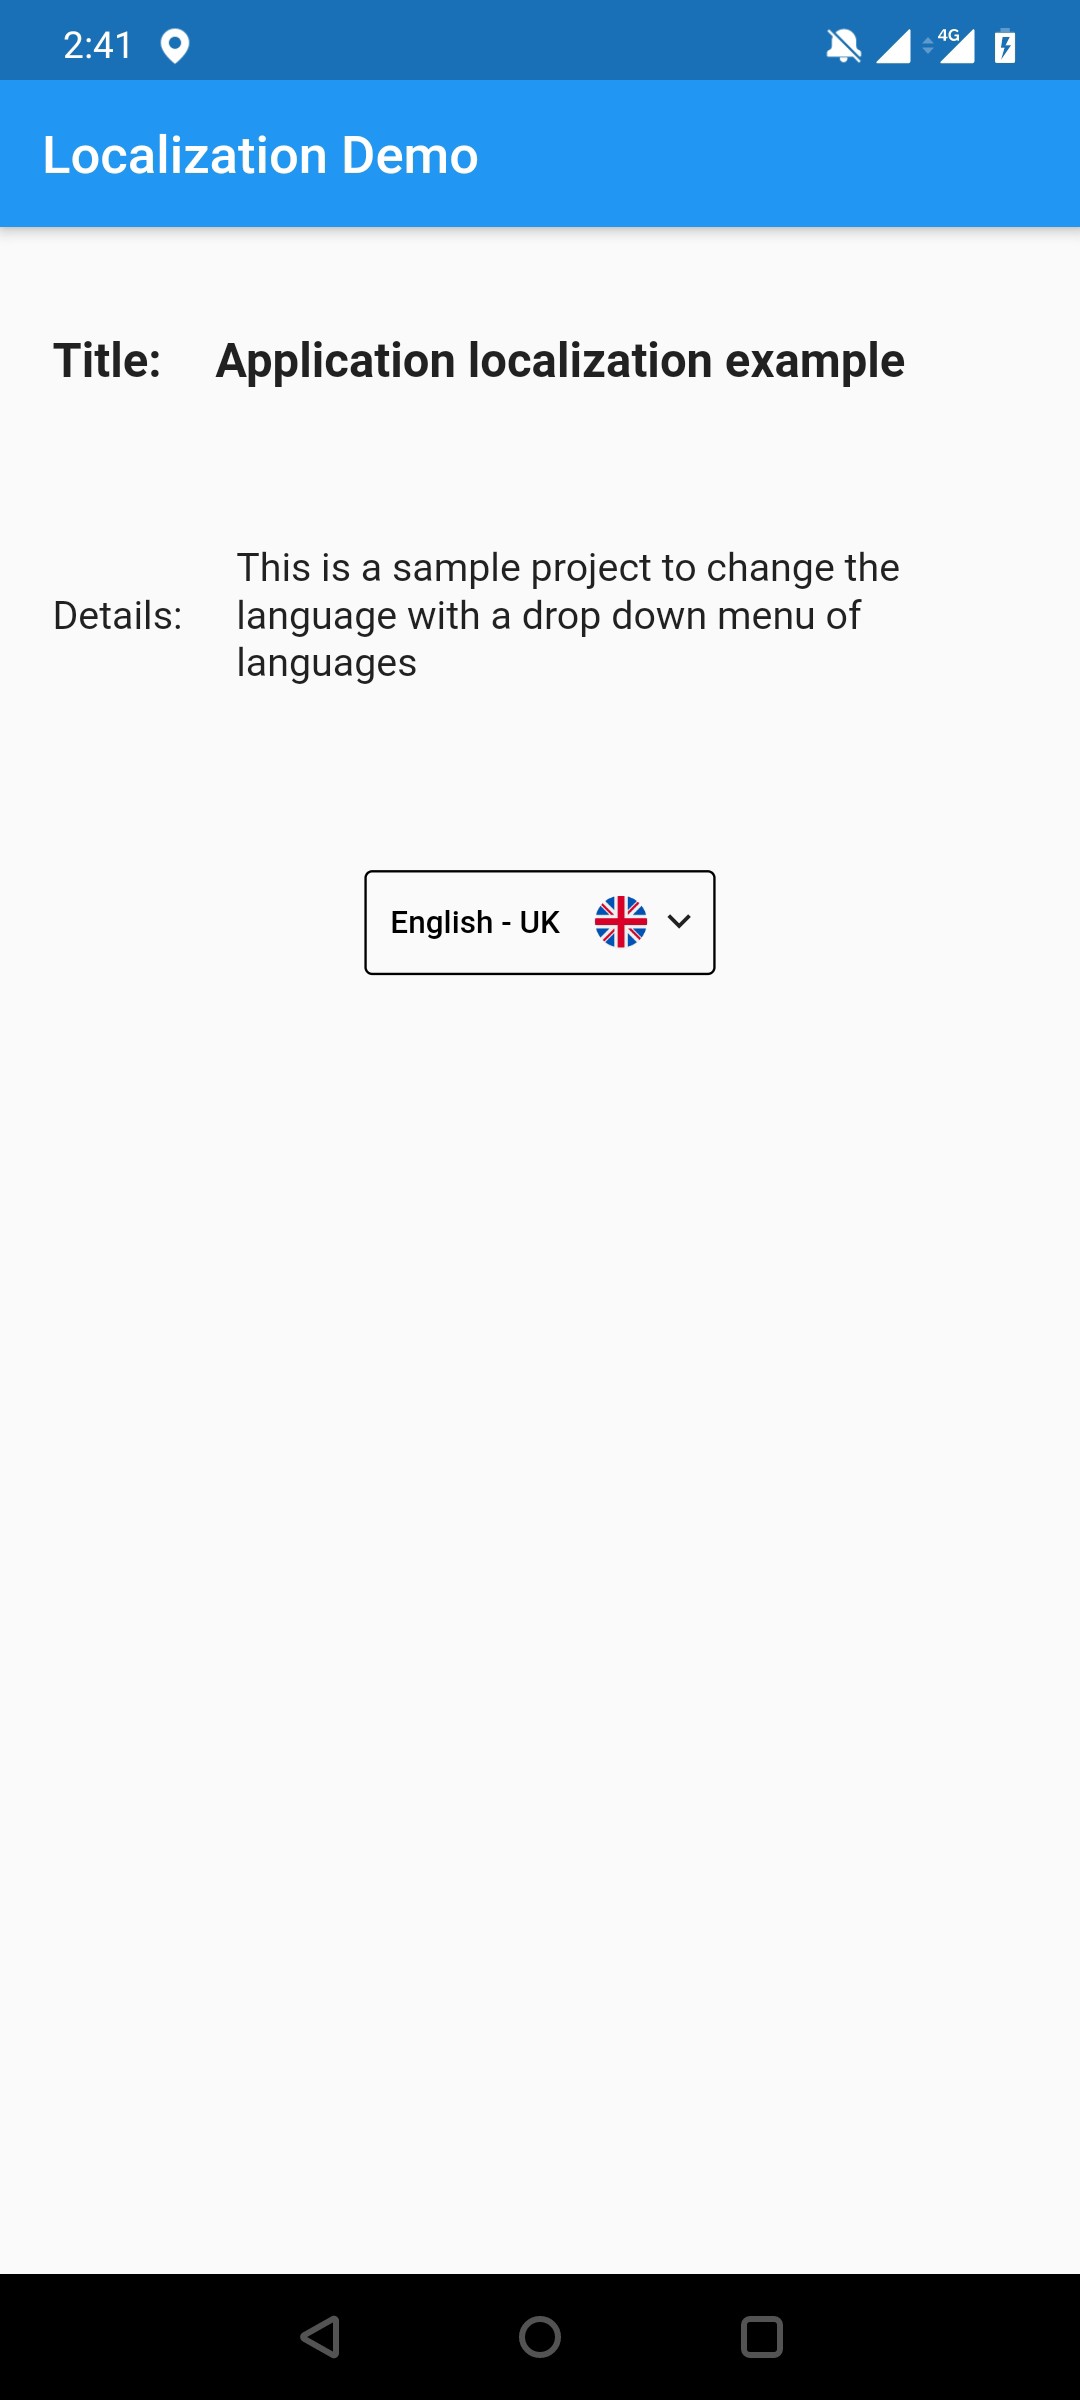
{
"title" : "Title",
"app_local_demo" : "Application localization example",
"demo_details" : "This is a sample project to change the language with a drop down menu of languages"}
es-SP.json
es-SP.json
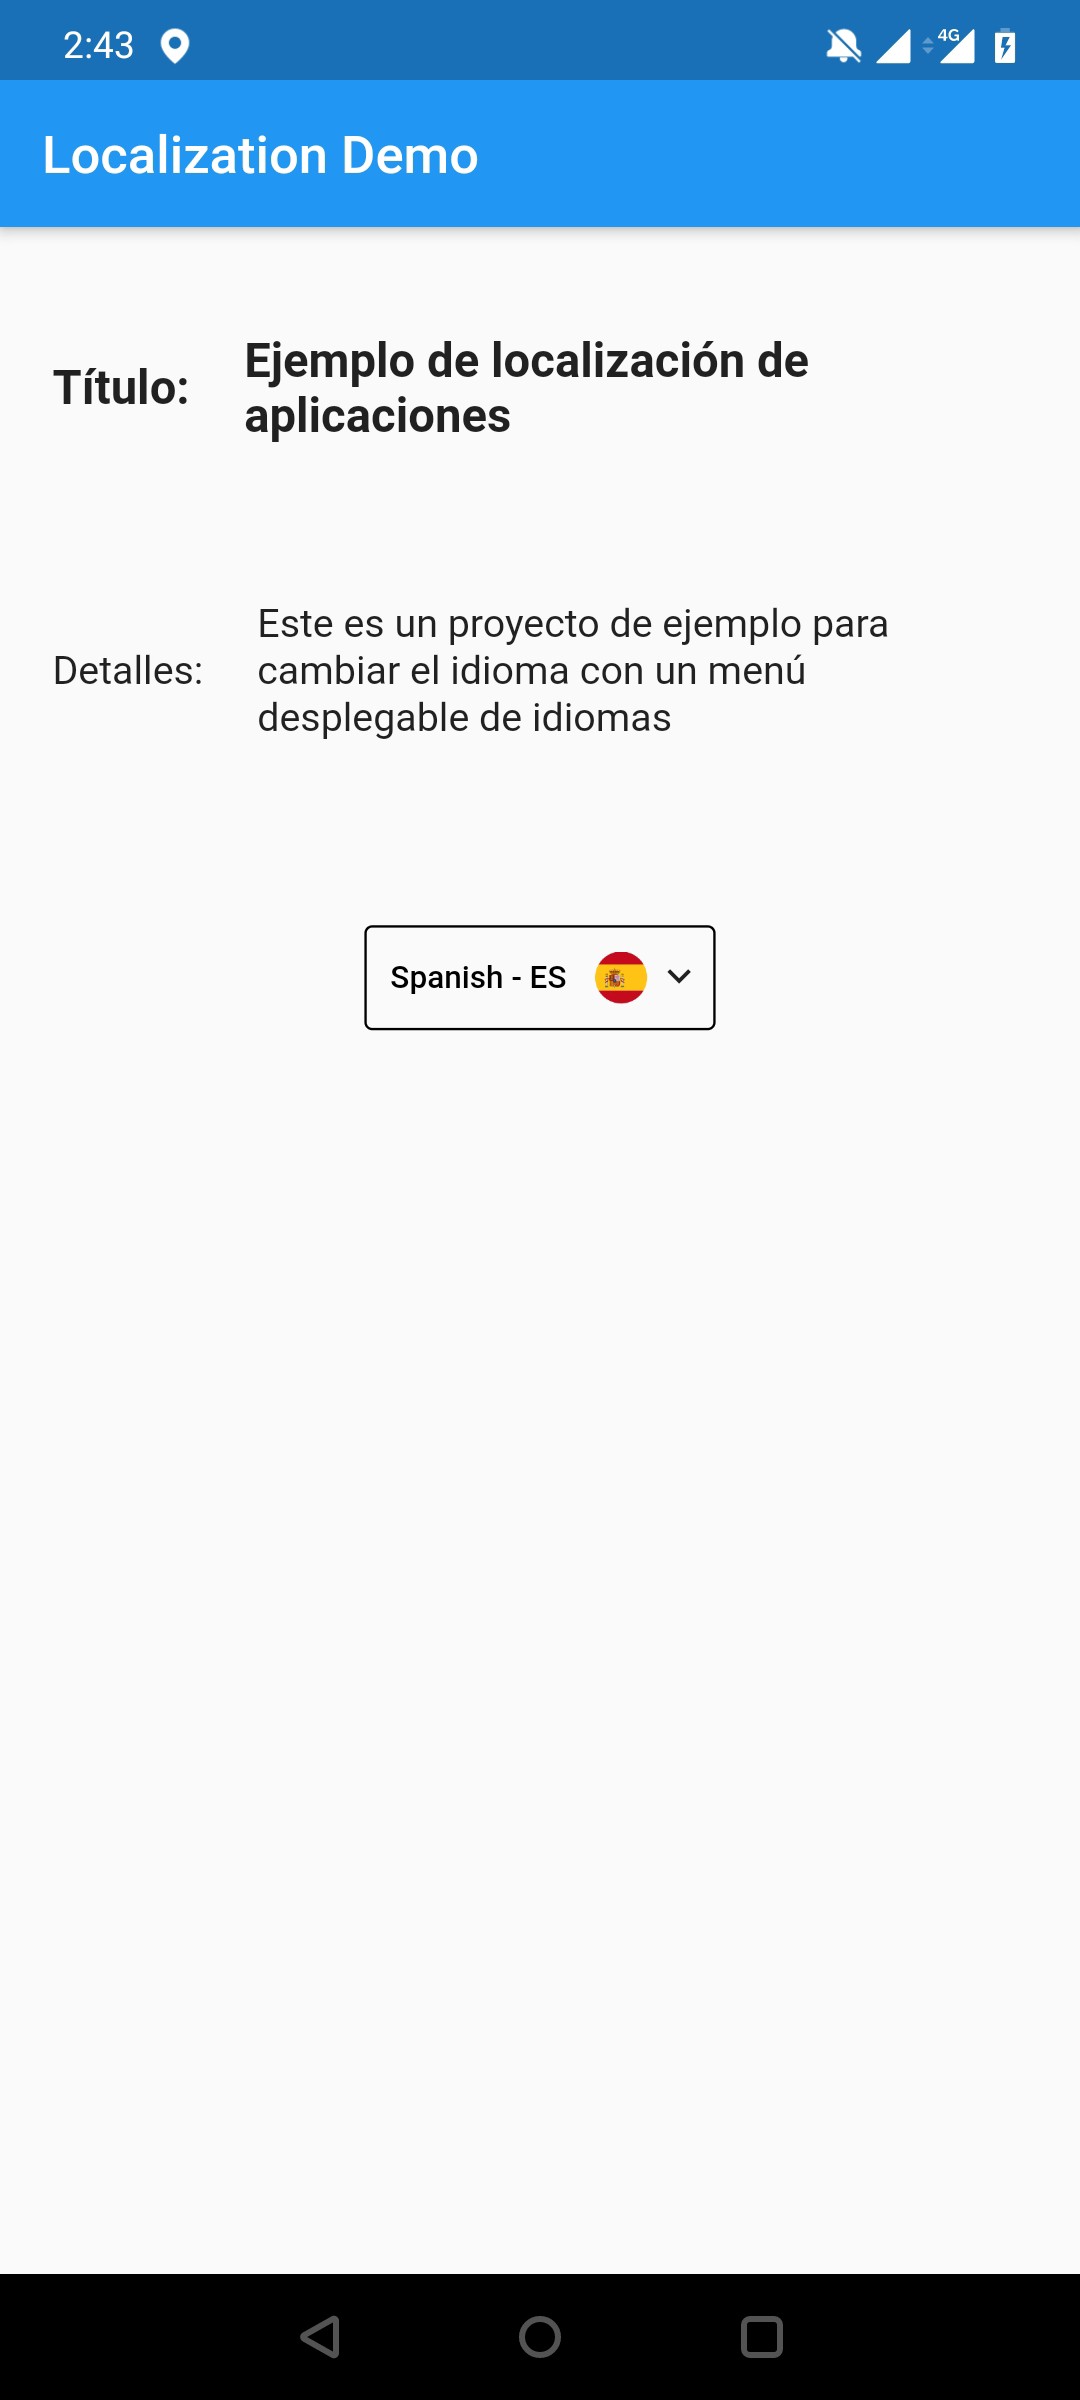
"title" : "Título",
"app_local_demo" : "Ejemplo de localización de aplicaciones",
"demo_details" : "Este es un proyecto de ejemplo para cambiar el idioma con un menú desplegable de idiomas"
To get the words just import the package and add the key as below example.
要获取单词,只需导入包并添加密钥,如下例所示。
'title'.tr()You can create your own dropdown, radio button or any widget to change the language. I just used a dropdown with with custom styles. You can save the last changed language to set as the default. Use shared preference for that.
您可以创建自己的下拉菜单,单选按钮或任何小部件来更改语言。 我只是在自定义样式中使用了下拉菜单。 您可以保存上次更改的语言以设置为默认语言。 为此使用共享首选项。
String dropdownValue = 'English - UK';
String icon = "uk.png";
Container(
height: 40,
padding: EdgeInsets.only(left: 5),
decoration: BoxDecoration(
borderRadius: BorderRadius.circular(3),
border: Border.all(color: Colors.black, width: .9),
),
child: Container(
padding: EdgeInsets.only(left: 4, right: 4),
child: Row(
mainAxisAlignment: MainAxisAlignment.center,
mainAxisSize: MainAxisSize.min,
children: <Widget>[
DropdownButton<String>(
icon: Container(
padding: EdgeInsets.only(
left: 10,
),
child: Image(
image: AssetImage("assets/images/icons/" + icon),
),
height: 30,
width: 30,
),
iconSize: 18,
elevation: 16,
value: dropdownValue,
style: TextStyle(color: Colors.black),
underline: Container(
padding: EdgeInsets.only(left: 4, right: 4),
color: Colors.transparent,
),
onChanged: (String newValue) {
setState(() {
if (newValue == 'English - UK') {
this.setState(() {
dropdownValue = 'English - UK';
icon = "uk.png";
context.locale = Locale('en', 'UK');
});
} else if (newValue == 'Spanish - ES') {
this.setState(() {
dropdownValue = 'Spanish - ES';
icon = "es.png";
context.locale = Locale('es', 'SP');
});
}
});
},
items: <String>['English - UK', 'Spanish - ES']
.map<DropdownMenuItem<String>>((String value) {
return DropdownMenuItem<String>(
value: value,
child: Text(
value,
style: TextStyle(
fontSize: 12,
fontWeight: FontWeight.w600,
color: Colors.black,
),
),
);
}).toList(),
),
Container(
margin: EdgeInsets.only(left: 3),
child: Icon(
Icons.keyboard_arrow_down,
size: 18,
),
)
],
)),
),I added the keys from my json files like this.
我从这样的json文件中添加了密钥。
Container(
              margin: EdgeInsets.symmetric(vertical: 40, horizontal: 20),
              child: Row(
                children: [
                  Text(
                    'title'.tr() + ":",
                    style: TextStyle(fontSize: 18, fontWeight: FontWeight.bold),
                  ),
                  Expanded(
                      child: Container(
                        margin: EdgeInsets.only(left: 20),
                    child: Text(
                      'app_local_demo'.tr(),
                      style: TextStyle(fontSize: 18, fontWeight: FontWeight.bold),
                    ),
                  )),
                ],
              ),
            ),
            Container(
              width: width,
              margin: EdgeInsets.symmetric(vertical: 20, horizontal: 20),
              child: Row(
                children: [
                  Text(
                    'details'.tr() + ":",
                    style: TextStyle(fontSize: 15),
                  ),
                  Expanded(
                      child: Container(
                        margin: EdgeInsets.only(left: 20),
                    child: Text('demo_details'.tr(),
                        style: TextStyle(fontSize: 15)),
                  ))
                ],
              ),
            ),
That’s all!!! Run the app and change the language and see. Since this is a simple example you can find more about the package with the following link.
就这样!!! 运行该应用程序并更改语言,然后查看。 由于这是一个简单的示例,因此您可以通过以下链接找到有关该软件包的更多信息。
You can find the full code from following link.
您可以从以下链接中找到完整的代码。
https://github.com/manee92/FlutterDemo/tree/master/lib/screens/localization
https://github.com/manee92/FlutterDemo/tree/master/lib/screens/localization
翻译自: https://medium.com/@kmerandi25/flutter-internationalization-with-easy-localization-790e46ca30e8


 3537
3537

 被折叠的 条评论
为什么被折叠?
被折叠的 条评论
为什么被折叠?
 到【灌水乐园】发言


