


mac安装ios应用程序
重点 (Top highlight)
In the last post: How to make your Mac more effectively for developers? I introduced some basic Mac configuration for programmers. In this article, I will continue to introduce some useful apps on your Mac. (If you are new here, I strongly suggest to read the last article before reading this story.)
在上一篇文章中: 如何为开发人员更有效地使用Mac? 我为程序员介绍了一些基本的Mac配置。 在本文中,我将继续在Mac上介绍一些有用的应用程序。 (如果您是这里的新手,我强烈建议您在阅读本故事之前先阅读上一篇文章。)
1.惊人的终端:iTerm2 (1. Amazing Terminal: iTerm2)

iTerm2 is a replacement for Terminal. You can install it with one line command using Homebrew Cask or downland.
iTerm2替代了Terminal。 您可以使用Homebrew Cask或downland用一行命令安装它。
brew cask install iterm2 Cursor movement
光标移动
In the last article, we talk about the system shortcut keys, it also can be used in iTerm2. Such as, move to the beginning/end of the line (⌃-A/E), move left/right (⌃-B/F) or delete characters (⌃-H), etc.
在上一篇文章中 ,我们讨论了系统快捷键 ,它也可以在iTerm2中使用。 例如,移至该行的开头/结尾( ⌃-A / E ),向左/向右移动( ⌃-B / F )或删除字符( ⌃-H )等。
You can also view and customize shortcut keys in iTerm2. Preferences>Keys>Key Bindings
您还可以在iTerm2中查看和自定义快捷键。 首选项>键>键绑定

Text Selection
文字选择
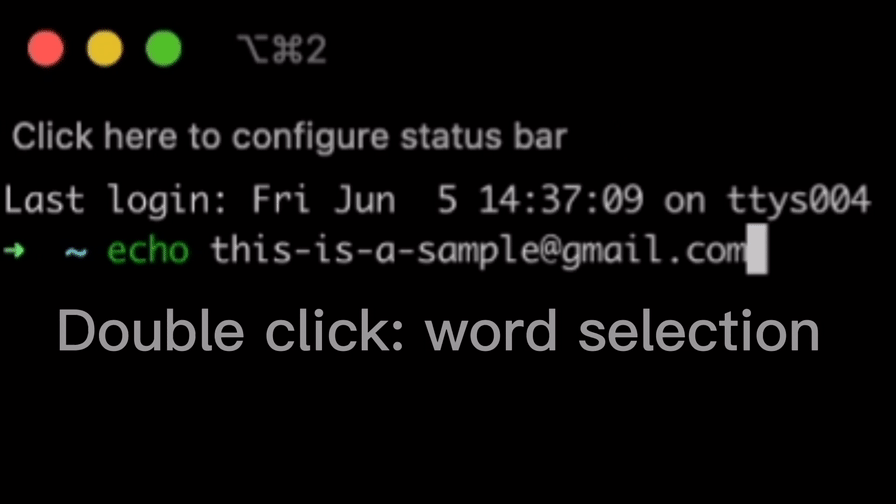
There are three ways to select text in iTerm2:
在iTerm2中可以通过三种方式选择文本:
- Double click: word selection 双击:单词选择
- Three clicks: line selection 单击三下:线路选择
- Four clicks: smart selection 四点击:智能选择
iTerm2 offers a Smart Selection feature that simplifies making selections on semantically recognizable objects. For a complete introduction, please refer to the official documentation. Smart Selection is great in the following situations:
iTerm2提供了“智能选择”功能,该功能简化了在语义上可识别的对象上的选择。 有关完整的介绍,请参阅官方文档 。 在以下情况下,“智能选择”非常有用:
- Words bounded by whitespace or line boundaries. 由空格或行边界界定的单词。
language-style pairs of identifiers separated by double colons, such as
namespace::identifierorfoo.bar.baz.以双冒号分隔的语言样式的标识符对,例如
namespace::identifier或foo.bar.baz。Quoted strings such as
foo bar.带引号的字符串,例如
foo bar。- URIs with the schemes: mailto, http, https, ssh, or telnet. 具有以下方案的URI:mailto,http,https,ssh或telnet。
- Email addresses. 电子邮件地址。
Under Preferences>Profiles>Advanced, you may view and edit the smart selection rules.
在“首选项”>“配置文件”>“高级”下 ,您可以查看和编辑智能选择规则。

By default, the text is copied when the text is selected in iTerm2. So you don’t need to use Command-C.
默认情况下,在iTerm2中选择文本时,将复制该文本。 所以您不需要使用 Command-C 。
Sometimes, if there is a small error in the previous command, you don’t have to type it again. You can use ^old^new to replace it.
有时,如果上一个命令中有一个小错误,则无需再次键入。 您可以使用^old^new替换它。

2. Ultimate Shell — Zsh和Oh My Zsh (2. Ultimate Shell— Zsh & Oh My Zsh)

Zsh is a shell designed for interactive use, although it is also a powerful scripting language. Many of the useful features of bash, ksh, and tcsh were incorporated into zsh; many original features were added. But the configuration of zsh is so complicated that few people use it. Until the emergence of the Oh My Zsh project, let us quickly get started with zsh.
Zsh是一种设计用于交互式使用的外壳程序,尽管它也是一种功能强大的脚本语言。 bash , ksh和tcsh的许多有用功能已合并到zsh中。 增加了许多原始功能。 但是zsh的配置是如此复杂,以至于很少有人使用它。 在Oh My Zsh项目出现之前,让我们快速开始使用zsh。
Installation
安装
$ sh -c "$(curl -fsSL https://raw.github.com/ohmyzsh/ohmyzsh/master/tools/install.sh)"or
要么
$ sh -c "$(wget https://raw.github.com/ohmyzsh/ohmyzsh/master/tools/install.sh -O -)"Configuration
组态
There is a ~/.zshrc in your home directory, this is your configuration file. Open it up with your favorite text editor, I choose vim.
您的主目录中有一个~/.zshrc ,这是您的配置文件。 用您喜欢的文本编辑器打开它,我选择vim。
You can set Environment variable, Alias, Theme, plugins,etc.
您可以设置Environment variable , Alias , Theme , plugins等。
You can add alias like this.
您可以像这样添加alias 。
alias cls='clear'
alias ll='ls -l'
alias la='ls -a'
alias vi='vim'
alias grep="grep --color=auto"
alias -s gz='tar -xzvf'
alias -s tgz='tar -xzvf'
alias -s zip='unzip'
alias -s bz2='tar -xjvf'
......
If you have no experience in alias, you can use the Oh My Zsh common-aliases plugins.
如果您没有alias经验,则可以使用Oh My Zsh 通用别名插件 。
Plugins
外挂程式
Oh My Zsh plugins allow you to add the functionality of many sorts to your shell just by enabling them. They are each documented in the README file in their respective plugins/ folder.
哦,我的Zsh插件使您可以通过启用它们来将多种功能添加到您的Shell中。 它们各自记录在各自plugins/文件夹的README文件中。
Enable a plugin by adding its name to the plugins array in your .zshrc file. For example, this enables the rail, git, autojump, and ruby plugins, in that order:(elements are separated by spaces.)
通过将插件名称添加到.zshrc文件中的plugins数组来启用插件。 例如,这按autojump顺序启用rail , git , autojump和ruby插件:(元素由空格分隔。)
plugins=(rails git autojump ruby)The following is a brief introduction:
以下是简要介绍:
git:
git的 :
The git plugin provides many aliases and a few useful functions. Such as g = git, ga = git add, etc. When you are in a git controlled directory, Zsh will clearly display “git” and “branch”, as shown below.
git插件提供了许多别名和一些有用的功能。 如g = git ,ga = git add等。当您处于git控制的目录中时,Zsh将清楚显示“ git”和“ branch”,如下所示。

自动跳转 :
Autojump is a perfect combination of Zsh and Autojump. Autojump is a faster way to navigate your filesystem. You have to install Autojump first. Homebrew is the recommended installation method for macOS:
Autojump是Zsh和Autojump的完美结合。 自动跳转是浏览文件系统的一种更快的方法。 您必须先安装自动跳转。 自制程序是macOS的推荐安装方法:
brew install autojumpAnd add autojump to the plugins array in your ./zshrc file:
并将autojump添加到./zshrc文件中的plugins数组中:
plugins=(... autojump)Zsh will automatically record the directories you have visited. Using j foo you can directly jump to the directory. For example, if you have visited the CoreML directory, enter j Co to jump correctly. j -stat can show database entries and their key weights.
Zsh将自动记录您访问过的目录。 使用j foo可以直接跳到目录。 例如,如果您访问了CoreML目录,请输入j Co以正确跳转。 j -stat可以显示数据库条目及其密钥权重。

Autosuggestions:
自动建议:
It suggests commands as you type based on history and completions.
它会根据您的历史记录和完成情况建议您键入的命令。
Clone this repository into
$ZSH_CUSTOM/plugins(by default~/.oh-my-zsh/custom/plugins)将此存储
$ZSH_CUSTOM/plugins到$ZSH_CUSTOM/plugins(默认情况下~/.oh-my-zsh/custom/plugins)
git clone https://github.com/zsh-users/zsh-autosuggestions ${ZSH_CUSTOM:-~/.oh-my-zsh/custom}/plugins/zsh-autosuggestionsAdd the plugin to the list of plugins for Oh My Zsh to load (inside
~/.zshrc):将插件添加到插件列表中以供Oh My Zsh加载(在
~/.zshrc):
plugins=(... zsh-autosuggestions)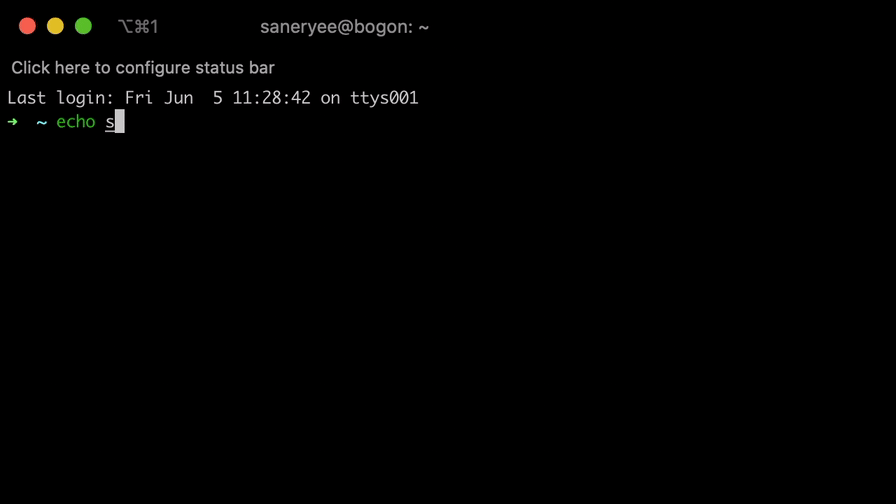
3. Alfred-增强版 焦点 (3. Alfred — Enhanced Edition Spotlight)

阿尔弗雷德·热基 (Alfred Hotkey)
Firstly, set the hotkey for Alfred startup. Here, for convenience, I set it to double-click the Command Key (⌘).
首先,设置Alfred启动的热键。 在这里,为方便起见,我将其设置为双击Command键(⌘)。

Find apps & files
查找应用程序和文件
Double-click Command to open the Alfred Window, then enter the file/app name. You will see the file and app in the search bar just press Return key or shortcut keys.
双击“命令”以打开“ Alfred窗口”,然后输入文件/应用程序名称。 您只需按回车键或快捷键,即可在搜索栏中看到文件和应用程序。

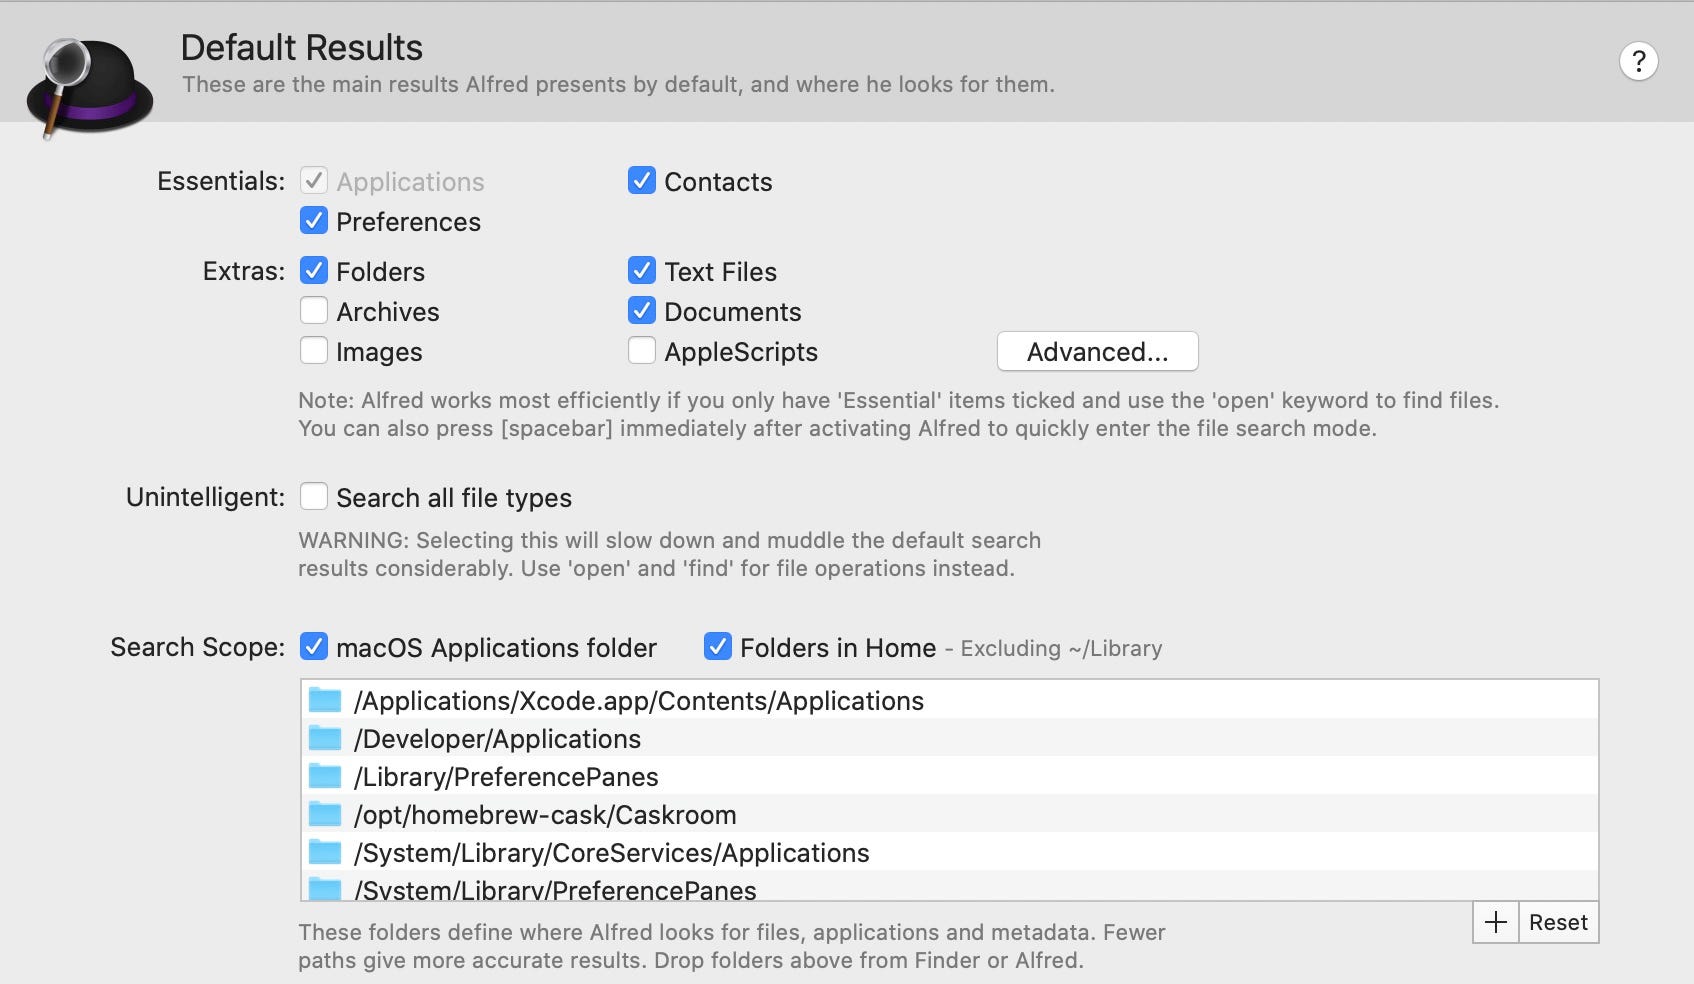
You can add additional file types and setting your search scope in Alfred’s preferences under Features > Default Results.
您可以在“ 功能”>“默认结果”下的Alfred首选项中添加其他文件类型并设置搜索范围 。
Search the web
搜索网页
It only takes two steps to search the web in Alfred.
在Alfred中搜索网络仅需两步。
- Pop up Alfred using Hotkey. 使用热键弹出Alfred。
- Enter search contents and press Return Key or shortcut keys. 输入搜索内容,然后按回车键或快捷键。
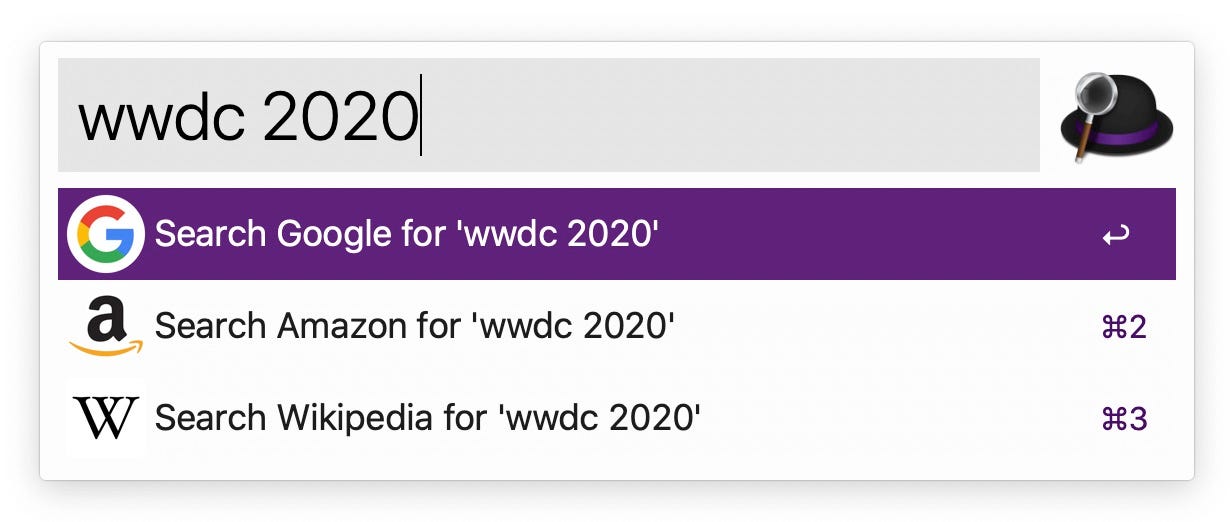
You can modify default web searches in Alfred’s preferences under Features > Web Search.
您可以在功能>网络搜索下的Alfred首选项中修改默认网络搜索。

The following features are Alfred's advanced features that you need to buy the Powerpack License.
以下功能是购买Powerpack许可证所需的Alfred的高级功能。
Clipboard History
剪贴板历史
Alfred clipboard history is an incredibly useful tool to help you be more efficient. Before you can start using the Clipboard History feature, you need to enable it in Alfred’s Preferences, under Features > Clipboard, and grant Alfred Accessibility permissions in macOS.
Alfred剪贴板历史记录是一个非常有用的工具,可帮助您提高效率。 在开始使用剪贴板历史记录功能之前,需要在Alfred的“首选项”中的“ 功能”>“剪贴板 ”下启用它,并在macOS中授予Alfred Accessibility权限。
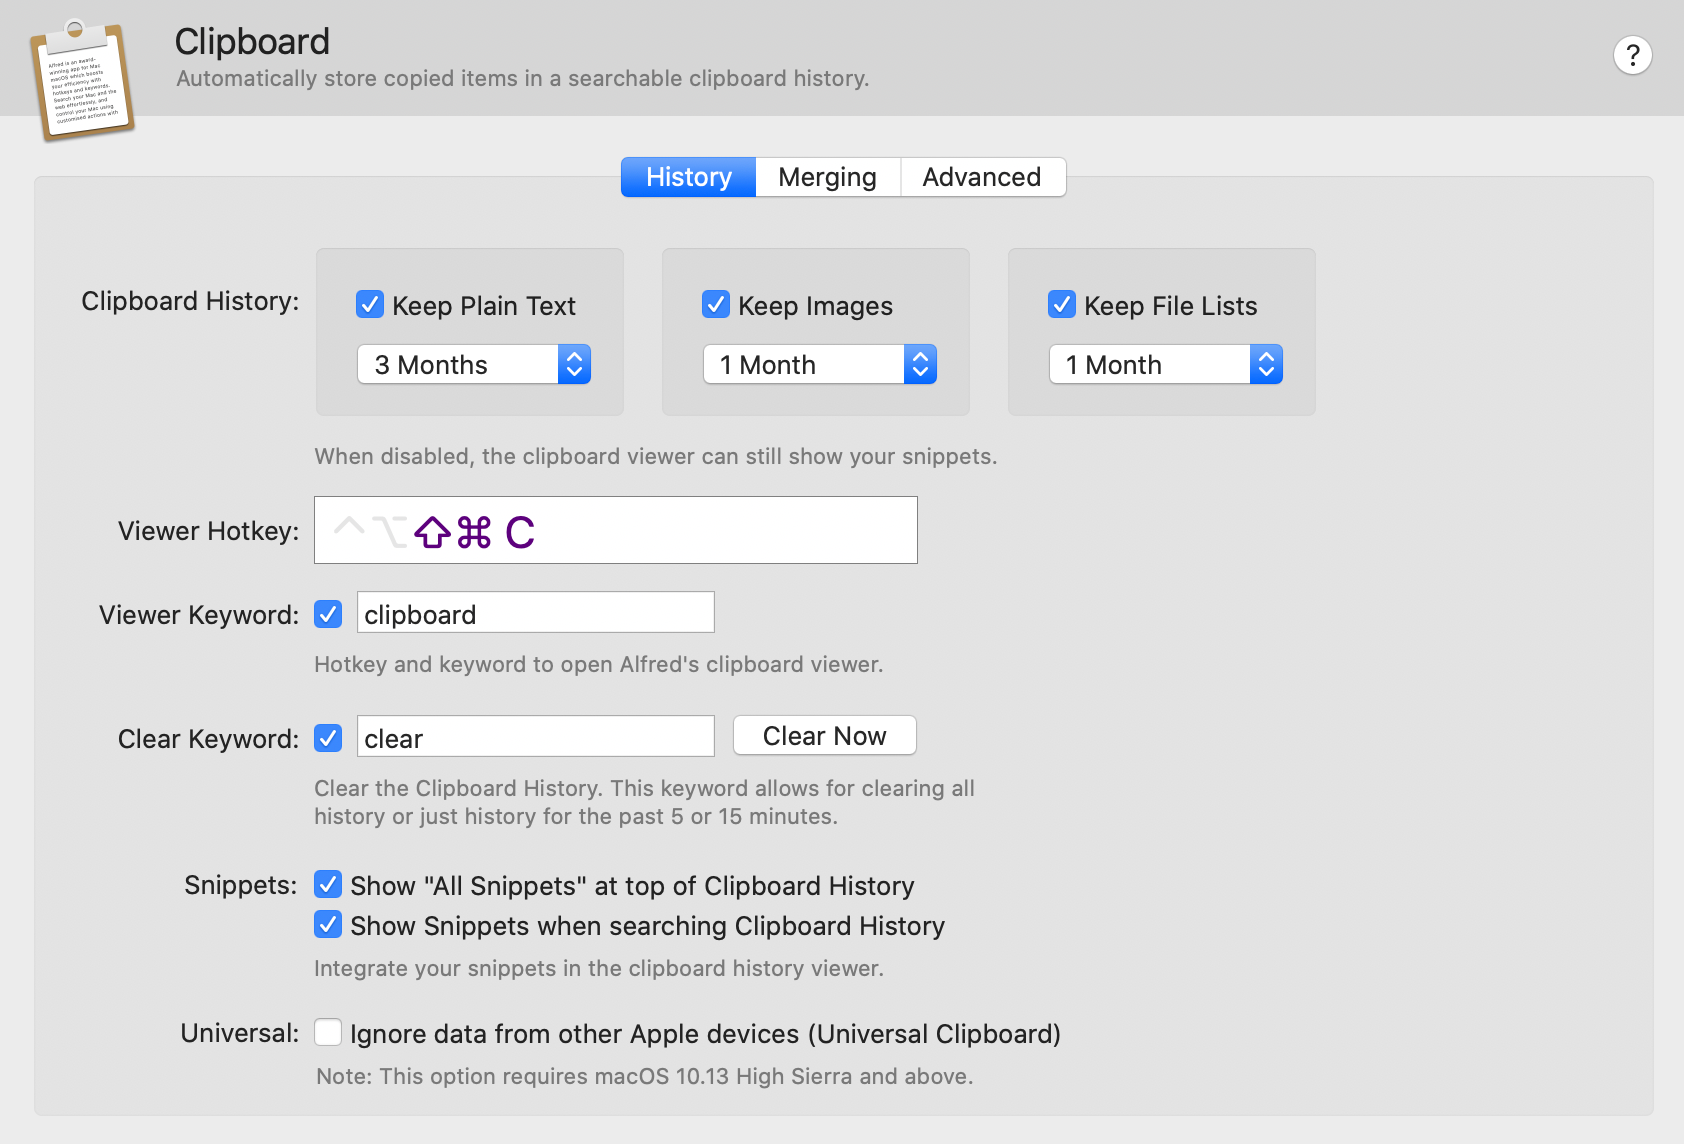
You can set the history types, how long you want Alfred to remember your clips for, Viewer Hotkey, etc. I set to keep Plain Text, Images, and File Lists for 3 months, 1 month, and 1month respectively. At the same time, set the Viewer Hotkey to Command+Shift+C. Using hotkey we will see:
您可以设置历史记录类型,想要Alfred记住剪辑片段的时间,查看器热键等。我设置为分别将纯文本,图像和文件列表保留3个月,1个月和1个月。 同时,将查看器热键设置为Command + Shift + C。 使用热键,我们将看到:

Snippets and Text Expansion
片段和文本扩展
By using snippets to save your frequently used text clips, such as email, phone number, address, URL, etc. Expand them automatically using a keyword or browse for the right clip in the Snippets Viewer. Firstly, you need to activate Automatically expand snippets by keyword. With auto-expansion, you can expand your snippets automatically in any app by typing the snippet’s keyword, without popping up Alfred’s Snippets window!
通过使用代码片段保存您经常使用的文本剪辑,例如电子邮件,电话号码,地址,URL等。使用关键字自动展开它们,或在“代码片段查看器”中浏览找到正确的剪辑。 首先,您需要激活按关键字自动展开代码段。 借助自动扩展功能,您无需键入Alfred的“代码段”窗口,即可在任何应用中键入代码段的关键字来自动扩展代码段!

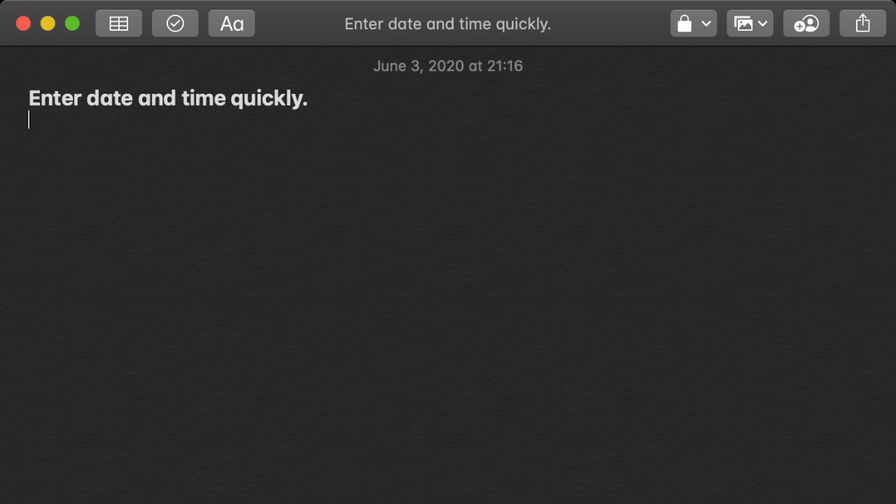
To use the snippet, simply type the keyword you set into the app or text field you want. As if by magic, your keyword will be replaced will the full text snippet. For example, enter !dt and replace it with the current date and time.
要使用代码段,只需在应用程序或文本字段中输入您设置的关键字。 就像魔术一样,您的关键字将被全文摘录替换。 例如,输入!dt并将其替换为当前日期和时间。
For more snippet settings, please refer to the official documentation.
有关更多代码段设置,请参阅官方文档 。
Workflows
工作流程
With Alfred’s workflows, we can extend Alfred and get things done in our own way. We can create our workflows or find hundreds more on official workflows or Packal.
借助Alfred的工作流程,我们可以扩展Alfred并以自己的方式完成工作。 我们可以创建工作流程,也可以在官方工作流程或Packal上找到数百个工作流程 。

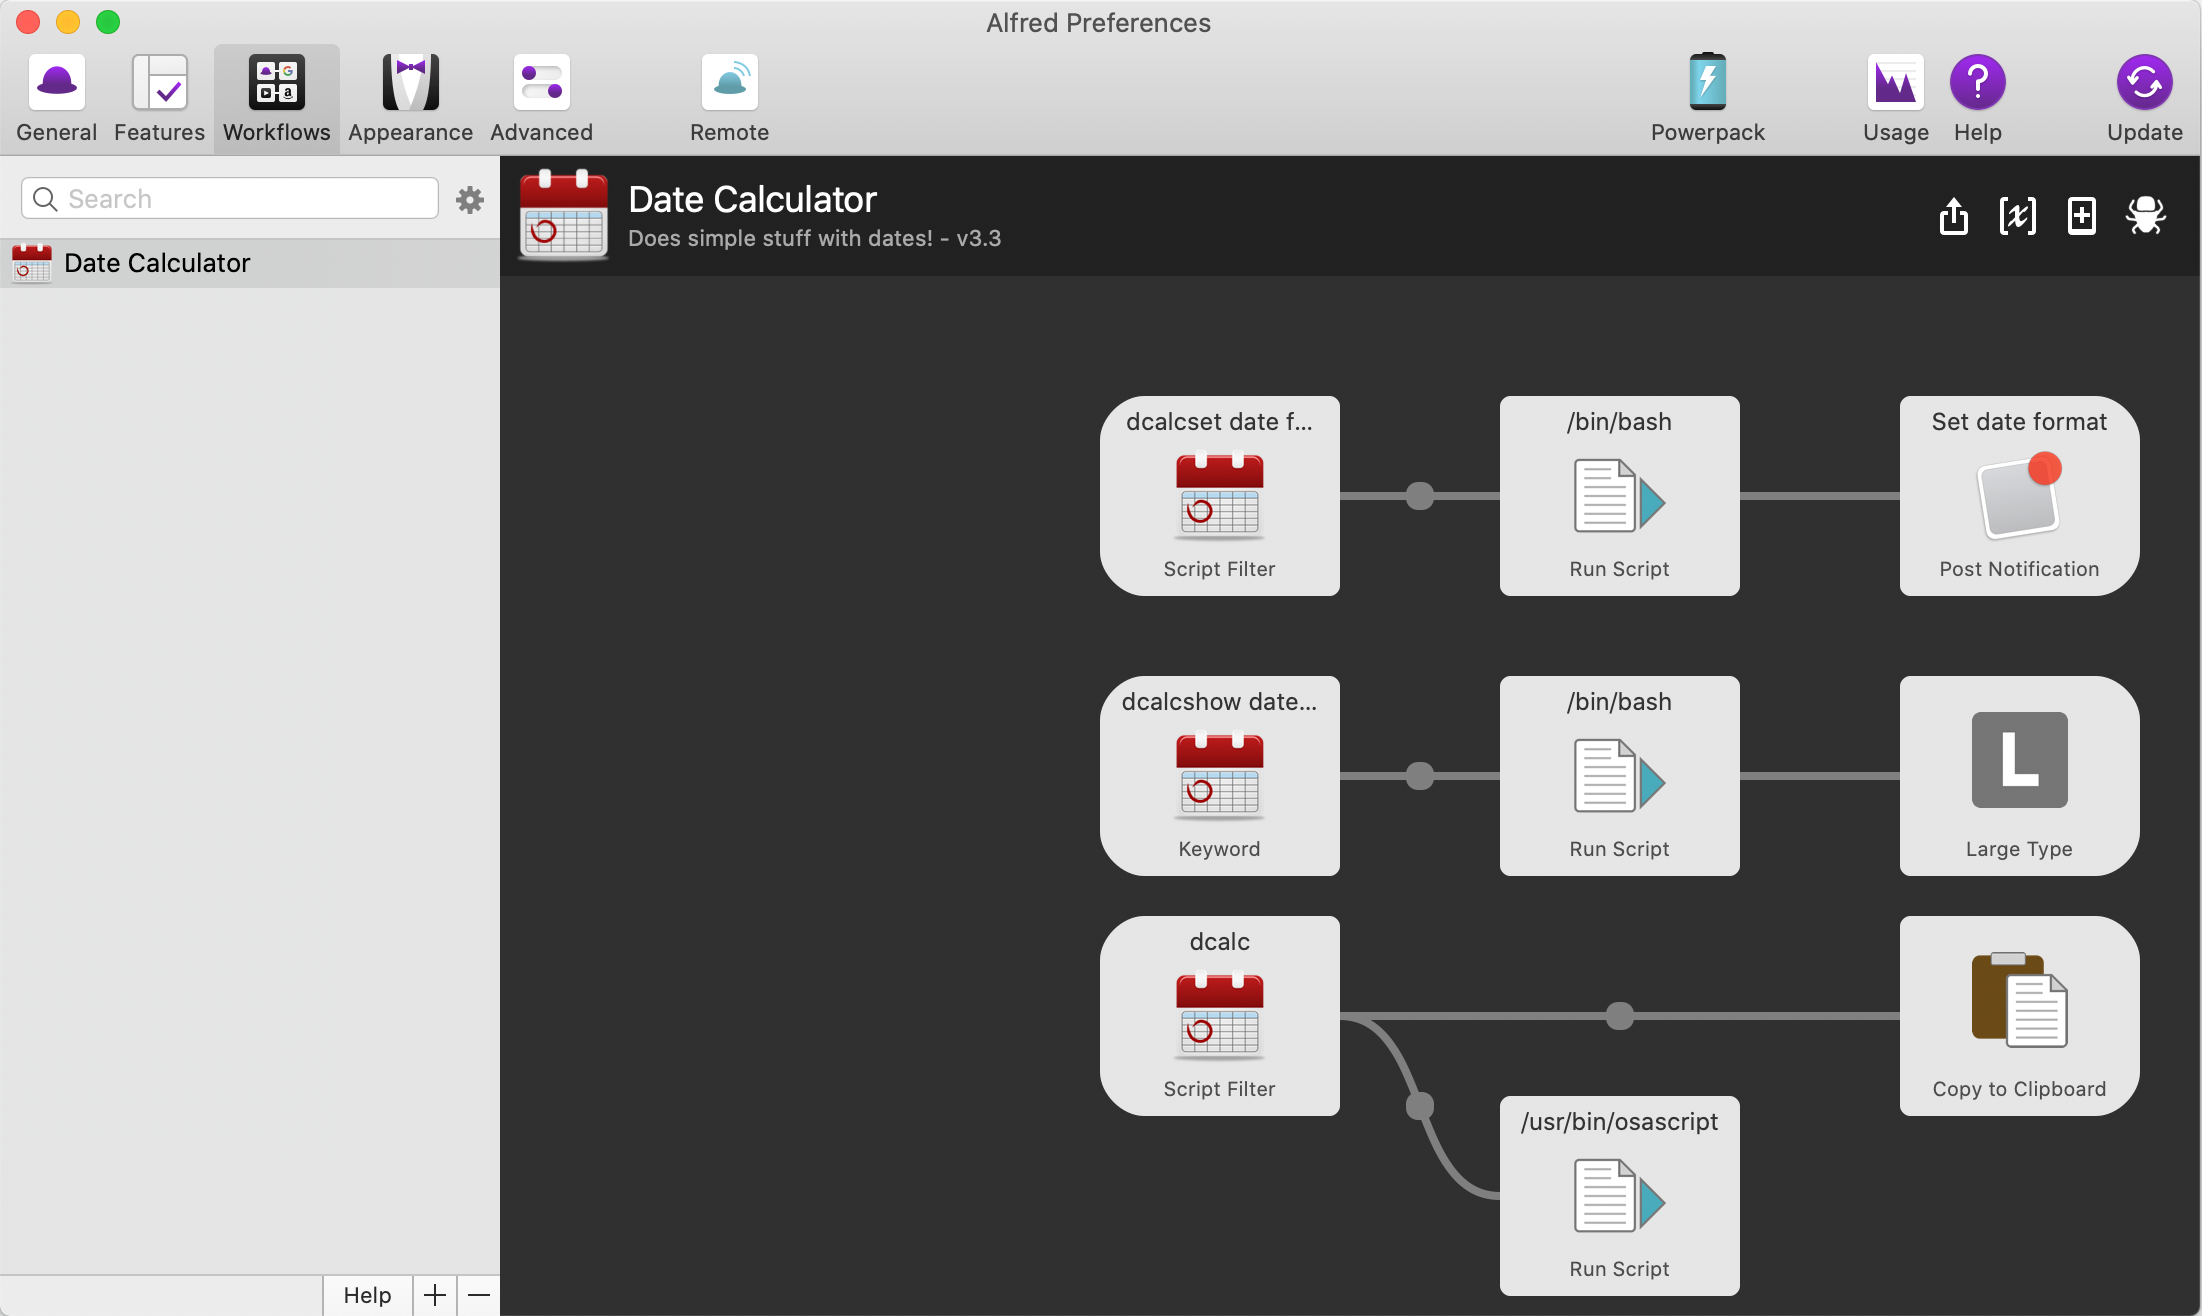
Here I will demonstrate the workflow I installed. This workflow can do some calculations about the date, such as calculating how many days are between two dates. You can see that there is 1 week, 3 days between 2020–05–25 and 2020–06–04.
在这里,我将演示我安装的工作流程。 该工作流可以对日期进行一些计算,例如计算两个日期之间的天数。 您会看到2020-05-25至2020-0604之间有1周3天 。

More about Alfred Workflows and Customize Search, please see my other article.
有关Alfred工作流程和自定义搜索的更多信息,请参阅我的其他文章。
4.代码编辑。 重新定义。 — Visual Studio代码 (4. Code editing. Redefined. — Visual Studio Code)
If you are only allowed to install an IDE on your Mac, I will not hesitate to choose VSCode.
如果只允许在Mac上安装IDE,我会毫不犹豫地选择VSCode。
Visual Studio Code is a lightweight but powerful source code editor that runs on your Mac. It comes with built-in support for Front-end development( JavaScript, TypeScript, Node.js, CSS) and has a rich ecosystem of extension for other languages(such as C++, C#, Java, Python, PHP, Go) and embedded development(PlatformIO).
Visual Studio Code是在Mac上运行的轻量级但功能强大的源代码编辑器。 它具有对前端开发(JavaScript,TypeScript,Node.js,CSS)的内置支持,并具有丰富的其他语言(例如C ++,C#,Java,Python,PHP,Go,Go)和嵌入式语言的扩展生态系统开发(PlatformIO)。
Installation:
安装:
Download Visual Studio Code for macOS.
下载适用于macOS的Visual Studio代码 。
Drag
Visual Studio Code.appto theApplicationsfolder, making it available in the macOS Launchpad.将
Visual Studio Code.appApplications文件夹中,使其在macOS Launchpad中可用。
Command Palette:
命令面板:
From Command Palette, you have access to all of the functionality of VS Code, including keyboard shortcuts for the most common operations.
您可以从Command Palette访问VS Code的所有功能,包括最常用操作的键盘快捷键。
Keyboard Shortcut: ⇧⌘P
键盘快捷键:⇧⌘P
Keyboard Shortcuts:
键盘快捷键:
VS Code provides rich and easy keyboard shortcuts helping developer coding fast and effective. You can also install a Keymap extension that brings the keyboard shortcuts from your favorite editor to VS Code.
VS Code提供了丰富而便捷的键盘快捷键,可帮助开发人员快速有效地进行编码。 您还可以安装一个Keymap扩展程序,该扩展程序将键盘快捷键从您最喜欢的编辑器添加到VS Code。

Extensions:
扩充功能:
In the Extensions view, you can search extensions, show recommended extensions and Install&Manage extensions. You can even create your own extension.
在扩展视图中,您可以搜索扩展,显示推荐的扩展以及安装和管理扩展。 您甚至可以创建自己的扩展程序。

You can find more extensions in the Marketplace or community curated extension lists. such as awesome-vscode.
您可以在Marketplace或社区策划的扩展列表中找到更多扩展。 例如awesome-vscode。
For more tips&ticks on VS Code, please see the Offical Document or my other article.
有关VS Code的更多提示和技巧,请参阅正式文档或其他文章。
One More Thing ……
还有一件事 ……
A Special app for Data Scientist Developer —— Mathpix Snipping Tool
数据科学家开发人员专用应用程序- Mathpix截图工具
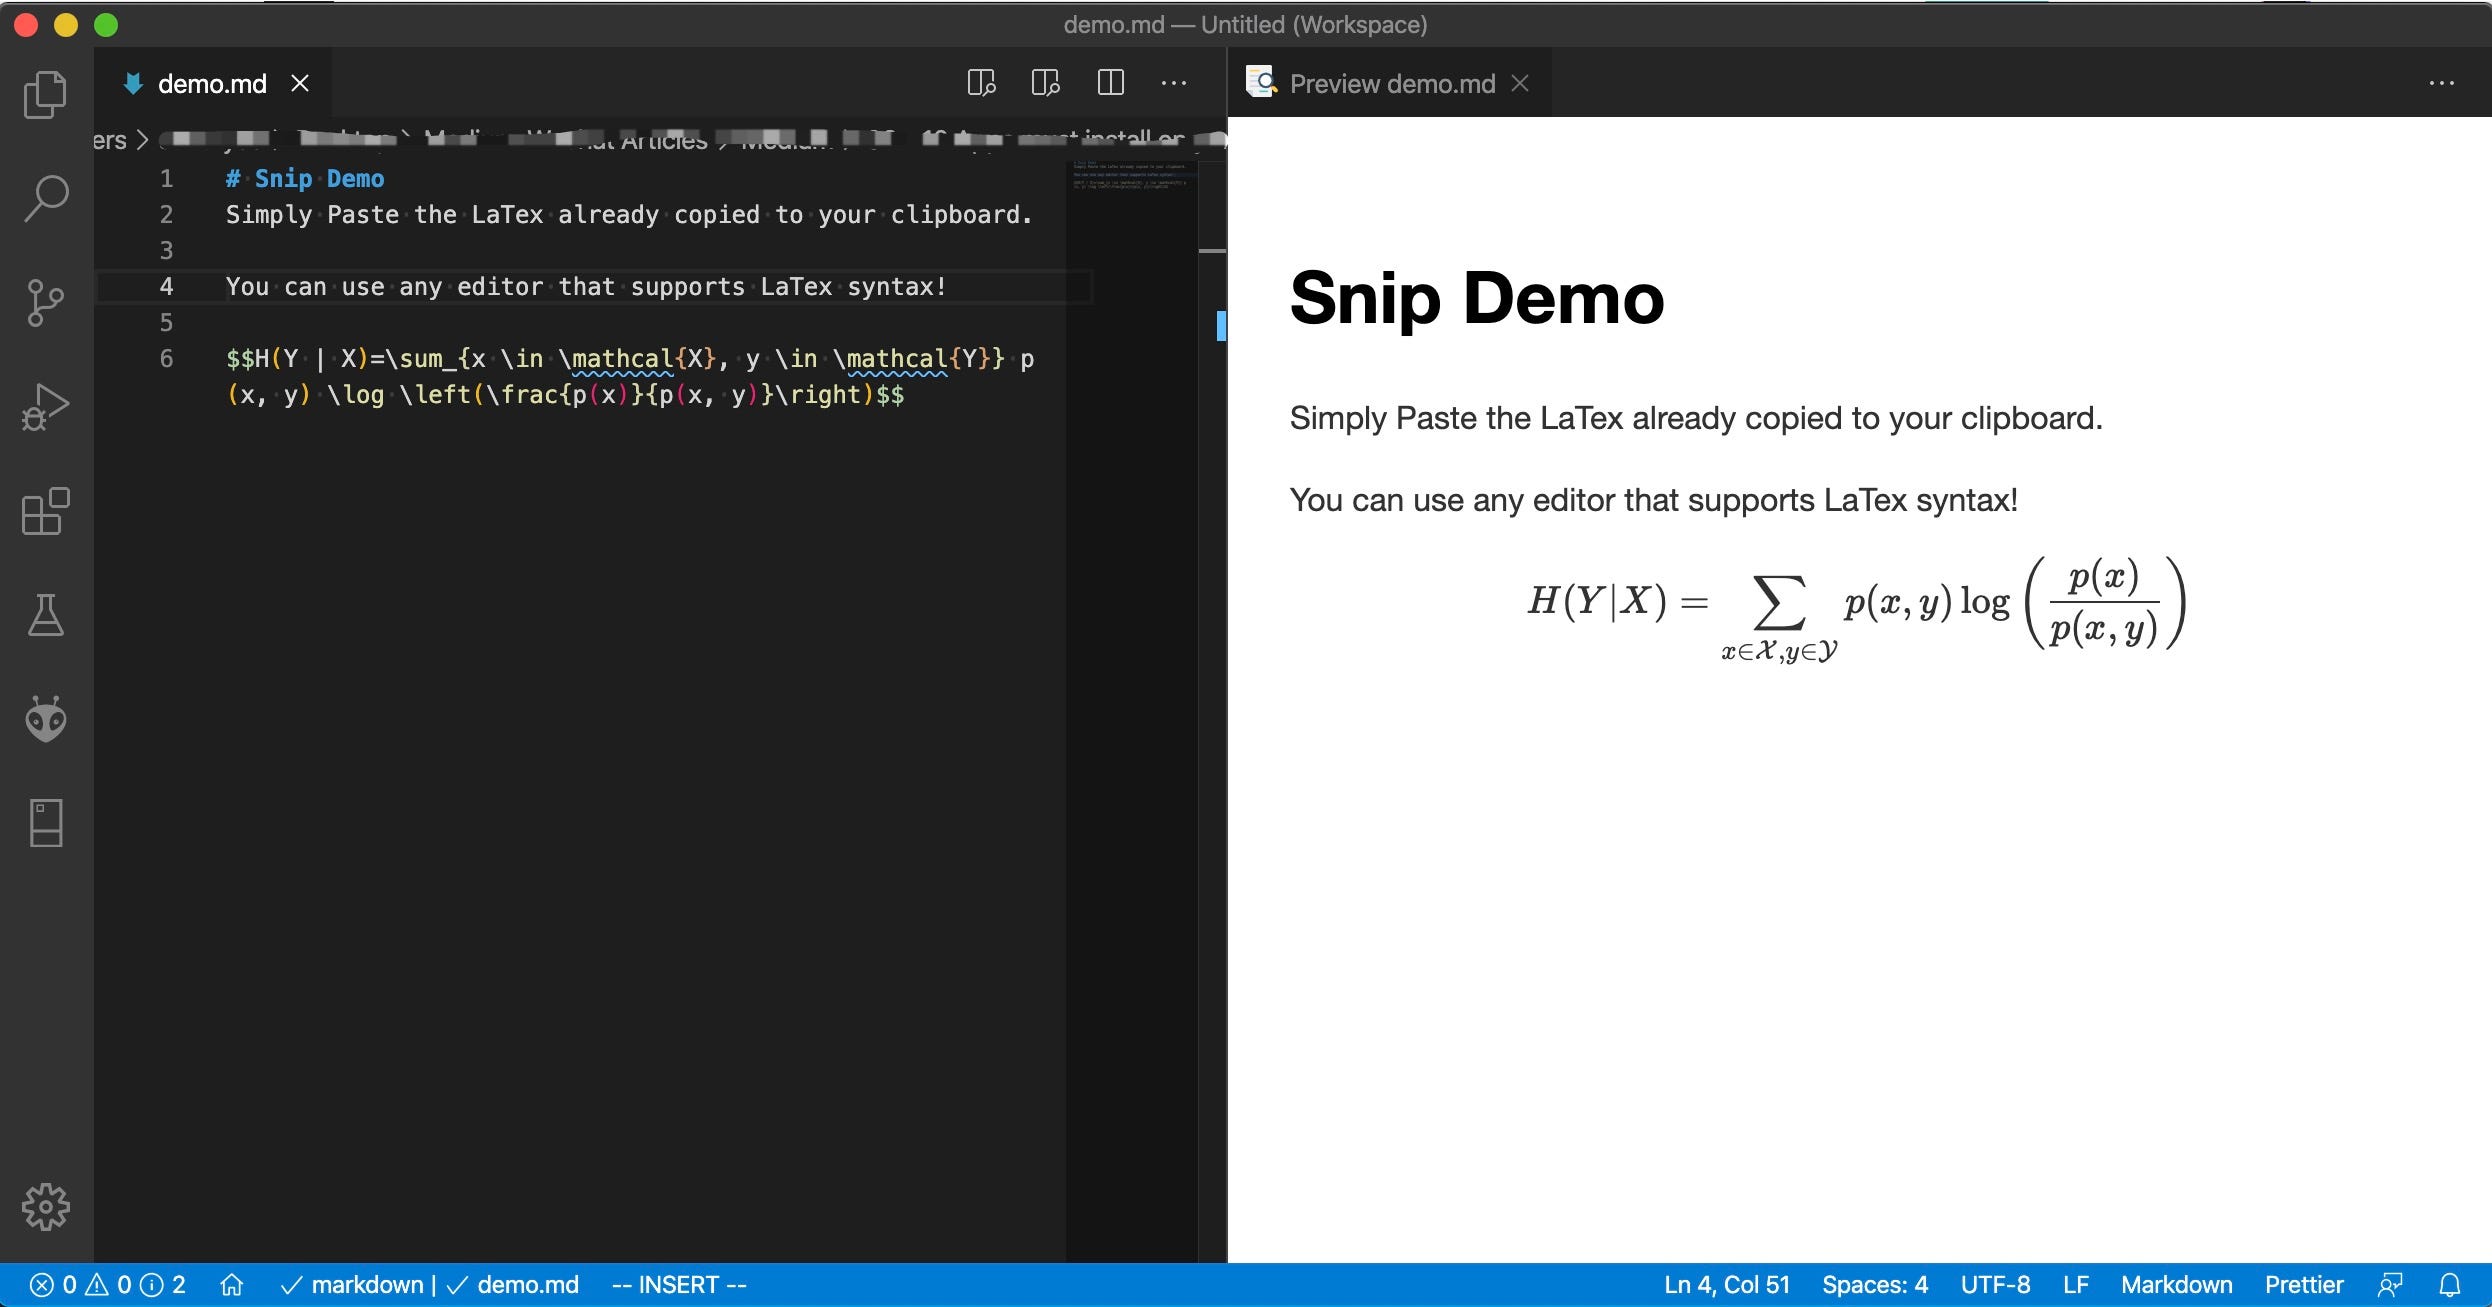
As data science & machine learning developers, science students, or scientific researchers, sometimes we need to use Markdown and LaText to write documents or papers. Mathpix can help us extract equations from PDFs or handwritten notes in seconds just by taking a screenshot, paste the resulting LaTeX code into any Markdown or LaTeX editor.
作为数据科学和机器学习的开发人员,理科学生或科学研究人员,有时我们需要使用Markdown和LaText编写文档或论文。 Mathpix可以帮助我们从几秒钟内从PDF或手写笔记中提取方程式,只需截图即可,然后将生成的LaTeX代码粘贴到任何Markdown或LaTeX编辑器中。
- Capture your desired inputs within the screenshot box 在屏幕截图框中捕获所需的输入

- Check the equation and copied. 检查方程式并复制。
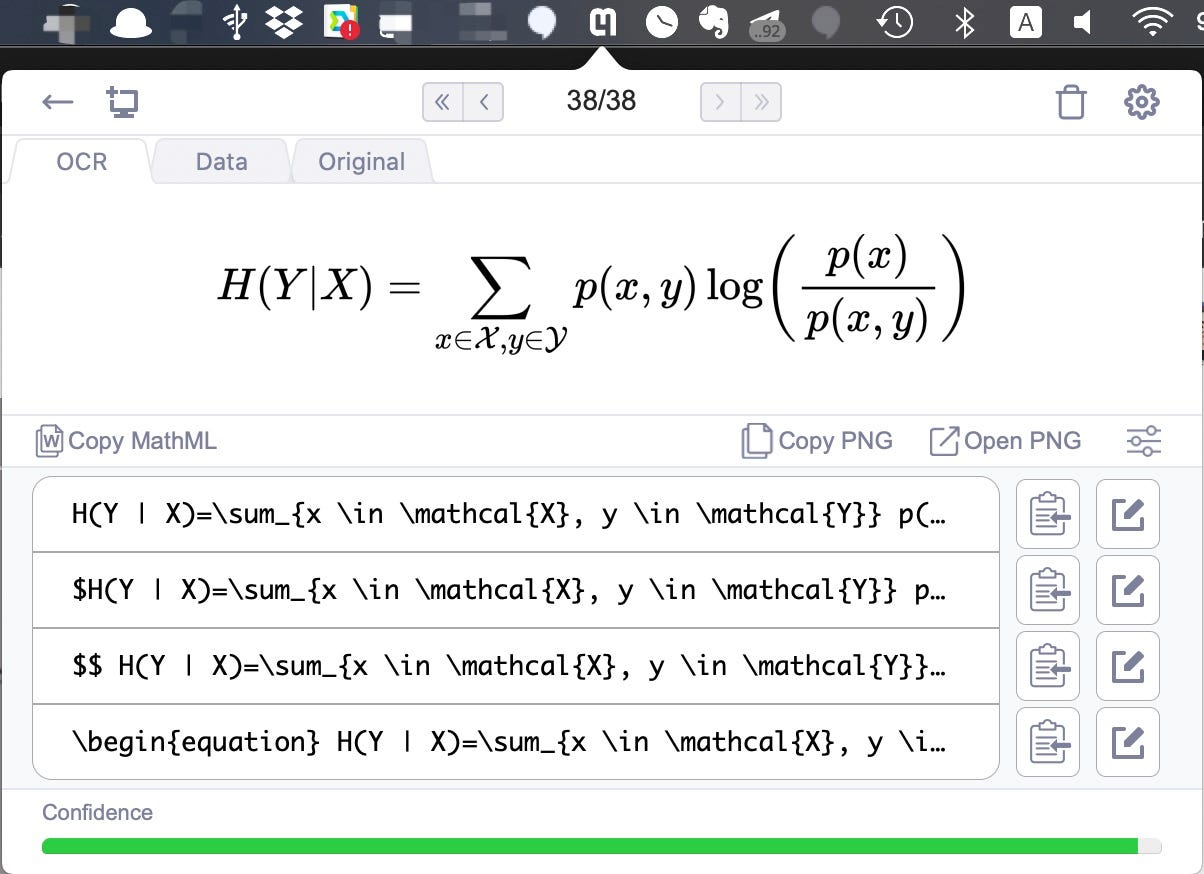
- Paste the LaTeX into any compatible editor. 将LaTeX粘贴到任何兼容的编辑器中。
The Mathpix provides 50 snips per month for a free account, which is enough for me.
Mathpix每月为免费帐户提供50个截图,对我来说足够了。
Thanks for reading. 🖖 Live long and prosper 🖖
谢谢阅读。 🖖长寿和繁荣🖖
翻译自: https://medium.com/swlh/4-apps-must-install-on-your-mac-for-development-in-2020-3d8cd81c316c
mac安装ios应用程序


 2338
2338

 被折叠的 条评论
为什么被折叠?
被折叠的 条评论
为什么被折叠?
 到【灌水乐园】发言


