


服务发现的需求 (The need for Service Discovery)
Microservices are dynamic in nature. This means multiple instances of a single Microservice will be co-existing. Most probably your instances will either have a different IP address or a different port or both. And the number of instances will be dynamic too. This brings up loads of questions —
微服务本质上是动态的。 这意味着单个微服务的多个实例将共存。 您的实例最有可能具有不同的IP地址或不同的端口,或两者都有。 实例的数量也将是动态的。 这带来了很多问题-
How do I know the location of any Microservice instance?
我怎么知道任何微服务实例的位置?
- How can I keep a track of all the instances? 如何跟踪所有实例?
How do I select a Microservice instance?
如何选择一个微服务实例?
What happens if the Microservice instance goes down?
如果微服务实例关闭,会发生什么?
Let's understand the problem statement from a practical perspective. We already developed Product Catalog Service as part of the first exercise. Follow a similar approach to develop another Microservice — Shopping Cart Service. Let's implement addItem , the method responsible to add an item to the shopping cart.
让我们从实际角度了解问题陈述。 作为第一个练习的一部分,我们已经开发了产品目录服务 。 遵循类似的方法来开发另一个微服务 - 购物车服务。 让我们实现addItem ,该方法负责将商品添加到购物车。
This method needs to call the Product Catalog Service to get the product details. It will use this info to update other item attributes in the Shopping Cart. If you see the code below, we are passing the URL reference of Product Catalog Service.
此方法需要调用产品目录服务以获取产品详细信息。 它将使用此信息来更新购物车中的其他商品属性。 如果您看到下面的代码,我们正在传递产品目录服务的URL参考。
@PostMapping("/cart/{cartId}/item")
public Cart addItem(@PathVariable String cartId, @RequestBody CartItem item) {
  if (cartId != null && item != null && item.getProductId() != null) {
    // get product details
    Product itemProduct = restTemplate.getForObject("http://localhost:8080/product/" + item.getProductId(), Product.class);
if (itemProduct != null && itemProduct.id != null) {
      // adding total item price in the shopping cart item
      item.setTotalItemPrice(itemProduct.getUnitPrice() * item.quantity);
      return shoppingCartDao.addItem(cartId, item);
    }
    throw new ResponseStatusException(HttpStatus.NOT_FOUND, "item product not found");
  }
  throw new ResponseStatusException(HttpStatus.NOT_FOUND, "cart or item missing");
}
We are assuming the URL (http://localhost:8080/product/**) to be constant but in reality, it is dynamic. All parts of it — be it hostname or the port .
我们假设URL( http://localhost:8080/product/** )是恒定的,但实际上它是动态的。 它的所有部分-它是hostname还是port 。
Service Discovery comes to the rescue. This provides a mechanism that keeps track of all the services and their instances. All the Microservices register to it and keep updating their network information regularly.
服务发现可为您提供帮助。 这提供了一种跟踪所有服务及其实例的机制。 所有微服务都向其注册,并保持定期更新其网络信息。

The end to end solution has two prominent variations — Client-side Service Discovery and Server-side Service Discovery. We will discuss both these options in detail with the supporting examples.
端到端解决方案具有两个突出的变化- 客户端服务发现和服务器端服务发现 。 我们将通过支持示例详细讨论这两个选项。
客户端服务发现 (Client-Side Service Discovery)
The problem can be resolved by creating a Discovery Server where our microservices can register themselves. The discovery server will keep a track of all the instances, their hosts, ports, and health status. If a service needs to communicate with another service, it needs to get the instance info from this discovery server. Let's understand this through our example
通过创建发现服务器可以在其中注册我们的微服务来解决该问题。 发现服务器将跟踪所有实例,它们的主机,端口和运行状况。 如果服务需要与另一服务进行通信,则需要从该发现服务器获取实例信息。 让我们通过示例了解这一点
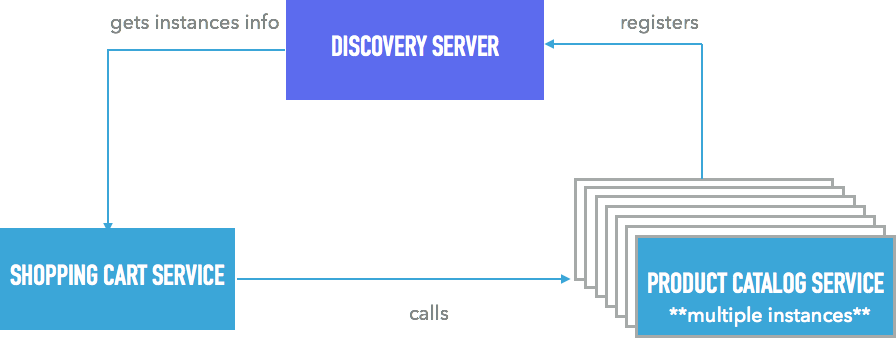
All the instances of Product Catalog Service will register to the Discovery Server. If the shopping cart service needs to communicate to Product Catalog Service, it will first get its instances information from Discovery Server. Once the information is received, Shopping Cart Service can call the Product Catalog Service to get the product details. As a first step — Let's create the Discovery Server
产品目录服务的所有实例都将注册到发现服务器。 如果购物车服务需要与产品目录服务通信,它将首先从Discovery Server获取其实例信息。 收到信息后, 购物车服务可以致电产品目录服务以获取产品详细信息。 第一步-让我们创建发现服务器
创建发现服务器 (Creating Discovery Server)
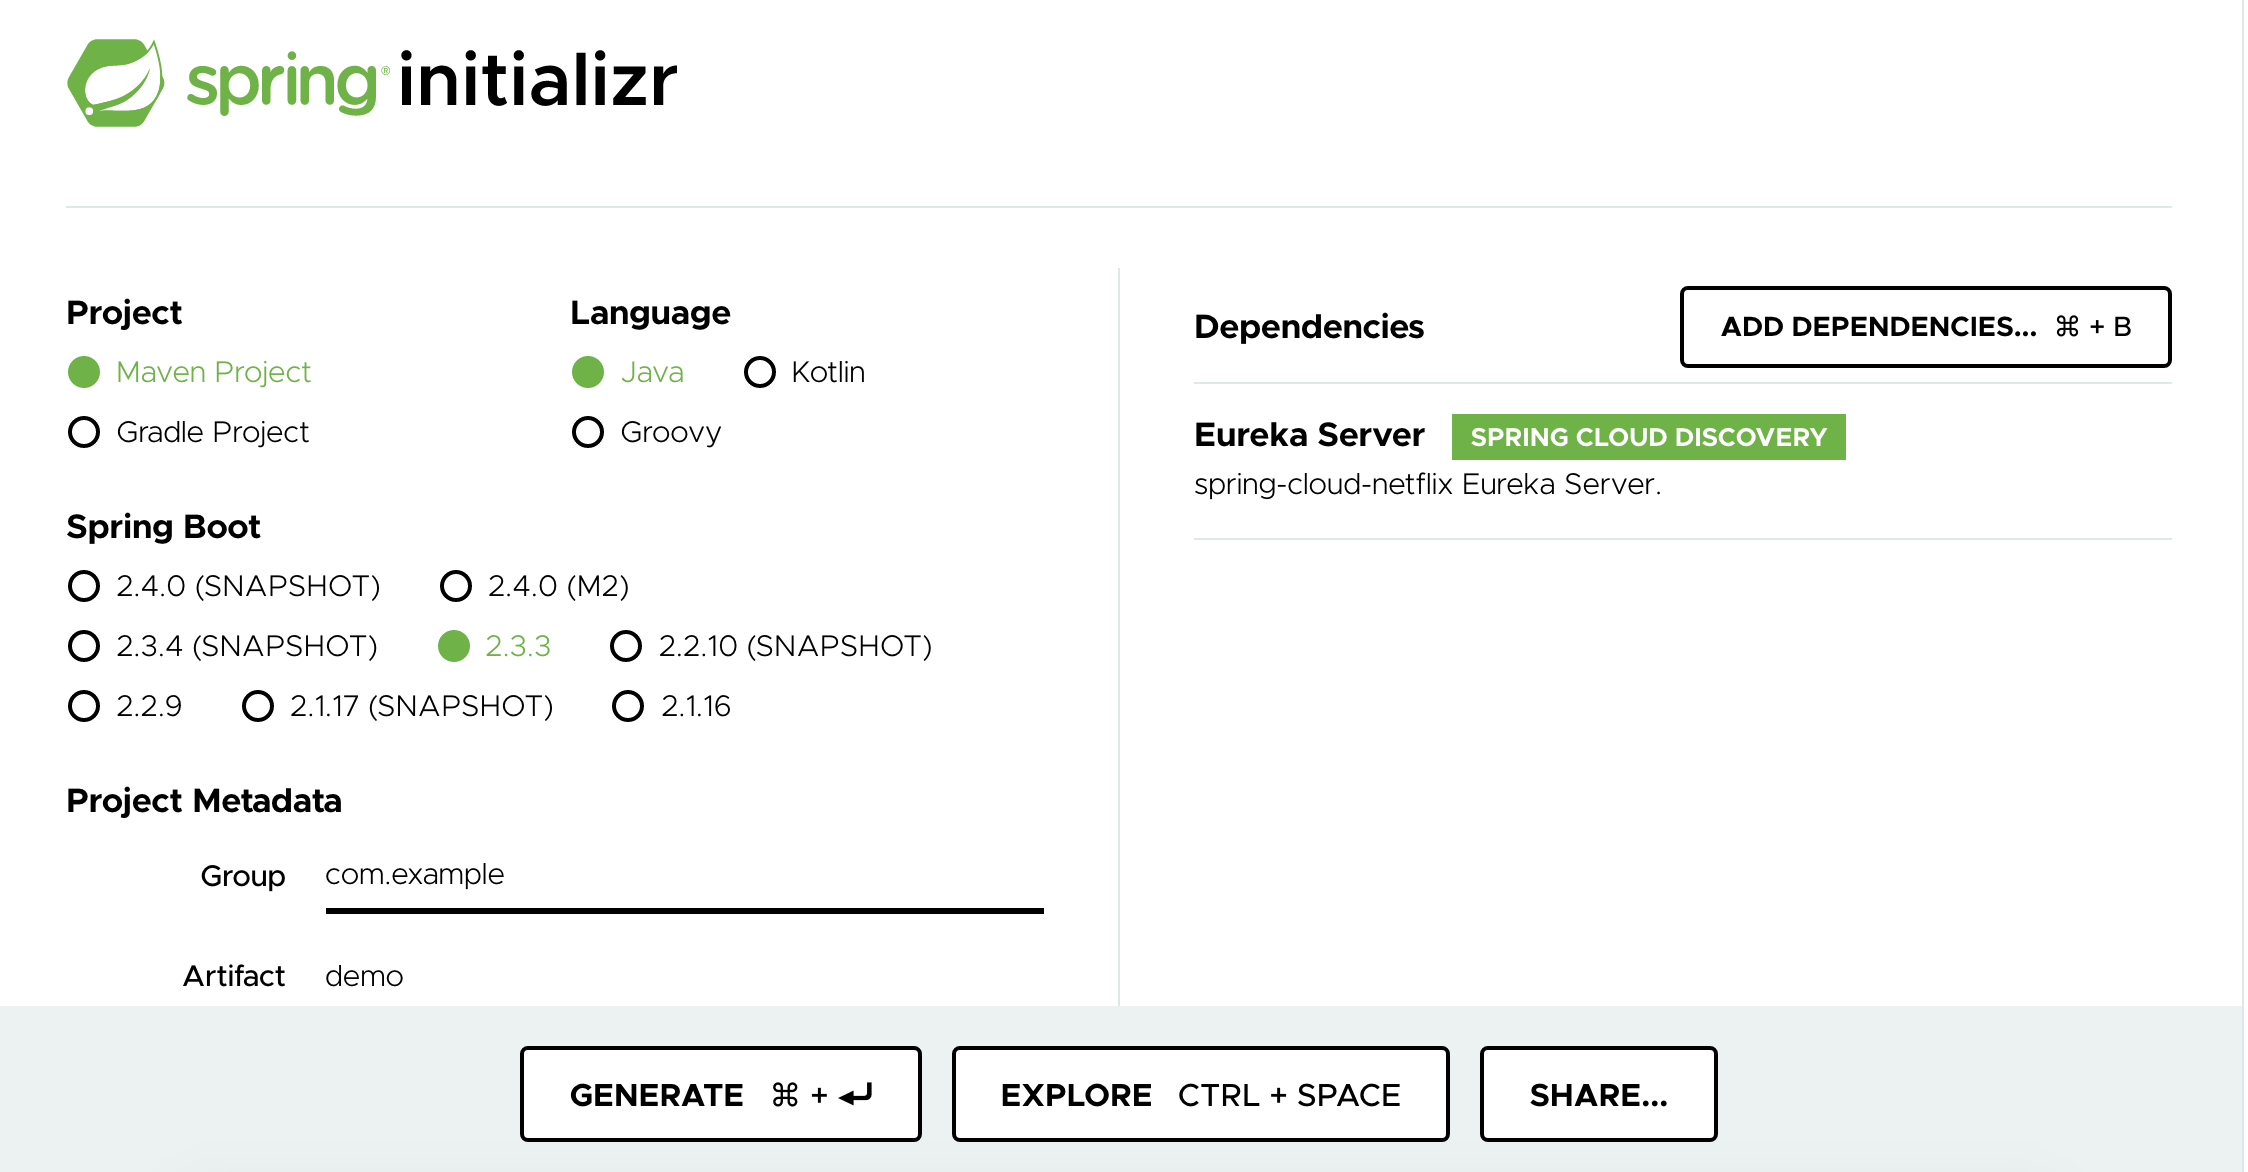
Step 1: Go to spring initializer, add the dependency of Spring Cloud Eureka Server. This library is a wrapper over the Netflix OSS library. Download the archive and unpack it to your favorite location.
步骤1 :转到spring初始化程序,添加Spring Cloud Eureka Server的依赖项。 该库是Netflix OSS库的包装。 下载档案并将其解压缩到您喜欢的位置。
Step 2: Open the auto-generated java file — DiscoveryServerApplication.java and add the annotation @EnableEurekaServer to this class. This will ensure all the dependent beans for the eureka server are initialized.
第2步:打开自动生成的java文件- DiscoveryServerApplication.java和添加注释@EnableEurekaServer这一类。 这将确保初始化eureka服务器的所有从属bean。
@SpringBootApplication
@EnableEurekaServerpublic class DiscoveryServerApplication { public static void main(String[] args) {
  SpringApplication.run(DiscoveryServerApplication.class, args);
 }}
Step 3: By default, every Eureka server is also a Eureka client and requires (at least one) service URL to locate a peer. If you do not provide it, the service runs and works, but it fills your logs with a lot of noise about not being able to register with the peer. To avoid this noise and make our Discovery Server standalone, update src/main/resources/application.properties with the following values
步骤3 :默认情况下,每个Eureka服务器也是Eureka客户端,并且需要(至少一个)服务URL来定位对等方。 如果您不提供该服务,则该服务将运行并运行,但是它将使您的日志充满关于无法向对等方注册的噪音。 为避免这种噪音并使我们的Discovery Server独立运行,请使用以下值更新src/main/resources/application.properties
server.port=8761eureka.client.register-with-eureka=false
eureka.client.fetch-registry=falselogging.level.com.netflix.eureka=OFF
logging.level.com.netflix.discovery=OFF
We are also setting the port to 8761 to avoid conflicts with other services.
我们还将端口设置为8761,以避免与其他服务冲突。
Step 4: Run the maven command to start the discovery server mvn spring-boot:run and visit http://localhost:8761/. You will see something similar to —
步骤4:运行maven命令以启动发现服务器mvn spring-boot:run并访问http:// localhost:8761 / 。 您会看到类似于-
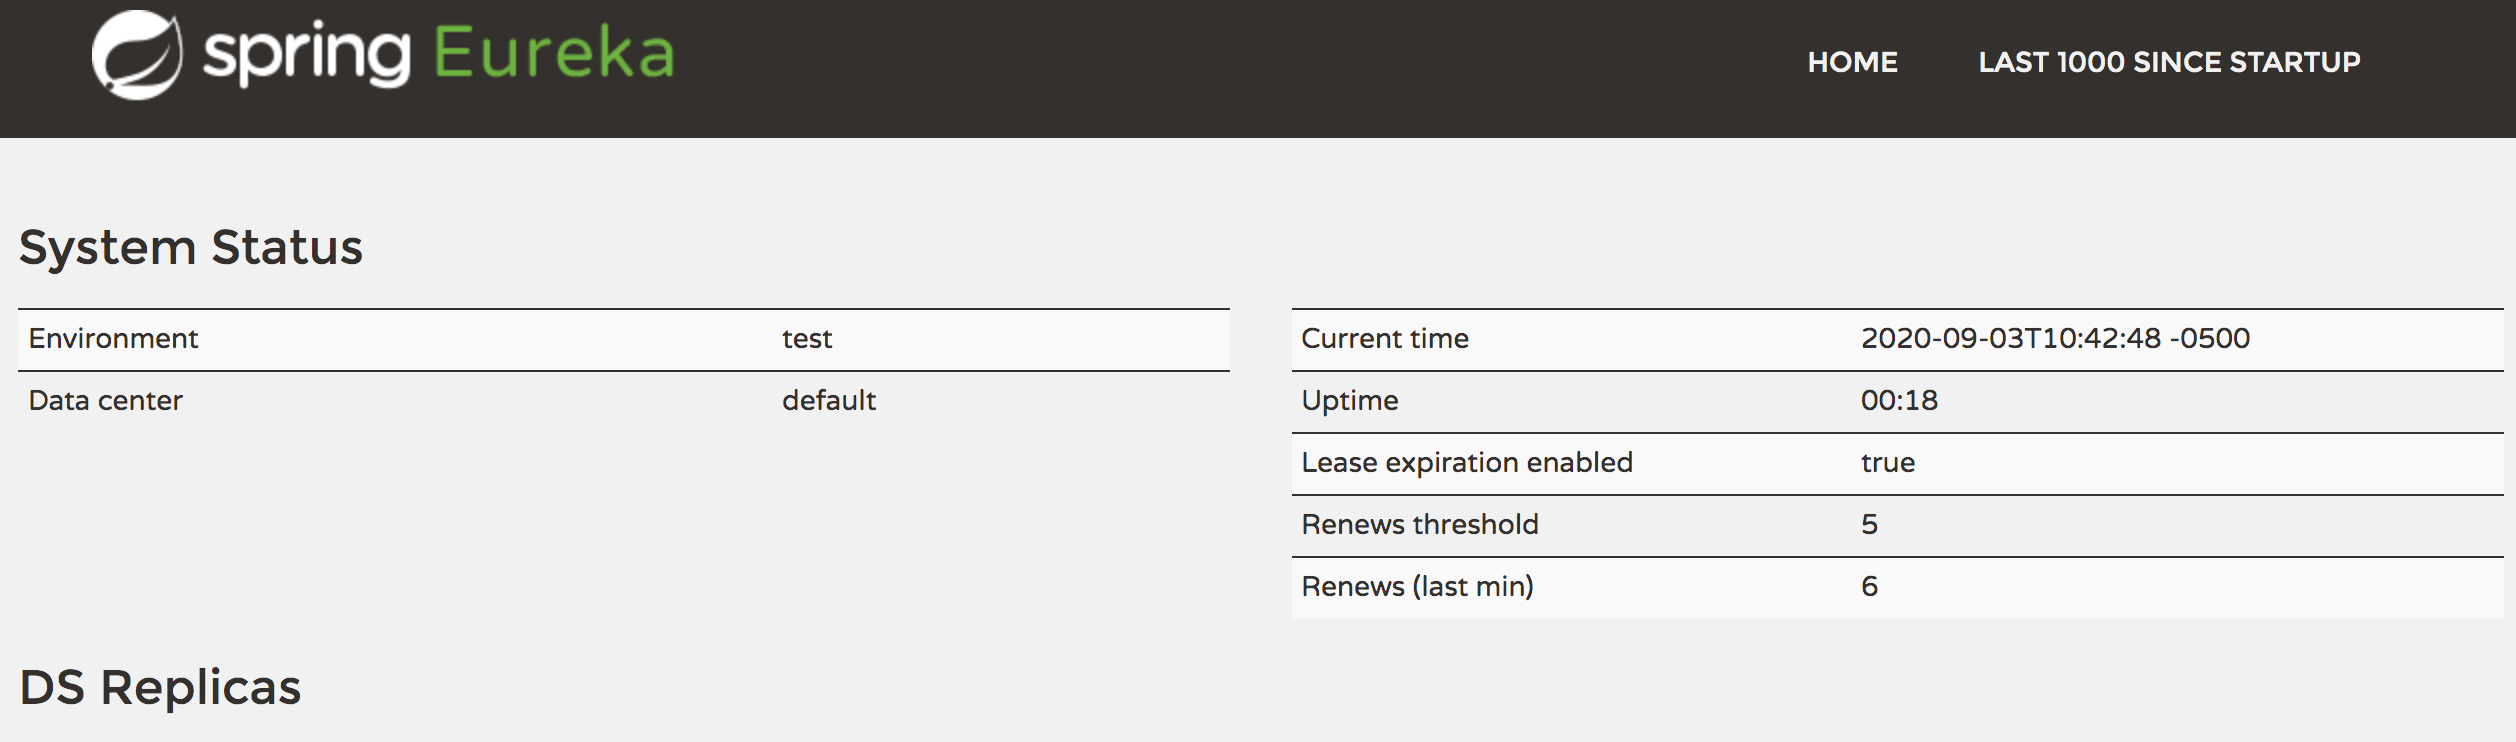
Congratulations! Your discovery server is successfully started. Its time to register our Microservices.
恭喜你! 发现服务器已成功启动。 是时候注册我们的微服务了。
注册微服务 (Registering Microservices)
We will extend the code of Product Catalog Service, developed as part of the very first exercise, to enable it, to communicate to the Discovery Server.
我们将扩展的代码产品目录服务 ,发展为第一个工作的一部分,启用它,传达给发现服务器 。
Step 1: Update pom.xml to include Spring Cloud Eureka Client dependency. As Spring Boot finds the library in the classpath, it registers automatically to the Eureka Server.
步骤1 :更新pom.xml以包括Spring Cloud Eureka Client依赖项。 当Spring Boot在类路径中找到该库时,它会自动注册到Eureka Server。
<project>
    ...    <dependencies>
        ...        <dependency>
            <groupId>org.springframework.cloud</groupId>
            <artifactId>spring-cloud-starter-netflix-eureka-client</artifactId>
        </dependency>        ...
    </dependencies>
    <dependencyManagement>
        <dependencies>
            <dependency>
                <groupId>org.springframework.cloud</groupId>
                <artifactId>spring-cloud-dependencies</artifactId>
                <version>${spring-cloud.version}</version>
                <type>pom</type>
                <scope>import</scope>
            </dependency>
        </dependencies>
    </dependencyManagement>
    ...</project>
Step 2: Add src/main/resources/bootstrap.properties and the property as below. The discovery server will register the service with this name(id). All the services instances of the same service will be tagged with this.
步骤2 :添加src/main/resources/bootstrap.properties和以下属性。 发现服务器将使用此名称(id)注册服务。 相同服务的所有服务实例都将以此标记。
spring.application.name=product_catalogStep 3: Run the mvn command to start Product Catalog Service and visit eureka server page — http://localhost:8761/. You will see the entry of Product Catalog Service
步骤3 :运行mvn命令以启动产品目录服务,并访问eureka服务器页面— http:// localhost:8761 / 。 您将看到产品目录服务条目

Spring Boot is making life easier. With minimal change, we are able to implement our discovery server and the client. We are all set to see how the service interaction takes place.
Spring Boot使生活更加轻松。 只需进行最小的更改,我们就能实现发现服务器和客户端。 我们都准备看到服务交互是如何发生的。
服务互动 (Service Interaction)
Shopping Cart Service is supposed to call the Product Catalog Service. Spring cloud discovery client helps in this communication. Similar to Product Catalog Service, include the discovery client library in Shopping Cart Service as well. Now we can use the client APIs to communicate with the Discovery Server. Let's modify our ShoppingCartService class.
购物车服务应称为产品目录服务。 Spring Cloud Discovery客户端可帮助进行这种通信。 与产品目录服务类似,在购物车服务中也包括发现客户端库。 现在,我们可以使用客户端API与Discovery Server通信。 让我们修改我们的ShoppingCartService类。
We are calling the discovery server to get the instances for the “product_catalog” service. This is returning a list of instances. We are getting the service URL by picking up the first instance in the list. Once we get the URL, the rest of the code works with no change.
我们正在调用发现服务器来获取“ product_catalog”服务的实例。 这将返回实例列表。 我们通过选择列表中的第一个实例来获取服务URL。 一旦获得URL,其余代码将保持不变。
Here we are using Spring Discovery Client API which only returns registered instances. We need to implement the Load Balancing logic to get the most appropriate instance. Eureka also provides a native client API, which makes the call bit easier
在这里,我们使用的是Spring Discovery Client API,该API仅返回注册的实例。 我们需要实现负载平衡逻辑以获取最合适的实例。 Eureka还提供了本机客户端API,这使调用更加容易
InstanceInfo instance = discoveryClient.getNextServerFromEureka("product_catalog",false); String productCatalogUrl = instance.getHomePageUrl()+"/product/"+ item.getProductId();
Load balancing is also available through other more matured libraries like Feign,Robin, etc.
还可以通过其他更成熟的库(例如Feign,Robin等)进行负载平衡。
客户端服务发现面临的挑战 (Challenges with Client-side service discovery)
Load balancing is a must as the discovery server does not handle it automatically. But this adds up a new dependency on the client-side. Can we move this logic to the server-side and make our calls much simpler?
负载平衡是必须的,因为发现服务器不会自动处理它。 但这在客户端增加了新的依赖性。 我们可以将此逻辑移到服务器端并使调用更简单吗?
服务器端发现服务 (Server-Side Discovery Service)
The picture looks a bit different with this option. It has the Discovery Server similar to the option above but the load balancing is not happening at the client side. We have a dedicated proxy server that takes care of this.
此选项的图片看起来有些不同。 它具有与上面的选项类似的Discovery Server,但客户端未实现负载平衡。 我们有专门的代理服务器来解决这个问题。
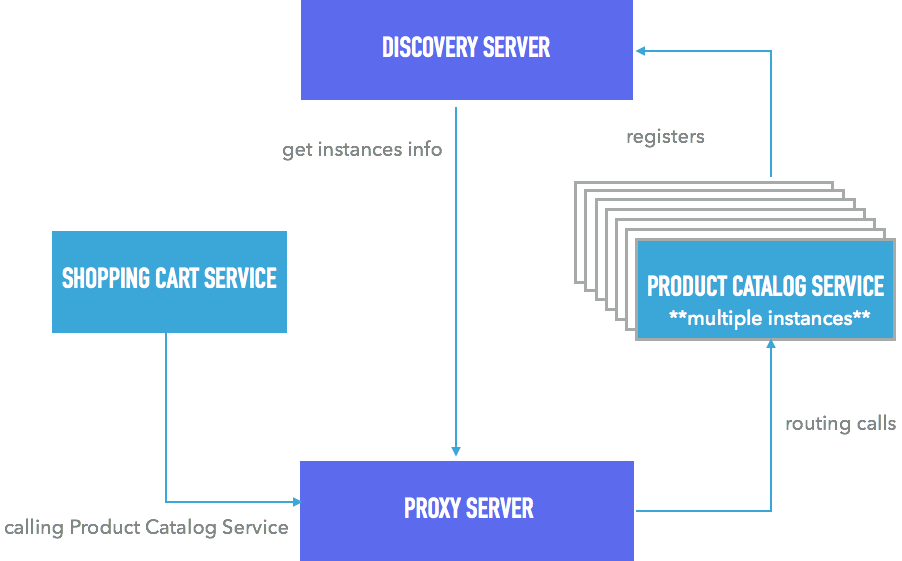
In the above example, all the instances of Product Catalog Service register themselves with Discovery Server. When Shopping Cart Service needs to call Product Catalog Service, the call goes through the Proxy Server. The Proxy Server is responsible for two things
在上面的示例中, 产品目录服务的所有实例都向Discovery Server进行了注册。 当购物车服务需要致电产品目录服务时 ,该呼叫将通过代理服务器进行。 代理服务器负责两件事
- To route the requests 路由请求
- To do load-balancing 做负载平衡
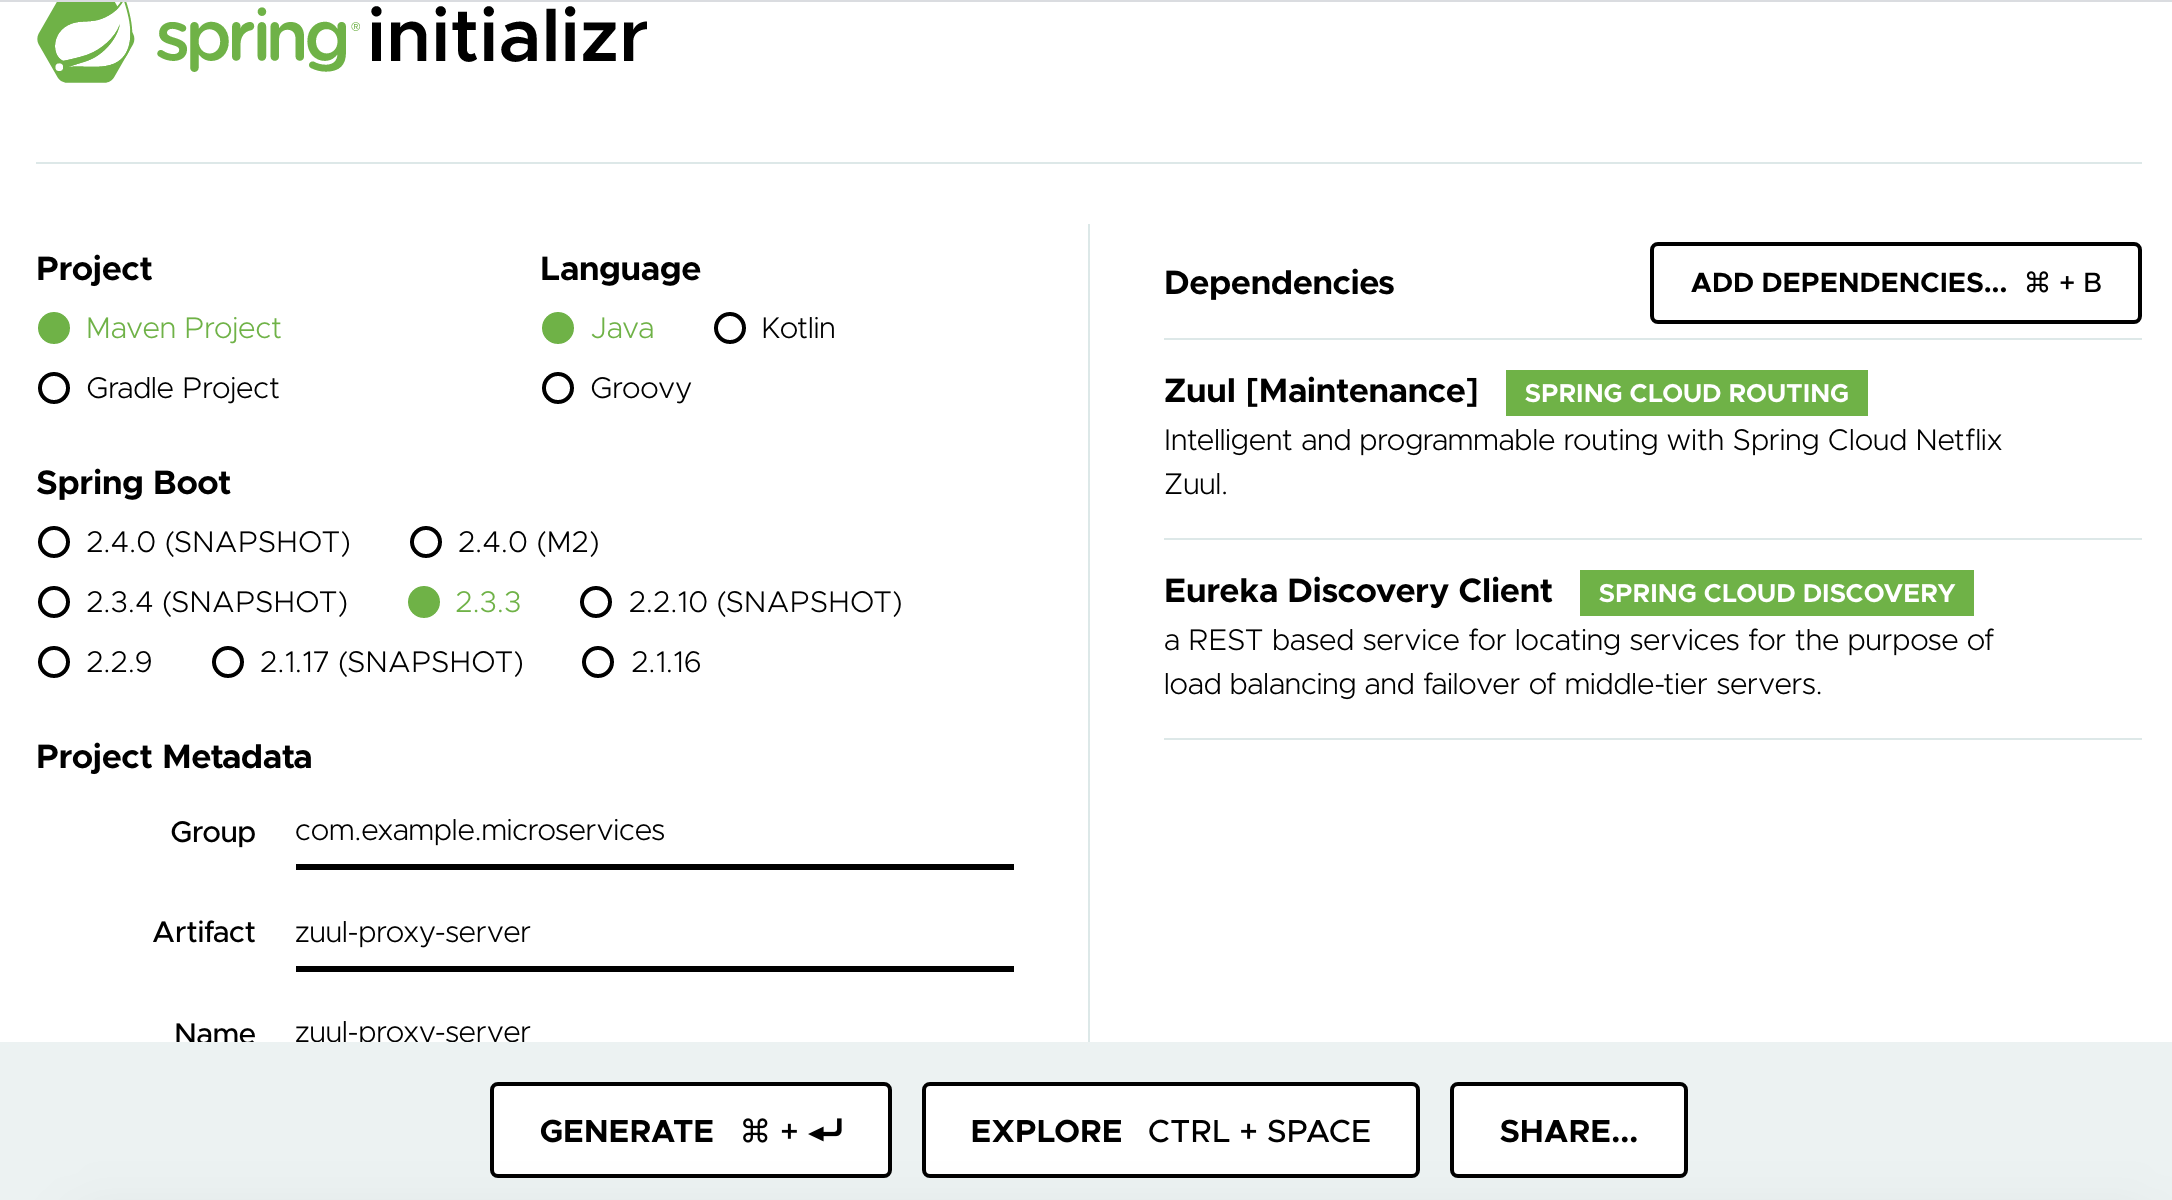
Let's implement this pattern for our use case. We have already built Discovery Server with, the client side option. We will be developing a proxy server based on Spring Boot, Spring Cloud Discovery Client, and Spring Cloud Netflix Zuul. Let's go to our one-stop shop — the Spring initializer. Add two dependencies — Spring Cloud Netflix Zuul and Spring Cloud Discovery Client. Generate the archive, download and unpack it to your favorite location.
让我们为用例实现此模式。 我们已经使用客户端选项构建了Discovery Server 。 我们将基于Spring Boot,Spring Cloud Discovery Client和Spring Cloud Netflix Zuul开发代理服务器。 让我们去一站式商店-Spring Initializer 。 添加两个依赖项-Spring Cloud Netflix Zuul和Spring Cloud Discovery Client。 生成存档,下载并解压缩到您喜欢的位置。
Update ZuulServerApplication.java with @EnableZuulProxy and @EnableDiscoveryClient annotations. @EnableZuulProxy annotates the application to be the Zuul Proxy Server. @EnableDiscoveryClient makes the application as one of the discovery clients, which can communicate with the Discovery Server.
使用@EnableZuulProxy和@EnableDiscoveryClient批注更新ZuulServerApplication.java 。 @EnableZuulProxy将应用程序注释为Zuul代理服务器 。 @EnableDiscoveryClient使应用程序成为发现客户端之一,可以与发现服务器通信。
 @SpringBootApplication
@EnableZuulProxy
@EnableDiscoveryClient public class ZuulServerApplication {  public static void main(String[] args) {
  SpringApplication.run(ZuulServerApplication.class, args);
 } }
Update the src/main/resources/application.properties with the following entries
使用以下条目更新src/main/resources/application.properties
 server.port=8762
spring.application.name=zuul-server
This first property tells to run the proxy server at port 8762 and the second property sets the service name. Our Discovery Client needs this property to register the service (proxy server) to the Discovery Server.
该第一个属性告诉运行代理服务器的端口8762,第二个属性设置服务名称。 我们的Discovery Client需要此属性才能将服务(代理服务器)注册到Discovery Server 。
Add a new file — application.yml in src/main/resources/ . We are going to define routing behavior for the Product Catalog Service, in it.
添加一个新文件— src/main/resources/ application.yml 。 我们将在其中定义产品目录服务的路由行为。
 zuul:
 routes:
  product:
   path: /product_catalog/**
   serviceId: product_catalog
With this definition, we are saying that when somebody calls the proxy server with the path /product/catalog/** , it should be redirected to product_catalog service. Product Catalog Service is registered with the Discovery Server with the id — product_catalog.
使用此定义,我们说的是当有人使用路径/product/catalog/**调用代理服务器时,应将其重定向到product_catalog服务。 产品目录服务已在Discovery Server中注册,其ID为product_catalog 。
Start the Proxy Server — mvn spring-boot:run . Assuming the Discovery Server and Product Catalog Service are already running, you can access the product catalog service at — http://localhost:8762/product_catalog/product
启动代理服务器 mvn spring-boot:run 。 假设发现服务器和产品目录服务已经在运行,则可以在以下位置访问产品目录服务: http://localhost:8762/product_catalog/product
As our other pieces are in place, let's see how the Shopping Cart Service is going to get product details. Update addItem in the ShoppingCartService as below.
当我们的其他零件准备就绪时,让我们看看购物车服务将如何获取产品详细信息。 如下更新ShoppingCartService中的addItem。
@PostMapping("/zuul/cart/{cartId}/item")
 public Cart addItem(@PathVariable String cartId, @RequestBody CartItem item) {
     if (cartId != null && item != null && item.getProductId() != null) {

         String productCatalogUrl = "http://localhost:8762/product_catalog/product/"
           + item.getProductId();

         // get product details
         Product itemProduct = restTemplate.getForObject(productCatalogUrl,
                                                         Product.class);
         if (itemProduct != null && itemProduct.id != null) {
             // adding total item price in the shopping cart item
             item.setTotalItemPrice(itemProduct.getUnitPrice() * item.quantity);
             return shoppingCartDao.addItem(cartId, item);
         }
         throw new ResponseStatusException(HttpStatus.NOT_FOUND,
                                           "item product not found");
     }
     throw new ResponseStatusException(HttpStatus.NOT_FOUND,
                                       "cart or item missing");
 }
We are using the proxy server URL now to connect to the Discovery Server. The Zuul based proxy server is doing the load balancing with the help of Netflix Ribbon. Spring recommends using Spring Cloud Load Balancer these days though in favor of Ribbon. If interested you can refer the guide to enable it here.
我们现在正在使用代理服务器URL连接到Discovery Server。 基于Zuul的代理服务器正在借助Netflix Ribbon进行负载平衡。 尽管最近推荐使用Ribbon, Spring建议最近使用Spring Cloud Load Balancer 。 如果有兴趣,您可以在此处参考该指南以启用它。
You can play around by starting multiple instances of Product Catalog Service with different ports. You can check the exact instance being called by calling actuator/env .
您可以通过使用不同端口启动多个产品目录服务实例来进行操作。 您可以通过调用actuator/env检查确切的实例被调用。
哪个选项更好? (Which option is better?)
Each of the options has its pros and cons. Client-side option is simpler but comes with an additional burden of load balancing. The load-balancing logic on the client-side is tightly coupled to the client service. If you have Microservices in different programming languages, you need to maintain consistent copies of it across all of them. This is quite a maintenance.
每个选项都有其优点和缺点。 客户端选项比较简单,但会带来额外的负载平衡负担。 客户端的负载平衡逻辑与客户端服务紧密耦合。 如果您使用不同编程语言的微服务,则需要在所有微服务中维护其一致的副本。 这是相当维护。
Server-side option resolves this issue but adds another moving part into the system. This adds another network hop in the end to end communication. Also, the proxy server needs to be highly available as this is the single entry point for all the microservices. It does make the client code simpler though, it just needs to refer the proxy server.
服务器端选项解决了此问题,但在系统中增加了另一个活动部件。 这在端到端通信中增加了另一个网络跃点。 另外,代理服务器需要高度可用,因为这是所有微服务的单个入口点。 它的确使客户端代码更简单,只需要引用代理服务器即可。
From a developer perspective, I would prefer a server-side option as it provides better maintainability on the development side.
从开发人员的角度来看,我更喜欢服务器端的选项,因为它在开发端提供了更好的可维护性。
下一步 (Next Steps)
In this article, we implemented an illustrative example of service discovery pattern with both the options — client-side & server-side. The complete source code can be accessed here at Github.
在本文中,我们使用客户端和服务器 端这两个选项实现了服务发现模式的说明性示例。 完整的源代码可以在Github上访问。
With the server-side option, we did peek into the proxy server implementation in terms of dynamic routing. In this next part, we will be discussing a similar pattern called API Gateway which takes care of Routing, Monitoring, Resiliency, Security, and many more aspects of Microservices.
使用服务器端选项,我们确实从动态路由的角度探究了代理服务器的实现。 在下一部分中,我们将讨论称为API网关的类似模式,该模式负责路由,监视,弹性,安全性以及微服务的许多其他方面。
For the complete series, you can visit the page here *
有关完整的系列,您可以在这里访问页面*
To visit the previous exercise visit — Developing Config as a Service *
要访问上一个 练习,请访问— 开发配置即服务 *
翻译自: https://medium.com/an-idea/spring-boot-microservices-implementing-service-discovery-cfc98e49b74f


 8098
8098


 被折叠的 条评论
为什么被折叠?
被折叠的 条评论
为什么被折叠?
 到【灌水乐园】发言


