


It is always a good practice to build separate apps from the same source code and for different environment such as development, staging and production. Why? When you build a system, most of the time, there will be additional bugs fixing and enhancements. Thus, in order not to break the production environment especially the database side of it, we need to separate the development and the testing environment.
从相同的源代码针对不同的环境(例如开发,登台和生产)构建单独的应用程序始终是一个好习惯。 为什么? 在大多数情况下,构建系统时,将修复和增强其他错误。 因此,为了不破坏生产环境,特别是不破坏数据库的生产环境,我们需要将开发和测试环境分开。
Officially, the team behind Flutter recommended the approach of using flavors — a common practice for native Android development.
正式地,Flutter背后的团队推荐了使用口味的方法-原生Android开发的一种常见做法。
The word flavor means ‘version’ and basically, we create multiple flavors of our mobile app that we can build the app with different configuration options and styles such as different database environment (development, staging or production).
Flavor一词的意思是“版本”,基本上,我们创建了移动应用程序的多种形式,我们可以使用不同的配置选项和样式(例如不同的数据库环境(开发,暂存或生产))来构建该应用程序。
We will be using the previous Flutter with Firebase CRUD project template (here) that I created previously, and further enhance it to include flavors. If you would like to know more about the template that I created, click on the link here.
我们将使用之前创建的以前的Flutter with Firebase CRUD项目模板( 在此处 ),并对其进行进一步增强以包含风味。 如果您想了解有关我创建的模板的更多信息,请单击此处的链接。
At the end of this article, we will have a working Flutter project that support 2 environments (development and production) using flavor. Each app will display the app name specifically to their flavor and connecting to different Firebase project.
在本文的结尾,我们将有一个可正常运行的Flutter项目,该项目支持使用调味料的2个环境(开发和生产)。 每个应用程序都将根据其风格显示应用程序名称,并连接到不同的Firebase项目。
Take note, this article is mainly for Flutter in Android environment and not the iOS.
请注意,本文主要针对Android环境中的Flutter,而非iOS。
第1步:创建2个不同的Firebase项目和配置 (Step 1: Create 2 Different Firebase Projects and Configuration)
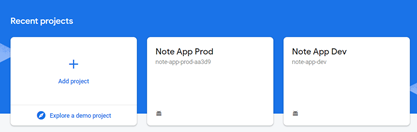
For this, as mentioned earlier, we will be defining 2 environments namely development and production, so we will need to create 2 Firebase projects.
为此,如前所述,我们将定义2个环境,即开发和生产,因此我们将需要创建2个Firebase项目 。
Then, for each Firebase projects, create a Cloud Firestore database. Do remember to have at least 1 sign-in method enabled for both projects — for this example, we are using Email/Password only.
然后,为每个Firebase项目创建一个Cloud Firestore数据库 。 请记住,两个项目都至少启用了一种登录方法 -在此示例中,我们仅使用电子邮件/密码。
Next, we need to get the google-services.json for each Firebase project. To do that, lets assume we will be using the following applicationId for both environment:
接下来,我们需要为每个Firebase项目获取google-services.json 。 为此,假设我们将在两个环境中使用以下applicationId:
- Note App Prod: applicationId: com.example.create_flutter_provider_app.prod
- 注意应用产品: applicationId:com.example.create_flutter_provider_app.prod
- Note App Dev: applicationId: com.example.create_flutter_provider_app.dev
- 注意应用开发: applicationId:com.example.create_flutter_provider_app.dev
You can use your preference naming convention for the applicationId, as long it is understandable that 1 is for production environment and another is for development environment.
您可以对applicationId使用首选项命名约定,只要可以理解1代表生产环境,另一个代表开发环境即可。
With the applicationId defined, we will used it to add Firebase to our project. Go to each Firebase project, click on the small Android icon and the following screen will appear. Add the applicationId to the right Firebase project as specified above.
定义了applicationId后,我们将使用它来将Firebase添加到我们的项目中。 转到每个Firebase项目,单击小的Android图标,将出现以下屏幕。 如上所述,将applicationId添加到正确的Firebase项目中。
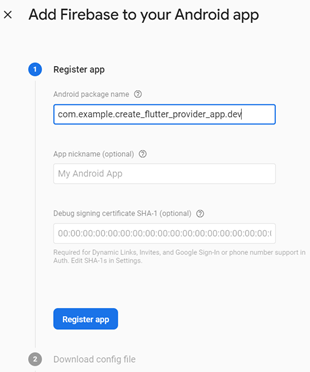
Once registering the app, download the google-services.json for each Firebase projects.
注册应用程序后,为每个Firebase项目下载google-services.json。
At the end of this step, you should have 2 Firebase projects with the following setup done:
在此步骤结束时,您应该具有2个Firebase项目,并完成以下设置:
Note App Prod
注意App产品
→ Sign-in method configured
→配置登录方式
→ Created Cloud Firestore Database
→创建的Cloud Firestore数据库
→ applicationId: com.example.create_flutter_provider_app.prod
→applicationId:com.example.create_flutter_provider_app.prod
→ google-services.json file downloaded
→已下载google-services.json文件
Note App Dev
注意应用开发
→ Sign-in method configured
→配置登录方式
→ Created Cloud Firestore Database
→创建的Cloud Firestore数据库
→ applicationId: com.example.create_flutter_provider_app.dev
→applicationId:com.example.create_flutter_provider_app.dev
→ google-services.json file downloaded
→已下载google-services.json文件
步骤2:更新项目配置文件 (Step 2: Updating Project Config Files)
Add in the following configuration into the project android/app/build.gradle:
将以下配置添加到项目android / app / build.gradle中:
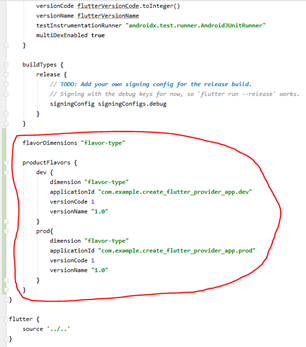
Here, we created 2 flavor. 1 is for development environment (dev) and another is for production (prod). The most important piece of information that you must remember is the applicationId field. Again, take note, the applicationId must match those specified in Step 1. As for the versionCode and versionName, this is just example. For me, I prefer to have some version name that I can refer later without touching the code layer.
在这里,我们创建了2种风味。 1用于开发环境(dev),另一用于生产(prod)。 您必须记住的最重要的信息是applicationId字段。 再次注意,applicationId必须与步骤1中指定的匹配。至于versionCode和versionName,这只是示例。 对于我来说,我更喜欢使用一些版本名称,以后可以在不接触代码层的情况下使用它。
步骤3:创建2个代表开发和生产的文件夹 (Step 3: Create 2 folders Representing Development and Production)
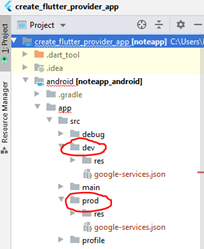
The folder name must match the named specified in productFlavors (android/app/build.gradle). The previous downloaded google-services.json files for both Firebase projects need to be moved to the right folder. For the file downloaded from Note App Prod, place it under the folder prod and for the same file name downloaded from Note App Dev, place it under the dev folder.
文件夹名称必须与productFlavors(android / app / build.gradle)中指定的名称匹配。 两个Firebase项目的先前下载的google-services.json文件需要移动到正确的文件夹中。 对于从Note App Prod下载的文件,将其放置在prod文件夹下,对于从Note App Dev下载的相同文件名,将其放置在dev文件夹下。
For the sub folder called ‘res’, ignore it for now. We will go through that shortly.
对于名为“ res”的子文件夹,暂时将其忽略。 我们将很快进行说明。
步骤4:为开发人员和生产人员使用不同的应用程序名称和应用程序图标 (Step 4: Having different app name and app icon for Dev and Prod)
We want to have a different app name for our project. This is helpful as with Flavor setup, we can install both app in the same devices for testing. Having app name such as NoteApp-Dev or Note-Dev or Note-Prod helps us to identify which app is for which environment — development or production.
我们想要为我们的项目使用不同的应用名称。 这与Flavor设置非常有帮助,我们可以将两个应用安装在同一设备上进行测试。 拥有诸如NoteApp-Dev或Note-Dev或Note-Prod之类的应用程序名称可以帮助我们确定哪个应用程序适合哪种环境-开发或生产。
The same concept and benefits if we have different app icon for each apps that are connecting to different environment.
如果我们为连接到不同环境的每个应用程序使用不同的应用程序图标,则具有相同的概念和优势。
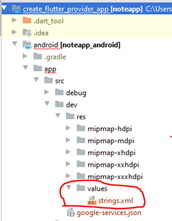
For app name, create file called strings.xml and with the following content:
对于应用程序名称,创建一个名为strings.xml的文件,其内容如下:
<?xml version=”1.0" encoding=”utf-8"?><resources>
 <string name=”app_name”>Note-Dev</string>
 </resources>
Change the app_name to fit your Dev app. Put this file under the dev/res/values:
更改app_name以适合您的Dev应用。 将此文件放在dev / res / values下:
Do the same for the prod environment but name your app_name to be Note-Prod or something that represent it is the app for Production.
对产品环境执行相同的操作,但将您的app_name命名为Note-Prod或代表它的名称,即生产应用程序。
<?xml version=”1.0" encoding=”utf-8"?><resources>
 <string name=”app_name”>Note-Prod</string>
 </resources>
The final step for the app name is to change the Android manifest file to refer to the String name app_name. To do that, open the file AndroidManifest.xml located at android/app/src/main folder. Update the android:label as follow:
应用程序名称的最后一步是更改Android清单文件以引用字符串名称app_name。 为此,请打开位于android / app / src / main文件夹中的文件AndroidManifest.xml。 更新android:label,如下所示:
android:label="@string/app_name"Next, for the images, copied all 5 sub folders that start with the name mipmap-xxx from main/res/, and paste it to the res folder for both dev and prod. At the end, you should have the following view:
接下来,对于图像,从main / res /复制所有以名称mipmap-xxx开头的5个子文件夹,并将其粘贴到dev和prod的res文件夹中。 最后,您应该具有以下视图:
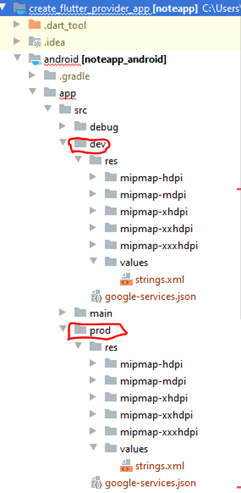
If you notice, each sub-folder with the name minimap contains images and that image is the app icon image. Change it to your needs.
如果您注意到,每个名为minimap的子文件夹都包含图像,并且该图像是应用程序图标图像。 根据您的需要进行更改。
步骤5:新的Dart文件和代码更新 (Step 5: New Dart files and Code Updates)
Create a flavor.dart file. This will just contain enum value that represent both dev and prod environment that the main class can refer and decide. The code:
创建一个flavor.dart文件。 这将只包含代表主类可以引用和决定的dev和prod环境的枚举值。 代码:
enum Flavor {dev, prod}Since we are using the Flutter template shared above, we will need to create additional main.dart that represent the production build and using the original main.dart to be representing as development build.
由于我们使用的是上面共享的Flutter模板,因此我们需要创建其他代表生产版本的main.dart,并使用原始main.dart代表开发版本。
Our goal is to able to build and run different flavor as follow:
我们的目标是能够建立和运行以下不同的风味:
flutter run --flavor dev -t lib/main.dart
 flutter run --flavor prod -t lib/main_prod.dart
First, update the main.dart as follow:
首先,如下更新main.dart:
void main() {
   WidgetsFlutterBinding.ensureInitialized();
   SystemChrome.setPreferredOrientations([DeviceOrientation.portraitUp]).then((_) async {
     runApp(MultiProvider(
         providers: [
           Provider<Flavor>.value(value: Flavor.dev),
           ChangeNotifierProvider<ThemeProvider>(
             create: (context) => ThemeProvider(),
           ),
           ChangeNotifierProvider<AuthProvider>(
             create: (context) => AuthProvider(),
           ),
           ChangeNotifierProvider<LanguageProvider>(
             create: (context) => LanguageProvider(),
           ),
         ],
         child: MyApp(
           databaseBuilder: (_, uid) => FirestoreDatabase(uid: uid),
         ),
       ),
     );
   });
 }
As mentioned before, we will make the main.dart as the representative of building a development build. As this project is using Provider, we will pre-set the main.dart to use the dev flavor.
如前所述,我们将main.dart作为构建开发版本的代表。 由于该项目正在使用提供程序,因此我们将预置main.dart以使用dev风格。
Duplicate this file and renamed it as main_prod.dart. Update the Flavor.dev to Flavor.prod.
复制此文件,并将其重命名为main_prod.dart。 将Flavor.dev更新为Flavor.prod。
Then, apart from the previous app name and app icon changes, we felt it is also necessary to display some info at the first screen namely the sign-in screen. Thus, since we are using Provider to set the initial value of the both main.dart and main_prod.dart, we then can access this initial default value at the sign-in screen as follow:
然后,除了以前的应用程序名称和应用程序图标更改之外,我们还认为有必要在第一个屏幕(即登录屏幕)上显示一些信息。 因此,由于我们使用提供程序来设置main.dart和main_prod.dart的初始值,因此我们可以在登录屏幕上访问此初始默认值,如下所示:
Text(
   Provider.of<Flavor>(context).toString(),
 ),
So, what will happen if we were to run the following code:
因此,如果我们运行以下代码,将会发生什么:
flutter run --flavor dev -t lib/main.dartFlutter will try to build and run the app using the flavor dev and using the main.dart file. This will result the following display of sign-in screen.
Flutter将尝试使用flavor开发人员和main.dart文件来构建和运行该应用程序。 这将导致以下登录屏幕显示。
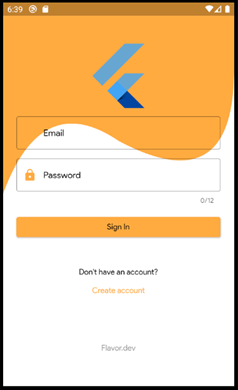
Notice the bottom part, it contains the value of the enum value dev.
注意底部,它包含枚举值dev的值。
The command: flutter run — flavor dev -t lib/main.dart is basically telling Flutter to build the app for testing using the flavour dev specified in the build.gradle. Also, the second part is basically telling it to run it using main.dart file. And since our main.dart has the initial flavor value pre-set as dev, it will be display as Flavor.dev.
命令: flutter run — flavour dev -t lib / main.dart 基本上是告诉Flutter使用build.gradle中指定的风味开发器来构建用于测试的应用程序。 另外,第二部分基本上是告诉它使用main.dart文件运行它。 而且由于main.dart的初始风味值已预先设置为dev,因此它将显示为Flavor.dev。
If were to run the command: flutter run — flavor prod -t lib/main_prod.dart, will result the following:
如果要运行以下命令: flutter run-flavour prod -t lib / main_prod.dart,将产生以下结果:
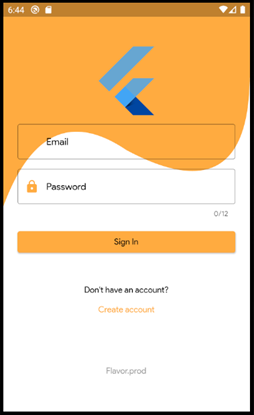
Notice the bottom of the screen, it is displaying Flavor.prod.
注意屏幕底部,它显示Flavor.prod。
There you have it, a more complete and updated Flutter template that utilizing the benefits of flavors.
有了它,它就可以利用风味的好处,提供更完整和更新的Flutter模板。
Link to github is here.
链接到github在这里 。
Again, I do hope the above explanation and additional improvement to the Flutter template will help even more in your project as much as it helps me.
再次,我希望以上解释和Flutter模板的进一步改进将在您的项目中为我带来更多帮助。
Cheers.
干杯。


 248
248


 被折叠的 条评论
为什么被折叠?
被折叠的 条评论
为什么被折叠?
 到【灌水乐园】发言


