


No rooting or custom modifications needed, we’re going to do this with stock Android and a few free (but high-quality) apps.
无需生根或自定义修改,我们将使用库存的Android和一些免费(但高质量)的应用程序来做到这一点。
I’m not even going to address the “Yeah… but why?”, because if you’ve found this article I know your reasoning (not unlike mine) falls beyond typical reasoning… So let’s dive in!
我什至不打算讲“是的……但是为什么?”,因为如果您找到了这篇文章,我知道您的推理(与我的不一样)超出了典型的推理范围……所以,让我们深入研究吧!
您会得到: (What you’ll get:)
- Windows XP Home or Pro running on your phone, 32-bit (not tested with 64-bit, and I’m sure you’d need to tweak things a bit) 手机上运行的Windows XP Home或Pro(32位)(未经64位测试,我敢肯定您需要进行一些调整)
- Optional multi-core running in XP (but don’t expect it to boost your performance) 在XP中运行的可选多核(但不要期望它会提高性能)
- A filesystem mount between XP and your phone XP和手机之间挂载的文件系统
- Working networking/internet (but good luck with IE) 可以工作的网络/互联网(但IE祝您好运)
- Maybe working sound (when it did work for me, it was very choppy) 可能工作正常(当它对我有用时,它非常断断续续)
Not enough video capabilities to play the OG Starcraft (But you can play Pinball and Solitaire!)
没有足够的视频功能来播放OG星际争霸(但您可以播放弹球和纸牌!)
您需要什么: (What you’ll need:)
- A modern-ish Android phone (Tested on Pixel 2 and OnePlus 8 Pro) 现代的Android手机(在Pixel 2和OnePlus 8 Pro上经过测试)
- Android 10 (although go ahead and try it with older versions, I see no reason why it wouldn’t work) Android 10(尽管可以尝试使用旧版本,但我认为没有理由不起作用)
- Windows XP install ISO CD image Windows XP安装ISO CD映像
- 10 or so GB free on your phone (adjust to taste) 手机上10 GB左右的可用空间(根据口味而定)
步骤1:进行设定 (Step 1: Getting Setup)
First, you’ll need the apps. We’re using a tool called Termux as our host platform, install it here: https://play.google.com/store/apps/details?id=com.termux&hl=en_US
首先,您需要这些应用程序。 我们正在使用称为Termux的工具作为我们的宿主平台,请在以下位置安装: https : //play.google.com/store/apps/details? id=com.termux &hl=zh_CN
You’ll also need a VNC Viewer app, to view the Windows XP screen I recommend VNC Viewer: https://play.google.com/store/apps/details?id=com.realvnc.viewer.android&hl=en_US
您还需要一个VNC Viewer应用程序,才能查看Windows XP屏幕,我建议使用VNC Viewer: https : //play.google.com/store/apps/details? id = com.realvnc.viewer.android &hl=zh_CN
Find or download your favorite backup of the Windows XP install ISO. I can’t provide that for you, but there are many areas on the internet where you can grab a copy. Get it in ISO format, and copy/download it to your Android’s “downloads” folder.
查找或下载Windows XP安装ISO的常用备份。 我无法为您提供此服务,但是互联网上有很多区域可以获取副本。 以ISO格式获取它,并将其复制/下载到Android的“下载”文件夹中。
The following Android keyboards are recommended, but not strictly necessary. You should be able to accomplish everything with your default keyboard, you just might get a bit frustrated with the lack of arrow keys and easy access to less common buttons:
建议使用以下Android键盘,但并非绝对必要。 您应该可以使用默认键盘完成所有操作,但由于缺少箭头键并易于访问不太常见的按钮,您可能会感到有些沮丧:
https://play.google.com/store/apps/details?id=org.pocketworkstation.pckeyboard
https://play.google.com/store/apps/details?id=org.pocketworkstation.pckeyboard
https://play.google.com/store/apps/details?id=com.microsoft.keyboardforexcel
https://play.google.com/store/apps/details?id=com.microsoft.keyboardforexcel
(If you happen to have a bluetooth keyboard or USB adapter and USB keyboard that works with your phone, by all means, indulge.)
(如果您碰巧拥有可以与手机配合使用的蓝牙键盘或USB适配器和USB键盘,请放心使用。)
步骤2:安装准备 (Step 2: Install Prep)
Termux doubles as a terminal emulator and Linux package tool, which gives us a lot of flexibility on Android.
Termux兼作终端仿真器和Linux打包工具,这使我们在Android上具有很大的灵活性。
To run Windows XP, we’ll be using the Qemu Emulator. To install Qemu, open Termux and run the following commands:
要运行Windows XP,我们将使用Qemu仿真器。 要安装Qemu,请打开Termux并运行以下命令:
pkg update -y
pkg install -y qemu-system-i386-headless qemu-utils
Connecting to Android storage
连接到Android存储
Since your Windows XP cd iso image is in your downloads folder, we need to configure termux to access directories in the wider Android, and not just it’s own scoped files. To do that we need to “setup storage” (https://wiki.termux.com/wiki/Termux-setup-storage)
由于您的Windows XP cd iso映像位于您的下载文件夹中,因此我们需要配置termux以访问更广泛的Android中的目录,而不仅仅是它自己的作用域文件。 为此,我们需要“设置存储”( https://wiki.termux.com/wiki/Termux-setup-storage )
It’s easy, simply run:
很简单,只需运行:
termux-setup-storageNext, we’ll create the hard drive image that Windows XP will be installed on:
接下来,我们将创建Windows XP将安装在的硬盘驱动器映像:
qemu-img create -f qcow2 WinXP.img 40GThe above command creates a 40 GB file image format that’s specific to Qemu (called qcow2, which stands for Qemu Copy On Write) while this isn’t as fast as raw images, it only consumes space as needed, instead of allocating all 40GB right away. The file produced is only about 193K, until we start filling it up 😉.
上面的命令创建了一个40 GB的文件图像格式,该格式特定于Qemu(称为qcow2,代表Q emu C opy O n W rite),但它的速度不像原始图像那样快,它仅消耗所需的空间,而不是立即分配所有40GB。 生成的文件只有大约193K,直到我们开始填充它为止。
步骤3:安装Windows XP (Step 3: Install Windows XP)
With the above setup in place, let’s get the install started! Here’s the magic command that will get install underway:
完成上述设置后,让我们开始安装! 这是魔术命令,它将开始安装:
qemu-system-i386 -m 512 -smp cores=4,sockets=2 -vnc :0 -drive file=WinXP.img,format=qcow2 -cdrom XPSP1a_ENG_PRO.iso -boot dNOTE: You’ll need to adjust the -cdrom XPSP1a_ENG_PRO.iso to be the location of your ISO image, chances are it’ll be something like: ~/storage/downloads/xp.iso , or similar.
注意:您需要将-cdrom XPSP1a_ENG_PRO.iso调整为ISO映像的位置,可能是~/storage/downloads/xp.iso或类似内容。
The above command will start our virtual machine with the empty hard drive and the XP install disk in the CD drive. To actually see and control the setup we now need to connect to the VNC output.
上面的命令将使用空的硬盘驱动器和CD驱动器中的XP安装磁盘启动我们的虚拟机。 为了实际查看和控制设置,我们现在需要连接到VNC输出。
It should look like the command is stuck. The cursor will go to the next line, but not give you a new line $ This is exactly what we want. Qemu is now running.
它应该像命令被卡住。 光标将移至下一行,但不会给您新行$这正是我们想要的。 Qemu现在正在运行。
步骤4:连接到XP (Step 4: Connecting to XP)
Switch over to the VNC Viewer and tap the ‘+’ to add a new connection:
切换到VNC Viewer,然后点击“ +”添加新的连接:
Address: localhost:5900
地址:本地主机:5900
Name: Windows XP
名称: Windows XP
Save and connect, if all goes well you should now be greeted with the Windows XP installation screen:
保存并连接,如果一切顺利,您现在应该会看到Windows XP安装屏幕:
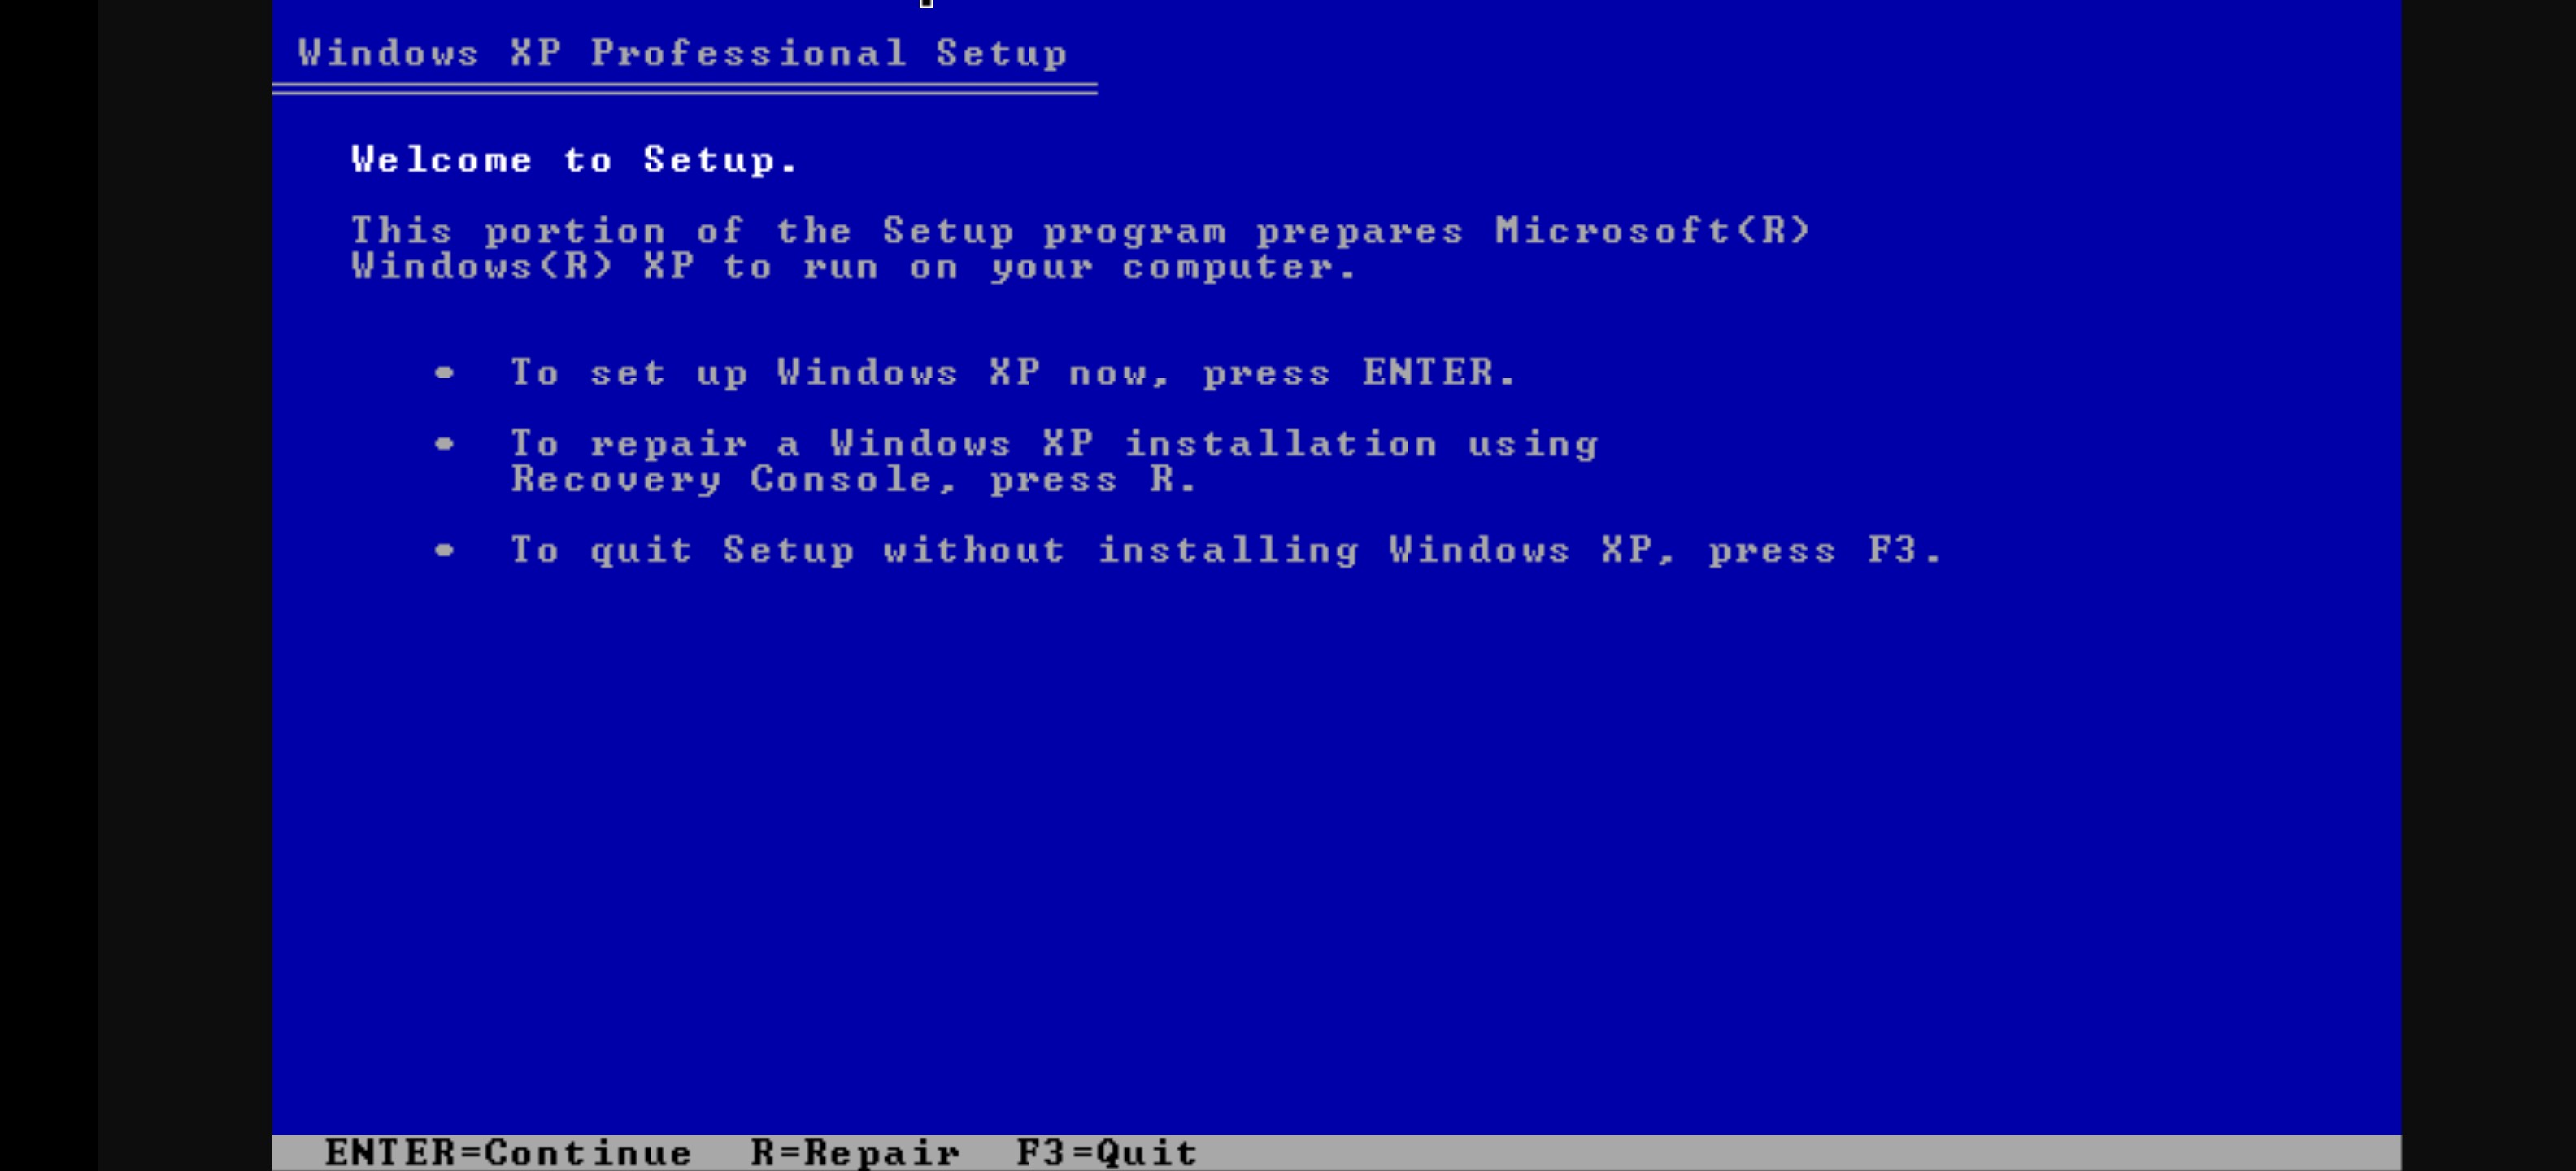
Doesn’t it just bring back the memories?
难道不只是带回回忆吗?
Now go ahead and complete your install like you normally would. Like you have 1,000 times before.
现在,像往常一样完成安装。 就像你以前有1000次一样。
One tip though: use the “Quick” formatting, since we’re not using a physical hard drive, a check isn’t needed.
但有一个技巧:使用“快速”格式,因为我们不使用物理硬盘驱动器,所以不需要检查。
After the initial install is finished, the VM will try to restart, but when Qemu notices the machine stops it will exit. Hop back over to Termux, remove the -cdrom XPSP1a_ENG_PRO.iso -boot d part of the command and start it back up. You’ll be able to finish the install and be welcomed by your new XP desktop.
初始安装完成后,VM将尝试重新启动,但是当Qemu通知计算机停止运行时,它将退出。 跳回Termux,删除命令的-cdrom XPSP1a_ENG_PRO.iso -boot d部分,然后将其启动。 您将能够完成安装,并受到新XP桌面的欢迎。
总结:充分利用Windows XP (Final Words: Getting the most out of your Windows XP)
After XP is installed and up and running, I recommend tweaking a few of the Qemu settings. Here’s the command I use on the regular:
安装XP并启动并运行后,我建议调整一些Qemu设置。 这是我在常规上使用的命令:
qemu-system-i386 -m 512 -drive file=WinXpPro.img,format=qcow2 -vnc :0 -smp cores=4,sockets=2 -netdev user,id=n0 -device rtl8139,netdev=n0 -drive file=fat:rw:storage/winxp,format=raw -soundhw pcspk,ac97What it does:
它能做什么:
- -m 512 sets your RAM to 512 MB -m 512将您的RAM设置为512 MB
- -smp cores=4,sockets=2 Gives you 2 CPUs, each with 4 cores. Windows XP won’t let you add more than 2 sockets, but it doesn’t limit how many cores are per socket. (I haven’t really noticed any speed improvement over 1 core, but it makes me feel cool) -smp cores = 4,sockets = 2为您提供2个CPU,每个CPU具有4个内核。 Windows XP不允许您添加两个以上的套接字,但是它并没有限制每个套接字有多少个内核。 (我还没有真正注意到1核上的任何速度提高,但是这让我感到很酷)
- -netdev user,id=n0 -device rtl8139,netdev=n0 configures your ethernet network device, allows XP to connect to the internet. (Which, ah, be careful? XP is not exactly an OS you want on the internet these days, use sparingly) -netdev用户,id = n0-设备rtl8139,netdev = n0配置您的以太网网络设备,允许XP连接到Internet。 (哪一点啊,要小心?XP如今并不是您想要在互联网上使用的操作系统,请谨慎使用)
- -drive file=fat:rw:storage/winxp,format raw configures a shared folder from your Android device (that must exist at ~/storage/winxp) and mounts it as a drive in Windows XP. Note that it’s both fat, and raw, which means large files can’t be placed into it, not many files can be put in it, and once the VM is on, placing or moving files from the Android side in that folder will result in odd behavior. Use it with caution, and with extreme limitation, just to get files in and out of your VM. -drive file = fat:rw:storage / winxp,format raw从您的Android设备配置共享文件夹(该文件夹必须存在于〜/ storage / winxp),并将其作为驱动器安装在Windows XP中。 请注意,它既胖又原始,这意味着不能将大文件放入其中,不能将许多文件放入其中,并且一旦打开虚拟机,将导致从Android端在该文件夹中放置或移动文件在奇怪的行为。 使用它时要格外小心,并且要严格限制,以使文件进出VM。
- -soundhw pcspk,ac97 This will add both a PC Speaker (beep), and Intel AC97 sound card… I’ve had very limited success with both, but good on ya for trying too! -soundhw pcspk,ac97这将同时添加PC扬声器(蜂鸣声)和Intel AC97声卡……我在两者上都取得了非常有限的成功,但也很乐意尝试!
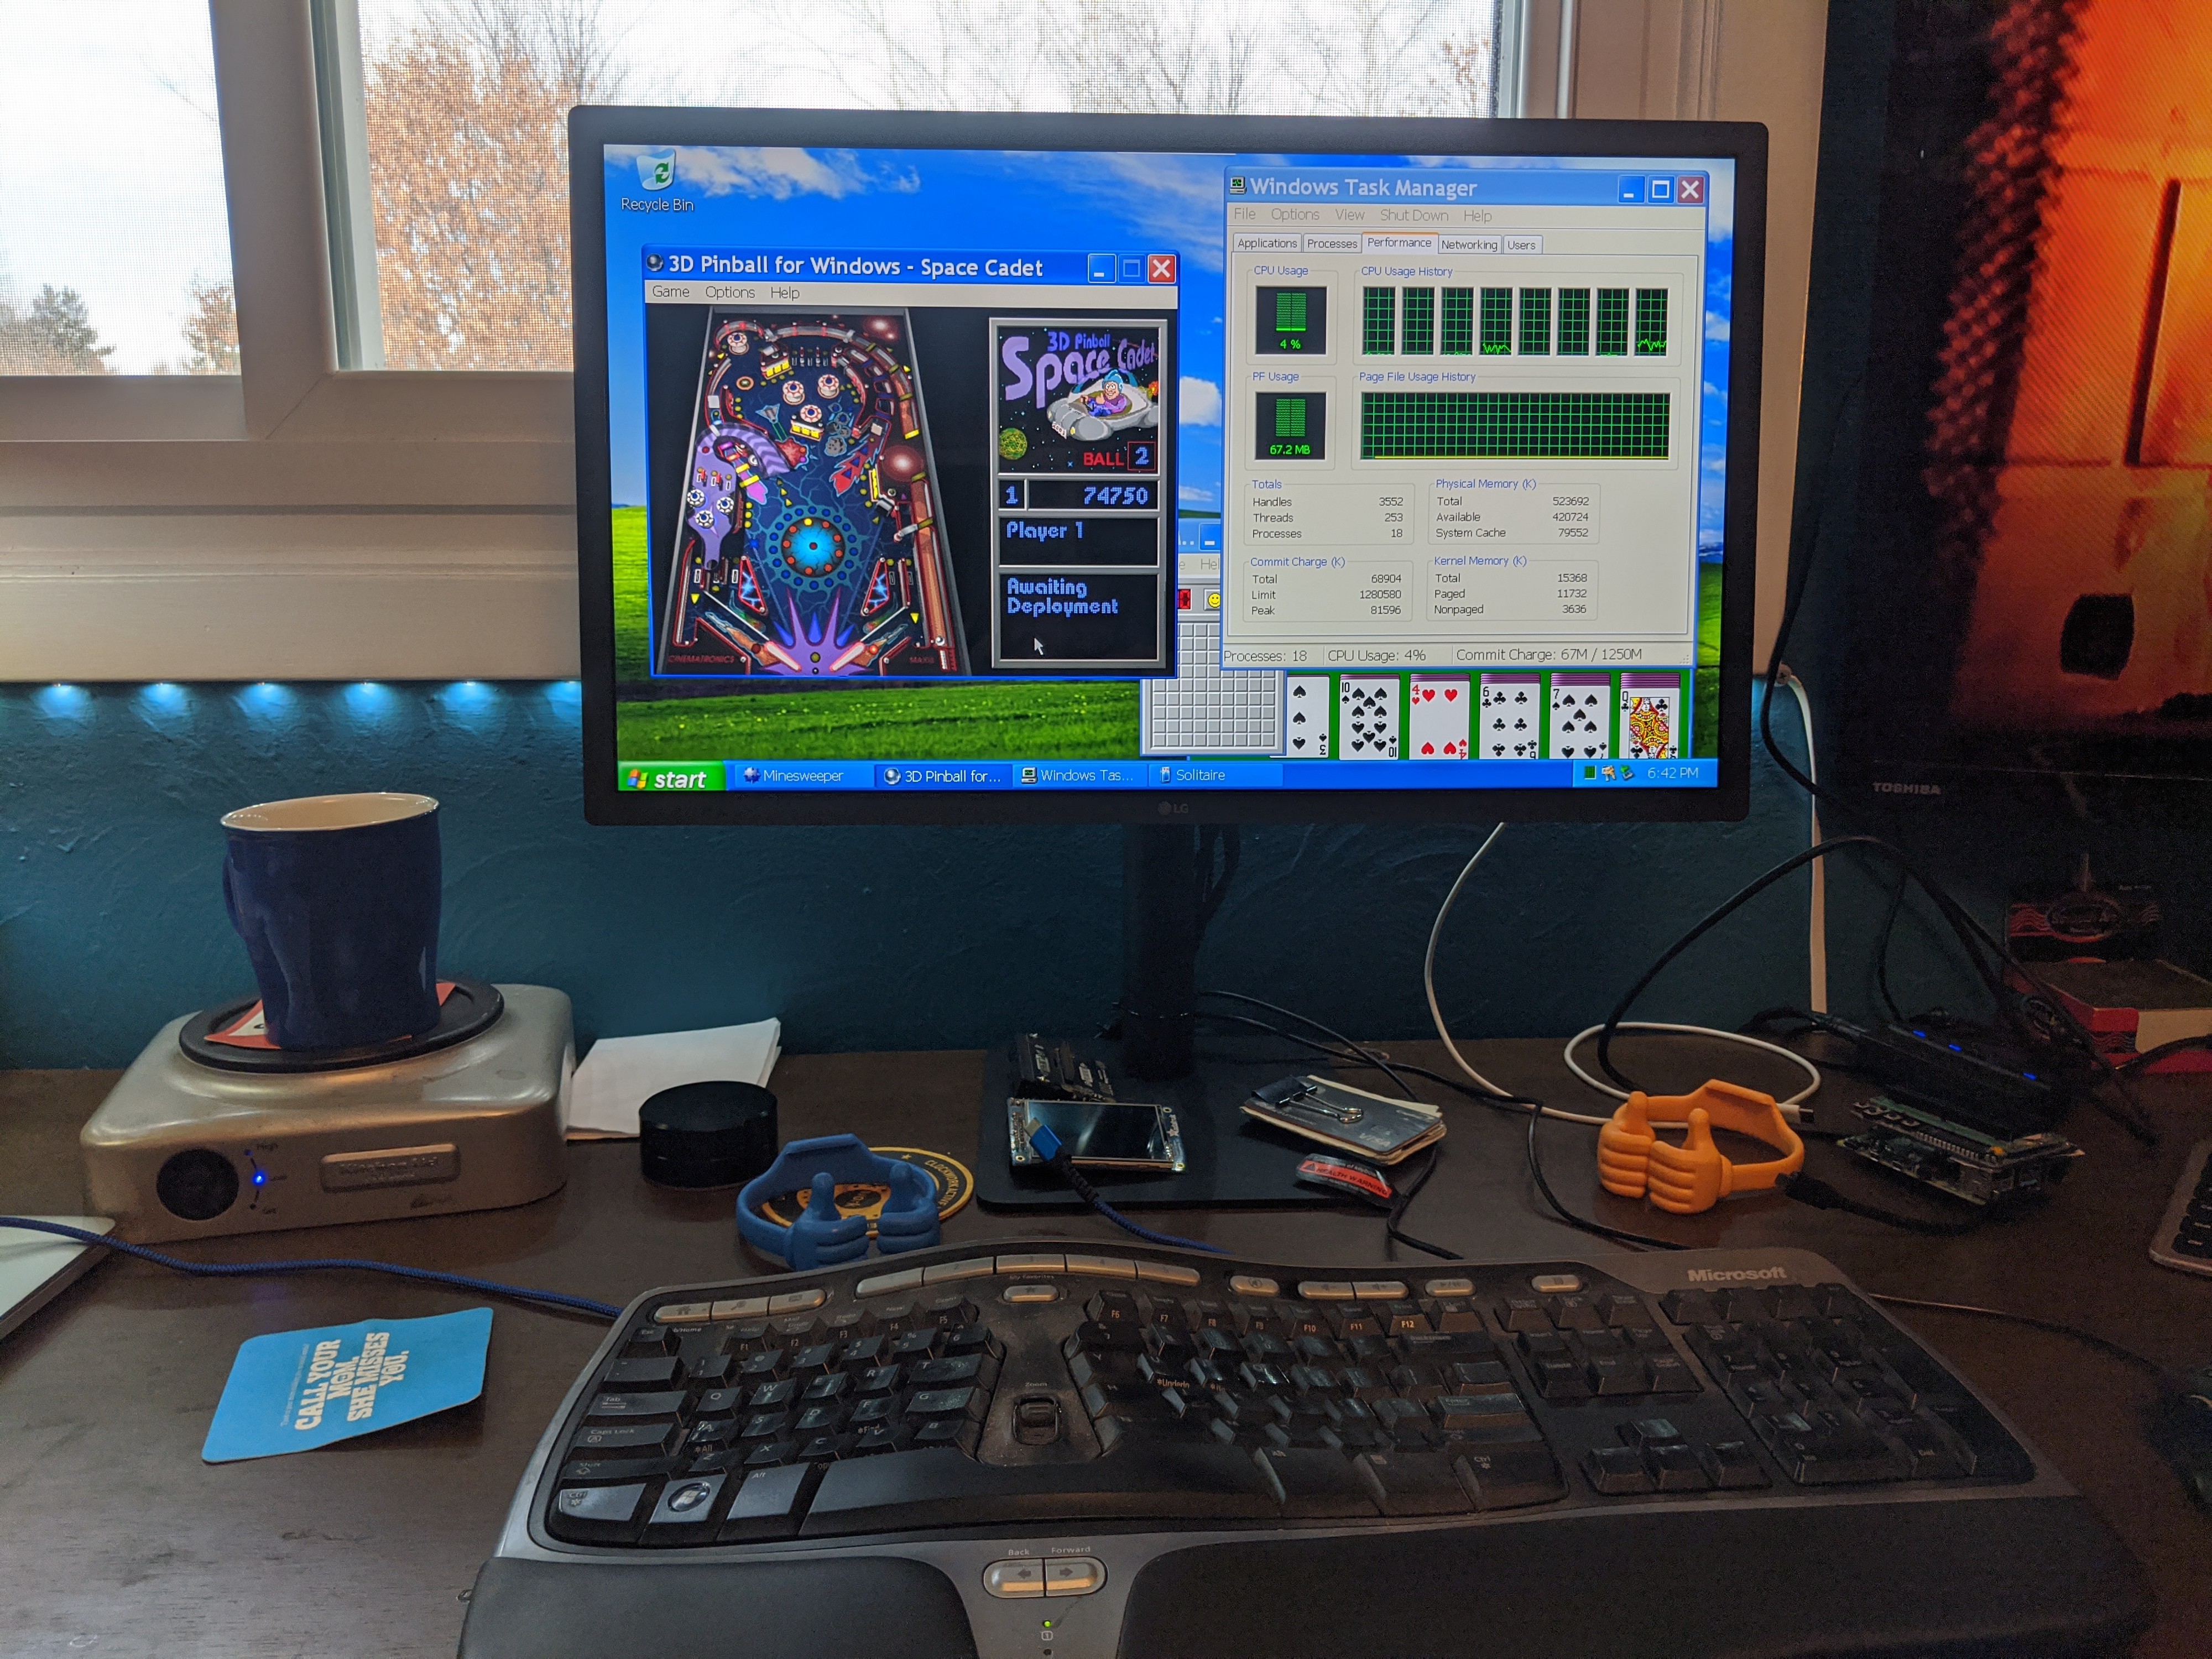
As you might have guessed, you can supply other ISOs for the -cdrom option after XP is up and running if you want to try and install and run your favorite classic game:
您可能已经猜到了,如果您想尝试安装并运行自己喜欢的经典游戏,可以在XP启动并运行后为-cdrom选项提供其他ISO:

更新XP (Updating XP)
If you happen to only have Service Pack 1 or 2 install disk, and are itching to get XP updated, you’ll quickly notice that Windows XP update tool doesn’t work anymore (and hasn’t worked for quite awhile). But fret not! Microsoft still hosts all of the old XP Service Pack update files (at least at the time of this writing they did): https://www.catalog.update.microsoft.com/Search.aspx?q=xp
如果您恰好只有Service Pack 1或2安装盘,并且渴望更新XP,您会很快注意到Windows XP更新工具不再起作用了(并且已经有一段时间没有起作用了)。 但是,不用担心! Microsoft仍托管所有旧的XP Service Pack更新文件(至少在撰写本文时已这样做): https : //www.catalog.update.microsoft.com/Search.aspx?q= xp

Because SSL versions have moved on since XP, you may need to download these from Android, and move them to a folder that’s mounted as a drive in XP (see bigger/better qemu command above).
由于SSL版本自XP以来一直在使用,因此您可能需要从Android下载这些版本,并将其移动到XP中作为驱动器安装的文件夹中(请参见上面的更大/更好的qemu命令)。
适度享受! (Enjoy with moderation!)
Looking for something a bit more retro than XP? I wrote an article on how to do this with Windows 98 as well!
寻找比XP更复古的东西吗? 我写了一篇关于如何在Windows 98上执行此操作的文章!
翻译自: https://medium.com/@centerorbit/running-windows-xp-on-android-4defa44c33fc


 4851
4851

 被折叠的 条评论
为什么被折叠?
被折叠的 条评论
为什么被折叠?
 到【灌水乐园】发言


