


Has it been 6 months already?! It sure has. And you know what that means — a new Laravel version is among us — Laravel 8!
已经六个月了吗? 它肯定有。 您知道这意味着什么-Laravel 8是我们当中的一个新Laravel版本!
Two days ago Laravel 8 was released with a bunch of useful updates I was excited to hear about. In this article, I’ll go over what’s changed from the previous version 7. For full details visit the release note here.
两天前,Laravel 8发行了许多有用的更新,我很高兴听到。 在本文中,我将介绍与先前版本7相比的更改。有关完整的详细信息,请访问此处的发行说明。
(Disclaimer: Laravel will continue to provide bug fixes for this version for the next 6 months and security fixes for the next year.)
(免责声明:Laravel将在接下来的6个月中继续提供此版本的错误修复,并在明年提供安全修复。)
涵盖了什么? (What’s being covered?)
1. Laravel Jetstream (1. Laravel Jetstream)
Version 8 introduces Laravel Jetstream — an application scaffolding for the framework boasting a stylish user dashboard. Jetstream handles everything from login, registration, and email verification, to session management and optional team management! It is designed using highly customisable CSS framework Tailwind and offers you a choice between Livewire, and Inertia.
版本8引入了Laravel Jetstream,它是具有时尚用户仪表板的框架应用程序支架。 Jetstream可以处理从登录,注册和电子邮件验证到会话管理和可选团队管理的所有工作! 它使用高度可定制CSS框架Tailwind设计,并为您提供Livewire和Inertia之间的选择。
To get started, run:
首先,运行:
composer global require laravel/installerlaravel new laravel-8 --jet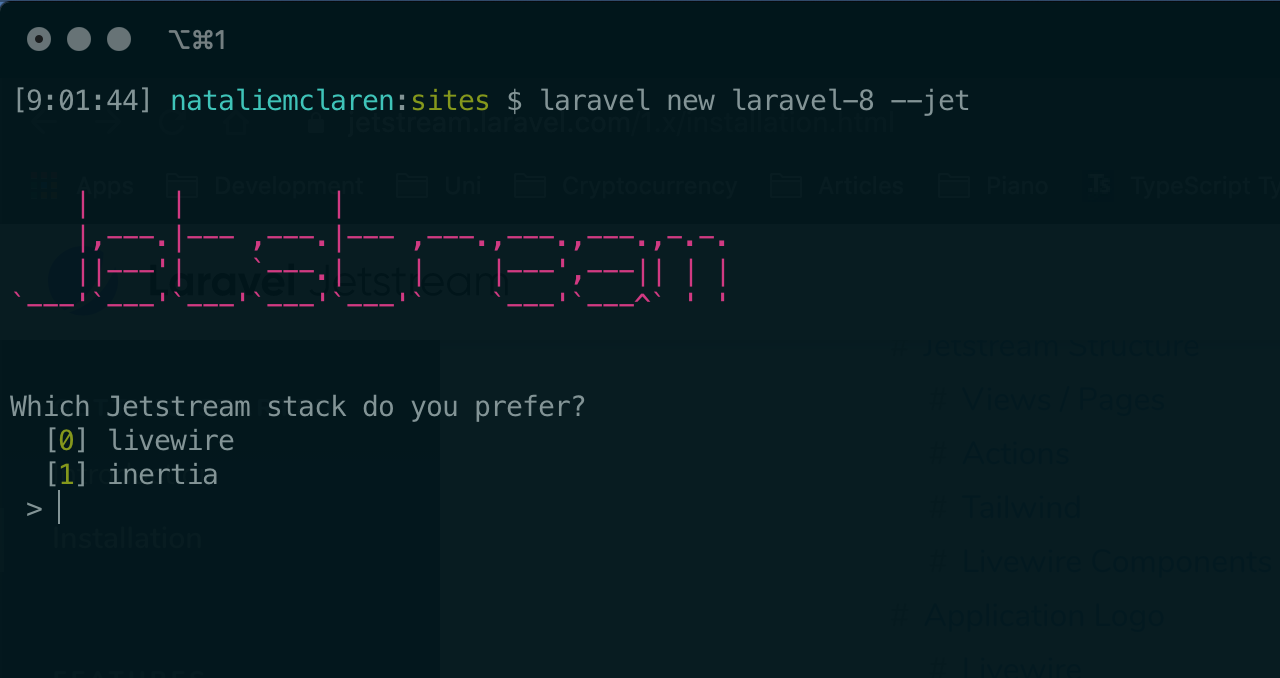
npm install && npm run devphp artisan serveMake sure to add your database name to the .env file and migrate your database.
确保将数据库名称添加到.env文件并迁移数据库。
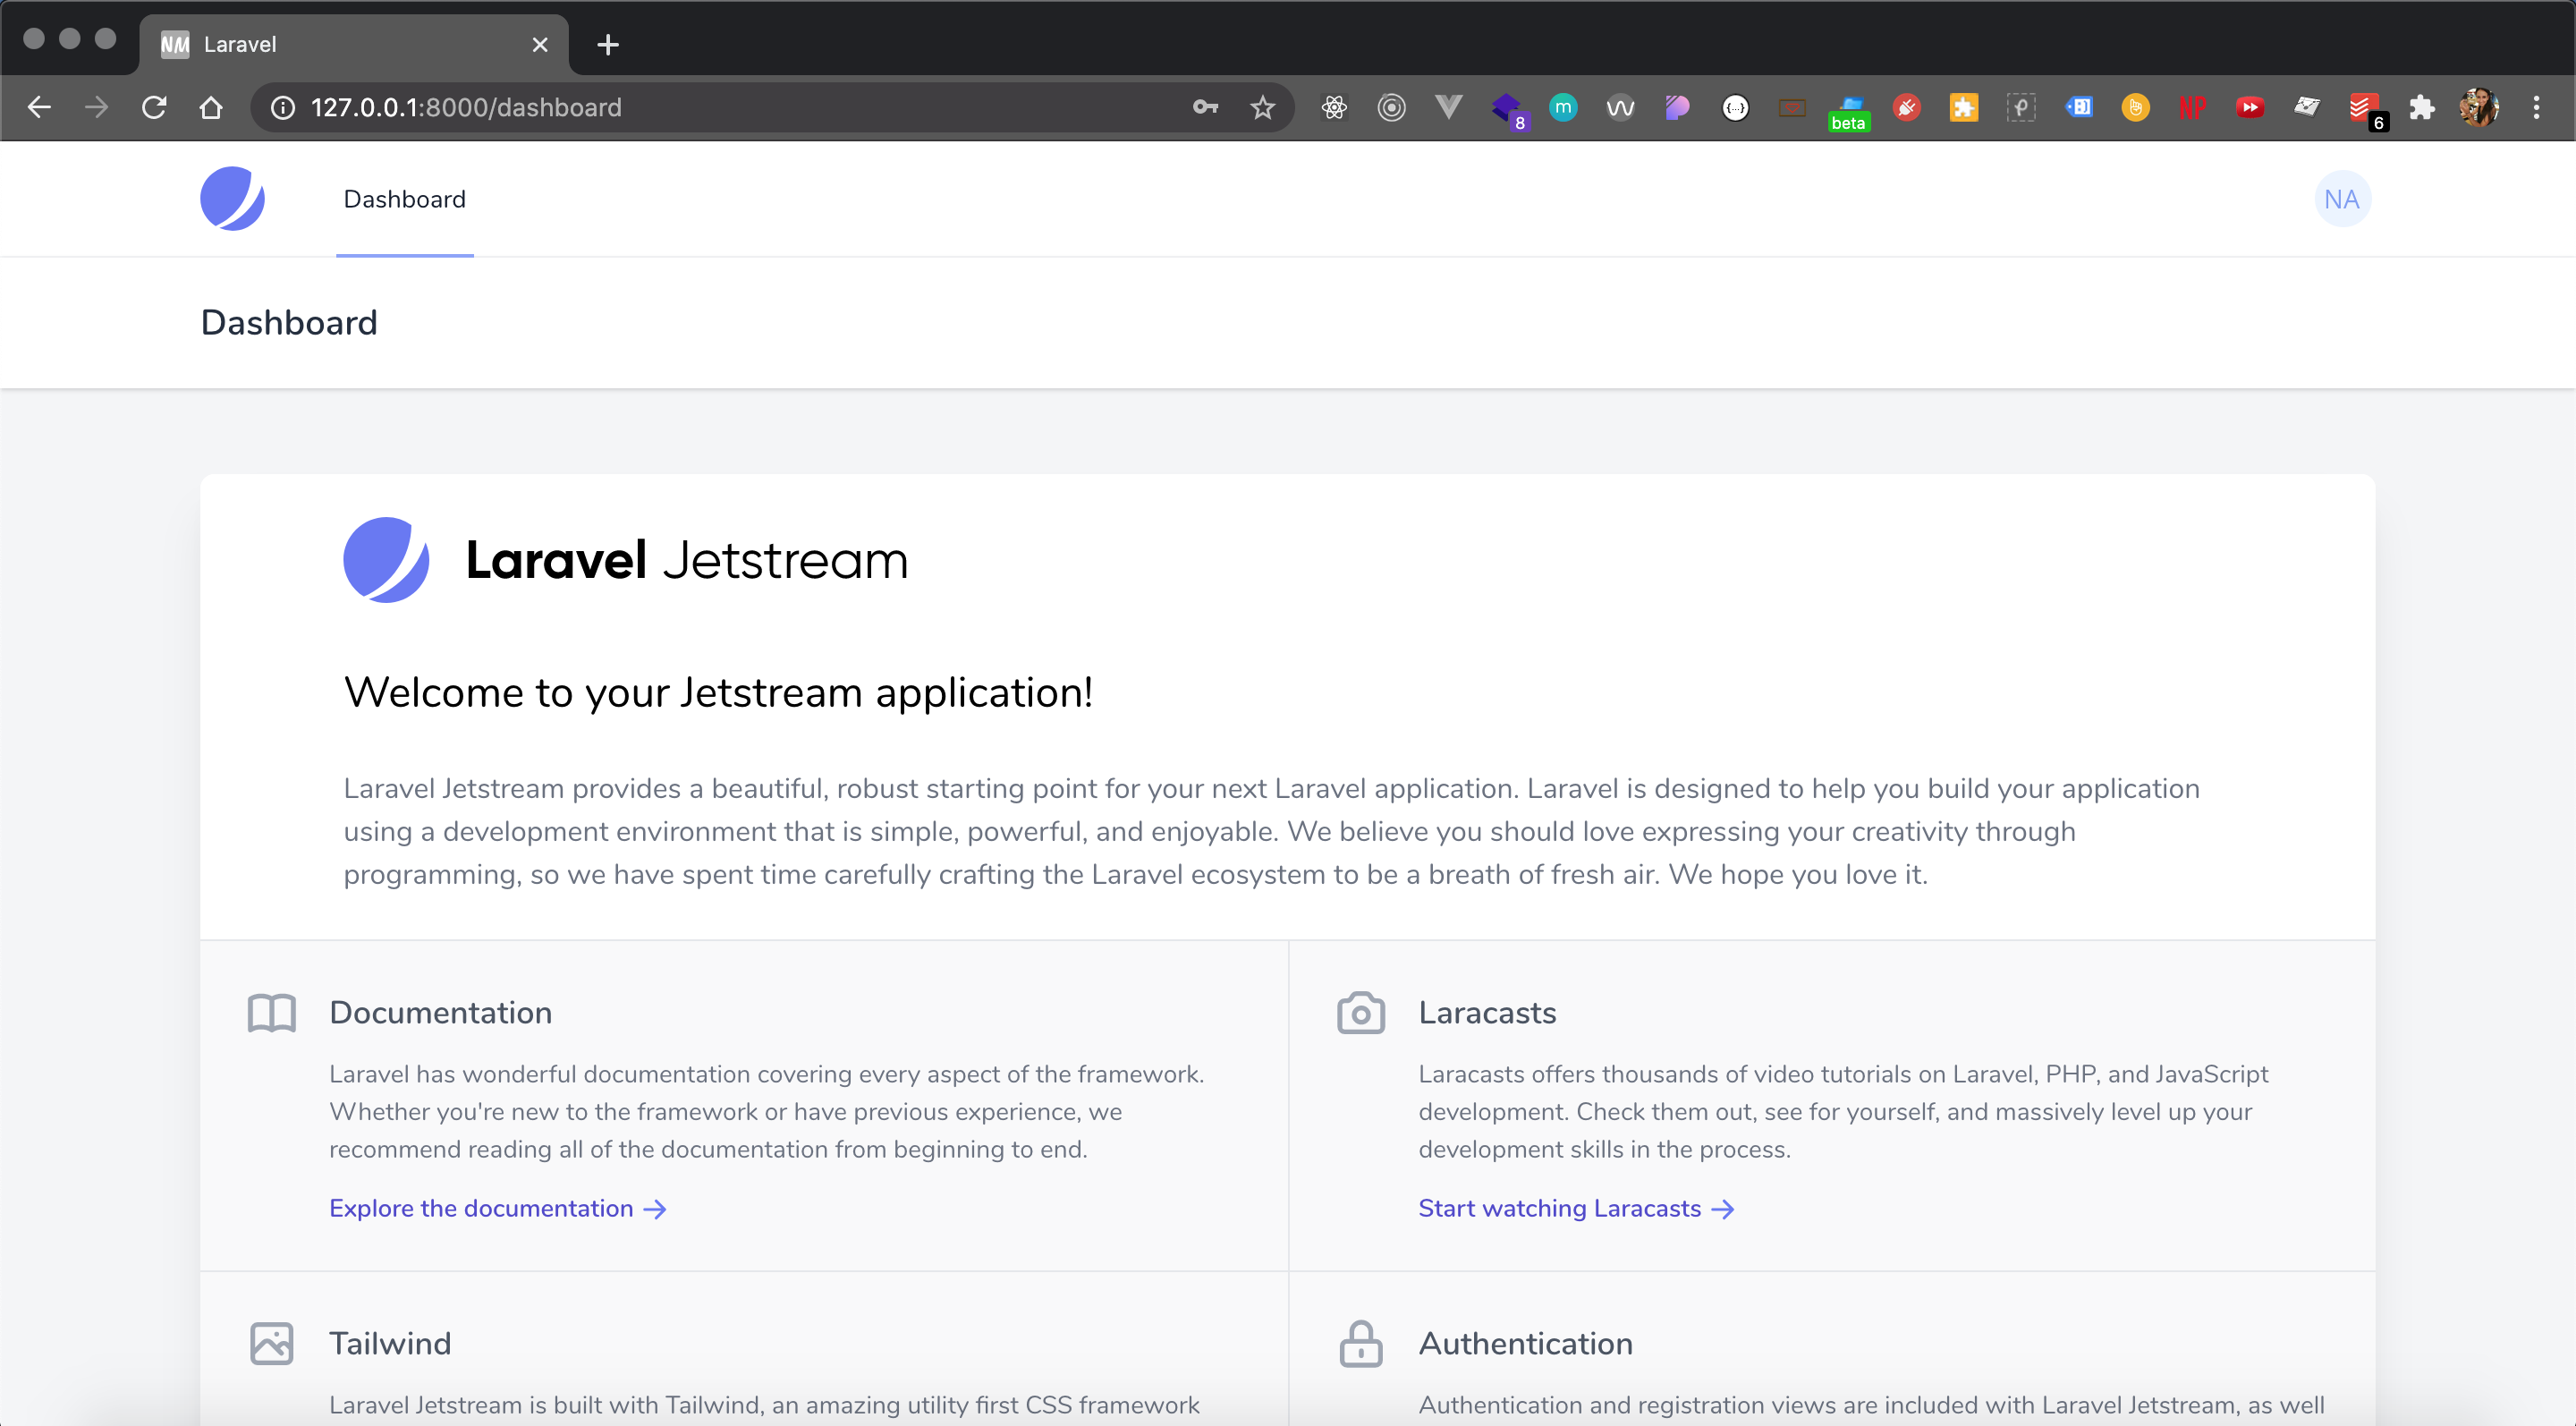
Upon refreshing you’ll see the usual Laravel welcome page (albeit looking somewhat different and much slicker!). Click on the register link to register your account and navigate to /dashboard to view your new dashboard:
刷新后,您会看到通常的Laravel欢迎页面(尽管看起来有些不同,而且更加流畅!)。 单击注册链接以注册您的帐户,然后导航到/dashboard以查看新的仪表板:
At this point, if you run php artisan vendor:publish — tag=jetstream-views and look under resources/views/vendor/jetstream/components — you will see a list of available components to use right out of the box. welcome.blade.php for example, would be used in your application as <x-jet-welcome /> .
此时,如果您运行php artisan vendor:publish — tag=jetstream-views并在resources/views/vendor/jetstream/components查看-您将立即获得可用的可用组件列表。 例如, welcome.blade.php将在您的应用程序中用作<x-jet-welcome /> 。
2.模型目录 (2. A models directory)
Low and behold, the moment we’ve all been waiting for — a models directory! Yay! Prior to version 8, all existing, as well as newly generated models, sat within the root of the framework’s /app directory. Most would then create a Models sub-folder, move all models to said folder and change their namespaces to reflect the new path. I think I speak for the community when I say we weren’t keen on this setup. Otwell has more than made up for this, however, with this latest update. All model generator commands have been updated to place new models inside a Models folder. If the directory doesn’t already exist, one will be created for you along with your new model. Happy days!
低估,我们一直在等待的那一刻-模型目录! 好极了! 在版本8之前,所有现有以及新生成的模型都位于框架/app目录的根目录中。 然后大多数人将创建一个Models子文件夹,将所有模型移动到所述文件夹并更改其名称空间以反映新路径。 当我说我们不热衷于这种设置时,我想我代表社区发言。 但是,通过最新的更新,Otwell可以弥补这一不足。 所有模型生成器命令均已更新,可以将新模型放置在“ Models 文件夹中 。 如果该目录尚不存在,则会为您创建一个目录以及新模型。 快乐的时光!
3.模型工厂课程 (3. Model factory classes)
Class-based factories have replaced the model factories we knew before.
基于类的工厂已经取代了我们以前知道的模型工厂。
Laravel 7 (Laravel 7)
/**
 * Run the database seeds.
 *
 * @return void
 */
public function run()
{
    factory(App\User::class, 50)->create()->each(function ($user) {
        $user->posts()->save(factory(App\Post::class)->make());
    });
}
Laravel 8 (Laravel 8)
use App\Models\User;/**
 * Run the database seeders.
 *
 * @return void
 */
public function run()
{
    User::factory()
            ->times(50)
            ->hasPosts(1)
            ->create();
}
4.迁移挤压 (4. Migration squashing)
With this cool new feature, bulky migration folders are a thing of the past. Migration squashing has been introduced to squash all migrations into a single SQL file.
有了这个很酷的新功能,庞大的迁移文件夹已成为过去。 引入了迁移压缩功能,可以将所有迁移数据压缩到一个SQL文件中。
Running the following will create a schema folder under database with an SQL file containing CREATE TABLE queries for all of your migrations:
运行以下命令将在database下创建一个schema文件夹,其中SQL文件包含用于所有迁移的CREATE TABLE查询:
php artisan schema:dumpTo then remove the migrations leaving only the SQL file, run:
要除去仅保留SQL文件的迁移,请运行:
php artisan schema:dump --prunephp artisan migrate will then run the SQL schema first, followed by any new migrations not yet part of the file under migrations. To include new migrations to the schema file, simply run the schema:dump command again.
然后, php artisan migrate migration将首先运行SQL模式,然后运行所有尚未迁移到文件中的新migrations 。 要包括向架构文件的新迁移,只需再次运行schema:dump命令。
5.作业批处理 (5. Job batching)
Laravel’s new job batching feature allows for the dispatching of multiple jobs using the new batch method of the Bus facade. You may of course then use methods like then , finally and catch to customise their completion. Basic implementation below:
Laravel的新作业批处理功能允许使用Bus Facade的新batch方法调度多个作业。 当然,您当然可以使用诸如then方法, finally使用catch来定制其完成方式。 下面的基本实现:
<?php


namespace App\Jobs;


use App\Jobs\ProcessFile;
use App\File;


use Illuminate\Bus\Queueable;
use Illuminate\Contracts\Queue\ShouldQueue;
use Illuminate\Foundation\Bus\Dispatchable;
use Illuminate\Queue\InteractsWithQueue;
use Illuminate\Queue\SerializesModels;


class ProcessFiles implements ShouldQueue
{
    use Dispatchable, InteractsWithQueue, Queueable, SerializesModels;


    /**
     * Create a new job instance.
     *
     * @return void
     */
    public function __construct()
    {
        //
    }


    /**
     * Execute the job.
     *
     * @return void
     */
    public function handle()
    {
        $batch = Bus::batch([


            new ProcessFile(File::find(1)),
            new ProcessFile(File::find(2)),
            new ProcessFile(File::find(3)),
            new ProcessFile(File::find(4)),
            new ProcessFile(File::find(5)),


        ])->then(function (Batch $batch) {
            // Do something when completed successfully...
        })->catch(function (Batch $batch, Throwable $e) {
            // Caught when first batch job failure detected
        })->finally(function (Batch $batch) {
            // Do something when batch has finished
        })->dispatch();


        return $batch->id;
    }
}
6.改善速率限制 (6. Improved rate limiting)
Setting a hit rate limit on routes can now be done in a more flexible and encapsulated way than in the previous version. Using the RateLimiter facade’s for method, limit times can be set and may even be dynamic based on the received $request.
与以前的版本相比,现在可以以更加灵活和封装的方式来设置路由的命中率限制。 使用RateLimiter门面的for方法,可以设置限制时间,甚至可以根据收到的$request是动态的。
Laravel 7 (Laravel 7)
Route::middleware('auth:api', 'throttle:60,1')->group(function () {
    Route::get('/user', function () {
        //
    });
});
Laravel 8 (Laravel 8)
use Illuminate\Cache\RateLimiting\Limit;
use Illuminate\Support\Facades\RateLimiter;RateLimiter::for('global', function (Request $request) {
    return $request->user()->vipCustomer()
                ? Limit::none()
                : Limit::perMinute(100);
});
To then make use of these limits on certain routes, apply them as you would any middleware using the same name you passed into the for method:
然后要在某些路由上使用这些限制,请像使用任何传递给for方法的相同名称的中间件一样应用它们:
Route::middleware(['throttle:global'])->group(function () {
    Route::post('/audio', function () {
        //
    });Route::post('/video', function () {
        //
    });
});
Backwards compatibility has been maintained, however, to make use of the previous release’s throttle middleware API.
但是,为了使用先前版本的throttle中间件API,保持了向后兼容性。
7.改进的维护模式 (7. Improved maintenance mode)
Despite having your application on maintenance mode, Laravel allows for specific users to view it so long as they meet a certain condition. This condition has now changed from an IP address to a secret token.
尽管您的应用程序处于维护模式,但Laravel允许特定用户查看它们,只要他们满足特定条件即可。 现在,此条件已从IP地址更改为秘密令牌 。
Laravel 7 (Laravel 7)
php artisan down --allow=127.0.0.1 --allow=192.168.0.0/16Laravel 8 (Laravel 8)
php artisan down --secret="1630542a-246b-4b66-afa1-dd72a4c43515"After setting the token, Laravel will know to look for it when a user hits the URL. So doing the following will display the application:
设置令牌后,Laravel会在用户点击URL时寻找它。 因此,执行以下操作将显示该应用程序:
https://test-site.com/1630542a-246b-4b66-afa1-dd72a4c43515Once the cookie has been saved to your browser, you will be able to revisit the application as you would outside of maintenance mode!
将Cookie保存到浏览器后,您将可以在维护模式之外重新访问该应用程序!
预渲染维护模式视图 (Pre-rendering a maintenance mode view)
As part of the improvements to maintenance mode, you may now pre-render a specific maintenance view. Why is this so important? Well before this, if you ran php artisan down during deployment, there was still a chance users could encounter an error if they hit the application before any dependencies had updated to reflect the new mode.
作为维护模式改进的一部分,您现在可以预渲染特定的维护视图。 为什么这个这么重要? 在此之前,如果您在部署过程中使php artisan down ,那么在更新任何依赖关系以反映新模式之前,如果用户点击应用程序,仍然有可能遇到错误。
With this addition, a maintenance mode view of your choice can be specified and will be displayed immediately at the start of the request cycle, thus not having to wait for the framework to boot.
使用此添加项,可以指定您选择的维护模式视图,该视图将在请求周期开始时立即显示,因此不必等待框架启动。
php artisan down --render="errors::503"8.封闭调度/链 (8. Closure dispatch / chain)
A new catch method has been added which will be executed if a queued closure fails to complete successfully. Very useful to customise what happens in case of that failure.
添加了一个新的catch方法,如果队列关闭无法成功完成,将执行该方法。 定制发生故障时发生的情况非常有用。
Laravel 7 (Laravel 7)
$podcast = App\Podcast::find(1);dispatch(function () use ($podcast) {
    $podcast->publish();
});
Laravel 8 (Laravel 8)
$podcast = App\Podcast::find(1);dispatch(function () use ($podcast) {
    $podcast->publish();
})->catch(function (Throwable $e) {
    // This job has failed...
});
9.动态刀片组件 (9. Dynamic blade components)
You now no longer need to hardcode component names onto a page, they can instead be rendered based on a runtime value or variable!
您现在不再需要 将组件名称硬编码到页面上,可以根据运行时值或变量来呈现它们!
Laravel 7 (Laravel 7)
php artisan make:component InfoTo display the component you would then use:
要显示该组件,您将使用:
<x-info />Laravel 8 (Laravel 8)
<x-dynamic-component :component="$componentName" />Let’s see below how we might implement this!
下面让我们看看如何实现这一目标!
First, create a component using php artisan make:component <component-name> . I’ve decided to call mine success
首先,使用php artisan make:component <component-name>创建一个组件。 我决定称自己的success
<div>
    <x-jet-section-title title="Congrats!" description="Your first dynamic component!" />
</div>
Then pick a route and pass down the relevant data to the view via its controller:
然后选择一条路线,并通过其控制器将相关数据传递到视图:
<?php


namespace Laravel\Jetstream\Http\Controllers\Livewire;


use Illuminate\Http\Request;
use Illuminate\Routing\Controller;


class UserProfileController extends Controller
{
    /**
     * Show the user profile screen.
     *
     * @param  \Illuminate\Http\Request  $request
     * @return \Illuminate\View\View
     */
    public function show(Request $request)
    {
        return view('profile.show', [
            'request' => $request,
            'user' => $request->user(),
            'message' => 'success'
        ]);
    }
}
<x-app-layout>
<x-slot name="header">
<h2 class="font-semibold text-xl text-gray-800 leading-tight">
{{ __('Profile') }}
</h2>
<x-dynamic-component :component="$message" />
</x-slot>
</x-app-layout>I chose to render my dynamic component inshow.blade.php. Navigating to /user/profile from your dashboard should now display your success text!
我选择在show.blade.php渲染我的动态组件。 从仪表板导航到/user/profile ,现在应该显示您的成功文本!

This is extremely useful for dynamically loading success or error components! Simply pass down the name to the view (in this example the variable was message and value was success), and so long as there is a component with that name, Laravel will dynamically render it for you!
这对于动态加载成功或错误组件非常有用! 只需将名称传递给视图(在此示例中,变量为message,值即为成功),只要有一个具有该名称的组件,Laravel就会为您动态呈现它!
10.事件监听器的改进 (10. Event listener improvements)
Event listeners have been improved to include the registration of Closure based event listeners. This can be done by only passing the Closure to the Event::listen method. Additionally, these new Closure based event listeners can also be marked as queueable, and like queued jobs the usual existing methods — onConnection , onQueue and delay — may be used on them to customise the execution of the queued listener.
事件侦听器已得到改进,包括基于Closure的事件侦听器的注册。 这可以通过仅将Closure传递给Event::listen方法来完成。 此外,这些新的基于Closure的事件侦听器也可以标记为可queueable ,并且像排队的作业一样,可以在其上使用通常的现有方法onConnection , onQueue和delay来自定义排队侦听器的执行。
Event::listen(queueable(function (PodcastProcessed $event) {
    //
}));
Marking as queueable is of course optional and can be removed.
标记为可queueable当然是可选的,可以删除。
11.时间测试助手 (11. Time testing helpers)
This new update brings us helpers to allow the modification of timestamps returned when testing! The introduction of travel() can be used in conjunction with the famous now() to go into the future, travel back in time, and return back to the present!
这个新的更新使我们的助手能够修改测试时返回的时间戳! travel()的介绍可以与著名的now()结合使用,进入未来,回到过去,回到现在!
// Travel into the past
$this->travel(-5)->hours();// Come back to the present
$this->travelBack();
12.根据环境变化自动重新加载 (12. Automatic reloading on environment changes)
Any changes detected in the .env file will now trigger an automatic reload, removing the need for a manual stop and restart of the serve command.
现在,在.env文件中检测到的所有更改都将触发自动重新加载,而无需手动停止和重新启动serve命令。

13. Tailwind成为分页器的默认样式 (13. Tailwind becomes default styling for the paginator)
But Bootstrap 3 and 4 views will still remain available!
但是Bootstrap 3和Bootstrap 4视图仍然可用!
14.路由命名空间更新 (14. Routing namespace updates)
The RouteServiceProvider class in versions 7 and below contained a $namespace property. This property’s value was then prefixed to all routes set out in the routes files. This newer version of Laravel removes the namespace and instead class names are used directly in routes files.
版本7及更低版本中的RouteServiceProvider类包含$namespace属性。 然后将此属性的值添加到路由文件中列出的所有路由的前缀。 Laravel的这个较新版本删除了名称空间,而类名直接在路由文件中使用。
Laravel 7 (Laravel 7)
class RouteServiceProvider extends ServiceProvider{/*** This namespace is applied to your controller routes.* In addition, it is set as the URL generator's root namespace.** @var string*/protected $namespace = 'App\Http\Controllers';}Thus, doing the below would work and the framework would know exactly where your controller sat:
因此,执行以下操作将有效,并且框架将确切知道控制器的位置:
Route::get('/users', 'UserController@index');Laravel 8 (Laravel 8)
Introducing a new way to set out routes:
引入一种新的路线设置方法:
use App\Http\Controllers\UserController;Route::get('/users', [UserController::class, 'index']);That’s all of the new/updated features announced in the Laravel 8 release! I hope you enjoyed reading about them.
这就是Laravel 8版本中宣布的所有新功能/更新功能! 我希望您喜欢阅读有关它们的文章。
Do you have any favourites? Let me know in the comments below, and happy coding!
你有什么最爱吗? 在下面的评论中让我知道,祝您编程愉快!
Official Docs: https://laravel.com/docs/8.x
官方文档: https : //laravel.com/docs/8.x
Release Note: https://laravel.com/docs/8.x/releases#laravel-8
翻译自: https://medium.com/@natalie.mclaren/whats-new-in-laravel-8-847c73d16d7a


 1113
1113


 被折叠的 条评论
为什么被折叠?
被折叠的 条评论
为什么被折叠?
 到【灌水乐园】发言


