


github合作
In the last tutorial, we learned about the basics of GitHub. In this tutorial, all those basics will come together and we will get to experience the real power of GitHub which comes from collaboration. Please note, in this tutorial, we will be frequently using words like cloning, push, pull, branches, master, etc. Therefore, if you are not clear on any of these, please read through the last tutorial first.
在上一教程中 ,我们了解了GitHub的基础知识。 在本教程中,所有这些基础知识都将融合在一起,我们将体验到协作带来的GitHub的真正功能。 请注意,在本教程中,我们将经常使用诸如克隆,推,拉,分支,主等之类的词。因此,如果您不清楚其中任何一个,请首先通读上一教程 。
定义协作 (Defining Collaboration)
To appreciate the solution, it is important to appreciate the problem. Read through the following to understand the scenario where GitHub can come in handy.
要了解解决方案,重要的是要了解问题。 通读以下内容以了解GitHub派上用场的场景。
You are a lead data scientist who is working on a machine learning project with a team of junior data scientists. Since you are the project owner you are responsible for maintaining the “master” version of the project code.
您是首席数据科学家,他正在与一组初级数据科学家一起从事机器学习项目。 由于您是项目所有者,因此您有责任维护项目代码的“ 主版本” 。
In your team, every data scientist is working individually to improve the model prediction. Therefore, they have created their local versions or alternate branches of the “master” version.
在您的团队中,每个数据科学家都在单独工作以改善模型预测。 因此,他们已经创建了本地版本或“主”版本的备用分支 。
Let’s assume that you have made some edits to the “master” version of your code and a member of your team comes up with his own edited version and claims that he has considerably improved the model prediction. A visual of this scenario is as follows:
假设您已经对代码的“ 主 ”版本进行了一些编辑 ,并且您的团队中的一个成员提出了自己的编辑版本,并声称他已经大大改善了模型预测。 这种情况的外观如下:
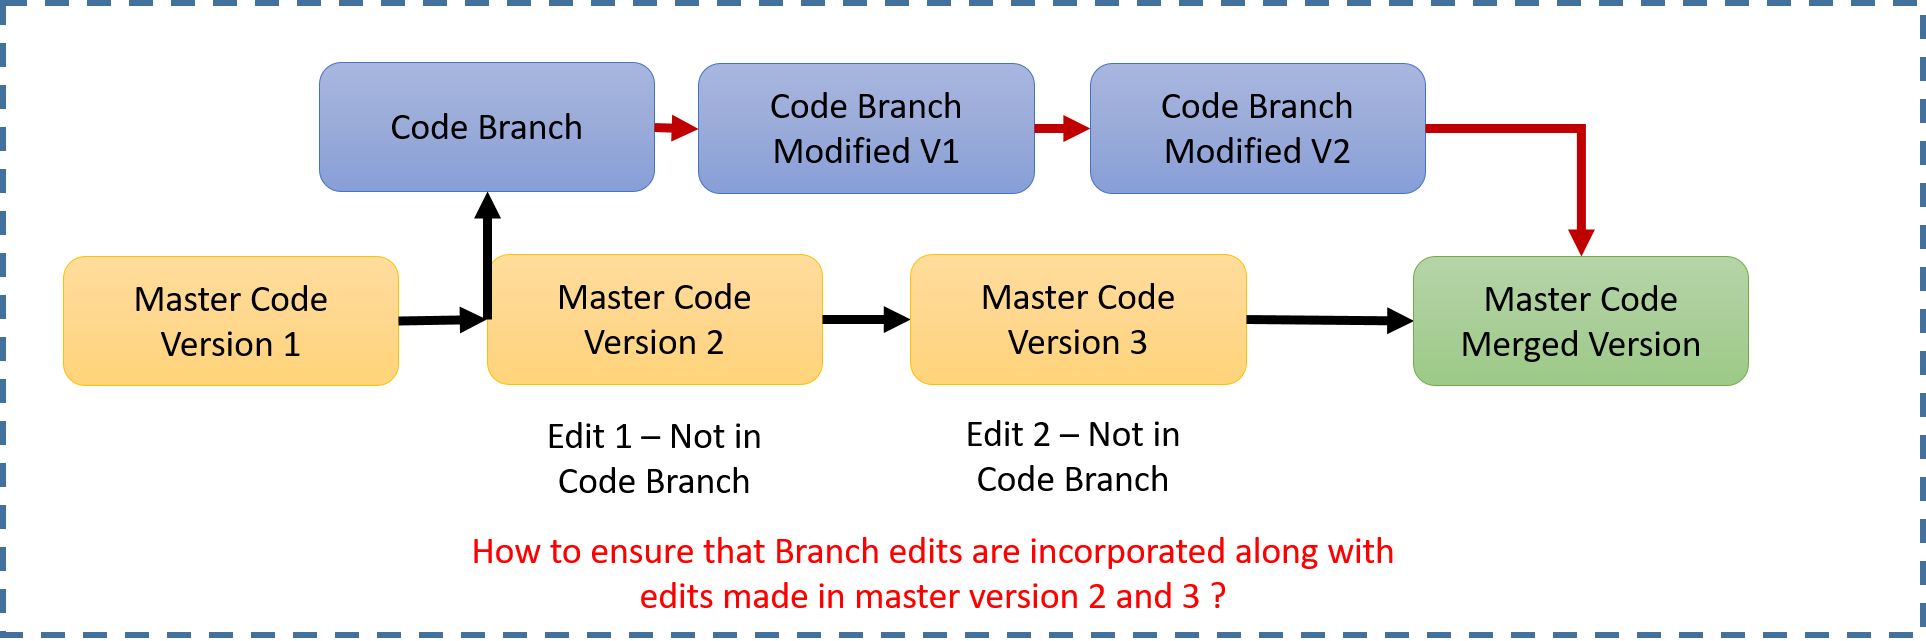
You now want to update the “master” version of the code but a number of conflicts can arise. Mentioning a few below:
现在,您想更新代码的“ 主 ”版本,但是可能会发生许多冲突。 下面提到一些:
The edits you have made to the “master” version are probably not there in your team member’s branched version
您对“ 主”版本所做的编辑可能不在您团队成员的分支版本中
The branched version might have some variable treatments which are different when compared with the “master” code
与“ 主”代码相比,分支版本可能会有一些不同的处理方式
This means simply overwriting the “master” code with the branch version of the code might not be in the best interest of the project. To resolve conflicts like these, GitHub comes in handy
这意味着仅用代码的分支版本覆盖 “ 主”代码可能不符合项目的最大利益 。 为了解决此类冲突 ,GitHub派上了用场
解决时间 (Solution Time)
I am sure that the above scenario must have made you appreciate the problem at hand. The question is, how GitHub will help?
我确信上述情况一定会让您意识到手头的问题。 问题是,GitHub将如何提供帮助?
第一件事第一 (First Things First)
Before we jump onto the solutions, let’s understand some basic terminologies we will be using throughout this tutorial:
在进入解决方案之前,让我们了解在本教程中将使用的一些基本术语:
Collaborator — A developer who is formally added to the project repository and is given the push access (access to modify the content of the repository) is called as a contributor or collaborator
协作者 — 正式添加到项目存储库并获得推送访问权限 (访问修改存储库内容的权限)的开发人员称为贡献者或协作者
Fork — Forking in GitHub is like copying someone else’s repository into your account. Generally, when you want to use an open-source project created by some other developer and you are not a contributor, you fork it and get access to their repository.
Fork —在GitHub上进行分叉就像将其他人的存储库复制到您的帐户中。 通常,当您要使用由其他开发人员创建的开源项目并且您不是贡献者时 ,可以对其进行分叉并访问其存储库。
Branch — Generally, developers use different branches for maintaining different modules of the project. Another common scenario that warrants the use of branches is when multiple members of the team want to work on the same piece of code. This is when each one can have its own branch. By default, each newly created repository has a central branch named “master” branch.
分支 -开发人员通常使用不同的分支来维护项目的不同模块 。 保证使用分支的另一种常见情况是团队的多个成员想要处理同一段代码。 这是每个人都可以拥有自己的分支的时候。 默认情况下, 每个新创建的存储库都有一个名为“ master ” 的中央分支。
Pull Request — A pull request is created to merge a branch with the “master” branch. The request goes directly to the project owner and he/she can work with the branch contributor to accept/ reject the edits.
拉请求 -创建一个拉请求将分支合并的“master”分支 。 该请求直接发送给项目所有者,他/她可以与分支贡献者合作以接受/拒绝编辑。
情境 (Scenarios)
To address the problem defined above, we will run through 2 scenarios which you can encounter when actively collaborating on GitHub:
为了解决上面定义的问题,我们将介绍两种在GitHub上积极协作时可能遇到的场景:
In the first scenario, we are assuming that you want to contribute to a repository (project) where you are not added as a contributor. In this scenario, we will assume that there are no edits made to the “master” branch after you have forked the project (in the sample scenario diagram shown above, yellow boxes of Version 2 and 3 don’t exist).
在第一种情况下,我们假设您要对未添加您作为贡献者的存储库(项目)作出贡献。 在这种情况下,我们将假定您对项目进行分叉后没有对“ master”分支进行任何编辑 (在上面显示的示例场景图中,版本2和3的黄色框不存在 )。
The second scenario assumes that you are part of the project group and are added as a contributor to the project repository. In this scenario, we will assume that there are edits made to the “master” branch after you have created your own branch (in the sample scenario diagram shown above, yellow boxes of Version 2 and 3 exist).
第二种情况假定您是项目组的一部分,并作为贡献者添加到项目存储库中。 在这种情况下,我们将假设您创建了自己的分支后,对“ master”分支进行了编辑 (在上面显示的示例场景图中, 存在版本2和3的黄色框)。
Let’s look at the workflow of the above scenarios.
让我们看一下上述方案的工作流程。
方案1-不是贡献者 (Scenario 1 — Not a contributor)
When you are not a contributor to a repository, you are not allowed to push edits from your local system to GitHub. The workflow steps to collaborate in a scenario like this are as follows:
如果您不是存储库的参与者 ,则不允许将编辑从本地系统推送到GitHub。 在这种情况下进行协作的工作流程步骤如下:
Forking the repository — Since we are not a collaborator to the repository, we will first fork the repository. To fork the repository, login to your account and search for the repository you are interested in. Go to the repository GitHub page and click on the “Fork button” as shown below:
分叉存储库-由于我们不是存储库的合作者,因此我们将首先分叉存储库 。 要派生存储库,请登录到您的帐户并搜索您感兴趣的存储库。转到存储库GitHub页面,然后单击“ Fork button ”,如下所示:
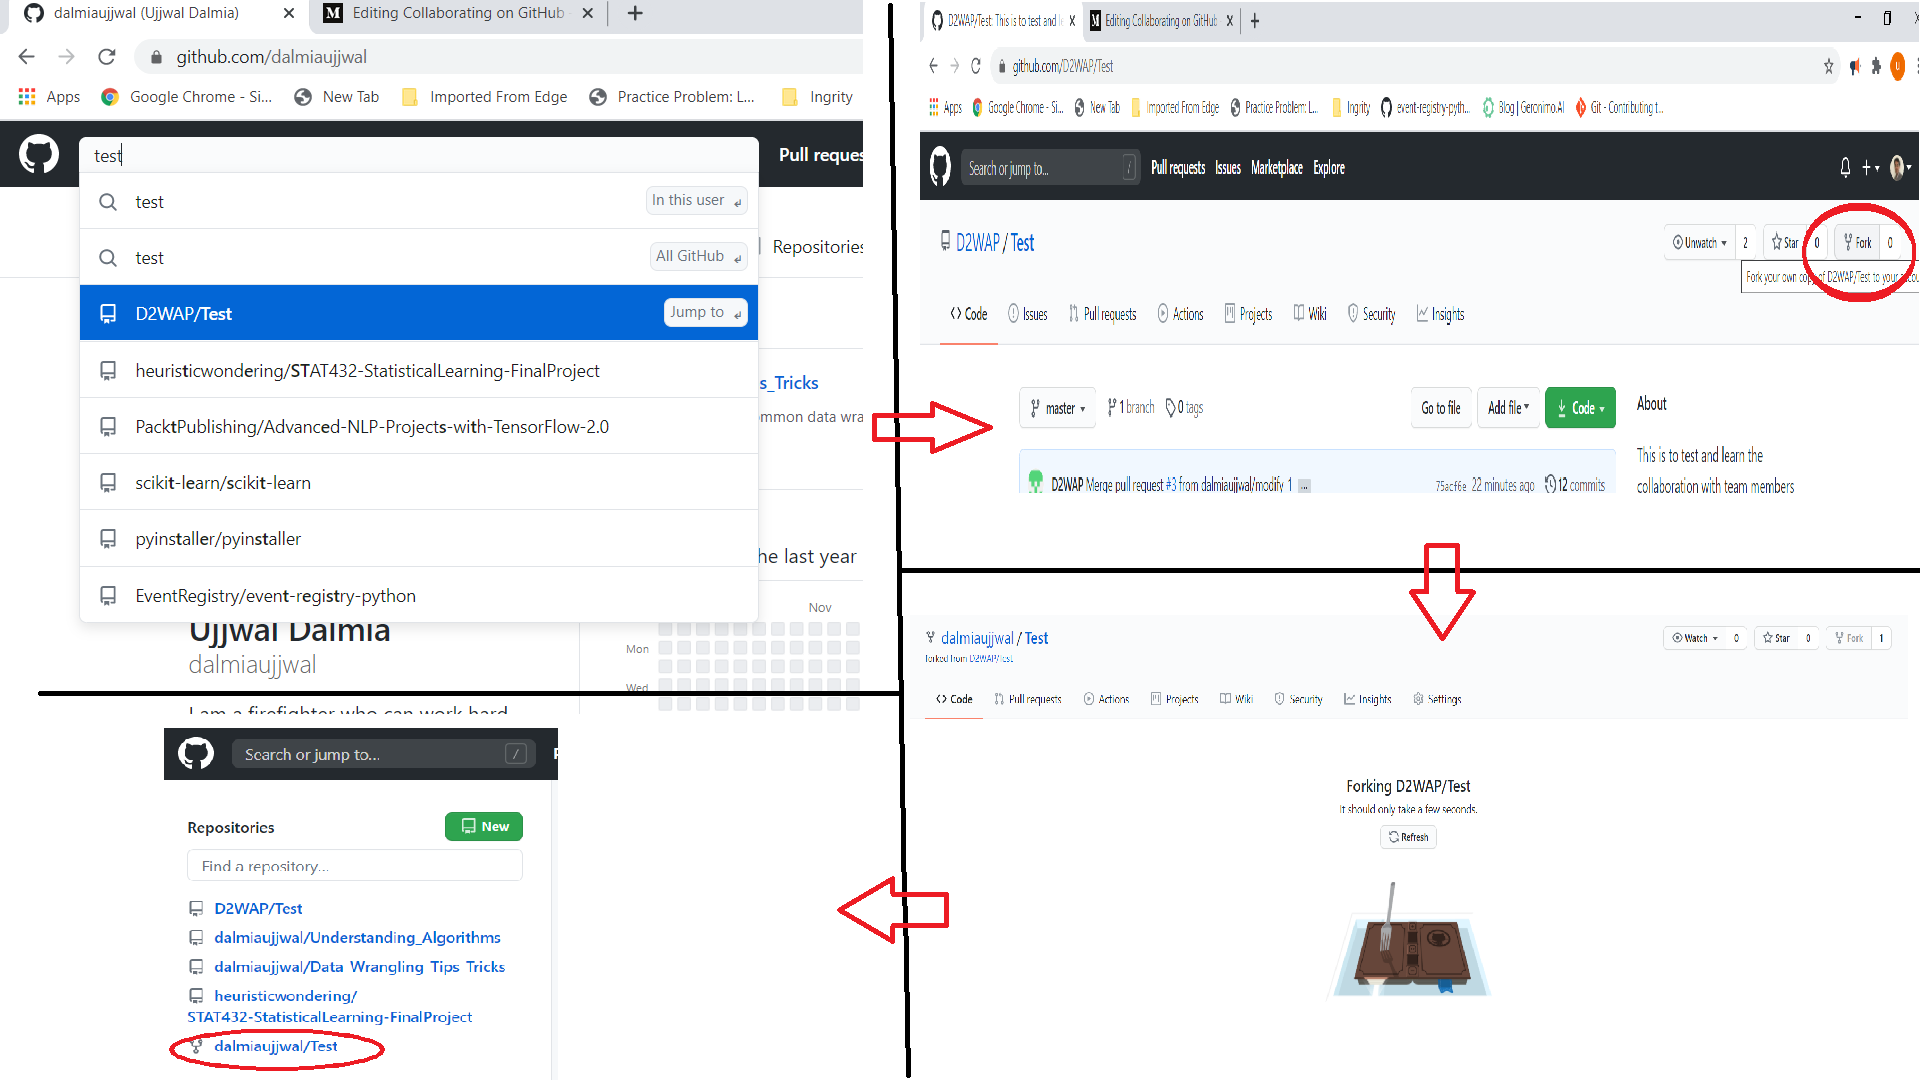
In the above 4 screenshots, we are searching for the repository (D2WAP/Test). We went on to the repository page and pressed the fork button on the top right. The forking process happened and the repository got forked in our account.
在以上4个屏幕截图中,我们正在搜索存储库 (D2WAP / Test)。 我们进入存储库页面,并按下右上角的fork按钮 。 分叉的过程发生了 ,我们的帐户中的存储库也被分叉了。
Clone the repository — Once done, you can clone the forked repository to make its content available on your system. The process for this is explained in the last tutorial. Since the forked repository is part of your account, you will have push access and you can push your edits to the forked repository. Please note, in this case, the cloning should be done after forking because, If done before forking, your locally cloned repository would point to the other developer’s account where you will not have the push access.
克隆存储库-完成后,您可以克隆派生的存储库以使其内容在系统上可用 。 在上一个教程中对此过程进行了说明。 由于分支的存储库是您帐户的一部分,因此您将拥有推送访问权限,并且可以将编辑推送到分支的存储库 。 请注意,在这种情况下, 克隆应该在分支之后进行,因为如果在分支之前完成,则本地克隆的存储库将指向其他开发者的帐户 ,您将没有推送访问权限 。
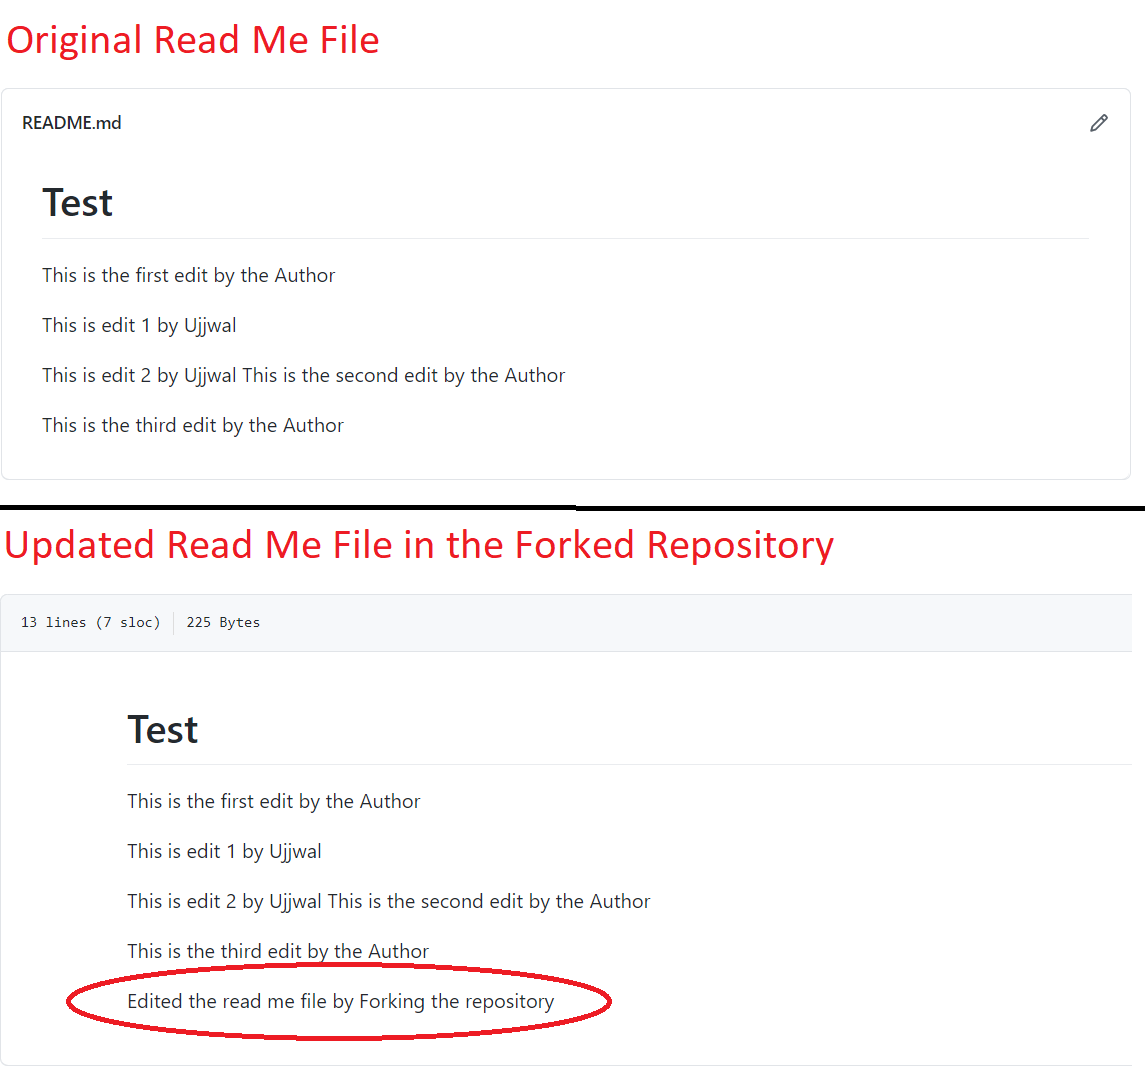
Modify the code, commit and push — The next step is to edit the codes in the cloned repository, commit the changes, and push them to your forked repository. Given you have a fork, you can push the edits directly to the “master” branch or can create a new branch also. It is recommended that we do the edits in a new branch only but to keep this scenario simple, we are pushing the edits directly to the “master” branch. We will look at the new branch creation in scenario 2. To demonstrate the process, I have edited the read me file of the forked repository. The difference between the forked and original repository can be seen from the screenshot below:
修改代码 , 提交并推送 —下一步是在克隆的存储库中编辑代码 , 提交更改,然后将其推送到派生的存储库中 。 如果您有叉子,则可以将编辑直接推送到“ master”分支 , 也可以创建一个新分支 。 建议仅在新分支中进行编辑,但是为了使这种情况保持简单,我们将编辑直接推到“ master ”分支。 我们将在场景2中查看新分支的创建。为了演示该过程,我编辑了分支存储库的自述文件 。 可以从下面的屏幕快照中看到分叉存储库和原始存储库之间的区别:
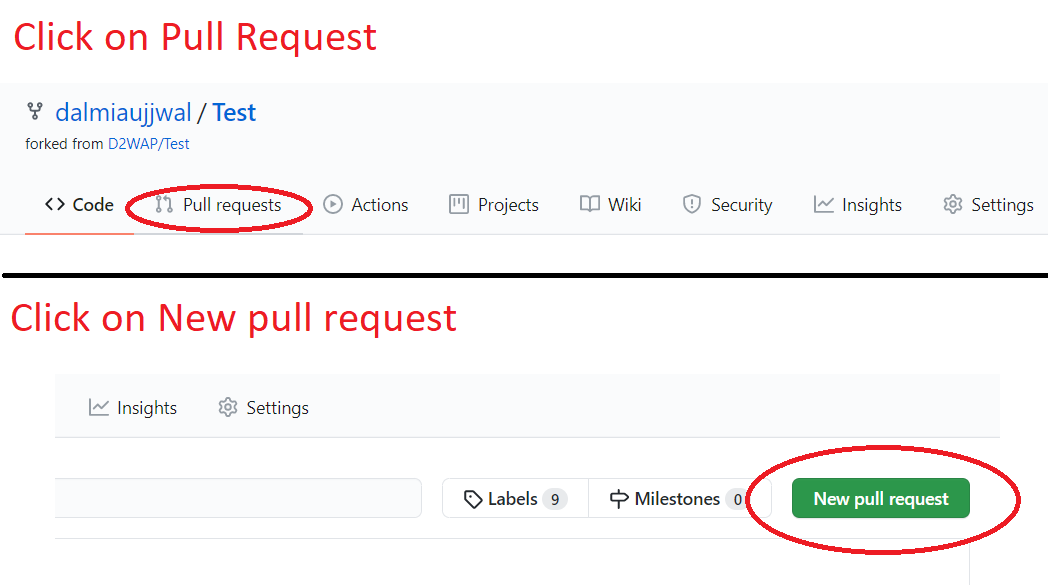
Create New Pull Request — Now that you have made necessary edits to the codes (read me file in our case), it is time to create a pull request. Click on “Pull request” option and go to the pull request screen. On the top right of the screen click on “New pull request”.
创建新的请求—现在,您已经对代码进行了必要的编辑( 在本例中为read me文件 ),现在该创建请求了。 单击“请求请求”选项,然后转到请求请求屏幕。 在屏幕的右上方,单击“ 新建请求”。
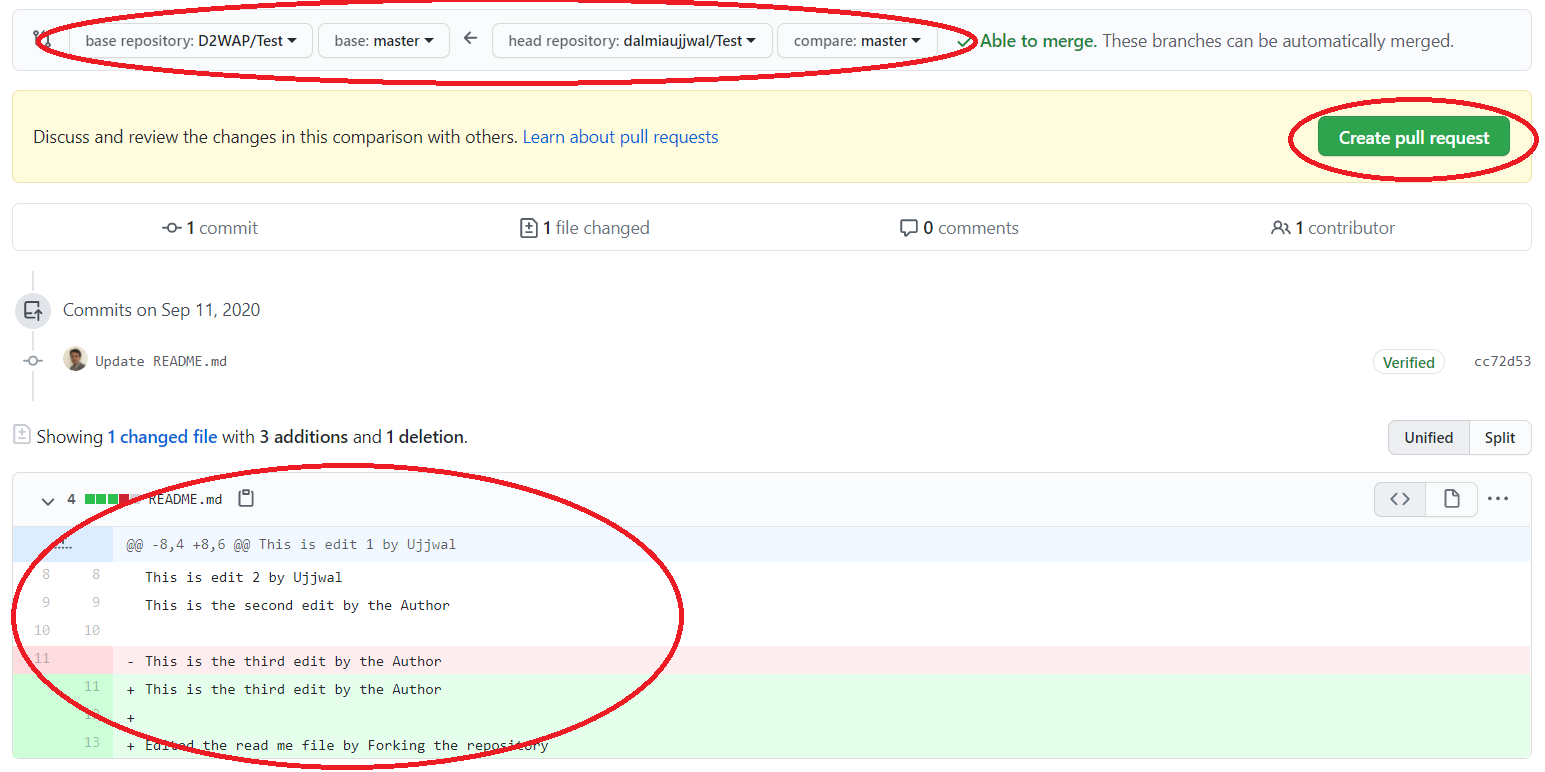
Select base and head repository — Once you click on “New pull request”, you will reach a page where you can select the base and head repository along with corresponding branches. Think of base as the destination repository and head as your forked repository. Since we have made the edits directly to the “master” branch of the forked repository, for both head and base branches select “master”. Once the selections are made, GitHub will show you the comparison between the 2 versions you are trying to merge. Again, click on “Create pull request”.
选择基础存储库和头存储库 —单击“ 新建提取请求 ”后,您将进入一个页面,您可以在其中选择基础存储库和头存储库以及相应的分支 。 将base作为目标存储库,并将其作为您的派生存储库。 由于我们已经直接对派生存储库的“ master ”分支进行了编辑,因此对于head分支和base分支都选择“ master” 。 做出选择后,GitHub将向您显示您要合并的两个版本之间的比较 。 再次单击“ 创建请求请求” 。
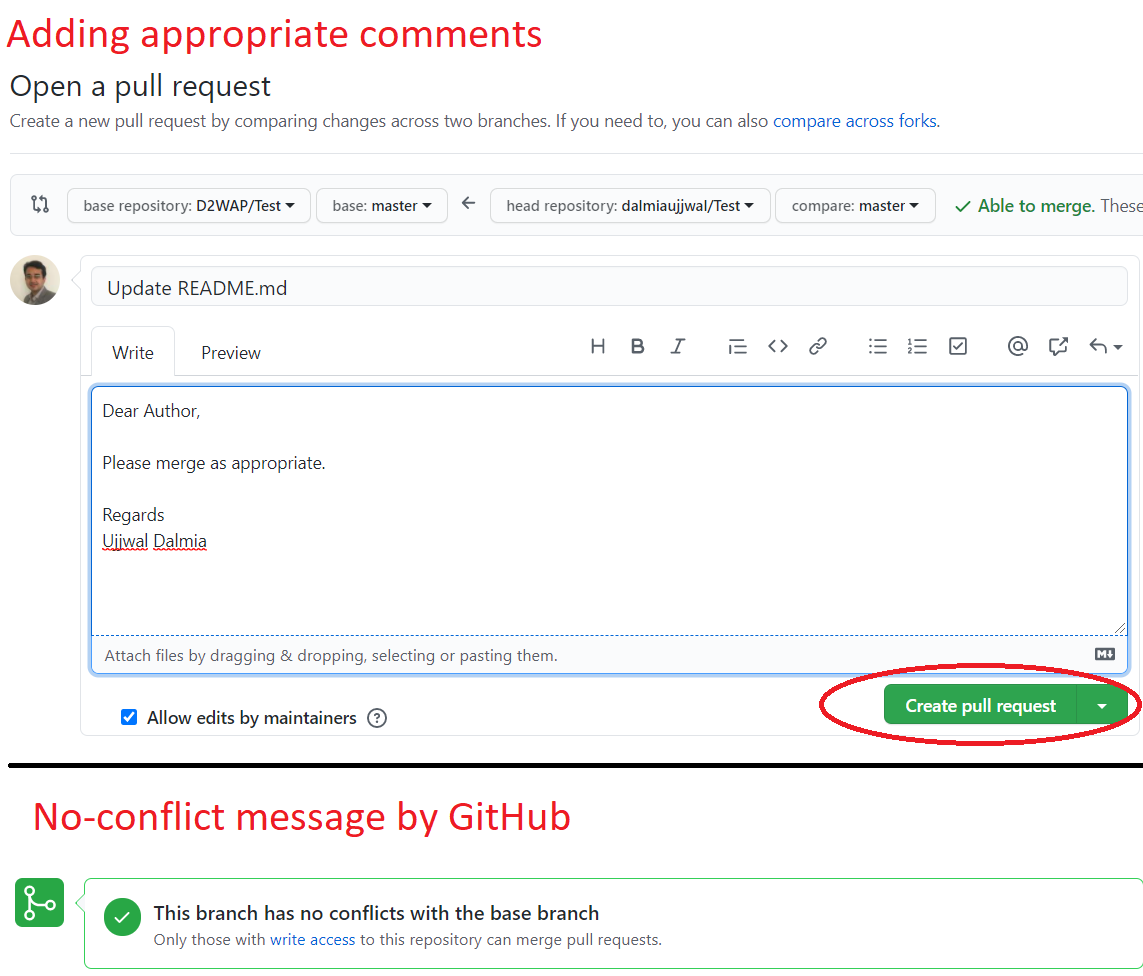
Add Comments — Once you have clicked on “Create pull request”, you will reach the comments page where you can add appropriate comments for the source repository developer. Once again click on “Create pull request” and your pull request will be sent to the source developer. Notice the message from GitHub saying there are no conflicts. This validates our assumption that there were no edits made in the source after we have forked the repository.
添加评论 —单击“ 创建请求请求 ”后,您将进入评论页面 ,您可以在其中为源存储库开发人员添加适当的评论 。 再次单击“创建请求请求” ,您的请求请求将发送给源开发人员。 注意来自GitHub的消息,说没有冲突 。 这证实了我们的假设,即我们在分叉存储库之后没有在源中进行任何编辑。
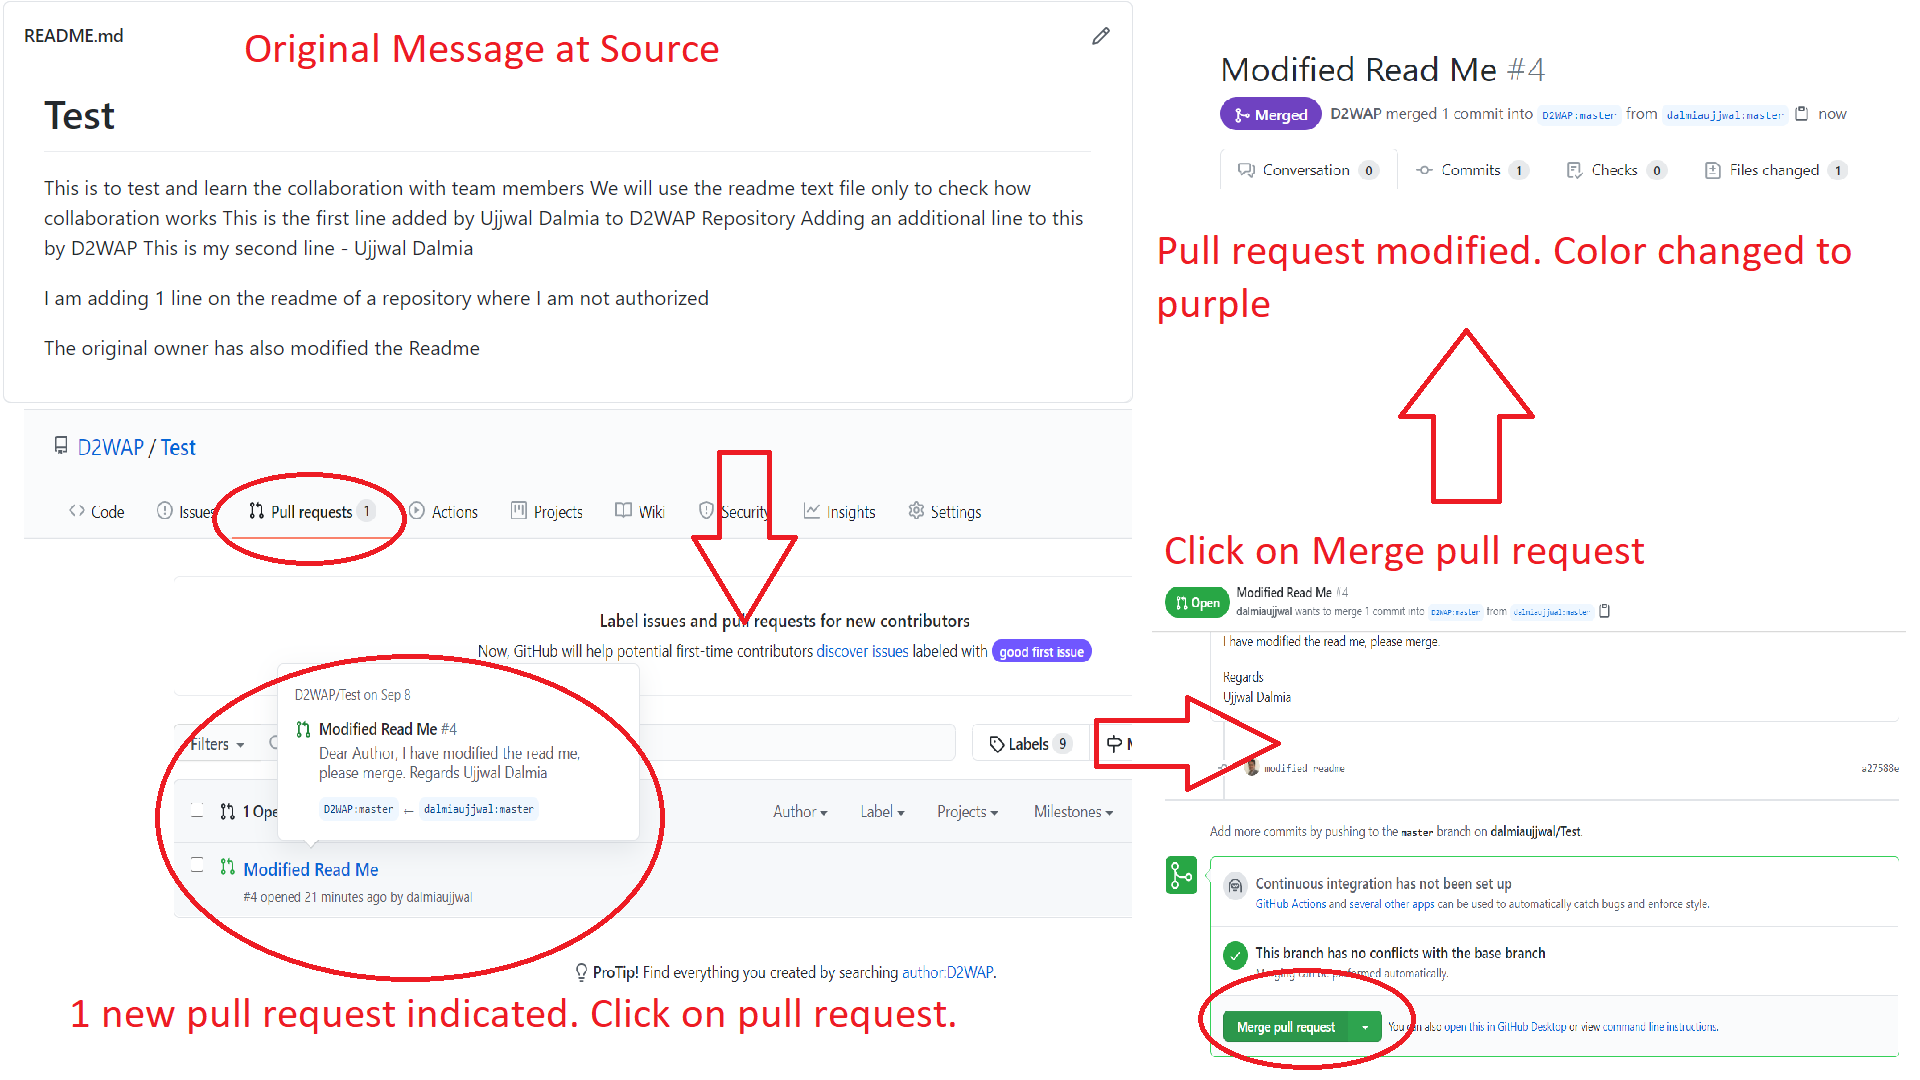
Merge by Author — Once you have submitted the pull request, the author receives it, and given there are no conflicts, he/she can approve it straight away. To merge, the author will go to the pull request tab and click on “Merge pull request”. That’s it, you have successfully contributed to the source repository
按作者合并 -提交拉取请求后,作者将收到请求,并且在没有冲突的情况下,他/她可以立即批准。 要合并,作者将转到拉取请求选项卡,然后单击“ 合并拉取请求” 。 就是这样,您已经成功地为源存储库做出了贡献
方案2-您是贡献者 (Scenario 2 — You are a contributor)
Since in this scenario we are assuming that you are added as a contributor by the repository owner, you will have the access rights to push the edits directly on to the source repository. With this assumption, let’s go through the workflow:
由于在这种情况下,我们假设您是由存储库所有者添加为贡献者的,因此您将具有将编辑直接推到源存储库的访问权限。 基于此假设,让我们来看一下工作流程:
Clone — Since you can now directly push the edits on to the main repository, there is no need for a fork. Go ahead and clone the repository. The process for this is explained in the last tutorial
克隆 -由于您现在可以直接将编辑推送到主存储库,因此无需fork 。 继续克隆存储库。 在上一个教程中对此过程进行了说明
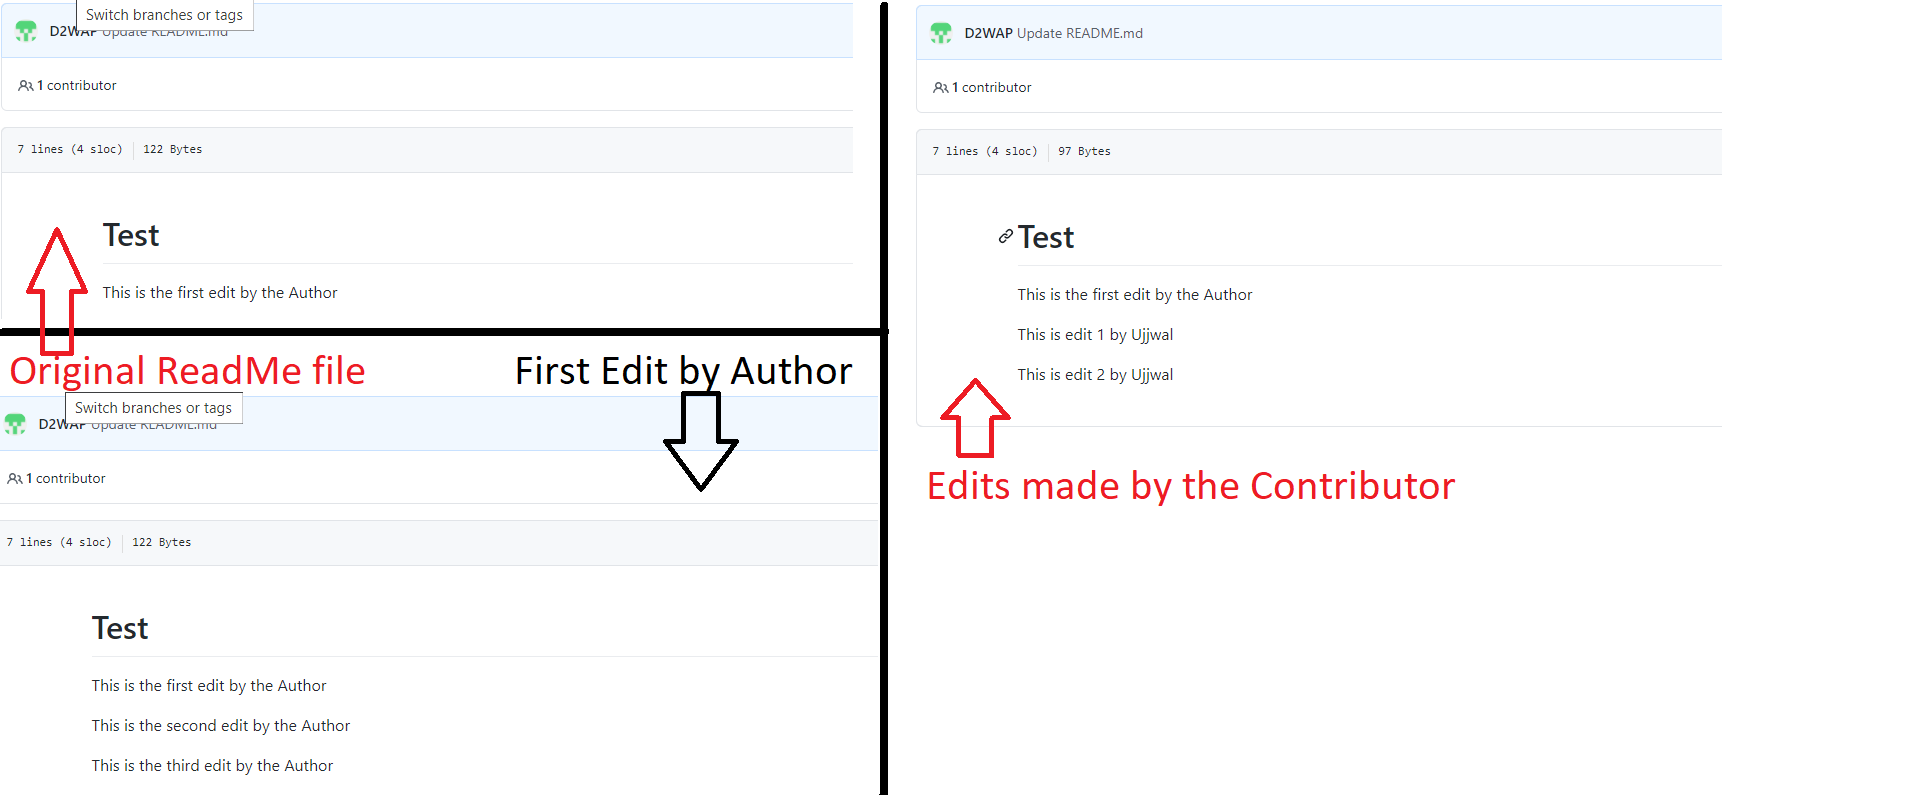
The source file is edited — Refer to the screenshots below to see the edits made to both the source file and the branched file. For demonstration purposes, we are modifying the read me file.
已编辑源文件 —请参考下面的屏幕快照,以查看对源文件和分支文件所做的编辑。 出于演示目的,我们正在修改自述文件 。
Drag & Drop— Assuming that you have made necessary edits, you can go to the original repository page on GitHub and drag & drop the edited file on the page. Screenshot added for your reference:
拖放 —假设您已进行了必要的编辑,则可以转到GitHub上的原始存储库页面,并将已编辑的文件拖放到该页面上。 屏幕截图已添加,供您参考:

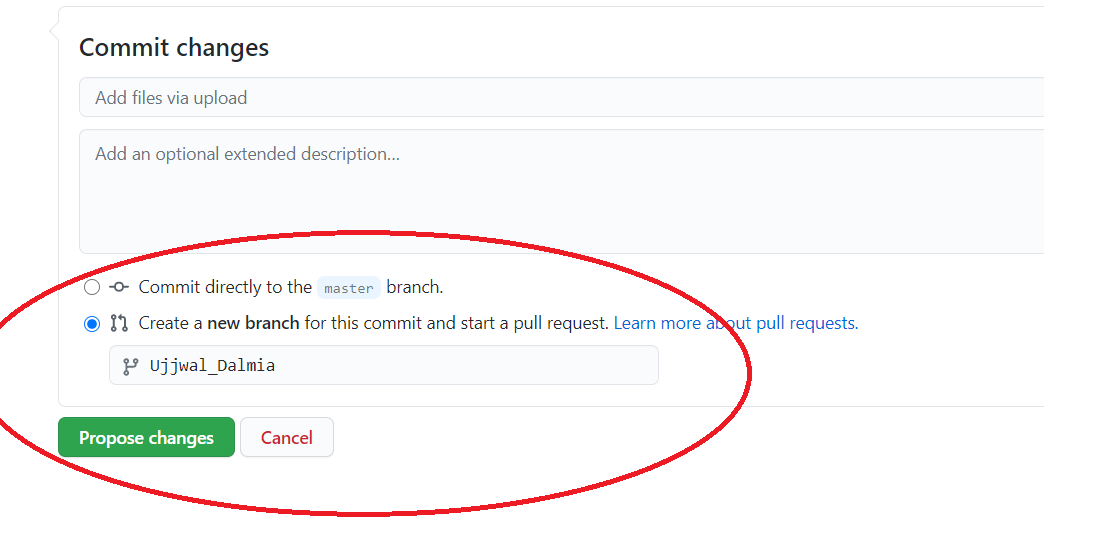
Create a new Branch — Once you have dropped the edited file on the repository page, you will get options to either directly edit the “master” branch or to create a new branch. In this scenario, we will go with the recommended approach of creating a new branch. When the corresponding radio button will be selected, GitHub will ask you to name the branch. Once named, click on “Propose changes”. Every time you want to backup or version control your work, you can do this step. Just make sure that if you are continuing to version control the edits before generating a pull request (explained in the next step), you are doing it on the same branch. The screenshots are added below for your reference:
创建新分支 -将已编辑的文件拖放到存储库页面后,您将获得直接编辑“ master ”分支或创建新分支的选项。 在这种情况下,我们将采用推荐的创建新分支的方法。 选择相应的单选按钮后,GitHub将要求您命名分支。 命名后,单击“ 提议更改 ”。 每当您要备份或控制版本时,都可以执行此步骤。 只要确保在生成拉取请求之前(如果在下一步中进行了说明),如果继续对版本进行控制,便是在同一分支上进行。 屏幕截图添加在下面,供您参考:
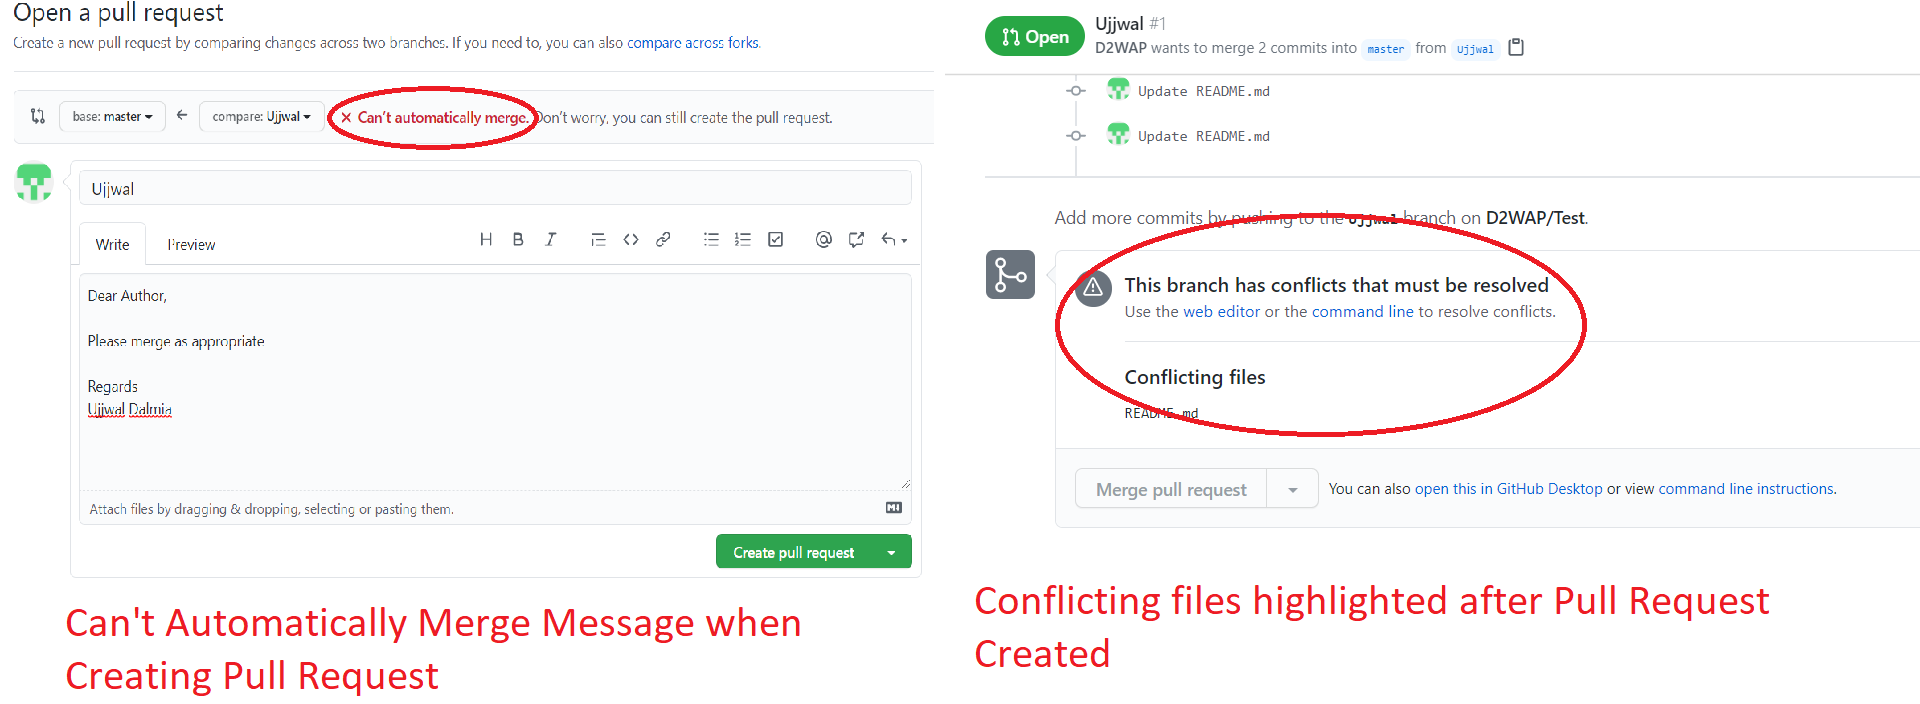
Create New Pull Request — Once you will propose the changes, you can create a pull request just the way it was explained in scenario 1. Note that, since we have made the edit directly to the source repository, you are not required to select the base and head repositories but only the branches to be merged. Also, since the 2 branches have been edited in parallel while merging a conflict is raised by GitHub. Screenshots added for your reference:
创建新的拉取请求 —提出更改后,就可以按照场景1中的说明创建拉取请求。请注意,由于我们直接对源存储库进行了编辑,因此不需要选择基本和头存储库,但只有要合并的分支。 另外,由于合并时已并行编辑了两个分支,因此GitHub引发了这一问题。 添加了屏幕截图供您参考:
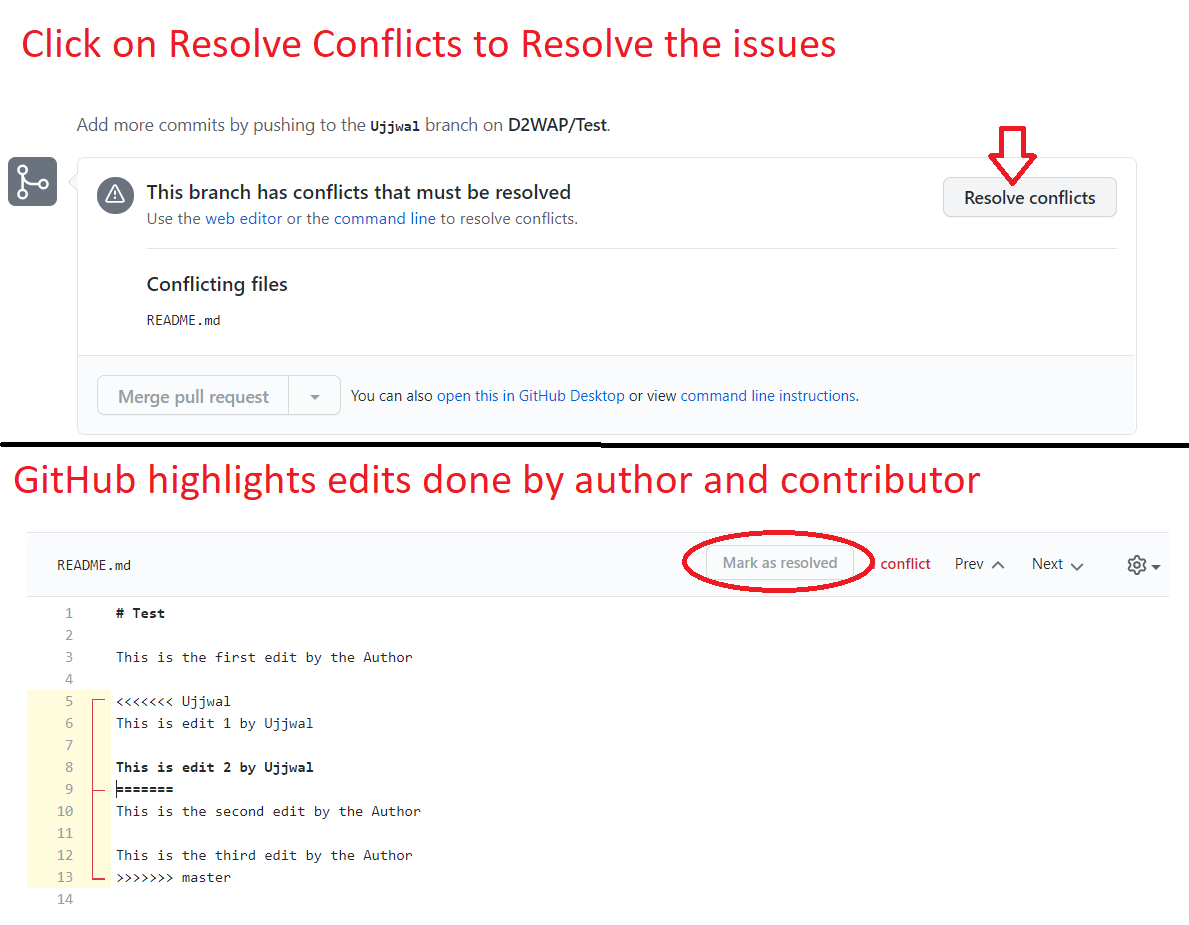
Resolving Conflicts — This is where the repository owner and the branch collaborator can get into a discussion and together resolve the conflict. On GitHub, this can be done by clicking on “Resolve conflict” and can be initiated by both the repository owner or the branch owner. In the screenshot below, notice the edits which are leading to conflicts. Which edit to keep and which to reject can be resolved by a mutual discussion. Once edits are finalized, click on “Mark as resolved” on the top right corner of the screen. Screenshot added for reference:
解决冲突 -存储库所有者和分支协作者可以在这里进行讨论并共同解决冲突。 在GitHub上,这可以通过单击“ 解决冲突 ”来完成,并且可以由存储库所有者或分支所有者来启动。 在下面的屏幕截图中,请注意导致冲突的编辑。 保留哪些编辑和拒绝哪些编辑可以通过相互讨论解决。 完成编辑后,单击屏幕右上角的“标记为已解决” 。 屏幕截图已添加以供参考:
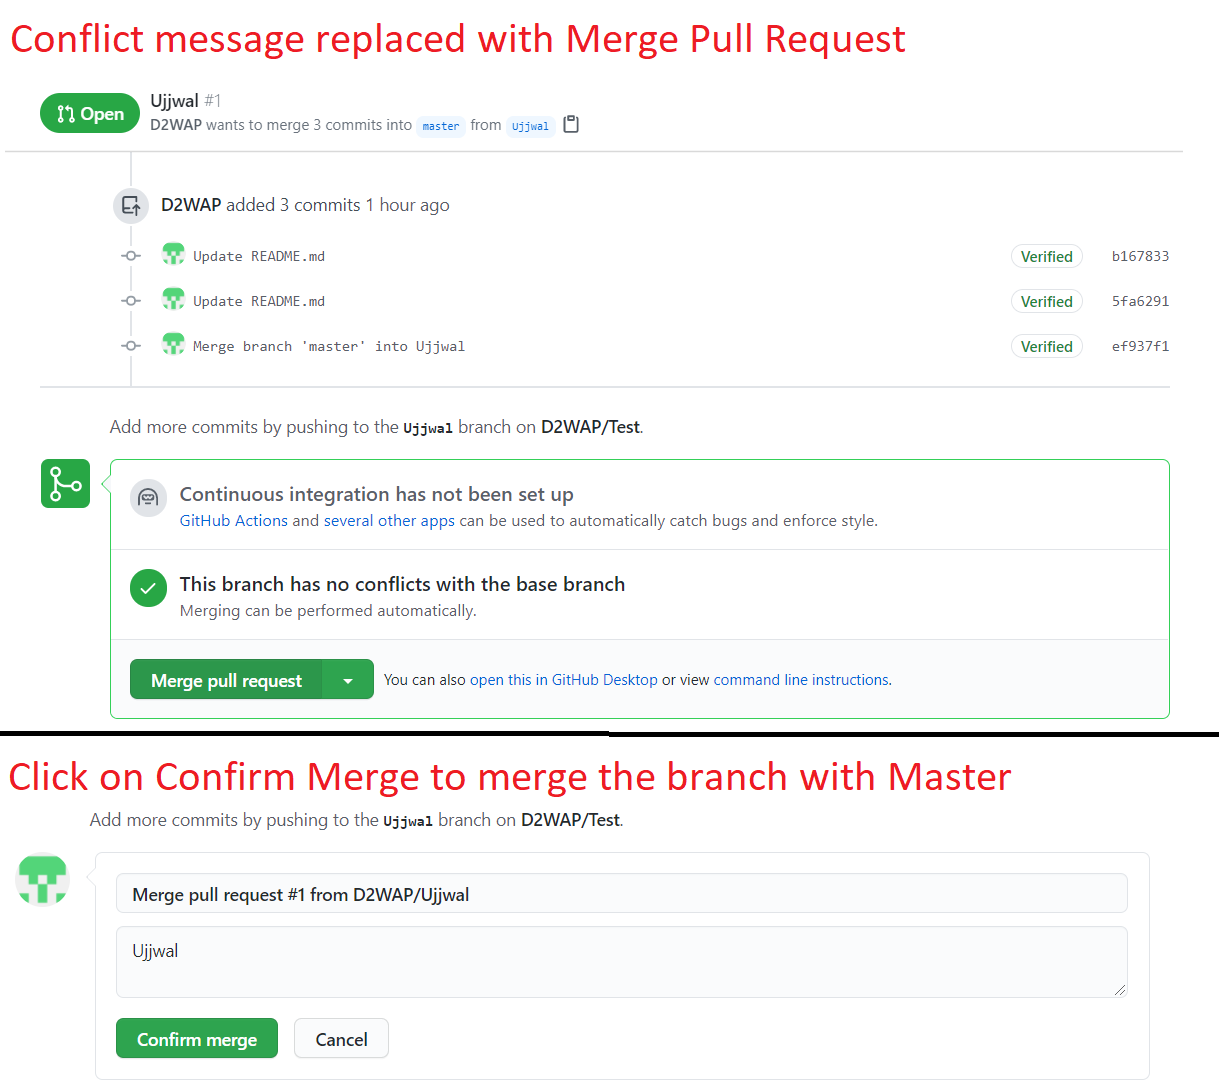
Merge Pull Request — Once the conflicts are resolved, you will reach the Pull request screen with the Conflicts message is replaced with the Merge Pull Request. Click on “Merge pull request” and then click on “Confirm merge” along with any message if you want to document. That’s it, your edits are merged with the “master” branch. Screenshots added for your reference:
合并拉取请求 -解决冲突后,您将进入“拉取请求”屏幕,其中“冲突”消息被“合并拉取请求”替换。 单击“ 合并拉取请求” ,然后单击“ 确认合并 ”以及任何要记录的消息。 就是这样,您的编辑将与“ master ”分支合并。 添加了屏幕截图供您参考:
Rechecking the “master” branch — Once merged, you will see the “master” branch is updated with the edits from the branch.
重新检查“ master”分支 -合并后,您将看到“ master ”分支已使用该分支中的编辑进行了更新。
结束语 (Closing note)
There are a lot of other functionalities associated with git & GitHub but those are for some other day.
git和GitHub还有许多其他功能,但这些功能将在以后使用。
Equipped with this knowledge, collaborate with your project teams, and leave the worry of version control to GitHub. Hope this tutorial was helpful and you learned something new.
具备了这些知识之后,就可以与您的项目团队合作,并将版本控制的烦恼交给GitHub。 希望本教程对您有所帮助,并且您学到了一些新知识。
Will try and bring more interesting topics in future tutorials.
将尝试在以后的教程中带来更多有趣的主题。
HAPPY LEARNING !!!
快乐学习!
翻译自: https://medium.com/@Ujjwal_Dalmia/collaborating-on-github-68f8dd953bb8
github合作


 1万+
1万+

 被折叠的 条评论
为什么被折叠?
被折叠的 条评论
为什么被折叠?
 到【灌水乐园】发言


