aws lambda
Few years ago, I bought into the Smart Home craze and ventured down Amazon’s Echo path. Now with numerous smart devices scattered around the house (and car), I’ve a need for few “skills” to further streamline the automation.
几年前,我买入了智能家居热潮,并沿着亚马逊的Echo路径冒险。 现在,在房屋(和汽车)周围散布着众多智能设备,我需要一些“技能”来进一步简化自动化。
Note: It is assumed that you have some level of familiarity with AWS technologies and terminologies as well as a good understanding of Java and Maven.
注意:假定您对AWS技术和术语有一定程度的了解,并且对Java和Maven有很好的了解。
Before venturing down the “build my own skill” (using AWS Lambda) path, I wanted to set the ground work in place. In doing so, I came across a challenge that took more effort than I liked, to overcome.
在尝试“建立自己的技能” (使用AWS Lambda)之路之前,我想做好基础工作。 在这样做时,我遇到了一个挑战,需要克服比我更喜欢的努力来克服它。
As the title says, it’s about how to share Java code using Lambda Layers in an automated fashion. Simply, when I commit common code into the repository, it should be available as a Lambda Layer after a few minutes. Then, in whichever Lambda Function that I need to use the common code, all I want to do is point it to the Lambda Layer (version) and commit that change into the repository. Similar to the Lambda Layer, the Lambda Function should be available to handle requests after a few minutes.
如标题所示,它是关于如何使用Lambda Layers以自动方式共享Java代码的。 简而言之,当我将通用代码提交到存储库中后,几分钟后它应该可以作为Lambda层使用。 然后,无论我需要使用通用代码的任何Lambda函数,我要做的就是将其指向Lambda层(版本)并将更改提交到存储库中。 与Lambda层类似,Lambda函数应可在几分钟后用于处理请求。
Only time I want to touch the AWS console is to check where things are and their corresponding statuses or errors.
我想触摸AWS控制台的唯一时间是检查事物的位置及其对应的状态或错误。
In the industry, this approach is called CI/CD. However, the tricky part is not the CI/CD but rather how the Java code is structured to provide the expected outcome, i.e. Automated way (through CI/CD) to share Java code.
在业界,这种方法称为CI / CD。 但是,棘手的部分不是CI / CD,而是Java代码的结构如何提供预期的结果, 即 (通过CI / CD)共享Java代码的自动方式。
动机 (Motivation)
When I started on this exercise, most of the resources I came across in the wild world of internet were describing how to do using the AWS Console or having additional manual steps in between or even using sam build (refer Extras below). Hence the reason, I ventured into finding an automated approach. Though in this example I've used scripts quite a bit, it is to perform cloudformation deploy of stacks with relevant parameter values. Which if you are familiar, is ideally done once or very infrequently in comparision to writing implementation Java code (which gets delivered automatically by CI/CD).
当我开始本练习时,我在互联网的狂野世界中遇到的大多数资源都在描述如何使用AWS控制台或在两者之间甚至使用sam build进行其他手动操作(请参阅下面的其他内容 )。 因此,我冒险寻找一种自动化的方法。 尽管在此示例中,我已经使用了很多脚本,但是它是使用相关参数值执行堆栈的cloudformation deploy 。 如果您很熟悉,那么与编写实现Java代码(由CI / CD自动提供)相比,理想情况下,一次或很少执行一次。
入门 (Getting Started)
The full source of this example is available in my GitHub repo p13i-eg-jl
该示例的完整资源可在我的GitHub存储库p13i-eg-jl中找到。
So, what do you need to get started?
那么,您需要什么入门呢?
A GitHub account — you can use any Git repository, but I’ve used GitHub because with private repos and Packages offering, it doubles as both the code repo as well as the artefact repo.
一个GitHub帐户-您可以使用任何Git存储库,但是我使用GitHub是因为有了私有仓库和Packages产品,它既可以作为代码仓库又可以作为人工仓库。
- Create a private repo named mvn-repo — this is the placeholder repo that will act as your Packages repository. You can change this later. 创建一个名为mvn-repo的私有存储库-这是一个占位符存储库,它将用作您的Packages存储库。 您可以稍后更改。
- Create a GitHub token having the following permissions 创建具有以下权限的GitHub令牌
repo:* (all) to be able to manage code
回购: *(全部)能够管理代码
write:packages, read:packages and delete:packages to be able to manage Packages
write:packages , read:packages和delete:packages以便能够管理Packages
admin:repo_hook to be able to create and delete web hooks from AWS (refer Extras below)
admin:repo_hook能够从AWS创建和删除Web挂钩(请参阅下面的其他内容 )
An AWS Account — obviously
一个AWS账户—显然
Create a Secret in AWS Secrets Manager as shown here, where the
secret-stringis{"username":"<github-username>","token":"<token-generated-above>"}. Make sure that the Secret is created in the region where you would be setting up the stack (using your local setup mentioned below)创建如图所示的秘密在AWS秘密管理这里 ,其中所述
secret-string是{"username":"<github-username>","token":"<token-generated-above>"}确保在要设置堆栈的区域中创建了Secret(使用下面提到的本地设置)
A comprehensive development environment — may it be local or virtual, as long as it has all the tooling like your git set up to push code, AWS CLI set up with appropriate IAM user, Java, Maven, an IDE, etc.
一个全面的开发环境-可以是本地的也可以是虚拟的,只要它具有所有工具(如设置git来推送代码,使用适当的IAM用户,Java,Maven,IDE等设置了AWS CLI)即可。
TL; DR (TL;DR)
Some of us just want to get to the action and then learn of how we got there. In the interest of such spirited souls, here are the steps of the shortest possible path to the end state, i.e. having a Lambda Function using Lambda Layer.
我们中有些人只是想采取行动,然后了解我们如何实现目标。 为了这些精明的灵魂,这是到最终状态的最短路径的步骤, 即使用Lambda层具有Lambda函数。
Clone the above repositories using
git clone --recurse-submodules https://github.com/rajivmb/p13i-eg-jl.git. To make it easier for this example, I've used git submodules to combine both the Lambda Layer and Lambda Function into a single repo. Hence the need for--recurse-submodulesin the clone command.使用
git clone --recurse-submodules https://github.com/rajivmb/p13i-eg-jl.git上述存储库。 为了使本示例更容易,我使用了git子模块将Lambda层和Lambda函数都组合到单个存储库中。 因此,在clone命令中需要--recurse-submodules。Change into the checked out directory
cd p13i-eg-jl.转到检出目录
cd p13i-eg-jl。Execute the setup script
./setup.shand follow the prompts. You will have to pass in your git repo and AWS Secret created in the Getting Started above, since the defaults are that of mine.执行安装脚本
./setup.sh并按照提示进行操作。 您将必须传入git repo和上面的入门中创建的AWS Secret,因为默认设置是我的默认设置。- Wait for the setup process to complete. It should roughly take about 15 minutes to complete. 等待安装过程完成。 完成大约需要15分钟。
Now you have a Lambda Function written in Java sharing common code using Lambda Layer, all delivered via CI/CD automatically.
现在,您已经有了用Java编写的Lambda函数,该函数使用Lambda层共享通用代码,所有这些都通过CI / CD自动提供。
You should see a similar output to the following from the setup process
您应该在安装过程中看到与以下类似的输出
$ ./setup.sh
Setting up Lambda Layer
***********************
Initialising...
DIR is p13i-eg-jpll
Commencing setup...
Enter component name [P13i-Eg-JPLL] or press <Enter> to accept default, you have 30s:
Enter your Secret name of GitHub token stored in AWS Secrets Manager [P13iAWSGitHubTokenSecret], you have 30s:
Enter your GitHub Packages (repo) URL to use as private Maven repo [https://maven.pkg.github.com/rajivmb/p13i-mvn-repo], you have 30s:
Starting to setup P13i-Eg-JPLL
Deploying stack of P13i-Eg-JPLL
Waiting for changeset to be created..
Waiting for stack create/update to complete
Successfully created/updated stack - P13i-Eg-JPLL
Deploying Lambda Layer via Pipeline: P13i-Eg-JPLL-Pipeline-<suffix>
Pipeline status is: InProgress. Waiting... | [ 04m 15s ]
Pipeline status is: Succeeded
Completed setup of P13i-Eg-JPLL
Lambda Layer setup completed in           [ 08m 22s ]
Setting up Lambda Function
**************************
Initialising...
DIR is p13i-eg-jglf
Commencing setup...
Enter component name [P13i-Eg-JGLF] or press <Enter> to accept default, you have 30s:
Enter your Secret name of GitHub token stored in AWS Secrets Manager [P13iAWSGitHubTokenSecret], you have 30s:
Enter your GitHub Packages (repo) URL to use as private Maven repo [https://maven.pkg.github.com/rajivmb/p13i-mvn-repo], you have 30s:
Fetching resource P13iMITEgJavaParentLambdaLayerArn from P13i-Eg-JPLL-DEPLOY outputs
Fetching latest version of Lambda Layer: arn:aws:lambda:ap-southeast-2:<AWS::AccountId>:layer:P13i-Eg-JPLL-Layer.
Latest version of Lambda Layer: arn:aws:lambda:ap-southeast-2:<AWS::AccountId>:layer:P13i-Eg-JPLL-Layer. is 3
Starting to setup P13i-Eg-JGLF
Deploying stack of P13i-Eg-JGLF
Waiting for changeset to be created..
Waiting for stack create/update to complete
Successfully created/updated stack - P13i-Eg-JGLF
Deploying Lambda Function via Pipeline: P13i-Eg-JGLF-Pipeline-<suffix>
Pipeline status is: InProgress. Waiting... \ [ 03m 30s ]
Pipeline status is: Succeeded
Completed setup of P13i-Eg-JGLF
./setup.sh: line 17: up.sh: command not found
Lambda Function setup completed in        [ 07m 21s ]
Invoking Lambda Function
************************
DIR is p13i-eg-jglf
Enter component name [P13i-Eg-JGLF] or press <Enter> to accept default, you have 30s:
Enter greeting name [github.com/rajivmb], you have 30s:
{
    "ExecutedVersion": "$LATEST",
    "StatusCode": 200
}
"Hello github.com/rajivmb, greetings from Java Lambda Function using Lambda Layer"
Lambda Layer setup completed in           [ 08m 22s ]
Lambda Function setup completed in        [ 07m 21s ]
Setup completed in                        [ 16m 49s ]
Note: If you executed the TL;DR version multiple time (for whatever reasons) and changed your private GitHub repository that you are using as your private Maven repository between each execution, then you will encounter the following build failure during the deploy goal of p13i-eg-jpll project.
注意:如果多次执行TL; DR版本(无论出于何种原因),并且在每次执行之间更改了用作私有Maven存储库的私有GitHub存储库,那么在p13i-eg-jpll的deploy目标期间将遇到以下构建失败p13i-eg-jpll项目。
[ERROR] Failed to execute goal org.apache.maven.plugins:maven-deploy-plugin:2.7:deploy (default-deploy) on project p13i-java-parent-example: Failed to deploy artifacts: Could not transfer artifact com.p13i.mit.aws.example:p13i-java-parent-example:jar:1.0.0-20200913.122552-1 from/to internal.repo (https://maven.pkg.github.com/***/mvn-repo): Transfer failed for https://maven.pkg.github.com/***/mvn-repo/com/p13i/mit/aws/example/p13i-java-parent-example/1.0.0-SNAPSHOT/p13i-java-parent-example-1.0.0-20200913.122552-1.jar 422 Unprocessable Entity -> [Help 1]The key thing to note here is error code, i.e. 422 Unprocessable Entity. You get this error, because you probably still have the same artefact stored in the repository that you had used in previous executions as opposed to the one you are using in the current execution. Once you delete the artefact from the old repository or use that same repository, then you would not encounter this error.
这里要注意的关键是错误代码, 即 422 Unprocessable Entity 。 之所以会出现此错误,是因为您可能仍在存储库中存储了与先前执行中所用的工件相同的工件,而不是与当前执行中所使用的工件相同。 从旧存储库中删除工件或使用该存储库后,您将不会遇到此错误。
层项目解释 (The Layer Project Explained)
Layer project is in the subdirectory p13i-eg-jpll. Alternately you can clone the repo p13i-eg-jpll
图层项目位于子目录 p13i-eg-jpll 。 或者,您可以克隆存储库 p13i-eg-jpll
The key focus of this post is about how to set up the Java project correctly to function as a Lambda Layer. Before getting into that, lets first establish what “common code” we intend to share. There are two flavors of code that are sharable;
这篇文章的重点是关于如何正确设置Java项目以充当Lambda层。 在开始讨论之前,让我们先建立我们打算共享的“通用代码”。 有两种可共享的代码。
Dependencies — these are the artefacts we reference in the
<dependencies>section of the POM依赖关系-这些是我们在POM的
<dependencies>部分中引用的伪像- Java code that we write — like utility classes, model classes, etc. 我们编写的Java代码-例如实用程序类,模型类等。
In essence, #2 is actually #1. Because, when you have some code that you want to share between your Java implementations, you create an artefact of it and then add it as a dependency on the implementations where you want to use it.
本质上,#2实际上是#1。 因为,当您要在Java实现之间共享某些代码时,您会创建一个工件,然后将其添加为对要使用它的实现的依赖。
So, the approach here is the same. Declare everything as a dependency, so that they are packaged as articulated in AWS documentation, where for Java, the shared code is expected to be placed in the java/lib directory.
因此,这里的方法是相同的。 将所有内容声明为依赖项,以便将它们按照AWS文档中的说明进行打包,对于Java,希望将共享代码放置在java/lib目录中。
项目结构 (Project Structure)
The project is a multi-module Maven project comprising of the following modules
该项目是一个包含以下模块的多模块Maven项目
Source — this is the module where you will place all the dependencies along with your own Java classes. For example, I’ve place the
FunctionResourceBundleclass in here.源代码 —这是一个模块,您将在其中放置所有依赖项以及自己的Java类。 例如,我将
FunctionResourceBundle类放在这里。LambdaLayer — this module is purely for Lambda Layer packaging purposes only. This will have a dependency on the artefact generated by the Source module above.
LambdaLayer-此模块仅用于Lambda层包装。 这将取决于上面的源模块生成的伪像。
项目包装 (Project Packaging)
If you inspect the three POM files i.e. pom.xml, Source/pom.xml and LambdaLayer/pom.xml you will notice that both pom.xml and LambdaLayer/pom.xml have the property maven.deploy.skip set to true. This is because, the build process ( buildspec.yaml) performs the deploy goal. In doing so, we only want the Source artefact to be uploaded to our internal repo (GitHub Packages), so that it can be shared by Java implementation with a provided scope (as you will see in the Lambda Function below)
如果检查三个POM文件, 即 pom.xml , Source/pom.xml和LambdaLayer/pom.xml您会注意到pom.xml和LambdaLayer/pom.xml都将属性maven.deploy.skip设置为true 。 这是因为构建过程( buildspec.yaml )执行了deploy目标。 为此,我们仅希望将源工件上传到我们的内部存储库(GitHub软件包)中,以便可以通过Java实现在provided范围内共享(如您在下面的Lambda函数中所见)
The LambdaLayer/pom.xml only has a single dependency, i.e. the Source artefact, since this module is what will be built to satisfy Lambda Layer packaging requirements by the build process and subsequently deployed by the pipeline. The Shade plugin is configured as follows, to match the Lambda Layer packaging requirements mentioned earlier.
LambdaLayer/pom.xml仅具有单个依赖关系, 即 源 LambdaLayer/pom.xml ,因为将通过构建过程构建此模块来满足Lambda层包装要求,然后由管道进行部署。 Shade插件的配置如下,以符合前面提到的Lambda层包装要求。
<plugin>
    <groupId>org.apache.maven.plugins</groupId>
    <artifactId>maven-dependency-plugin</artifactId>
    <version>3.1.1</version>
    <executions>
        <execution>
            <id>copy-dependencies</id>
            <phase>prepare-package</phase>
            <goals>
                <goal>copy-dependencies</goal>
            </goals>
            <configuration>
                <outputDirectory>
                    ${project.build.directory}/classes/java/lib
                </outputDirectory>
                <includeScope>runtime</includeScope>
            </configuration>
        </execution>
    </executions>
</plugin>
Here prepare-package phase performs the copy-dependencies goal that copies over all of the dependeny jars into the java/lib directory in the classpath.
在这里, prepare-package阶段执行copy-dependencies目标,该目标将所有依赖项jar复制到类路径中的java/lib目录中。
At the end of a successful deployment, you should see something similar to the following in your AWS Console.
成功部署结束后,您应该在AWS控制台中看到类似于以下内容的内容。

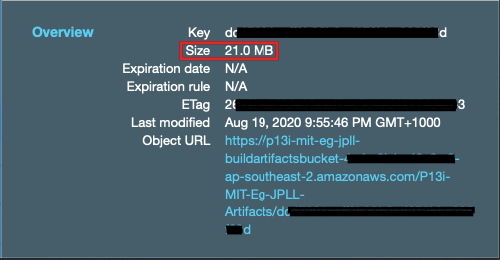
Take note of the file size. The packaged Lambda Layer artefact is 21.0 MB. We will compare this with that of the Lambda Function below.
注意文件大小。 打包的Lambda层制品为21.0 MB 。 我们将其与下面的Lambda函数进行比较。
功能项目说明 (The Function Project Explained)
Function project is in the subdirectory p13i-eg-jglf. Alternately you can clone the repo p13i-eg-jglf
功能项目位于子目录 p13i-eg-jglf 。 您也可以克隆回购 p13i-eg-jglf
This is a normal Lambda Function implementation, nothing fancy here except how the dependency is managed. If you inspect the pom.xml file you will see the dependency on the parent artefact declared as follows.
这是一个正常的Lambda Function实现,在这里没有什么特别的,除了如何管理依赖项。 如果检查pom.xml文件,您将看到对声明为父构件的依赖关系,如下所示。
<dependency>
    <groupId>com.p13i.mit.aws.example</groupId>
    <artifactId>p13i-java-parent-example</artifactId>
    <version>1.0.0-SNAPSHOT</version>
    <scope>provided</scope>
</dependency>
Key thing to note here is the <scope> having the value provided. This tells Maven not to package this dependency in to the build artefact because it will be provided at run time. Refer Introduction to the Dependency Mechanism in Maven documentation. Also note that the dependency is on the Source artifact, not on LambdaLayer. Because in a conventional Maven Java project, you would not care about the bespoke packaging requirements enforced by the runtime, i.e. AWS Lambda in this case.
这里要注意的关键是<scope>具有provided的值。 这告诉Maven 不要将此依赖项打包到构建工件中,因为它将在运行时provided 。 请参阅Maven文档中的依赖机制简介 。 另请注意,该依赖关系取决于Source工件,而不是LambdaLayer 。 因为在常规的Maven Java项目中,您将不必在乎运行时所实施的定制打包要求, 即本例中的AWS Lambda。
功能实现 (Function Implementation)
The implementation is a simple “Hello World”. If a name parameter was passed then the greeting would be for the value of the parameter. The demonstrated point here is that, the greeting message is constructed using the FunctionResourceBundle class that we packaged in the Lambda Layer.
该实现是一个简单的“ Hello World”。 如果传递了name参数,则问候语将是该参数的值。 这里演示的要点是,问候消息是使用我们打包在Lambda层中的FunctionResourceBundle类构造的。
If you didn’t do the TL;DR approach above, you can deploy the Lambda Function by running the setup.sh script. Thereafter, you can invoke the Lambda Function by running the invoke.sh script. Assuming everything went to plan, you should see the following output (if you accepted the defaults). You should also see something similar to the image following the output in your AWS Console.
如果您没有执行上述TL; DR方法,则可以通过运行setup.sh脚本来部署Lambda函数。 之后,您可以通过运行invoke.sh脚本来调用Lambda函数。 假设一切都按计划进行,您应该看到以下输出(如果您接受默认值)。 您还应该在AWS控制台中的输出后看到类似于该图像的图像。
{
    "ExecutedVersion": "$LATEST",
    "StatusCode": 200
}
"Hello github.com/rajivmb, greetings from Java Lambda Function using Lambda Layer"
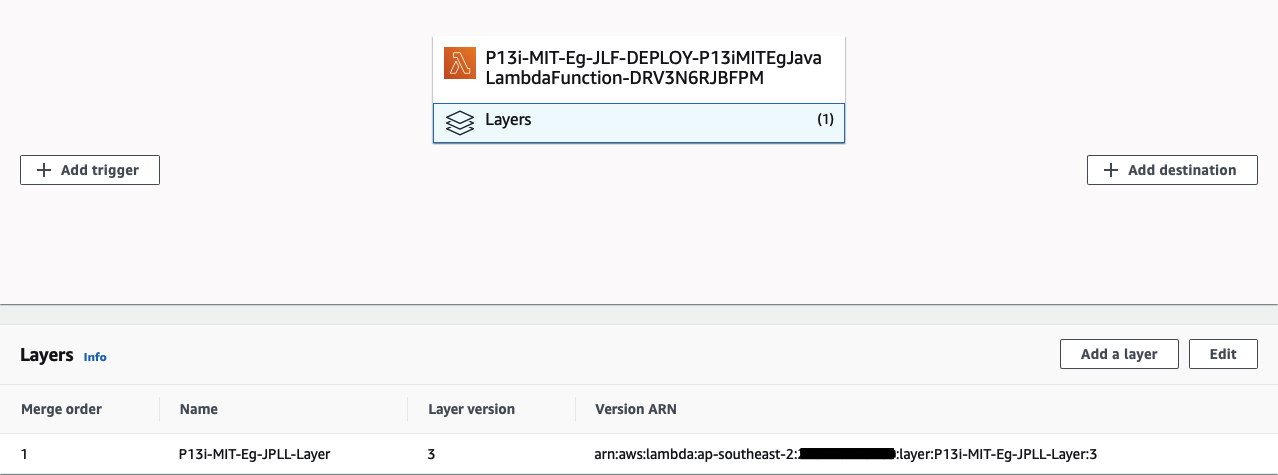
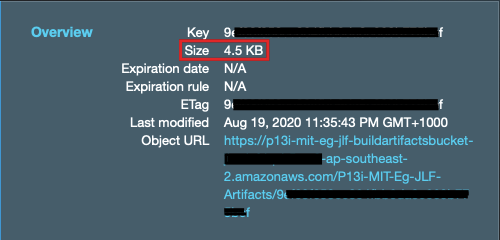
Take note of the file size yet again. The packaged Lambda Function artefact is just 4.5 KB as opposed to the Lambda Layer above, which is 21.0 MB. This is proof that the use of provided scope worked as expected in not packaging the dependency into the Function artefact.
再次注意文件大小。 打包的Lambda Function工件仅为4.5 KB ,而上述Lambda层为21.0 MB 。 这证明了在不将依赖项包装到功能工件中的情况下,使用provided范围可以按预期工作。
The fact that this Lambda Function is able to execute is yet another confirmation that the Lambda dependencies are all being provided to the Lambda Function by the Lambda Layer at run time and therefore we don’t have to individually package them into every Lambda Function.
该Lambda函数能够执行的事实再次证明了Lambda依赖项已在运行时由Lambda层提供给Lambda函数,因此我们不必将其分别打包到每个Lambda函数中。
附加功能 (Extras)
GitHub工作流程以清除和(重新)部署 (GitHub Workflow to purge and (re)deploy)
When using Maven 3, each SNAPSHOT version you deploy gets deployed as a new artifact, versioned with the timestamp. Refer Maven Deploy Plugin for more details. For ease of reference, here is the excerpt.
使用Maven 3时,您部署的每个SNAPSHOT版本都会作为新工件进行部署,并带有时间戳版本。 有关更多详细信息,请参考Maven Deploy插件 。 为了便于参考,以下是摘录。
Major Version Upgrade to version 3.0.0
主要版本升级到版本3.0.0
Please note that the following parameter has been completely removed from the plugin configuration:
请注意,以下参数已从插件配置中完全删除:
* uniqueVersion
* uniqueVersion
As of Maven 3, snapshot artifacts will always be deployed using a timestamped version.
从Maven 3开始,快照工件将始终使用带有时间戳的版本进行部署。
Unlike the purpose built Maven artefact repos like Nexus or Artifactory, GitHub Packages does not offer a centralised configuration to prune or limit the number of SNAPSHOT versions to retain. In order to optimise the storage utilisation, as a workaround a GitHub Workflow is placed in p13i-eg-jpll repo to purge and deploy (similar to what the buildspec.yaml does) once a week.
与Nexus或Artifactory等专用Maven人工仓库不同,GitHub Packages不提供集中化的配置来修剪或限制要保留的SNAPSHOT版本的数量。 为了优化存储利用率,作为一种解决方法,将GitHub工作流放置在p13i-eg-jpll库中,以每周进行一次清除和部署(类似于buildspec.yaml操作)。
Note: The workflow uses a separate token than the one that is available by default. As it states on Authenticating with the GITHUB_TOKEN, this token only has permissions to the repo where the workflow is. For ease of reference, here is the excerpt.
注意:工作流使用一个单独的令牌,而不是默认情况下可用的令牌。 正如它在使用GITHUB_TOKEN进行身份验证中所指出的那样 ,此令牌仅具有工作流所在的存储库的权限。 为了便于参考,以下是摘录。
The token’s permissions are limited to the repository that contains your workflow.
令牌的权限仅限于包含您的工作流程的存储库。
Because I’m using a separate repository as my internal Maven repo, a new token with relevant permissions had to be created to be used in the workflow.
因为我使用单独的存储库作为内部Maven存储库,所以必须创建具有相关权限的新令牌才能在工作流中使用。
使用cloudformation代替sam (Use of cloudformation instead of sam)
Though I started off using sam build and sam package, I switched to using mvn package/ mvn deploy and cloudformation deploy because the sam build didn't seems to honour the provided scope for dependencies. After performing sam build you can see all the dependencies in the build output directory as shown below.
尽管我开始使用sam build和sam package ,但由于使用sam build似乎不遵守所provided的依赖范围,因此我改用了mvn package / mvn deploy和cloudformation deploy 。 执行sam build您可以在构建输出目录中看到所有依赖项,如下所示。
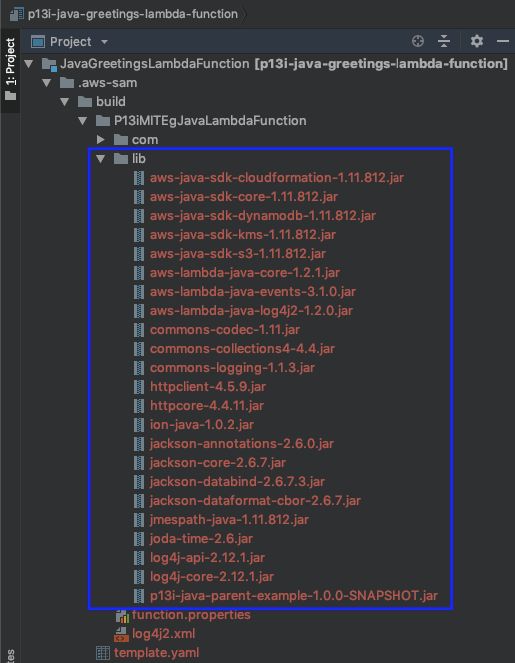
Similarly, after performing sam package you can see the size of the artifact is larger than it should be.
同样,执行sam package您可以看到工件的大小大于应有的大小。
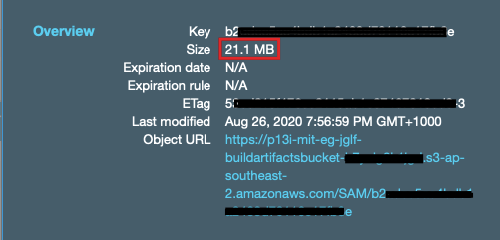
Therefore, you may get a false sense of using the Lambda Layer, while actually packaging your dependencies with your Lambda Function.
因此,在将依赖项与Lambda函数实际打包在一起时,您可能会误以为使用Lambda层。
ImportValue和外部化的Lambda Layer版本 (ImportValue and externalised Lambda Layer version)
If you inspect the package.yaml file in p13i-eg-jglf, you can see the use of Fn::ImportValue and the parameterised LambdaLayerVersion. I used this purely for demonstration purposes. You are better off specifying the Lambda Layer dependency in the Function's template file explicitly. It is a more scalable approach and you have flexibility to use more than one Layer without complicating your implementation.
如果检查p13i-eg-jglf的package.yaml文件, p13i-eg-jglf可以看到Fn::ImportValue和参数化的LambdaLayerVersion 。 我将其纯粹用于演示目的。 最好在函数的模板文件中明确指定Lambda Layer依赖项。 这是一种更具可扩展性的方法,您可以灵活地使用多个层而不会使您的实现复杂化。
禁用GitHub Webhook创建 (Disabled GitHub Webhook creation)
Because you are running this as an example from my repo as the source, the P13iEgJPLLGitHubWebhook and P13iEgJGLFGitHubWebhook resources are disabled by default. If you were to fork my example repos, you can enable these resource creations by uncommenting the CreateGitHubWebHook parameter overrides in the setup.sh script.
因为您是从我的源代码中作为示例运行此示例,所以默认情况下禁用P13iEgJPLLGitHubWebhook和P13iEgJGLFGitHubWebhook资源。 如果要派生示例存储库,则可以通过取消注释setup.sh脚本中的CreateGitHubWebHook参数替代来注释这些资源,以启用这些资源。
结论 (Conclusion)
No guide is complete without providing a teardown. Assuming you are already in the p13i-eg-jl directory, execute the teardown script ./teardown.sh and follow the prompts.
如果没有提供拆解,则没有完整的指南。 假设您已经在p13i-eg-jl目录中,请执行拆解脚本./teardown.sh并按照提示进行操作。
You should see a similar output to the following from the teardown process
您应该在拆卸过程中看到与以下类似的输出
$ ./teardown.sh
Tearing down Lambda Function
****************************
Initialising...
DIR is p13i-eg-jglf
Commencing tear down...
Enter component name [P13i-Eg-JGLF] or press <Enter> to accept default, you have 30s:
Starting to tear down P13i-Eg-JGLF
Fetching resource BuildArtifactsBucketName from P13i-Eg-JGLF outputs
Deleting stack arn:aws:cloudformation:ap-southeast-2:<AWS::AccountId>:stack/P13i-Eg-JGLF-DEPLOY/<stackId>
Stack status is: DELETE_IN_PROGRESS. Waiting... / [ 00m 00s ]
Stack status is: DELETE_COMPLETE.
Deleting stack arn:aws:cloudformation:ap-southeast-2:<AWS::AccountId>:stack/P13i-Eg-JGLF/<stackId>
Stack status is: DELETE_IN_PROGRESS. Waiting... \ [ 00m 05s ]
Stack status is: DELETE_COMPLETE.
Deleting S3 bucket : p13i-eg-jglf-buildartifactsbucket-<suffix>.
delete: s3://p13i-eg-jglf-buildartifactsbucket-<suffix>/P13i-Eg-JGLF-Artifacts/d8d7ab279f9e965e06a22ac57a877b8a
delete: s3://p13i-eg-jglf-buildartifactsbucket-<suffix>/P13i-Eg-JGLF-Pip/BuildArtif/B2seD5N
delete: s3://p13i-eg-jglf-buildartifactsbucket-<suffix>/P13i-Eg-JGLF-Pip/SourceCode/aq19ktb.zip
delete: s3://p13i-eg-jglf-buildartifactsbucket-<suffix>/codebuild-cache/5b533265-9019-44ef-b9ef-2a3edc17cfc9
remove_bucket: p13i-eg-jglf-buildartifactsbucket-<suffix>
Completed tearing down P13i-Eg-JGLF
Lambda Function teardown completed in           [ 01m 02s ]
Tearing down Lambda Layer
*************************
Initialising...
DIR is p13i-eg-jpllCommencing tear down...
Enter component name [P13i-Eg-JPLL] or press <Enter> to accept default, you have 30s:
Starting to tear down P13i-Eg-JPLL
Fetching resource BuildArtifactsBucketName from P13i-Eg-JPLL outputs
Fetching resource P13iMITEgJavaParentLambdaLayerArn from P13i-Eg-JPLL-DEPLOY outputs
Deleting stack arn:aws:cloudformation:ap-southeast-2:<AWS::AccountId>:stack/P13i-Eg-JPLL-DEPLOY/<stackId>
Stack status is: DELETE_IN_PROGRESS. Waiting... | [ 00m 00s ]
Stack status is: DELETE_COMPLETE.
Deleting stack arn:aws:cloudformation:ap-southeast-2:<AWS::AccountId>:stack/P13i-Eg-JPLL/<stackId>
Stack status is: DELETE_IN_PROGRESS. Waiting... - [ 00m 05s ]
Stack status is: DELETE_COMPLETE.
Deleting S3 bucket : p13i-eg-jpll-buildartifactsbucket-<suffix>.
delete: s3://p13i-eg-jpll-buildartifactsbucket-<suffix>/P13i-Eg-JPLL-Artifacts/5e7f0354aa9002befc9018c3576a7adf
delete: s3://p13i-eg-jpll-buildartifactsbucket-<suffix>/P13i-Eg-JPLL-Pip/BuildArtif/ohCQYOo
delete: s3://p13i-eg-jpll-buildartifactsbucket-<suffix>/P13i-Eg-JPLL-Pip/SourceCode/evx19yF.zip
delete: s3://p13i-eg-jpll-buildartifactsbucket-<suffix>/codebuild-cache/6316e8a5-7c7e-4898-a3ac-9b71b10efce8
remove_bucket: p13i-eg-jpll-buildartifactsbucket-<suffix>
Deleting Lambda Layer : arn:aws:lambda:ap-southeast-2:<AWS::AccountId>:layer:P13i-Eg-JPLL-Layer.
Deleting Layer Version 3
Completed tearing down P13i-Eg-JPLL
Lambda Layer teardown completed in              [ 01m 04s ]
Lambda Function teardown completed in           [ 01m 02s ]
Lambda Layer teardown completed in              [ 01m 04s ]
Teardown completed in                           [ 02m 06s ]
Note: The teardown process will not delete the AWS Secret you set up manually as part of Getting Started above. You will have to delete this yourself if you no longer need it.
注意:拆卸过程不会删除您作为上面的入门中的一部分手动设置的AWS Secret。 如果不再需要它,则必须自己删除它。
往下 (Up Next)
In this example, I’ve used git submodules to embed the Lambda Layer and the Lambda Function repos into an over arching example repo. As stated in the git submodules documentation (referenced above), using submodules for two way modification is not the best approach. A better approach would be to use a monorepository. In the next article, I will demonstrate my use of the monorepository concept using a practical implementation.
在此示例中,我使用了git子模块将Lambda层和Lambda Function存储库嵌入到上拱示例存储库中。 正如git子模块文档(上面引用)中所述,使用子模块进行双向修改并不是最佳方法。 更好的方法是使用单一存储库。 在下一篇文章中,我将通过实际的实现来演示我对单一存储库概念的使用。
致谢 (Acknowledgements)
Acknowledging the inputs and feedback provided by Jamie Cansdale in my implementation of Git Workflow mentioned above.
在我上述实现Git Workflow的过程中,感谢Jamie Cansdale提供的输入和反馈。
Acknowledging the assistance rendered by my friend Srisaiyeegharan Kidnapillai in proofing this article and validating that the example not only “works on my machine” but on another person’s too.
确认我的朋友Srisaiyeegharan Kidnapillai在为本文打样方面提供了帮助,并确认该示例不仅“在我的机器上工作”,而且在其他人身上也起作用。
翻译自: https://medium.com/@rajivmb/automated-aws-lambda-layer-for-sharing-java-code-253e833d7d4
aws lambda


 5478
5478

 被折叠的 条评论
为什么被折叠?


