


aws部署web
In an earlier tutorial, we discussed how to deploy a web app on to an EC2 instance. However, it is not optimal to just have one copy of your app running on a single server, especially as your user base, and hence the traffic into your website, grows. What if that single server breaks down? What if the server overloads with traffic? You don’t want your entire website to go down in such instances (no pun intended). This is why we need multiple EC2 instances running copies of our app. We will also then need a load balancer to — you guessed it right — balance the traffic load by distributing network traffic among our instances.
在之前的教程中,我们讨论了如何将Web应用程序部署到EC2实例上。 但是,将应用程序的一个副本仅在一台服务器上运行并不是最佳选择,尤其是随着用户群的增加,因此进入您网站的流量会增加。 如果单个服务器出现故障怎么办? 如果服务器流量超载怎么办? 您不希望您的整个网站在这种情况下崩溃(无双关语)。 这就是为什么我们需要多个EC2实例运行我们的应用程序副本的原因。 然后,我们还需要一个负载平衡器,以您猜对了,通过在我们的实例之间分配网络流量来平衡流量负载。
You may be asking now, “Alright, so now I need to manage multiple instances? What if all of them break down at once?”. Well, this is why you should consider using AWS’s Elastic Container Service (ECS). ECS can automatically start up EC2 instances and host a copy of your web app on each of them. ECS also monitors EC2 instances and spin up new ones if any of them go down. On top of all that, ECS can scale the number of copies of your web app up and down as per the amount of traffic load and CPU and memory needs. It saves you a considerable amount of time, money and energy that you can re-invest in developing your app further. I hope this short intro convinced you to learn more about ECS, so let’s get cracking :)
您现在可能会问,“好吧,现在我需要管理多个实例吗? 如果所有人都立即崩溃怎么办?”。 好吧,这就是为什么您应该考虑使用AWS的Elastic Container Service(ECS)的原因。 ECS可以自动启动EC2实例,并在每个实例上托管您的Web应用程序的副本。 ECS还会监视EC2实例,并在出现故障时启动新实例。 最重要的是,ECS可以根据流量负载以及CPU和内存需求的大小上下扩展Web应用程序的副本数。 它为您节省了大量时间,金钱和精力,您可以将其重新投资用于进一步开发应用程序。 我希望这个简短的介绍可以说服您了解有关ECS的更多信息,所以让我们开始吧:)
Prerequisites for this tutorial:
本教程的先决条件:
Besides a Free-tier AWS account, you will need AWS CLI and docker installed on your machine. You can install docker from here and learn how to download and set up AWS CLI here. It is assumed that you already have a Dockerised web app in hand. If not, you can learn how to create one from my earlier tutorial or download a sample one from my git repository here.
除了免费的AWS账户之外,您还需要在计算机上安装AWS CLI和docker。 您可以从安装码头工人在这里学习如何下载和安装AWS CLI这里。 假定您已经拥有一个Dockerized Web应用程序。 如果没有,你可以学习如何创建一个从我前面的教程或从我的Git库下载一个样品在这里。
设置包括什么? (WHAT DOES THE SETUP INCLUDE?)
An ECS setup typically includes the following:
ECS设置通常包括以下内容:
- An auto-scaling group of EC2 instances 自动缩放的EC2实例组
- An ECS clusterECS集群
- An ECS task definition and tasksECS任务定义和任务
- An ECR repository containing a docker image包含docker映像的ECR存储库
- An ECS ServiceECS服务
An ECS cluster manages an auto scaling group of EC2 instances. An ECR repository will contain docker images of your web app. An ECS service places tasks inside instances in the auto-scaling group. A task is, simply put, a copy of your web app. A task can spin up one or more docker containers depending on how your app is set up. Task definitions are blueprints for tasks that specify things like which docker image(s) to use, how much memory and CPU should be allocated to the task and the networking among different containers run by the task.
ECS集群管理EC2实例的自动扩展组。 ECR存储库将包含您的Web应用程序的docker映像。 ECS服务将任务放置在自动扩展组中的实例内部。 简而言之,任务就是您的Web应用程序的副本。 一项任务可以启动一个或多个Docker容器,具体取决于您的应用设置方式。 任务定义是任务的蓝图,这些任务指定诸如使用哪个docker映像,应为任务分配多少内存和CPU以及任务运行的不同容器之间的网络之类的内容。
创建简单的ECS设置 (CREATING A SIMPLE ECS SETUP)
1-Create an empty cluster
1-创建一个空集群
Let’s start by creating an empty ECS cluster. From the AWS console, click on the “Services” tab and click on “Elastic Container Service”. From the ECS page click on “Clusters” in the left-hand pane. Now, click on “Create cluster”. Select the “EC2 Linux + Networking” option and on the next page give your cluster a name. Tick the “Create an empty cluster” tick-box and click on “Create”.
让我们从创建一个空的ECS集群开始。 在AWS控制台中,单击“服务”选项卡,然后单击“弹性容器服务”。 在ECS页面中,单击左侧窗格中的“集群”。 现在,单击“创建集群”。 选择“ EC2 Linux +网络”选项,然后在下一页上为群集命名。 勾选“创建一个空集群”复选框,然后单击“创建”。
2-Create an auto scaling group
2-创建一个自动缩放组
Now, we need an auto-scaling group. But, before we do that we need to create the launch template based on which the instances in the auto-scaling group will spin up. For this, go to the EC2 console and select “Launch Templates” under “Instances” from the left-hand pane. Click on “Create launch template”. Give the launch template a name and a description. Under AMI select “amzn2-ami-ecs-hvm-2.0.20200902-x86_64-ebs” or any other ECS-optimised Linux-based AMIs. Now, go down and expand the “Advance details” section. Under “User data” copy and paste the following. Replace “<your-cluster-name>” with the name of the empty cluster you just created.
现在,我们需要一个自动扩展组。 但是,在此之前,我们需要创建启动模板,自动扩展组中的实例将基于该启动模板启动。 为此,请转到EC2控制台,然后从左侧窗格的“实例”下选择“启动模板”。 点击“创建启动模板”。 给启动模板命名和描述。 在AMI下,选择“ amzn2-ami-ecs-hvm-2.0.20200902-x86_64-ebs”或任何其他经ECS优化的基于Linux的AMI。 现在,向下展开“高级详细信息”部分。 在“用户数据”下复制并粘贴以下内容。 将“ < your-cluster-name >”替换为刚创建的空集群的名称。
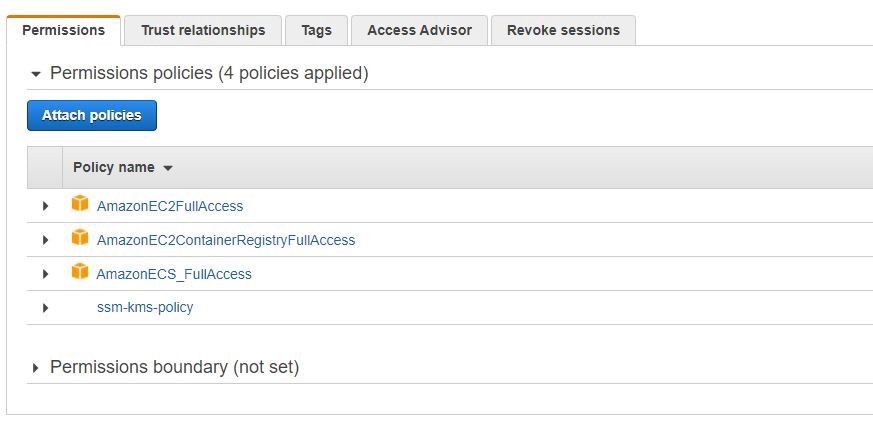
#!/bin/bashecho ECS_CLUSTER=<your-cluster-name> >> /etc/ecs/ecs.configUnder “IAM profile” click on “Create new IAM profile”. This will take you to the IAM console. From there, click on the “Create role” button. For the “AWS Trusted Entity” keep the default “AWS Service” option and under “Choose a Use Case” select EC2. Click on “Next: Permissions”. Select “EC2FullAccess”, “AmazonEC2ContainerRegistryFullAccess”, “AmazonECS_FullAccess” and “ssm-kms-policy” before clicking on “Attach policies”. The “ssm-kms-policy” is what allows you to log into the instance. If you don’t see the “ssm-kms-policy” policy, just create a new policy with the same name and using following JSON:
在“ IAM配置文件”下,单击“创建新的IAM配置文件”。 这将带您到IAM控制台。 从那里,单击“创建角色”按钮。 对于“ AWS受信任实体”,请保留默认的“ AWS服务”选项,并在“选择用例”下选择EC2。 单击“下一步:权限”。 在单击“附加策略”之前,选择“ EC2FullAccess”,“ AmazonEC2ContainerRegistryFullAccess ”,“ AmazonECS_FullAccess ”和“ ssm-kms-policy”。 使用“ ssm-kms-policy”可以登录实例。 如果没有看到“ ssm-kms-policy”策略,只需使用以下名称创建一个具有相同名称的新策略:
{
    "Version": "2012-10-17",
    "Statement": [
        {
            "Sid": "VisualEditor0",
            "Effect": "Allow",
            "Action": [
                "s3:GetEncryptionConfiguration",
                "s3:GetBucketAcl",
                "s3:GetBucketLocation"
            ],
            "Resource": "arn:aws:s3:::dcp-685169213993-eu-west-2-logs"
        },
        {
            "Sid": "VisualEditor1",
            "Effect": "Allow",
            "Action": [
                "logs:CreateLogStream",
                "cloudwatch:PutMetricData",
                "logs:DescribeLogGroups",
                "logs:DescribeLogStreams",
                "kms:*",
                "ssm:*",
                "ec2messages:*",
                "ssmmessages:*",
                "logs:CreateLogGroup",
                "logs:PutLogEvents",
                "kms:ReEncrypt*",
                "ec2:DescribeInstanceStatus"
            ],
            "Resource": "*"
        },
        {
            "Sid": "VisualEditor2",
            "Effect": "Allow",
            "Action": [
                "s3:PutObject",
                "s3:AbortMultipartUpload"
            ],
            "Resource": "arn:aws:s3:::dcp-685169213993-eu-west-2-logs/session-manager/*"
        }
    ]
}
Now, let’s go back to the launch template creation. Click on “Create launch template”. Then go back to the EC2 console and select “Auto Scaling Groups” from the left-hand pane. Click on “Create an auto scaling group”. Give it a suitable name, select the launch template you just created and click “Next”. For “On-demand instances” put down “2” and for instance type, remove any default selections and select “t2.micro”. No additional instances needed. Under network choose all the subnets available and click “Next”. Set “Desired”, “Minimum” and “Maximum capacity” of instances to “2”. Click “Skip to review”. Click on “Create Auto Scaling group”. Now if you go to “Instances” page from the EC2 console, you’ll be able to see the 2 instances which are part of the auto scaling group you just created. You may have to wait for a few minutes for the newly spun up instances to show up.
现在,让我们回到启动模板的创建。 点击“创建启动模板”。 然后返回EC2控制台,并从左侧窗格中选择“ Auto Scaling Groups”。 单击“创建自动缩放组”。 给它起一个合适的名称,选择刚刚创建的启动模板,然后单击“下一步”。 对于“按需实例”,放下“ 2”并输入实例类型,删除所有默认选择,然后选择“ t2.micro”。 无需其他实例。 在网络下,选择所有可用的子网,然后单击“下一步”。 将实例的“所需”,“最小”和“最大容量”设置为“ 2”。 点击“跳过以查看”。 单击“创建Auto Scaling组”。 现在,如果您从EC2控制台转到“实例”页面,您将能够看到这两个实例,它们是您刚刚创建的自动扩展组的一部分。 您可能需要等待几分钟,才能显示新启动的实例。
2-Create an ECR repository and upload your docker image
2-创建一个ECR存储库并上传您的Docker映像
To create an ECR repo go to the ECS console and select “Repositories” from the left-hand pane. Click on “Create repository”. Give the repository a name. Enable the “Scan on push” option and click on the “Create repository” button.
要创建ECR存储库,请转到ECS控制台,然后从左侧窗格中选择“存储库”。 单击“创建存储库”。 为存储库命名。 启用“按需扫描”选项,然后单击“创建存储库”按钮。
Now click on the “View push commands” button and a popup will give you instructions on how to push your docker image into the repository.
现在,单击“查看推送命令”按钮,将弹出一个窗口,向您说明如何将Docker映像推送到存储库中。


Once you have finished pushing your image and can see it listed inside your ECR repository, copy the image URI. We’ll need this in a later step.
完成推送图像并可以在ECR存储库中看到它之后,请复制图像URI。 我们将在以后的步骤中使用它。
3-Create an application load balancer
3-创建应用程序负载平衡器
From the EC2 console, click on “Load Balancers” from the left-hand pane. Then click on “Create load balancer” and select “Application Load Balancer”. Give the load balancer a suitable name, select all the availability zones for your VPC and click “Next”. Skip to the “Configure security groups” stage and opt to create a new security group. Under “Type” select “HTTP” and “Anywhere” as the “Source”. Click “Next” and opt to “Create a new target group”. Give the target group a name and make sure the protocol and port are set to “HTTP” and “80” respectively. Change the target type to “IP”. Under “Health checks” select the “HTTP” protocol again and for “path” select the path of your web app where you want your health checks to be done. I am giving the root path “/” of my flask app. Click on “Next” and “Next” again. Review your selections and click on “Create”
在EC2控制台中,单击左侧窗格中的“负载平衡器”。 然后单击“创建负载均衡器”,然后选择“应用程序负载均衡器”。 给负载均衡器起一个合适的名称,为VPC选择所有可用区域,然后单击“下一步”。 跳到“配置安全组”阶段,然后选择创建一个新的安全组。 在“类型”下,选择“ HTTP”和“任何地方”作为“源”。 单击“下一步”,然后选择“创建新的目标组”。 为目标组命名,并确保协议和端口分别设置为“ HTTP”和“ 80”。 将目标类型更改为“ IP”。 在“运行状况检查”下,再次选择“ HTTP”协议,对于“路径”,选择要在其中执行运行状况检查的Web应用程序的路径。 我给我的flask应用程序的根路径“ /”。 单击“下一步”,然后再次单击“下一步”。 查看您的选择,然后单击“创建”

If your health check status code is set to “200” which is the default, you will want to make sure that the path you give is working in your web app and doesn’t do a forward or redirect to another path. Or else, you could change the success code under “Advanced health check settings”
如果您的健康状况检查状态代码设置为默认值“ 200”,则您将要确保所提供的路径在您的Web应用程序中有效,并且不会进行转发或重定向到其他路径。 否则,您可以在“高级运行状况检查设置”下更改成功代码
4-Create a task definition
4-创建任务定义
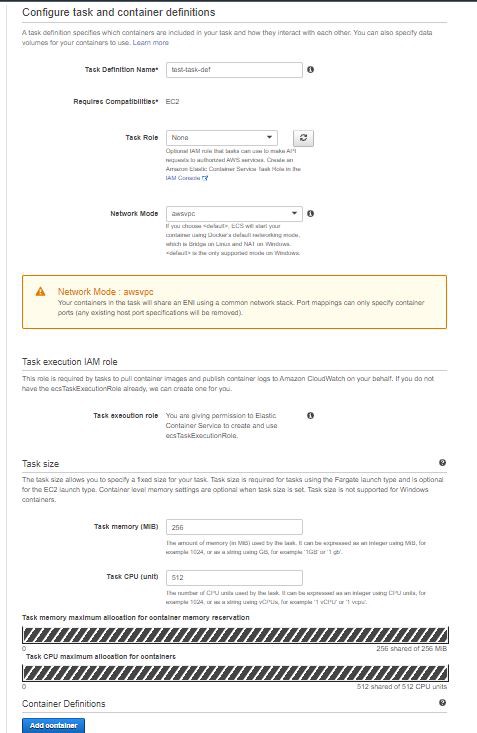
Go to the ECS console and click on “Task Definitions”. Select “Create task definition” and select “EC2” compatibility option. Give your task definition a name. Select “none” for the IAM role and “awsvpc” for the network mode. Under task size set “Task memory” as “256” and “CPU” as “512”. Scroll down and click on “Add container”.
转到ECS控制台,然后单击“任务定义”。 选择“创建任务定义”,然后选择“ EC2”兼容性选项。 给您的任务定义起一个名字。 选择“无”作为IAM角色,选择“ awsvpc”作为网络模式。 在任务大小下,将“任务存储器”设置为“ 256”,将“ CPU”设置为“ 512”。 向下滚动并单击“添加容器”。
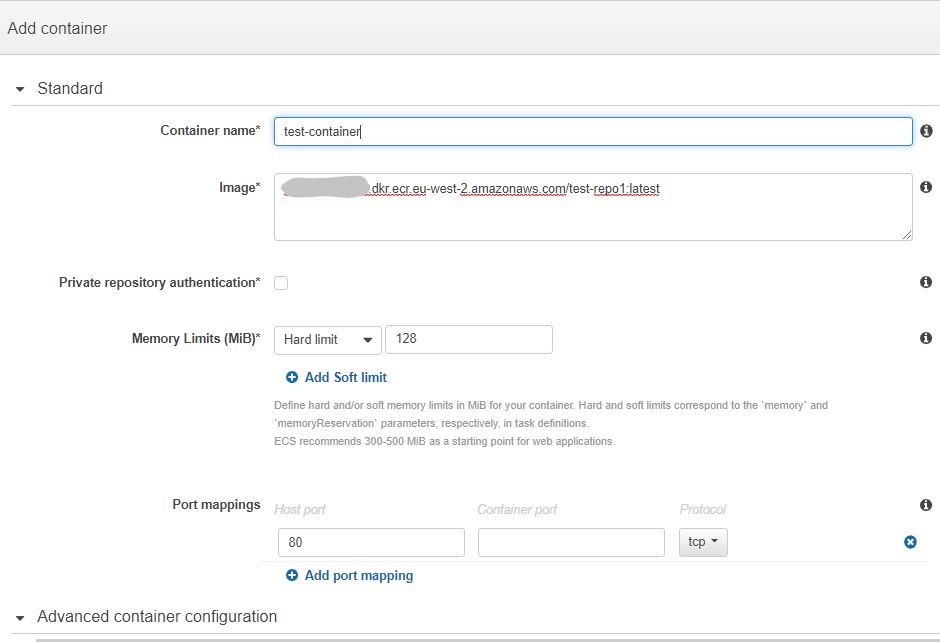
Give the container a name and paste the image URI you copied earlier. For “Port mappings” add the container ports you want to use. The only one I’m using is port 80 of my container. Click on “Add” and you will be taken back to the task creation page. You should now see your container entry listed as part of the task definition. Scroll down and click on “Create”.
为容器命名,然后粘贴您先前复制的图像URI。 对于“端口映射”,添加要使用的容器端口。 我唯一使用的是容器的端口80。 单击“添加”,您将返回到任务创建页面。 现在,您应该看到您的容器条目已作为任务定义的一部分列出。 向下滚动并单击“创建”。
5-Create an ECS service
5-创建ECS服务
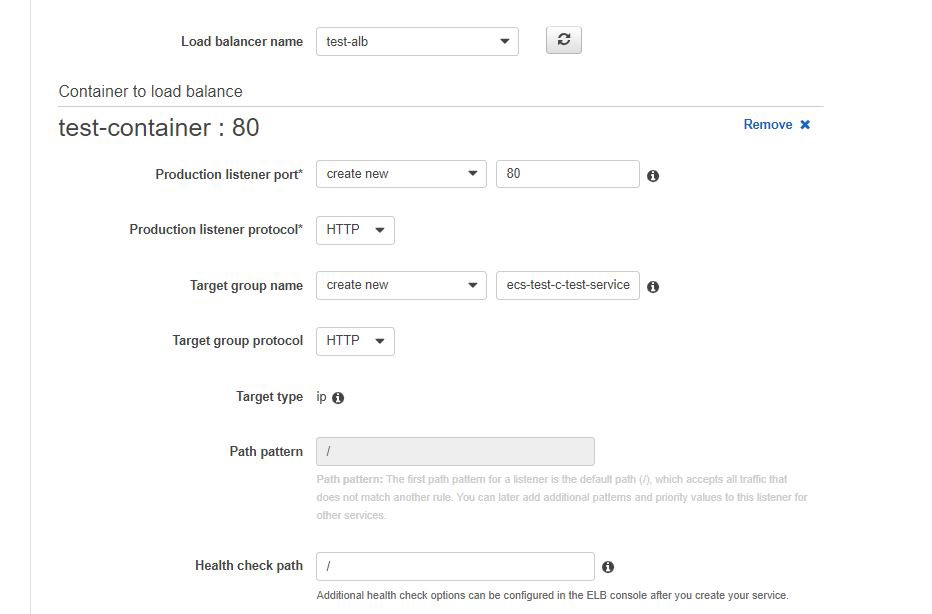
The last part of the process is creating an ECS service. Go to the empty cluster you created earlier and under “Services” click on “Create”. Select the “EC2” launch type, give your service a name and put in “2” for the number of tasks. Click on “Next”. Select your cluster VPC and all the subnets available. Under “Load balancing” select “Application Load Balancer”, then select the load balancer you just created. Now, select your container port and click on “Add to load balancer”. Select the listener port we created with the load balancer i.e “80:HTTP” and change the path pattern to the default path for your web app. In my case it is “/”. You will automatically be given a target group name. If not, type in one. Add the health check path as we did when creating the load balancer. Skip to the review stage and click on “Create service”.
该过程的最后一部分是创建ECS服务。 转到您先前创建的空集群,然后在“服务”下单击“创建”。 选择“ EC2”启动类型,为您的服务命名,并在任务数中输入“ 2”。 点击“下一步”。 选择您的群集VPC和所有可用子网。 在“负载平衡”下,选择“应用程序负载平衡器”,然后选择您刚创建的负载平衡器。 现在,选择您的容器端口,然后单击“添加到负载平衡器”。 选择我们使用负载均衡器创建的侦听器端口,即“ 80:HTTP”,然后将路径模式更改为Web应用程序的默认路径。 就我而言,它是“ /”。 系统将自动为您提供目标组名称。 如果不是,请输入一个。 与创建负载平衡器时一样,添加运行状况检查路径。 跳至审核阶段,然后单击“创建服务”。
The number of tasks in a service should not be bigger than the number of available instances in the ECS cluster.
服务中的任务数量不应大于ECS集群中可用实例的数量。
You’ll now see the ECS service placing tasks in the instances in the auto scaling group. You can see this under “Events” on the ECS service page. You’ll also see targets being registered inside the target group you just created on the EC2 console. You can monitor the health checks under the “Targets” section on your target group page.
现在,您将看到ECS服务将任务放置在自动扩展组的实例中。 您可以在ECS服务页面上的“事件”下看到此内容。 您还将看到目标已在您刚刚在EC2控制台上创建的目标组中注册。 您可以在目标组页面的“目标”部分下监视运行状况检查。
If you want to see what’s happening inside your instances, you can connect to your instances using a session manager from the EC2 console and see the docker logs. Inside the instances you can view the ECS logs by typing in the following:
如果要查看实例内部发生的情况,可以使用EC2控制台中的会话管理器连接到实例,并查看docker日志。 在实例内部,您可以通过键入以下内容查看ECS日志:
cat /var/log/ecs/ecs-agent.log测试是否可行 (TESTING IF IT WORKS)
To see if your setup works go to your application load balancer and copy it’s DNS name. Paste it into a new browser tab and you should be able to access your web app!
要查看您的设置是否有效,请转到应用程序负载平衡器,然后复制其DNS名称。 将其粘贴到新的浏览器标签中,您应该可以访问您的Web应用程序!
If you are seeing a 502 error, it might be worth checking the security groups for all the instances in the auto scaling group. Make sure they allow inbound HTTP traffic through port 80 from anywhere.
如果看到502错误,可能值得检查自动伸缩组中所有实例的安全组。 确保它们允许任何地方通过端口80的入站HTTP通信。
从这里继续前进 (GOING FURTHER FROM HERE)
We have been looking at how to install a single web app using a single application load balancer. Application Load Balancers have a feature called “Path-based routing” that will allow you to host multiple web apps using a single load balancer. You will be able to use the DNS name of your application load balancer and add separate paths for each of your web apps. For instance, “aws.my-load-balancer.com/app1” and “aws.my-load-balancer.com/app2”. Load balancers are quite expensive. So, having separate ones for each of your web apps may not be a good idea. But, when you do this you may end up with the problem of not being able to rewrite your URLs. That is, you may want to remove the “/app1” and “/app2” bits from your URLs as those web apps may not accept those paths.
我们一直在研究如何使用单个应用程序负载平衡器安装单个Web应用程序。 应用程序负载平衡器具有一项称为“基于路径的路由”的功能,通过该功能,您可以使用单个负载平衡器托管多个Web应用程序。 您将能够使用应用程序负载平衡器的DNS名称,并为每个Web应用程序添加单独的路径。 例如,“ aws.my-load-balancer.com/app1”和“ aws.my-load-balancer.com/app2”。 负载平衡器非常昂贵。 因此,为您的每个Web应用程序使用单独的应用程序可能不是一个好主意。 但是,当您这样做时,可能会遇到无法重写URL的问题。 也就是说,您可能要从URL中删除“ / app1”和“ / app2”位,因为这些Web应用程序可能不接受这些路径。
Unfortunately, AWS doesn’t support URL rewrites as of today. So, one good option would be using an Nginx container as a sidecar within each of your instances. They will essentially act as reverse proxies for your app containers rewriting the URLs as the traffic passes through them. Nginx does rewrite rules quite well. Using an Nginx sidecar container will also improve the security of your setup. But that is a quite big setup. So, it would be best to keep the topic for another separate tutorial :)
不幸的是,AWS到目前为止不支持URL重写。 因此,一个不错的选择是在每个实例中使用Nginx容器作为辅助工具。 实际上,它们将充当您的应用容器在流量通过它们重写URL时的反向代理。 Nginx确实很好地重写了规则。 使用Nginx边车容器还将提高设置的安全性。 但这是一个很大的设置。 因此,最好将主题保留在另一个单独的教程中:)
aws部署web


 382
382

 被折叠的 条评论
为什么被折叠?
被折叠的 条评论
为什么被折叠?
 到【灌水乐园】发言


