


discord linux
教程| Python | 不和谐 (Tutorial | Python | Discord.py)
Me and my friends use the app Discord to communicate about when we plan to play our favorite Xbox game, Sea of Thieves. We have a couple bots setup to post news and update information about the game in our server, but there was certain information that we could not find a pre-built bot to deliver for us.
我和我的朋友使用应用程序Discord交流有关何时计划玩我们最喜欢的Xbox游戏“盗贼之海”的信息。 我们有几个机器人设置,可以在服务器上发布新闻和更新有关游戏的信息,但是某些信息使我们找不到预装的机器人来为我们提供。
I decided that if the bot we wanted didn’t exist, I would program it myself. This turned out to be a larger task than I imagined, but was a great learning experience. Building a bot that operates in your server is a very fulfilling project, and it can help make your life easier in many ways. The first step is creating a simple bot.
我决定,如果我们想要的机器人不存在,我将自己编程。 事实证明,这是比我想象的更大的任务,但是却是一次很棒的学习经历。 构建一个在您的服务器中运行的机器人是一个非常令人满意的项目,它可以在许多方面帮助您简化生活。 第一步是创建一个简单的机器人。
你好机器人 (The Hello Word Bot)
Now jumping right in to program a sophisticated bot using a new platform isn’t easy. Let’s start with a simple “Hello World” bot using Discord.py. We’ll:
现在就跳入使用新平台对复杂的机器人进行编程并不容易。 让我们从一个使用Discord.py的简单“ Hello World”机器人开始。 好:
- Create the bot 创建机器人
- Add it to our server将其添加到我们的服务器
- Program the bot编程机器人
- Test its functionality测试其功能
All of the code used will be consolidated at the end if you just want to hit the ground running.
如果您只是想动手做的话,所有使用的代码将在最后合并。
Note: This tutorial assumes that you already have python installed (version 3.5.3 or higher) on a Windows machine and know how to use the command line to run a python script. Any commands that are sent to command prompt will be prefaced by a “$”
注意:本教程假定您已经在Windows计算机上安装了python (版本3.5.3或更高版本) ,并且知道如何使用命令行来运行python脚本。 发送到命令提示符的所有命令都将以“ $”开头
创建机器人(Create the Bot)
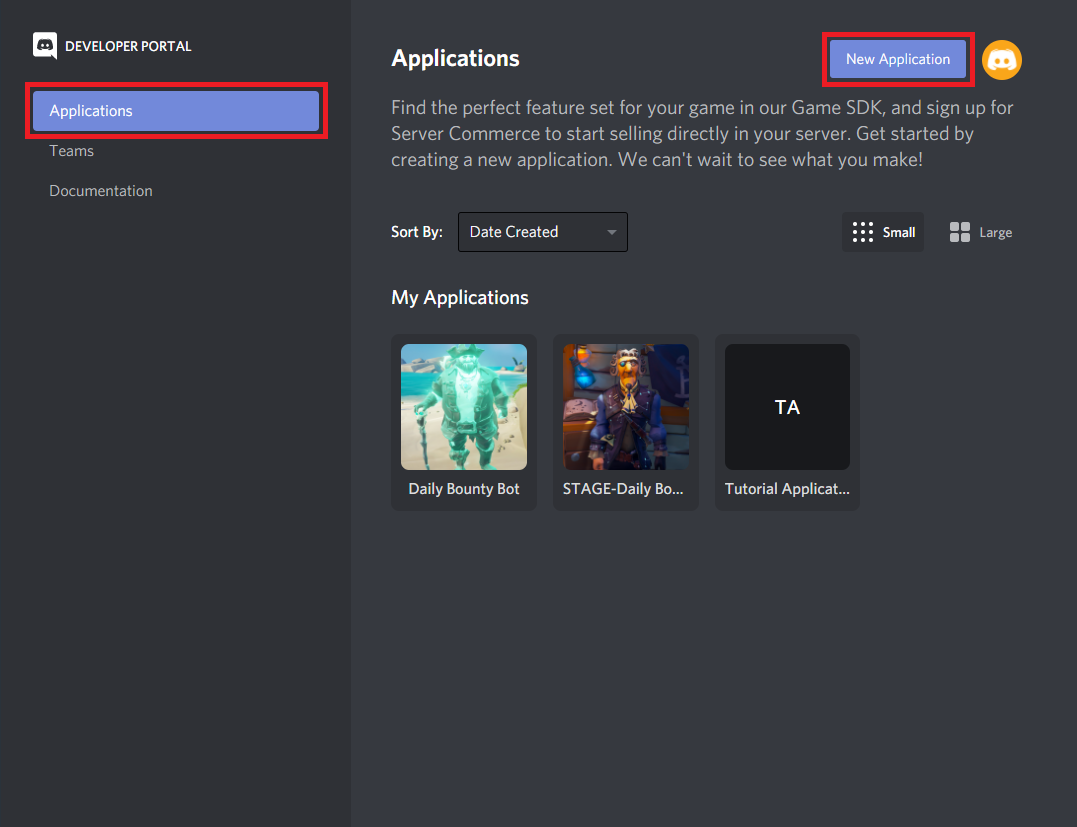
If you don’t already have a Discord account, sign up for one first. Once you have an account, head to the Discord Developer Portal. On the applications tab you’ll click on New Application in the top right corner.
如果您还没有Discord帐户,请先注册一个。 拥有帐户后,请访问Discord开发人员门户。 在“应用程序”选项卡上,您将单击右上角的“新建应用程序”。
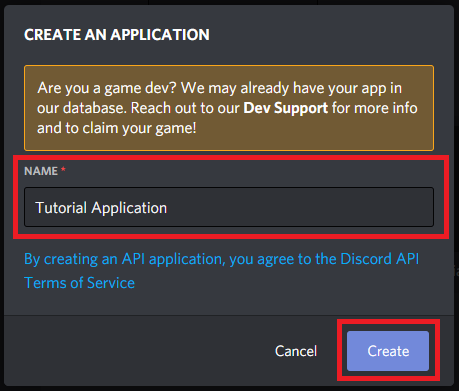
On the Create An Application popup, we’ll give our application a name. Here I’ll be using Tutorial Application. Click Create to create the bot.
在“创建应用程序”弹出窗口中,我们将为应用程序命名。 在这里,我将使用Tutorial Application 。 单击创建以创建机器人。
The next page is General Information about the bot you have created. Make sure to add a description to your bot. This isn’t strictly necessary, but will help in identifying it later when you are a Discord.py wizard and have many applications. Be sure to click Save Changes when you are done.
下一页是有关您创建的机器人的常规信息。 确保为您的机器人添加说明。 这不是严格必要的,但是当您是Discord.py向导并且有许多应用程序时,将有助于稍后识别它。 完成后,请确保单击“保存更改” 。

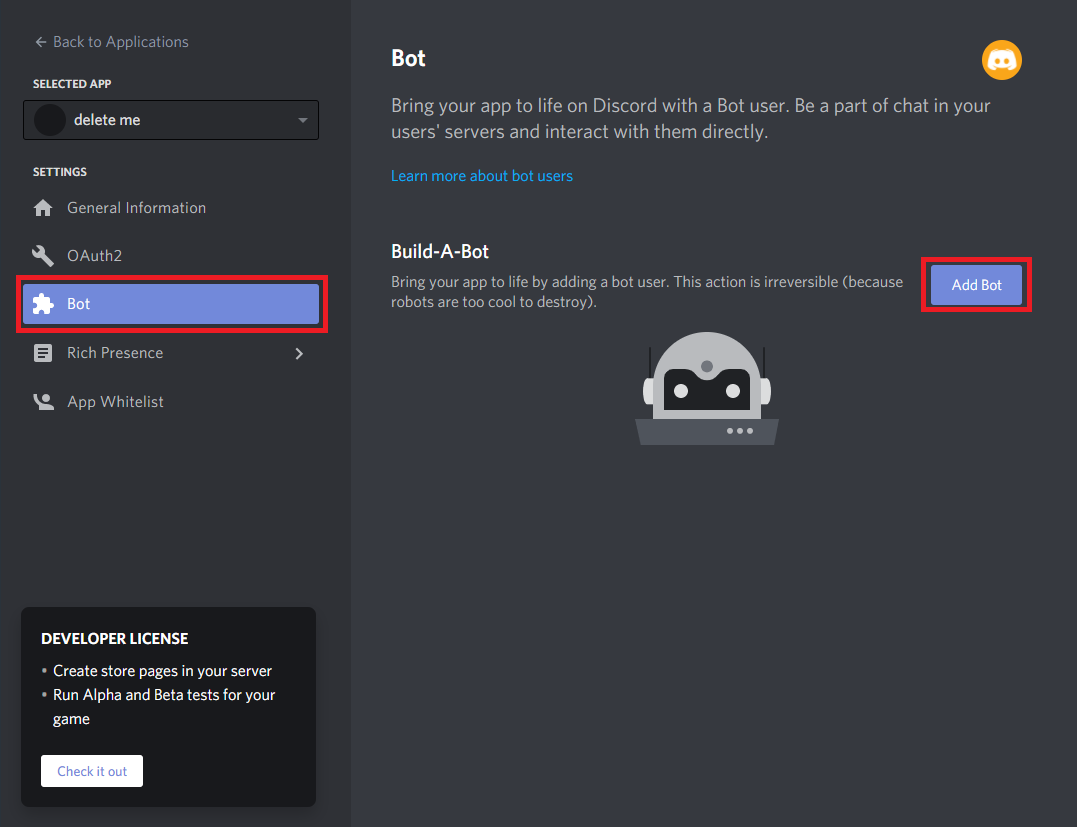
On the bot page, click Add Bot. Bots create a way for your code to interface with your Discord server. Adding a bot will make your app visible in Discord, so just confirm that when asked by clicking Yes, do it!
在漫游器页面上,点击添加Bot 。 机器人程序为您的代码与Discord服务器建立接口提供了一种方法。 添加机器人将使您的应用在Discord中可见,因此只需在被询问时单击“是”即可确认!
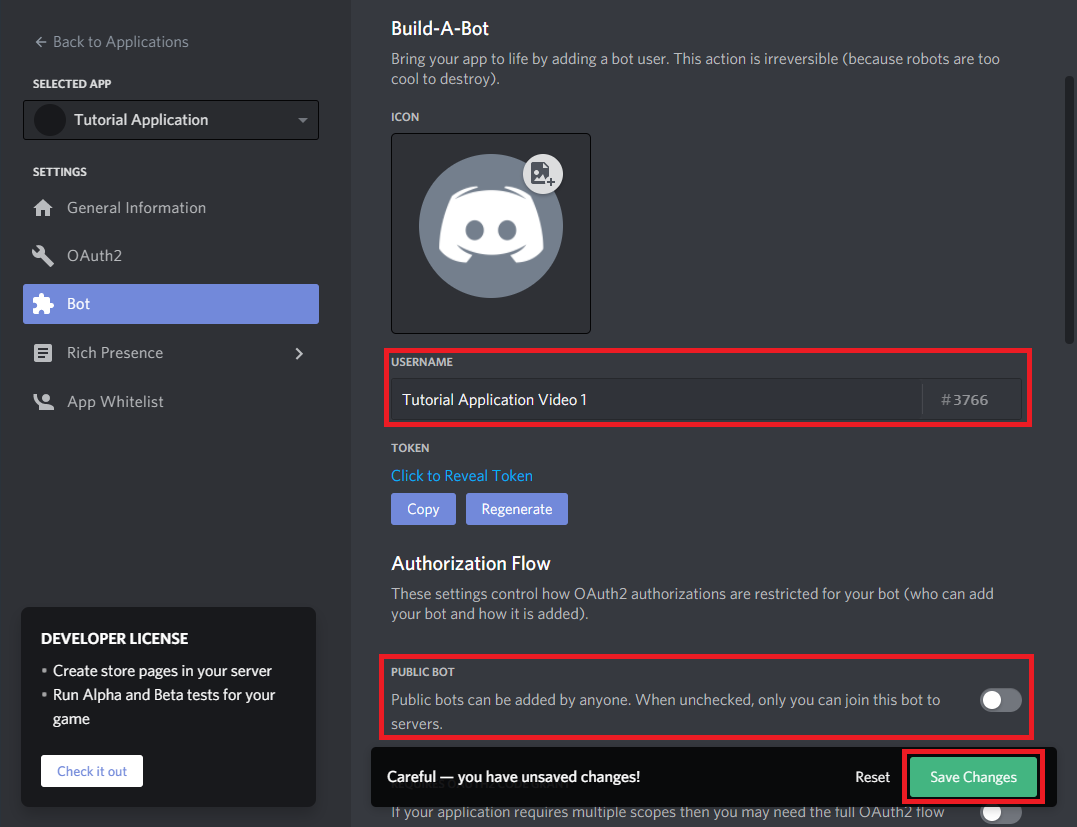
Let’s give our bot a name, in my case I’ll call it Tutorial Application Video 1. We can also un-check the public bot option. This will make it so that only you can add this bot to servers. We wouldn’t want someone stressing our poor bot out while we are still working out the kinks.
让我们给我们的机器人起个名字,在我的情况下,我将其称为Tutorial Application Video 1 。 我们也可以取消选中public bot选项。 这样可以做到,只有您才能将此机器人添加到服务器。 我们不希望有人在我们仍在努力解决问题时向我们强调可怜的机器人。
将Bot添加到服务器 (Add the Bot to a Server)
If you don’t already have a server with a channel that you can add the bot to, go ahead and make one. In the Discord app click the plus button on the left side to add a server.
如果您还没有带有可将漫游器添加到其中的频道的服务器,请继续制作一个。 在Discord应用程序中,单击左侧的加号按钮以添加服务器。

Click the option to Create a server. You will need to give your server a name, in this case Tutorial Server will work. Click Create to finish the process. If it asks you to invite friends to your server, just close that window, we aren’t ready for them quite yet.
单击选项创建服务器。 您需要给服务器起一个名字,在这种情况下Tutorial Server可以使用。 单击创建以完成该过程。 如果它要求您邀请朋友加入您的服务器,只需关闭该窗口,我们还没有为他们准备好。
To add our bot to the server, we head back over to the developer portal. Open the application for your bot and click on the OAuth2 option in the left pane.
要将我们的机器人添加到服务器,请回到开发人员门户。 打开您的机器人的应用程序,然后在左窗格中单击OAuth2选项。
In the Scopes section, we want to give our bot the bot scope.
在“作用域”部分中,我们想给我们的机器人bot范围。
In the Bot Permissions section, we can just give it the permission to Send Messages for now.
在Bot权限部分中,我们可以暂时为其授予发送消息的权限。
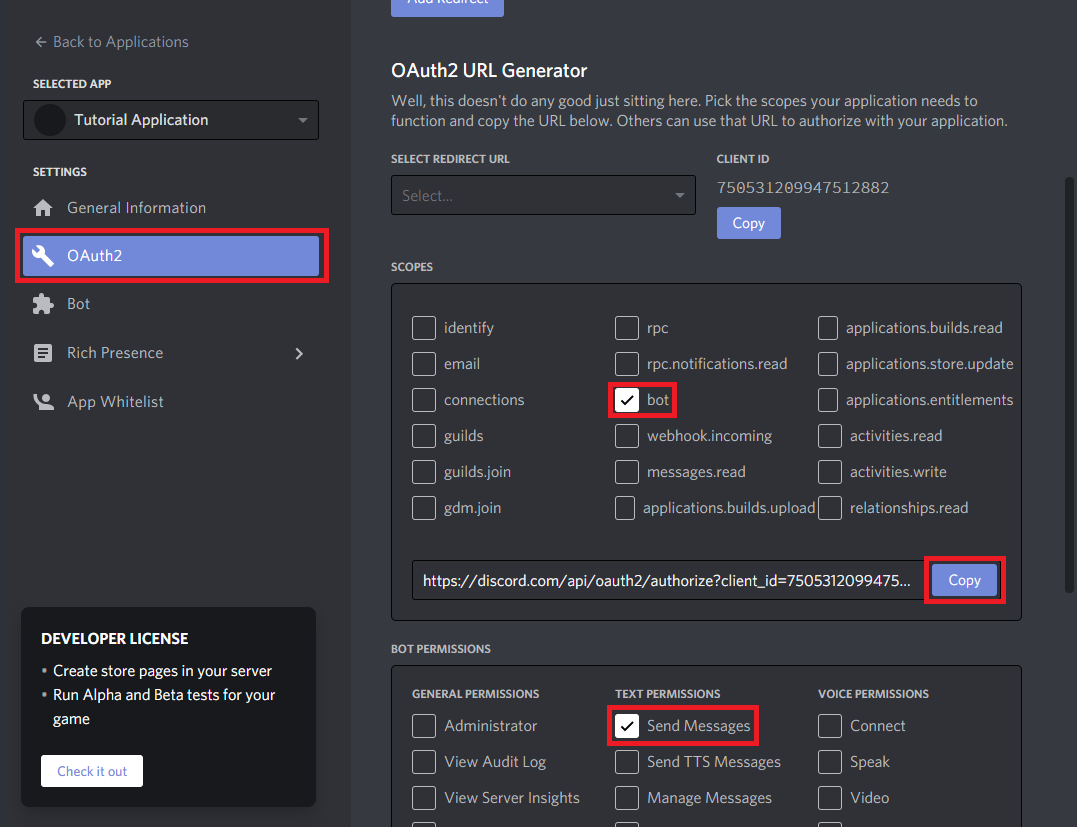
You’ll see a URL has been generated in the Scopes section. Copy this and open it in your browser. You will be asked where you want to add the bot. Select the server you are using for testing from the drop down menu and click continue.
您会在“作用域”部分看到一个URL,该URL已经生成。 复制它并在浏览器中打开它。 系统将询问您要将机器人添加到何处。 从下拉菜单中选择要用于测试的服务器,然后单击继续。
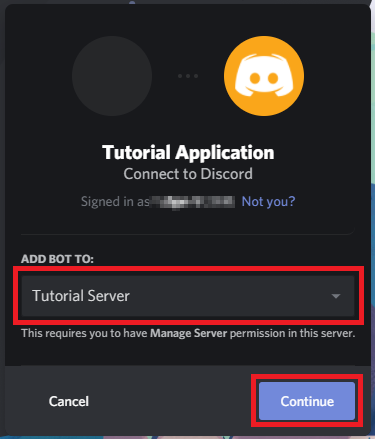
Discord will confirm that you want to give the bot the permissions we defined when creating the URL.
Discord会确认您要授予bot我们在创建URL时定义的权限。

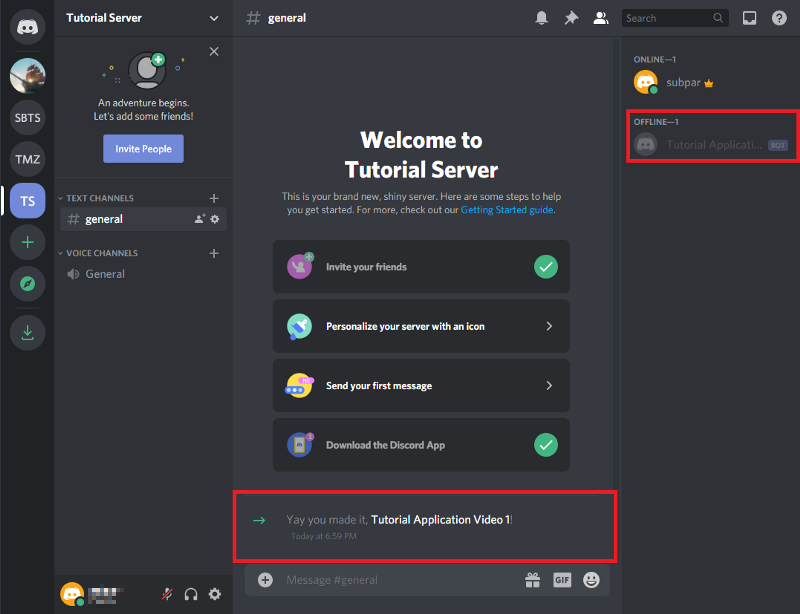
Discord will likely ask you to confirm that you are not a bot and then add the application to your server. Back on your sever you will see that our bot has joined the server and we can see that it is offline on the right pane.
Discord可能会要求您确认您不是机器人,然后将应用程序添加到服务器。 回到服务器上,您将看到我们的机器人已加入服务器,并且在右窗格中可以看到它已脱机。
赋予机器人大脑(为机器人编程) (Giving the Bot Brains (Program the bot))
Our bot is waiting offline, ready for us to connect and give it life! Let’s go over what we need:
我们的漫游器正在离线等待,准备好连接并赋予它生命! 让我们来看看我们需要什么:
The
discord.pypython module installed安装了
discord.pypython模块- An editor to write the script编辑器编写脚本
- Somewhere to run our python script某个地方可以运行我们的python脚本
To install the discord module, you can use the package installer for python, more commonly known as pip. The following should be executed from the command line.
要安装discord模块,您可以使用python软件包安装程序,通常称为pip 。 以下应从命令行执行。
$ pip install discord.pyAs for your editor, you can use a integrated development environment or IDE, but I prefer using a text editor like Atom or Notepad++. Anything with syntax highlighting and code completion will work well. Using an IDE is possible but some, specifically Spyder require additional packages to run asynchronous code, like that used in Discord.py.
至于编辑器,您可以使用集成开发环境或IDE ,但我更喜欢使用Atom或Notepad ++之类的文本编辑器。 任何带有语法高亮和代码完成的功能都可以正常工作。 可以使用IDE,但有些(特别是Spyder)需要其他程序包来运行异步代码,例如Discord.py中使用的程序包。
The first section of code will be our imports. Right now we just need discord and an extension from the discord package, commands
代码的第一部分将是我们的导入。 现在,我们只需要discord和discord包的扩展, commands
# Imports
import discord
from discord.ext import commands
Next we will create a variable TOKEN that contains our token to authorize the code with Discord. This will not only let the code interact with Discord, but also tell Discord which bot we are interacting with. Our token will be found on the Bot page. It is hidden by default. This is sensitive information and sharing it with anyone will allow them full access to your bot until you regenerate your token.
接下来,我们将创建一个包含令牌的变量TOKEN ,以使用Discord授权代码。 这不仅将使代码与Discord交互,而且还将告诉Discord我们正在与哪个bot交互。 我们的令牌可以在Bot页面上找到。 默认情况下它是隐藏的。 这是敏感信息,与任何人共享都将使他们能够完全访问您的机器人,直到您重新生成令牌。
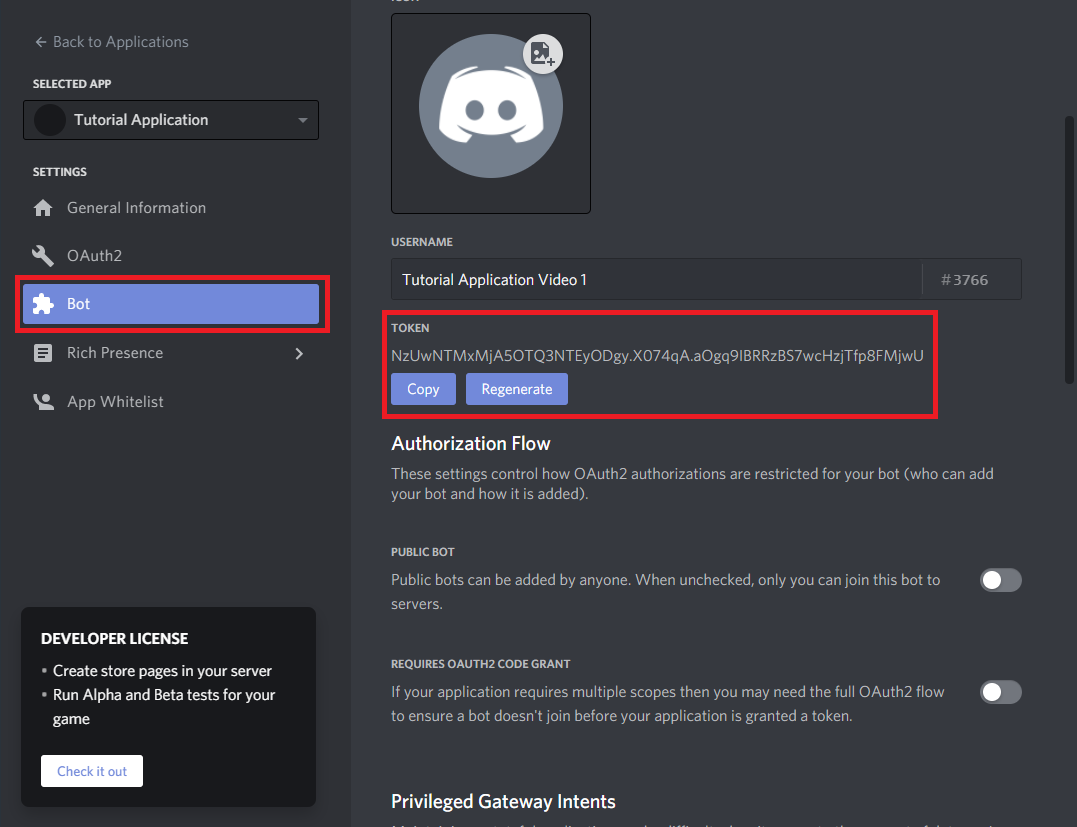
# Credentials
TOKEN = 'NzUwNTMxMjA5OTQ3NTEyODgy.X074qA.aOgq9IBRRzBS7wcHzjTfp8FMjwU'
Our next step is to initialize our bot. From commands we will use the Bot method. We add the argument command_prefix='!' to tell our bot that commands will start with an exclamation point (!). Anything will work here, but special characters considered best practice as it is unlikely they are going to mistakenly trigger our bot.
我们的下一步是初始化我们的机器人。 在commands我们将使用Bot方法。 我们添加参数command_prefix='!' 告诉我们的机器人命令将以感叹号(!)开头。 任何东西都可以在这里工作,但是特殊字符被认为是最佳实践,因为它们不太可能会误触发我们的机器人。
# Create bot
client = commands.Bot(command_prefix='!')
Next we’ll have the script output to the console so that we can verify that the bot is connected correctly. We will write a function that prints out the bot’s name and ID number when it connects. When client is initialized, both name and id become available as part of the user attribute. With some simple text formatting, we can print client.user.name and client.user.id to the console. Don’t worry too much about the code preceding the function, at this point you just need to know that these are required for Discord.py to work.
接下来,我们将脚本输出到控制台,以便我们可以验证机器人是否已正确连接。 我们将编写一个函数,该函数在连接时打印出机器人的名称和ID号。 初始化client , name和id可以作为user属性的一部分user 。 通过一些简单的文本格式,我们可以将client.user.name和client.user.id打印到控制台。 不必太担心函数之前的代码,这时,您只需要知道这些对于Discord.py来说是必需的。
# Startup Information
@client.event
async def on_ready():
    print('Connected to bot: {}'.format(client.user.name))
    print('Bot ID: {}'.format(client.user.id))
Now we want the bot to say “Hello World” when we type “!helloworld” in the Discord chat Channel. To do this, we need to create a command function. It will start with the command decorator. Next we define the function helloworld. The name of this function is exactly how we will call the function from discord. The function needs 1 argument: ctx. This will be the context from the command and Discord.py will handle this for us. ctx will contain many things we would want to know about a request, including what Discord channel it came from. In the next line we use the await keyword to wait until the process running our bot is ready. The ctx.send sends the “Hello World!” message back to where the command was send from, as saved in the context of the request.
现在,我们希望机器人在Discord聊天频道中键入“!helloworld”时说“ Hello World”。 为此,我们需要创建一个命令函数。 它将以命令装饰器开始。 接下来,我们定义函数helloworld 。 该函数的名称正是我们将如何从discord调用该函数。 该函数需要1个参数: ctx 。 这将是命令的上下文,Discord.py将为我们处理此情况。 ctx将包含我们想要了解的关于请求的许多信息,包括请求来自哪个Discord通道。 在下一行中,我们使用await关键字等待直到运行我们的机器人的进程准备就绪。 ctx.send发送“ Hello World!” 消息返回到命令的发送源,保存在请求的上下文中。
# Command
@client.command()
async def helloworld(ctx):
    await ctx.send('Hello World!')
For the final piece of our script, we need to use the run method, passing it our token to connect and start the bot. With that added we can save and try running it.
对于脚本的最后一部分,我们需要使用run方法,并将其令牌传递给我们以连接并启动bot。 添加后,我们可以保存并尝试运行它。
# Run the bot
client.run(TOKEN)
To run our bot, open up your command line. Navigate to the directory where your script is saved using the change directory command. Once in the correct directory, run the script.
要运行我们的机器人,请打开命令行。 使用change directory命令导航到保存脚本的目录。 进入正确的目录后,运行脚本。
$ cd "path\to\your\bot"
$ python tutorial_bot.py
If all went well, you should see similar output printed to the console:
如果一切顺利,您应该在控制台上看到类似的输出:
Connected to bot: Tutorial Application Video 1
Bot ID: 7505311099577812556
If you see this, your bot is successfully connected!
如果看到此消息,则说明您的漫游器已成功连接!
测试机器人 (Testing Your Bot)
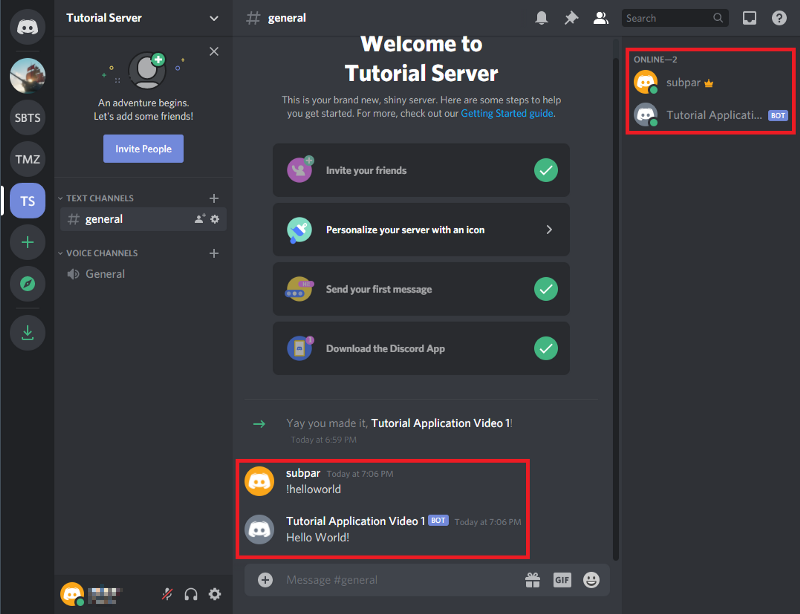
To test the hello world command we wrote, head on over to the Discord server we added the bot to earlier. On the right panel, you will see that the bot is now in the online status.
为了测试我们编写的hello world命令,请转到我们之前将机器人添加到的Discord服务器。 在右侧面板上,您将看到该机器人现在处于在线状态。
To test the command, simply enter !helloworld into the Discord channel. The bot will quickly respond back!
要测试该命令,只需在Discord通道中输入!helloworld 。 该机器人将Swift回复!
下一步(Next Steps)
Now that you have the basics down, there are many more things you can do with your Discord bot. In addition to special Discord methods that are provided, you can also add in any traditional python code to perform operations before interacting with the Discord server again.
现在您已经掌握了基础知识,使用Discord机器人可以做更多的事情。 除了提供的特殊Discord方法之外,您还可以添加任何传统的python代码以在再次与Discord服务器进行交互之前执行操作。
Keep an eye out for more posts related to using Discord.py and building Discord bots in python. If you have ideas or requests for other tutorials, let me know in the comments below.
请密切注意与使用Discord.py和在python中构建Discord机器人相关的更多帖子。 如果您有其他教程的想法或要求,请在下面的评论中告诉我。
完整的Bot脚本 (Full Bot Script)
# Imports
import discord
from discord.ext import commands


# Credentials
TOKEN = 'YOUR-TOKEN-HERE'


# Create bot
client = commands.Bot(command_prefix='!')


# Startup Information
@client.event
async def on_ready():
    print('Connected to bot: {}'.format(client.user.name))
    print('Bot ID: {}'.format(client.user.id))


# Command
@client.command()
async def helloworld(ctx):
    await ctx.send('Hello World!')


client.run(TOKEN)普通英语的Python(Python In Plain English)
Enjoyed this article? If so, get more similar content by subscribing to Decoded, our YouTube channel!
喜欢这篇文章吗? 如果是这样,请订阅我们的YouTube频道解码,以获得更多类似的内容!
discord linux


 被折叠的 条评论
为什么被折叠?
被折叠的 条评论
为什么被折叠?
 到【灌水乐园】发言


