


heroku
This article is also available on my personal blog.
在我的个人博客上也可以找到此文章。
This post is part of a series which aims how to obtain relevant tweets, based on hashtags, as notifications in an iOS app. You can see the main post here.
这篇文章是一系列文章的一部分,该文章旨在如何基于主题标签获取相关的推文,作为iOS应用程序中的通知。 您可以在此处查看主要帖子。
We’re going to see how to upload our app and local database to Heroku.
我们将了解如何将我们的应用程序和本地数据库上传到Heroku。
什么是Heroku? (What is Heroku?)
Heroku is a Cloud Service platform which allows us to deploy, run and manage Ruby, Node.js, Java, Python, Clojure, Scala, Go and PHP applications.
Heroku是一个云服务平台,它使我们能够部署,运行和管理Ruby,Node.js,Java,Python,Clojure,Scala,Go和PHP应用程序。
Dynos are fundamental pieces of Heroku architecture model, they provide computing processing on the platform. They are based on Linux Containers.
Dynos是Heroku体系结构模型的基本组成部分,它们在平台上提供计算处理。 它们基于Linux容器。
Each Dyno is isolated of the rest, so the commands which we run and the files that are stored there don’t affect other dynos. Also they run on the required environment for the applications to be run.
每个Dyno都与其余的Dyno隔离,因此我们运行的命令和存储在其中的文件不会影响其他dyno。 它们也可以在运行应用程序所需的环境中运行。
如何在Heroku上创建应用 (How to create an app on Heroku)
To be able to start to work with Heroku we can create a new account here. We do all the new account process, validate our email and login again in the page.
为了能够开始使用Heroku,我们可以在这里创建一个新帐户。 我们将执行所有新的帐户流程,验证我们的电子邮件,然后在页面中再次登录。
We have to download the Heroku client which will allow us to upload and setup our application from terminal. Here we can download the client.
我们必须下载Heroku客户端,这将允许我们从终端上载和设置应用程序。 在这里我们可以下载客户端。
Once we have the client installed, we open the terminal and run the command heroku login, which will ask us for our credentials.
安装完客户端后,我们将打开终端并运行heroku login命令,这将要求我们提供凭据。
With all the setup done for the client, we go to the folder of our project SimpleRTAppApi and run heroku create. This will give us the following output:
为客户端完成所有设置后,我们转到项目SimpleRTAppApi的文件夹并运行heroku create 。 这将为我们提供以下输出:
MacBook-Pro-de-Federico-Jordan:SimpleRTAppAPI federicojordan$ heroku create
Creating app… done, ⬢ polar-meadow-74884
https://polar-meadow-74884.herokuapp.com/ | https://git.heroku.com/polar-meadow-74884.git
Now we created the app on Heroku, which will have an linked git repository with our local changes. By this way if we want to deploy any change to the Heroku app, we simply would have to do a push to this branch.
现在,我们在Heroku上创建了该应用程序,该应用程序将具有一个链接的git存储库,其中包含我们的本地更改。 通过这种方式,如果我们要将任何更改部署到Heroku应用程序,我们只需要推送到该分支即可。
Heroku will create the app with a random name, in this case it will be polar-meadow-74884, we can rename it later in the dashboard.
Heroku将使用一个随机名称创建该应用,在这种情况下,它将为polar-meadow-74884 ,我们稍后可以在仪表板中对其进行重命名。
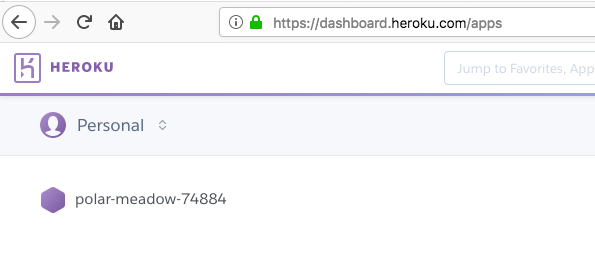
If we want to check that we’ve created the app successfully, we can simply go to the Heroku dashboard on https://dashboard.heroku.com/apps:
如果要检查是否已成功创建应用程序,则可以简单地转到https://dashboard.heroku.com/apps上的Heroku仪表板:
使用ClearDB创建MySQL数据库 (MySQL database creation with ClearDB)
Now we have to setup the server database. In this case, we’ll use a Heroku plugin called ClearDB.
现在,我们必须设置服务器数据库。 在这种情况下,我们将使用一个名为ClearDB的Heroku插件。
Basically it’ll allow us to create a MySQL database and provide us the tools to work with it.
基本上,它将允许我们创建一个MySQL数据库并为我们提供使用它的工具。
We go to our Heroku dashboard, and on Resources tab look for “ClearDB” in the Add-ons section.
我们转到Heroku仪表板,然后在“资源”选项卡上的“加载项”部分中查找“ ClearDB”。

We select ClearDB MySQL and this will create a database as we see on the following image:
我们选择ClearDB MySQL,这将创建一个数据库,如下图所示:
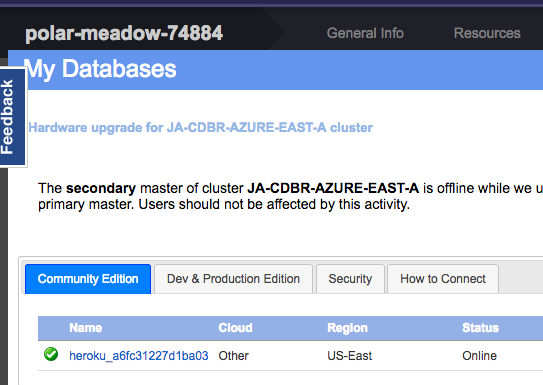
Our new database name will be heroku_a6fc31227d1ba03
我们的新数据库名称将为heroku_a6fc31227d1ba03
The next steps will be to find the needed credentials to visualize the database with SequelPro. We have to open the Heroku dashboard and go to the Settings tab:
下一步将是找到所需的凭据,以使用SequelPro可视化数据库。 我们必须打开Heroku仪表板,然后转到“设置”标签:
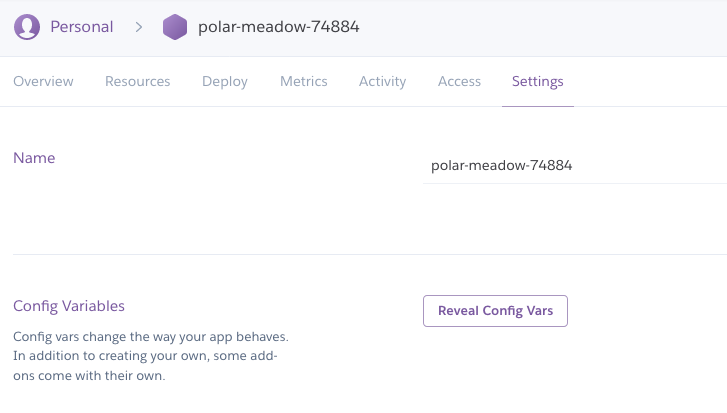
We tap on “Reveal Config Vars” and for the variable CLEARDB_DATABASE_URL it will show us something like the following:
我们点击“ Reveal Config Vars”,对于变量CLEARDB_DATABASE_URL,它将向我们显示如下内容:
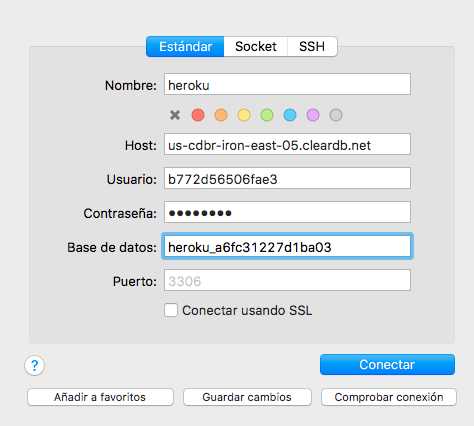
mysql://b772d56506fae3:db73ae24@us-cdbr-iron-east-05.cleardb.net/heroku_a6fc31227d1ba03?reconnect=trueFrom where we can obtain the following credentials:
从这里我们可以获得以下凭证:
User: From // until :. In this case b772d56506fae3.
用户:从//直到: 。 在这种情况下b772d56506fae3 。
Password: From : until @. In this case db73ae24.
密码:从:直到@ 。 在这种情况下db73ae24 。
Host: From @ until /. In this case us-cdbr-iron-east-05.cleardb.net.
主持人:从@直到/ 。 在这种情况下, us-cdbr-iron-east-05.cleardb.net 。
Database: From / until ?. In this case, the same we saw before: heroku_a6fc31227d1ba03.
数据库:从/直到? 。 在这种情况下,我们之前看到的内容相同: heroku_a6fc31227d1ba03 。
Important: If we got a Heroku free account, it’s possible that it ask us to validate our account entering a credit card data. There is no risk on submit that and there is not any cost on the used services in this post. It’s just a identity validation for the customer.
重要提示:如果我们有一个Heroku免费帐户,则可能会要求我们验证输入信用卡数据的帐户。 提交该文档没有风险,使用过的服务也不会产生任何费用。 这只是对客户的身份验证。
使用SequelPro迁移我们的本地数据库 (Migrating our local database with SequelPro)
Now with the credentials for our server database, we open SequelPro and enter them here:
现在有了服务器数据库的凭据,我们打开SequelPro并在此处输入它们:
If we want we can click on “Check connection” to see if everything is ok. We connect and it’ll open the database, totally empty for now.
如果需要,我们可以单击“检查连接”以查看是否一切正常。 我们进行连接,它将打开数据库,目前完全为空。
As we want to upload our local data, we have to migrate them to the server database using a SQL script.
当我们要上传本地数据时,我们必须使用SQL脚本将其迁移到服务器数据库。
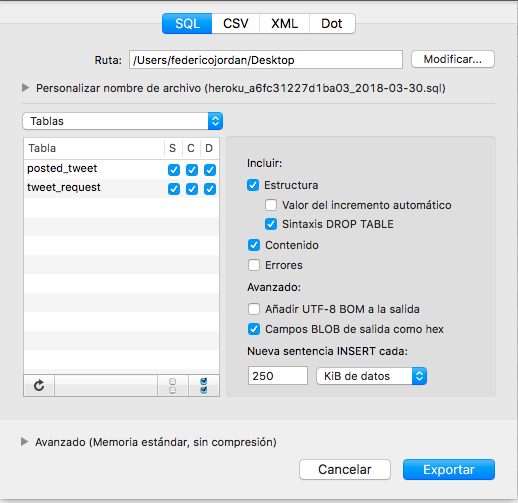
To do that, we open our local database on SequelPro (as we did previously) and go to File -> Export. It will open the following window:
为此,我们在SequelPro上打开本地数据库(就像我们之前所做的那样),然后转到File-> Export。 它将打开以下窗口:
We save the generated file, open the window with the server database, and go to File -> Import, where we select the file with the SQL script.
我们保存生成的文件,打开带有服务器数据库的窗口,然后转到File-> Import,在其中我们使用SQL脚本选择文件。
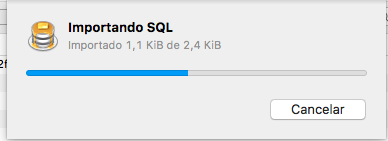
We wait it to finish the process and after that we can see our data on the Heroku database.
我们等待它完成该过程,然后我们可以在Heroku数据库上看到我们的数据。
使用与服务器数据库的连接 (Using the connection with the server database)
Now we’re going to test our app locally, but with the server database.
现在,我们将使用服务器数据库在本地测试我们的应用程序。
We open our .env file, where we had saved the local database data and we replace these values by the server ones:
我们打开.env文件,保存了本地数据库数据,并用服务器值替换了这些值:
Basically, we replace the values for DB_HOST, DB_USERNAME, DB_PASSWORD and DB_NAME by the ones seen previously.
基本上,我们将DB_HOST , DB_USERNAME , DB_PASSWORD和DB_NAME的值替换为之前看到的值。
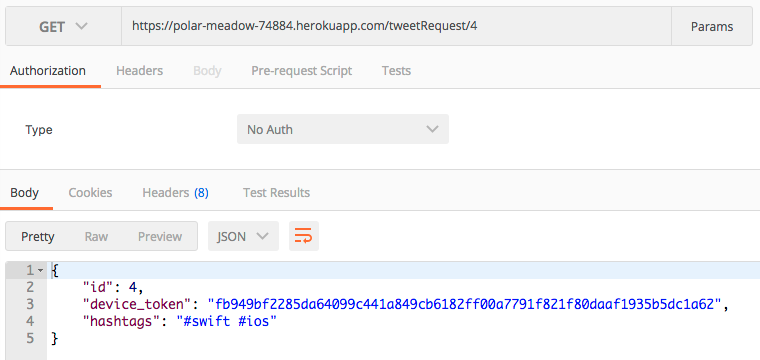
To test if we have a successful connection to the database, we open terminal app and run node server.js
为了测试我们是否成功连接到数据库,我们打开终端应用程序并运行node server.js
We can check with Postman doing a request to http://localhost:3000/tweetRequest/4 , being 4 a valid id number for the “tweet_request” table.
我们可以通过Postman向http://localhost:3000/tweetRequest/4发出请求来进行检查,该请求为4是“ tweet_request”表的有效ID号。

This show us that our app is ready to be deployed to Heroku.
这说明我们的应用已准备好部署到Heroku。
将我们的应用程序部署到Heroku (Deploying our app to Heroku)
The last step is to upload the app code to the Heroku git repo. But before all that, we have to tell Heroku which is the command that needs to be executed to run our application. It can be done with a Procfile.
最后一步是将应用程序代码上传到Heroku git repo。 但是在此之前,我们必须告诉Heroku运行该应用程序需要执行的命令。 可以使用Procfile完成。
What is a Procfile? It’s a text file which will have the information about which is the command to be run to init our application. We can create it with the following:
什么是Procfile? 这是一个文本文件,其中包含有关要启动应用程序的命令的信息。 我们可以使用以下方法创建它:
In this line we are defining a dyno called web which will execute the command node server.js . It’s very simple, just a line.
在这一行中,我们定义了一个称为web的dyno,它将执行命令node server.js 。 这很简单,只需一行。
With all of that, it’s just a matter of uploading our app to Heroku. We can do:
有了所有这些,只需将我们的应用程序上载到Heroku。 我们能做的:
git add .git commit -m “deploy to Heroku”git push heroku masterAnd with this, we’re going to have our code uploaded and the app will be run with the command node server.js. We can see the web service URL running the command heroku open. In my case the url will be:
至此,我们将上传代码,并且该应用程序将使用命令node server.js运行。 我们可以看到运行命令heroku open的Web服务URL。 在我的情况下,该网址为:
https://polar-meadow-74884.herokuapp.com/We can test that we’ve done everything well with Postman:
我们可以测试一下Postman是否做得很好:
We have our app uploaded!
我们已经上传了我们的应用程序!
Note: If you want to consume the uploaded API from the iOS app that we code before, you’ll have to change the embedded URL in the app by the Heroku one.
注意:如果您想使用我们之前编写的iOS应用中的上载API,则必须通过Heroku更改应用中的嵌入式URL。
如果服务器崩溃,该怎么办 (What to do if our server crashes)
It’s possible that we do an invalid request sometime, like requesting a tweetRequest that is not on the database. For those cases, our application should have the logic to deliver the proper error to the client, which is not covered by these posts.
我们有时可能会执行无效请求,例如请求不在数据库上的tweetRequest。 对于这些情况,我们的应用程序应具有将适当的错误传递给客户端的逻辑,而这些错误并未涵盖这些逻辑。
If that’s the case, or any other, we have to have the possibility to restore our server in case there is any error. To do that, we can to the Heroku dashboard, and on the right, where it’s “More”, we tap on “Restart all dynos”
如果是这种情况,或者有其他情况,我们必须能够还原我们的服务器,以防出现任何错误。 为此,我们可以转到Heroku仪表板,然后在右侧的“更多”位置点击“重新启动所有测功机”
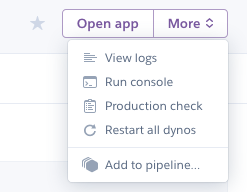
By this way, it will run the command node server.js, which is the command that we specified on our Procfile for the web dyno.
通过这种方式,它将运行命令node server.js ,这是我们在Procfile中为web dyno指定的命令。
We can also see why our application stopped working going to “View logs”. This will show us the last logs and we would see what was the error there.
我们还可以看到为什么我们的应用程序停止工作以转到“查看日志”。 这将向我们显示最后的日志,我们将看到那里的错误。
结论 (Conclusions)
With the base of a Node.js app and a local MySQL database, we saw how to upload it to a cloud service as Heroku.
借助Node.js应用程序和本地MySQL数据库,我们看到了如何将其作为Heroku上载到云服务。
We learned how to configure the account, the essential commands, migrate our local database to the server and test the server database and the deployed app.
我们学习了如何配置帐户,基本命令,将本地数据库迁移到服务器以及测试服务器数据库和已部署的应用程序。
Thanks for reading!
谢谢阅读!
More info about how to start working with Heroku here
有关如何在此处开始使用Heroku的更多信息
资料来源:(Sources:)
http://selimsalihovic.github.io/2016-02-07-using-mysql-on-heroku/
http://selimsalihovic.github.io/2016-02-07-using-mysql-on-heroku/
https://devcenter.heroku.com/articles/getting-started-with-nodejs#deploy-the-app
https://devcenter.heroku.com/articles/getting-started-with-nodejs#deploy-the-app
翻译自: https://medium.com/@federicojordn/simplertapp-deploying-a-node-js-app-to-heroku-fa47197309aa
heroku


 被折叠的 条评论
为什么被折叠?
被折叠的 条评论
为什么被折叠?
 到【灌水乐园】发言


