


使用curl上传文件
In many cases, it may be difficult to send data from a new machine to another. Examples of this include HPC facilities which are hidden behind a login portal but do not allow ssh tunnelling or simple headless machines which only have a few core programs installed. In this article, we look at using cURL (a command-line program for transferring data) to push a zipped file (containing log files) onto our google drive account for further analysis.
在许多情况下,可能很难将数据从新计算机发送到另一台计算机。 例如,HPC工具隐藏在登录门户后面,但不允许ssh隧道或仅安装了几个核心程序的简单无头机器。 在本文中,我们着眼于使用cURL(用于传输数据的命令行程序)将压缩文件(包含日志文件)推送到我们的google驱动器帐户中以进行进一步分析。
安装 (Installation)
Most machines will come with cURL installed (try typing which curl). If this is not the case we can install it with
大多数机器都安装了cURL(尝试键入which curl )。 如果不是这种情况,我们可以使用
sudo apt install curl # Linux Debian/Ubuntuor
要么
brew install curl # MacNow we have it installed, we can look at creating the credentials needed to send files.
现在我们已经安装了它,我们可以看看创建发送文件所需的凭据。
创建您的项目凭证 (Create your project credentials)
As we are allowing access to our google drive, we want to be able to manage this. This is done by creating a project with user-defined permissions to act as the proxy between our users (in this case us on a different machine) and our account. We start by going to the following page (link below) and creating a new project.
由于我们允许访问我们的Google驱动器,因此我们希望能够对其进行管理。 这是通过创建一个具有用户定义权限的项目来完成的,该项目充当我们的用户(在本例中,我们在另一台计算机上)和我们的帐户之间的代理。 我们首先进入下一页(下面的链接)并创建一个新项目。
After this has been done we select the Credentials tab (on the left) and “create credentials” from the top.
完成此操作后,我们选择“凭据”选项卡(在左侧),然后从顶部“创建凭据”。

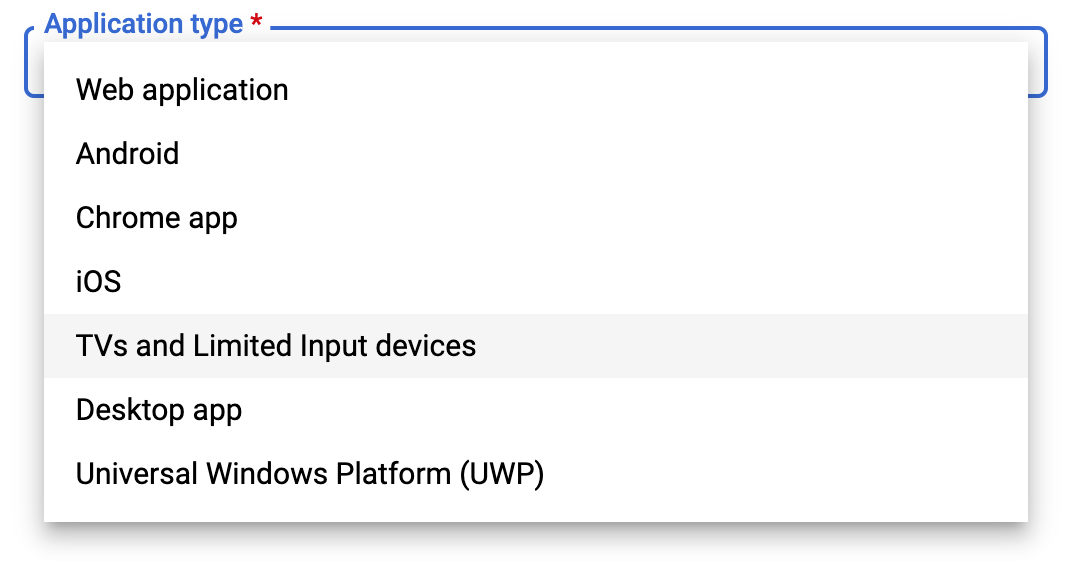
When asked for the app type, we select TV and other.
当询问应用程序类型时,我们选择电视等。
Finally, this generates a client id and a client seacret .
最后,这将生成一个client id和一个client seacret 。
This is your username and password so copy it somewhere secure.
这是您的用户名和密码,因此请将其复制到安全的地方。
现在我们需要验证设备 (Now we need to verify the device)
To do this we ssh into the machine we wish to upload from and run the following command:
为此,我们将ssh放入要从其上载的计算机中,并运行以下命令:
curl -d "client_id=<client_id>&scope=Doing so we get a response in the following format
这样做,我们将获得以下格式的回复
{"device_code": "<long string>",
"user_code": "xxx-xxx-xxx",
"expires_in": 1800,
"interval": 5,
"verification_url": "https://www.google.com/device"}
Here we need to visit the URL (https://www.google.com/device) and provide the user code to complete our verification. We now continue to select our google account and grant the relevant permissions. When doing this make sure to note down the device code for the next step.
在这里,我们需要访问URL( https://www.google.com/device )并提供用户代码以完成我们的验证。 现在,我们继续选择我们的Google帐户并授予相关权限。 执行此操作时,请确保记下下一步的设备代码。
获取承载代码 (Get Bearer code)
When we start uploading, this is the code we shall need to use to identify our account. We get it by using the following:
当我们开始上传时,这是我们用来识别我们的帐户的代码。 我们使用以下方法获得它:
curl -d client_id=<client id> -d client_secret=<client secret> -d device_code=<device code> -d grant_type=urn%3Aietf%3Aparams%3Aoauth%3Agrant-type%3Adevice_code https://accounts.google.com/o/oauth2/tokenThe client id and secret are saved from the first step, and the device code in the previous section. The output should be in the format:
从第一步开始保存客户机ID和密码,并在上一节中保存设备代码。 输出应采用以下格式:
{
"access_token": ".....",
"expires_in": 3599,
"refresh_token": "....",
"scope": "https://www.googleapis.com/auth/drive.file",
"token_type": "Bearer"
}
Write down the access_token as it will be needed in the upload stage.
记下在上载阶段将需要的access_token 。
上传文件 (Upload files)
The command we use to upload files is given below
下面给出了我们用于上传文件的命令
curl -X POST -L \
    -H "Authorization: Bearer <enter client secret here>" \
    -F "metadata={name :'<our.zip>'};type=application/json;charset=UTF-8" \
    -F "file=@<our.zip>;type=application/zip" \
    "https://www.googleapis.com/upload/drive/v3/files?uploadType=multipart"
Here you may need to enable the app API before being allowed to upload data. The link to do this is given in the error message if this is the case.
在这里,您可能需要先启用应用程序API,然后才能上传数据。 在这种情况下,错误消息中提供了执行此操作的链接。
Here multipart files are expected to only be a couple of MB in size. However if you are looking at moving larger files resumable may be better suited (see https://developers.google.com/drive/api/v3/manage-uploads )
在这里,多部分文件的大小预计只有几个MB。 但是,如果您要移动较大的文件,则可恢复的文件可能更适合(请参阅https://developers.google.com/drive/api/v3/manage-uploads )
将所有内容打包成脚本 (Wrap it all up in a script)
Now we know our commands work we can create an executable script to do all the work for us. Here we can provide a group of files, it zips them up and then sends them to google drive.
现在我们知道命令可以正常工作,我们可以创建一个可执行脚本来为我们完成所有工作。 在这里,我们可以提供一组文件,将其压缩,然后将其发送到Google驱动器。
We start by creating a new file with nano curlgoogle; and enter the following code — remember to add your own personal auth token! Python 2.7 has been chosen as this is still the default python version on older systems, however the script below should also run for python 3.
我们首先使用nano curlgoogle;创建一个新文件nano curlgoogle; 并输入以下代码-请记住添加您自己的个人身份验证令牌! 选择python 2.7是因为它仍然是旧系统上的默认python版本,但是下面的脚本也应该在python 3上运行。
It should require no new dependencies provided curl already exists on the system.
只要系统上已经存在curl,就不需要新的依赖关系。
#!/usr/bin/python'''
A quick python script to automate curl->googledrive interfacing
This should require nothing more than the system python version and curl. Written for python2.7 (with 3 in mind).Dan Ellis 2020
'''import os,sys,jsonif sys.version[0]=='3':
  raw_input = lambda(x): input(x)##############################
#Owner information goes here!#
##############################
name = 'curldata'
client_id= '<enter your client id>'
client_secret='<enter your client secret>'##############################
cmd1 = json.loads(os.popen('curl -d "client_id=%s&scope=https://www.googleapis.com/auth/drive.file" https://oauth2.googleapis.com/device/code'%client_id).read())str(raw_input('\n Enter %(user_code)s\n\n at %(verification_url)s \n\n Then hit Enter to continue.'%cmd1))str(raw_input('(twice)'))cmd2 = json.loads(os.popen(('curl -d client_id=%s -d client_secret=%s -d device_code=%s -d grant_type=urn~~3Aietf~~3Aparams~~3Aoauth~~3Agrant-type~~3Adevice_code https://accounts.google.com/o/oauth2/token'%(client_id,client_secret,cmd1['device_code'])).replace('~~','%')).read())
print(cmd2)# zip files
cmd3 = os.popen('zip -r %s.zip %s'%(name,' '.join(sys.argv[1:]))).read
print(cmd3)cmd4 = os.popen('''
curl -X POST -L \
    -H "Authorization: Bearer %s" \
    -F "metadata={name :\'%s\'};type=application/json;charset=UTF-8" \
    -F "file=@%s.zip;type=application/zip" \
    "https://www.googleapis.com/upload/drive/v3/files?uploadType=multipart"
    '''%(cmd2["access_token"],name,name)).read()print(cmd4)
print('end')
We then make it executable chmod a+x curlgoogle allowing us to use it in an executable manner:
然后,我们将其设置为可执行文件chmod a+x curlgoogle从而允许我们以可执行方式使用它:
./curlgoogle file1 file2.txt file3.jpg etc... 结论(Conclusions)
And there we have it, an easy way to send multiple log files from a headless machine to a google drive repository, which can be accessed by multiple people for analysis.
有了我们,这是一种将无头计算机中的多个日志文件发送到google驱动器存储库的简单方法,多个人可以访问该文件进行分析。
If you are in need of more information, stack overflow answers by Tanaike and HAKS (amongst others) were particularly helpful in creating this post.
使用curl上传文件


 被折叠的 条评论
为什么被折叠?
被折叠的 条评论
为什么被折叠?
 到【灌水乐园】发言


