


python 字符识别
Optical Character Recognition is the conversion of 2-Dimensional text data into a form of machine-encoded text by the use of an electronic or mechanical device. The 2-Dimensional text data can be obtained from various sources such as scanned documents like PDF files, images with text data in formats such as .png or .jpeg, signposts like traffic posts, or any other images with any form of textual data. There is a wide range of interesting applications for optical character recognition.
øptical字符识别是2维的文本数据转换成通过使用电子或机械设备的机器编码文本的形式。 二维文本数据可以从各种来源获得,例如扫描的文档(如PDF文件),带有文本数据(如.png或.jpeg格式)的图像,路标(如交通路标)或任何其他形式的文本数据的图像。 光学字符识别有许多有趣的应用。
The first time I came across optical character recognition was in my school days where our answer scripts with multiple choice type questions (MCQ’s) would be analyzed by these devices. The data extraction from these answer scripts could be done and the answers would be marked according to the answer key. Uhm, albeit a majority of people used to always complain that the result they got was not the one they desired. This could have been due to the fault/ incompetence of the device or the students perhaps were slightly misleading. However, with modern technologies, optical character recognition is used in a variety of applications and they are much more advanced. The accuracy of these devices has vastly improved.
我第一次遇到光学字符识别是在上学的时候,这些设备会分析带有多种选择类型问题(MCQ)的答案脚本。 可以从这些答案脚本中提取数据,并根据答案键标记答案。 嗯,尽管大多数人过去总是抱怨他们得到的结果不是他们想要的结果。 这可能是由于设备的故障/功能不全造成的,或者是学生可能会误导他人。 但是,随着现代技术的发展,光学字符识别已被用于各种应用中,并且它们的技术要先进得多。 这些设备的准确性已大大提高。
In this article, we will cover the basics of optical character recognition. Then, we will proceed to install the pytesseract module which we will be using for performing the optical character recognition. Initially, the installation was quite annoying and troublesome for me when I was getting started. So, I will try to simplify the steps for the installation process. We will then understand the various functions in the pytesseract module using python. Finally, we will end it with a code snippet covering the use of the optical character recognition alongside the google text to speech module combined.
在本文中,我们将介绍光学字符识别的基础知识。 然后,我们将继续安装pytesseract模块,该模块将用于执行光学字符识别。 刚开始时,安装对我来说很烦人且麻烦。 因此,我将尝试简化安装过程的步骤。 然后,我们将使用python了解pytesseract模块中的各种功能。 最后,我们将以一个代码片段结尾,该代码片段涵盖将光学字符识别与Google文本到语音模块结合使用的功能。
Note: The final code will be a combined code using both the text to speech and character recognition. This is the second part of the language model designing series. If you have no clue about the gTTS module, I would highly recommend the viewers to check out the below link. In the next part of this series, we will try to combine speech translation and optical character recognition with deep learning. To view this series in the order of your preference you can click the link here.
注意:最终代码将是结合使用文本到语音和字符识别的代码。 这是语言模型设计系列的第二部分。 如果您对gTTS模块一无所知,我强烈建议观众查看以下链接。 在本系列的下一部分中,我们将尝试将语音翻译和光学字符识别与深度学习相结合。 要按您的喜好顺序查看此系列,可以单击此处的链接。
光学字符识别如何正确工作? (How does optical character recognition work exactly?)
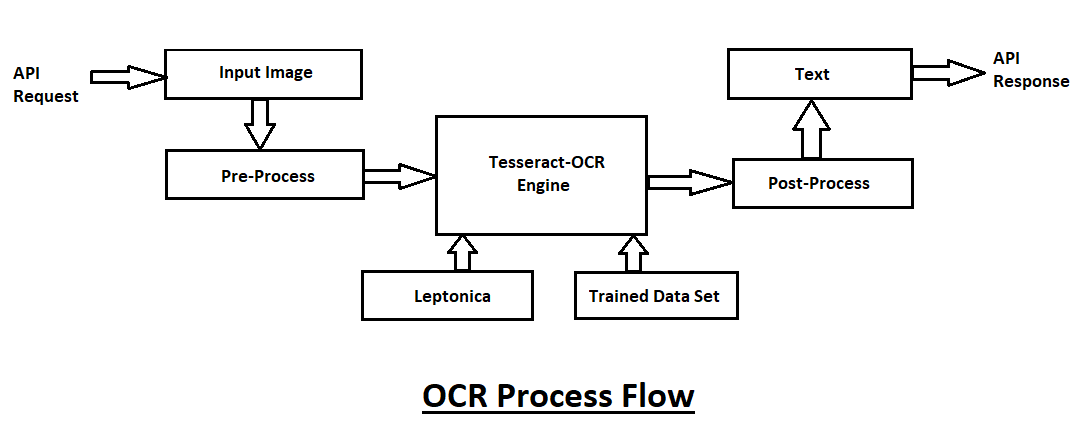
The optical character recognition process flow is demonstrated in the above block diagram. An API request is sent for the OCR operation to be performed. The input image is read and pre-processed accordingly. The text is formatted and extracted from the image. Using the trained dataset the image sent into the OCR engine is computed. The OCR engine tries to analyze the characters in the image and find the appropriate solutions. Once the engine finishes the analysis, it sends the data for another step of pre-processing and formatting to exclude any unnecessary items. Once This process is completed we will finally have the text data required. After this, an API response can be generated back to the user with the converted text data from the image.
在上述框图中说明了光学字符识别处理流程。 发送API请求以执行OCR操作。 读取输入图像并进行相应的预处理。 文本被格式化并从图像中提取。 使用训练后的数据集,可以计算出发送到OCR引擎的图像。 OCR引擎尝试分析图像中的字符并找到适当的解决方案。 引擎完成分析后,它将发送数据以进行下一步的预处理和格式化,以排除任何不必要的项目。 完成此过程后,我们将最终获得所需的文本数据。 此后,可以使用来自图像的转换后的文本数据将API响应返回给用户。
安装: (Installation:)
The installation might be a bit tricky. However, I will try to simplify the steps for installation so that you can get started as soon as possible. The first step is simple, you just install the pytesseract module using the pip command. Type the following command in the command prompt terminal/virtual environment —
安装可能有些棘手。 但是,我将尝试简化安装步骤,以便您尽快上手。 第一步很简单,您只需使用pip命令安装pytesseract模块。 在命令提示符终端/虚拟环境中键入以下命令-
pip install pytesseractWe have successfully installed the pytesseract module but when you try to run the code right away you will receive an error message which states that the tesseract module is not installed in your system. For this step to be completed, visit this site. This is the official site for windows tesseract. The installer for Windows for Tesseract 3.05, Tesseract 4, and development version 5.00 Alpha are available from Tesseract at UB Mannheim. These include the training tools. Both 32-bit and 64-bit installers are available.
我们已经成功安装了pytesseract模块,但是当您尝试立即运行代码时,您将收到一条错误消息,指出您的系统中未安装tesseract模块。 要完成此步骤,请访问此网站 。 这是Windows tesseract的官方网站。 可从UB Mannheim的 Tesseract获得Tesseract 3.05,Tesseract 4和Windows开发版本5.00 Alpha的Windows安装程序。 这些包括培训工具。 32位和64位安装程序均可用。
Choose the Installation of your preference and install it accordingly. You can add the pytesseract module to your path or just use it directly. I hope this solves most of the issues for the installation process. If you have any other queries feel free to let me know.
选择首选项的“安装”并进行相应的安装。 您可以将pytesseract模块添加到您的路径中,或直接使用它。 我希望这可以解决安装过程中的大多数问题。 如果您有任何其他疑问,请随时告诉我。
了解pytesseract模块: (Understanding the pytesseract module:)
Python-tesseract is a wrapper for Google’s Tesseract-OCR Engine. It is also useful as a stand-alone invocation script to tesseract, as it can read all image types supported by the Pillow and Leptonica imaging libraries, including jpeg, png, gif, bmp, tiff, and others. Additionally, if used as a script, Python-tesseract will print the recognized text instead of writing it to a file.
Python-tesseract是Google Tesseract-OCR引擎的包装。 它也可以用作tesseract的独立调用脚本,因为它可以读取Pillow和Leptonica图像库支持的所有图像类型,包括jpeg,png,gif,bmp,tiff等。 此外,如果将Python-tesseract用作脚本,它将打印识别的文本,而不是将其写入文件。
To understand this more intuitively let us look at the following simple code block —
为了更直观地理解这一点,让我们看下面的简单代码块-
# Importing the OCR library
import pytesseract


# Specifying the path
pytesseract.pytesseract.tesseract_cmd = r'C:/Program Files/Tesseract-OCR/tesseract.exe'


# Reading the image
image = cv2.imread('1.png')


# Extraction of text from image
text = pytesseract.image_to_string(image)
We import the pytesseract module and specify the path. We then read the image using the cv2 module. Finally we extract these images and return the text data. The image_to_string Returns the result of a Tesseract OCR run on the image to string. For more information on the tesseract OCR and its functions like image_to_string visit here.
我们导入pytesseract模块并指定路径。 然后,我们使用cv2模块读取图像。 最后,我们提取这些图像并返回文本数据。 image_to_string返回在图像上运行的Tesseract OCR的结果,以字符串形式显示。 有关tesseract OCR及其功能(如image_to_string)的更多信息,请访问此处 。
码: (Code:)
This section will contain the final code snippet combining both text to speech and optical character recognition. We will be using the recently installed pytesseract module alongside modules like gTTS and PIL. PIL stands for python imaging library which will be used for loading our images. The open-cv module cv2 can also be used for reading images. Let us look at how the entire code works in 3 parts.
本部分将包含最终的代码段,将文本到语音以及光学字符识别结合在一起。 我们将使用最近安装的pytesseract模块以及gTTS和PIL等模块。 PIL代表python映像库,该库将用于加载我们的图像。 open-cv模块cv2也可以用于读取图像。 让我们看一下整个代码如何由3部分组成。
1. Reading the Image —
1.阅读图像—
#Importing the libraries
import cv2
import pytesseract
from PIL import Image


# Specifying the path
pytesseract.pytesseract.tesseract_cmd = r'C:/Program Files/Tesseract-OCR/tesseract.exe'


# Reading the image
image = cv2.imread('1.png')


# Extraction of text from image
text = pytesseract.image_to_string(image)


# Printing the text
print(text)
In this code block, we are importing the required libraries and specifying the path to the Tesseract location. We will then proceed to read the image with the cv2 module. You can also use the PIL library for this. The command would be “Image.open()”. After this step, we will use the OCR library for the conversion of image into text data and print the required output.
在此代码块中,我们将导入所需的库并指定Tesseract位置的路径。 然后,我们将继续使用cv2模块读取图像。 您也可以为此使用PIL库。 该命令将是“ Image.open()”。 完成此步骤后,我们将使用OCR库将图像转换为文本数据并打印所需的输出。
2. Formatting the data —
2.格式化数据—
# Create the voice_text variable to store the data.


voice_text = ""


# Pre-processing the data


for i in text.split():
    voice_text += i + ' '

voice_text = voice_text[:-1]
voice_text
In this next code block, we are formatting the text data to get it one single line. We are basically performing pre-processing on the already obtained text data before passing it into the gTTS module for the process of speech translation.
在下一个代码块中,我们将格式化文本数据以使其一行。 在将其传递到gTTS模块进行语音翻译之前,我们基本上是对已经获得的文本数据进行预处理。
3. Converting into Speech —
3.转换成语音-
from gtts import gTTS
from playsound import playsound


tts = gTTS(voice_text)
tts.save("test.mp3")
playsound("test.mp3")
Finally, we will import the Google text-to-speech module and convert the text data in the form of an audio message. This is extremely useful for hearing a vocal audio for text data in PDF’s as well as images. If you are having any confusion related to the gTTS module, then refer to one of my previous articles to understand this concept better.
最后,我们将导入Google文本语音转换模块,并以音频消息的形式转换文本数据。 这对于收听PDF和图像中的文本数据的人声音频非常有用。 如果您对gTTS模块有任何困惑,请参阅我以前的一篇文章,以更好地理解此概念。
结论: (Conclusion:)
We have covered some of the concepts of optical character recognition with an intuitive understanding of how exactly OCR process flow works. I hope the installation procedure to get started with OCR technology with python was simplified and all of you could achieve the desired results. We understood a few functions of the pytesseract module and finally wrote a code combining both the gTTS and pytesseract module.
我们通过对光学字符识别(OCR)处理流程的工作原理的直观了解,涵盖了光学字符识别的一些概念。 我希望简化使用OCR技术和python的安装过程,并且所有人都能达到预期的效果。 我们了解了pytesseract模块的一些功能,并最终编写了结合gTTS和pytesseract模块的代码。
In the next part of this topic language model designing, we will look into how we can use deep learning technologies as well as OCR and TTS (text-to-speech) to develop a cool project.
在本主题语言模型设计的下一部分,我们将研究如何使用深度学习技术以及OCR和TTS(文本到语音)来开发一个很棒的项目。
I would highly recommend all of you to check out the below references for grasping the concepts and learning them better. Let me know if you have any queries and have a wonderful day!
我强烈建议大家阅读以下参考资料,以掌握这些概念并更好地学习它们。 让我知道您是否有任何疑问,祝您有美好的一天!
python 字符识别


 2万+
2万+


 被折叠的 条评论
为什么被折叠?
被折叠的 条评论
为什么被折叠?
 到【灌水乐园】发言


