


gatsby
My last adventure was migrating my crufty Jekyll site to Gatsby. I used to deploy my Jekyll site manually by building it locally and pushing the generated static content to the gh-pages branch on GitHub. With my new site in place, I decided it was time to leave my old ways behind and set up an automated pipeline to deploy my site to GitHub pages.
我的最后一次冒险是将我那简陋的杰基尔遗址迁移到盖茨比。 我曾经通过在本地构建我的Jekyll网站并将其生成的静态内容推送到GitHub上的gh-pages分支来手动部署我的Jekyll网站。 有了新站点后,我决定是时候放弃旧方法,并建立一个自动管道将我的站点部署到GitHub页面上了。
为什么选择GitHub Pages? (Why GitHub Pages?)
I’ve always used GitHub Pages to host my blog because it’s lightweight and integrates seamlessly with GitHub. It is simple, free, and provides free goodies like enforcing HTTPS by default and also supports adding a custom domain.
我一直使用GitHub Pages来托管我的博客,因为它是轻量级的并且可以与GitHub无缝集成。 它简单,免费,并提供免费的功能,例如默认情况下强制执行HTTPS,还支持添加自定义域。
在本地部署Gatsby网站 (Deploying a Gatsby Site Locally)
Before automating the deployment of my new Gatsby site, I learned how to deploy it locally. To do this, I added an entry to the scripts tag in package.json which creates a production-ready build for my Gatsby site.
在自动化新Gatsby站点的部署之前,我学习了如何在本地进行部署。 为此,我在package.json的scripts标签中添加了一个条目,该条目为我的Gatsby网站创建了可量产的版本。
"scripts": {
  ...
  "build": "gatsby build"
}
npm run build builds the site and places the generated assets in a folder called public. Copying this public folder to any HTTP server would deploy my site to that server.
npm run build会构建站点并将生成的资产放置在名为public的文件夹中。 复制此public文件夹中的任何HTTP服务器将部署我的网站到该服务器。
I started an HTTP server using http-server to serve the assets in the public folder which effectively deployed my site locally.
我开始使用一个HTTP服务器的HTTP服务器服务于资产在public有效地部署了我的网站在本地文件夹中。
➜  cd public
➜  http-serverStarting up http-server, serving ./
Available on:
http://127.0.0.1:8082
http://10.10.10.10:8082
http://192.168.13.12:8082
将Gatsby网站手动部署到Github Pages (Deploying a Gatsby Site Manually to Github Pages)
设置Github页面 (Setting up Github Pages)
I already had GitHub pages set up since I used it for my Jekyll site but I will go over the steps here for completeness.
自从我在Jekyll网站上使用GitHub页面以来,我已经设置了它,但是为了完整起见,我将在这里进行介绍。
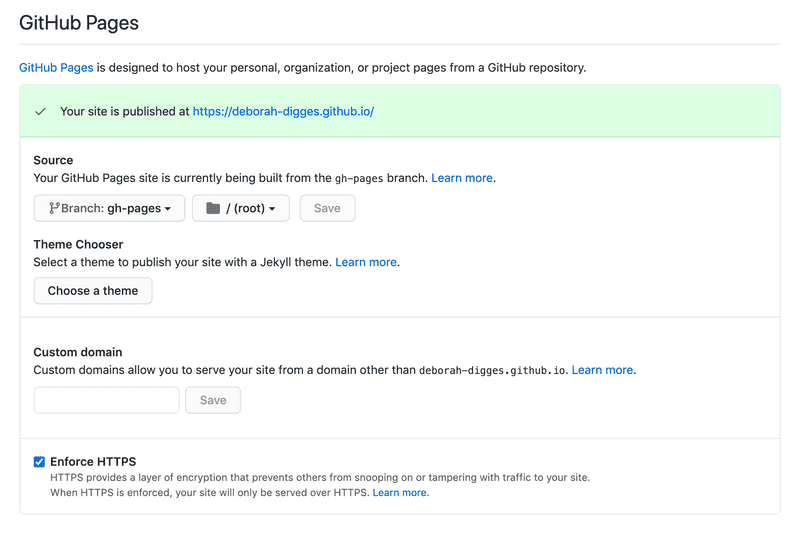
I headed to my GitHub repository’s settings page and scrolled down to the GitHub Pages section.
我转到GitHub存储库的设置页面,然后向下滚动到GitHub Pages部分。

I did not want the files generated by the Gatsby build process to clutter up my master branch so I chose the gh-pages branch as the source branch for my GitHub Pages site. Any static site I pushed to this branch would then be published at deborah-digges.github.io. I also liked the fact that Enforce HTTPS was enabled by default. All the security!
我不想让Gatsby构建过程生成的文件弄乱我的master分支,所以我选择gh-pages分支作为GitHub Pages站点的源分支。 然后,我推送到该分支的任何静态站点都将发布在deborah-digges.github.io 。 我还喜欢默认情况下启用Enforce HTTPS的事实。 一切安全!
手动部署(Deploying Manually)
I deployed the site manually to GitHub Pages by building the site locally and pushing only the public folder to the gh-pages branch on GitHub.
我通过在本地构建站点并将public文件夹仅推送到GitHub上的gh-pages分支,将站点手动部署到GitHub Pages。
This required a rather awkward sequence of commands.
这需要相当麻烦的命令序列。
That’s a mouthful and it’s easy to go and accidentally nuke your whole computer with commands like rm -r *. It's a good thing the gh-pages package exists to save us from ourselves.
这很容易,而且很容易用rm -r *类的命令意外地破坏整个计算机。 gh-pages软件包的存在是一件很不错的事情,它使我们从我们自己身上救出来。
I added the dependency to my project to give it a spin.
我将依赖项添加到我的项目中以使其旋转。
yarn add gh-pagesTo let gh-pages know where my repository was located, I added the homepage property in package.json.
为了让gh-pages知道我的存储库位于哪里,我在package.json添加了homepage属性。
{
  ...  "homepage": "deborah-digges.github.io"  ...
}
I added another script deploy to my package.json which does a build and then pushes the public folder to the gh-pages branch of my repository on Github.
我又增加了脚本deploy到我package.json这确实一个build ,然后推动public文件夹到gh-pages我在Github库的分支。
"scripts": {
  "build": "gatsby build",
  "deploy": "npm run build && gh-pages -d public"
}
And voila! I was able to deploy my site manually from my computer using the npm run deploy script. My site was then up and running at deborah-digges.github.io
瞧! 我可以使用npm run deploy脚本从计算机手动部署站点。 然后,我的网站在deborah-digges.github.io上启动并运行
✨连续地✨用Travis CI部署Gatsby网站(✨Continuously✨ Deploying a Gatsby Site with Travis CI)
Great! I deployed my Gatsby site! However, I wouldn’t want to be deploying a site manually from my laptop on a Friday afternoon.
大! 我部署了我的Gatsby网站! 但是,我不想在星期五的下午从笔记本电脑手动部署网站。
I decided to continuously deploy my site so that every new commit would automatically be deployed to my GitHub Pages site. This was exciting, but I had bypassed an important step which is having automated tests for my site to ensure that a bad commit did not bring down my entire blog. However, I decided to live dangerously and keep the testing of my Gatsby site for a future blog post.
我决定继续部署我的站点,以便每个新提交都将自动部署到我的GitHub Pages站点。 这令人兴奋,但是我绕过了重要的一步,即对我的站点进行自动化测试,以确保错误的提交不会使整个博客崩溃。 但是,我决定过着危险的生活,并继续对Gatsby网站进行测试,以备将来发表博客文章。
报名 (Signing Up)
I signed up on the Travis CI website with my GitHub account and consented to sharing my GitHub data with Travis.
我使用GitHub帐户在Travis CI网站上注册,并同意与Travis共享我的GitHub数据。
启用存储库 (Enabling the Repository)
I then headed to the repositories page and enabled builds for the deborah-digges.github.io repository.
然后,我转到存储库页面,并启用了deborah-digges.github.io存储库的构建。

添加travis.yml文件(Adding the travis.yml file)
I added a travis.yml file to the root of my repository to tell Travis what to do on every commit to master.
我在存储库的根目录中添加了一个travis.yml文件,以告诉Travis对master每次提交都要做什么。
The script runs the yarn run deploy step that I previously used to deploy my site locally. It is doing some extra steps to give Travis CI the right access to push to my GitHub repository.
该script运行以前在本地本地部署我的站点的yarn run deploy步骤。 它正在做一些额外的步骤,以使Travis CI有权访问推送到我的GitHub存储库。
It tells the git client installed on Travis CI who I am.
它告诉我安装在Travis CI上的git客户端。
git config --global user.name $GH_USERNAME
git config --global user.email $GH_EMAIL
To provide the script push access to my GitHub repository, I embedded my Github Token environment variable in the remote URL.
为了提供对我的GitHub存储库的脚本推送访问,我在远程URL中嵌入了Github Token环境变量。
git remote set-url origin "https://${GH_USERNAME}:${GH_TOKEN}@github.com/deborah-digges/Where did these environment variables come from?
这些环境变量来自哪里?
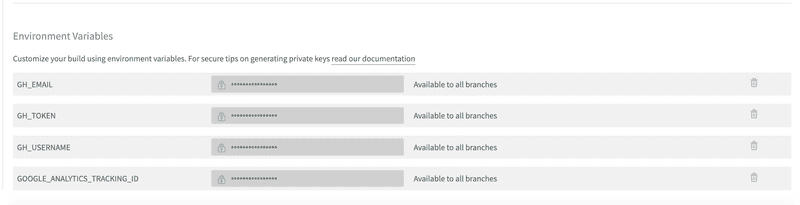
配置Travis环境变量 (Configuring Travis Environment Variables)
I headed to my repository settings and made the following environment variables available to my script.
我进入了存储库设置,并为脚本提供了以下环境变量。
It took me a few attempts to get this right, but I am proud to say that my site is now being continuously deployed to GitHub Pages on every commit to the master branch of my repository.
我花了一些时间才能做到这一点,但是我很自豪地说我的网站现在在每次提交到存储库的master分支时都不断地部署到GitHub Pages。

This was a lot of work, and in my quest to search for a simpler solution, I will explore using a GitHub Action to continuously deploy my site. Stay tuned for more dangerous living!
这是很多工作,在寻求更简单的解决方案的过程中,我将探索使用GitHub Action来持续部署我的网站。 请继续关注更多危险的生活!
Originally published at https://deborah-digges.github.io.
翻译自: https://medium.com/javascript-in-plain-english/gatsby-up-running-creating-a-cd-pipeline-68e561bb5f8e
gatsby


 890
890


 被折叠的 条评论
为什么被折叠?
被折叠的 条评论
为什么被折叠?
 到【灌水乐园】发言


