


figma 安装插件
** The code for this section is here.**
**此部分的代码 在这里 。**
Okay so we have done a lot of work but our plugin still looks like 🔥 hot trash™ and is missing some reactiveness.
好的,我们已经做了很多工作,但是我们的插件仍然看起来像 🔥 热垃圾桶™ ,并且缺少某些React性。
Design设计 (🖼 The Design)
Luckily for us we have a design we want to get to:
对于我们来说幸运的是,我们有一个想要达到的设计:
Looking at the final design we can see that there are a few things we are going to need to do every time the selection changes:
查看最终设计,我们可以看到每次选择更改时我们都需要做一些事情:
- Change element colours. 更改元素颜色。
- Change text values. 更改文本值。
♻️更改文本值 (♻️ Changing Text Values)
So we are going to start off by writing some functions in ui.html that will prevent this from becoming very repetitive. Inside <script/> write the following:
因此,我们将从在ui.html中编写一些函数开始,以防止此过程变得非常重复。 在<script/>编写以下内容:
This 👆takes two parameters: an id to find the right html element and the text we want to replace it with. So we can use it to replace text content like this:
这有两个参数:用于找到正确的html元素的id和我们要替换为的text 。 因此我们可以使用它来替换文本内容,如下所示:
Nice and clean.
干净整洁。
♻️改变元素的颜色 (♻️ Changing Element Colours)
Now we can do the same for changing an element’s colour, with a few differences. Firstly, because we want to change more than one element at a time we are going to use classes and not ids. Secondly, because we are changing both p and div elements we need to check what kind of element it is before changing the colour:
现在,我们可以为更改元素的颜色执行相同的操作,但有一些区别。 首先,因为我们想一次更改多个元素,所以我们将使用classes而不是ids 。 其次,由于我们同时更改了p和div元素,因此需要在更改颜色之前检查它是哪种元素:
We fetch a list of all elements with a specific class name and loop through that list checking each element’s type. If it’s a div we use background-color: instead of color: to prevent changing the wrong thing.
我们获取具有特定类名的所有元素的列表,并循环遍历该列表,检查每个元素的类型。 如果是div则使用background-color:而不是color:来防止更改错误的内容。
Notice how we use a for loop to iterate through elements? That’s because getElementsByClassName() does not return an array but instead returns an “array-like” list that doesn’t have array methods like .map().
注意我们如何使用for循环迭代 elements ? 这是因为 getElementsByClassName() 不会返回 array ,而是返回一个不包含 .map() 这样的数组方法的“类似数组”的列表 。
Use the changeColor() function like this to easily change the colour of multiple elements at once:
像这样使用changeColor()函数可以轻松地一次更改多个元素的颜色:
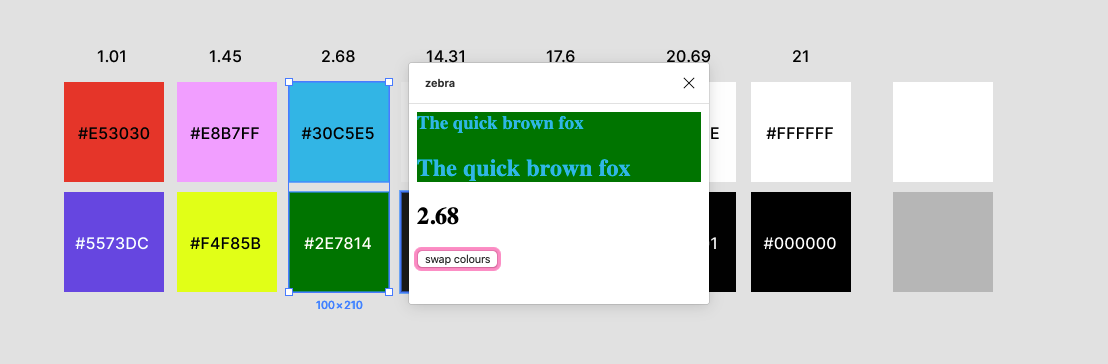
We should see something like this if everything goes well:
如果一切顺利,我们应该看到类似这样的内容:
Score更新分数 (💯 Updating Scores)
The scores are tricky because when we update them we need to change both their colour and their text content and we have to do it in two places at once. We’re going to write some CSS classes to handle the colour of the different scores. We can just write them inside <style/> like so:
分数很棘手,因为更新分数时,我们需要同时更改其颜色和文本内容,并且必须一次在两个位置进行更改。 我们将编写一些CSS类来处理不同乐谱的颜色。 我们可以像这样在<style/>编写它们:
Then with a custom function we can handle changing their className and text content at the same time:
然后,使用自定义函数,我们可以同时更改其className和文本内容:
Before we test it, hop over to code.js and alter the figma.showUI() call so that it spawns a larger window:
在测试它之前,请code.js并更改figma.showUI()调用,以便产生更大的窗口:
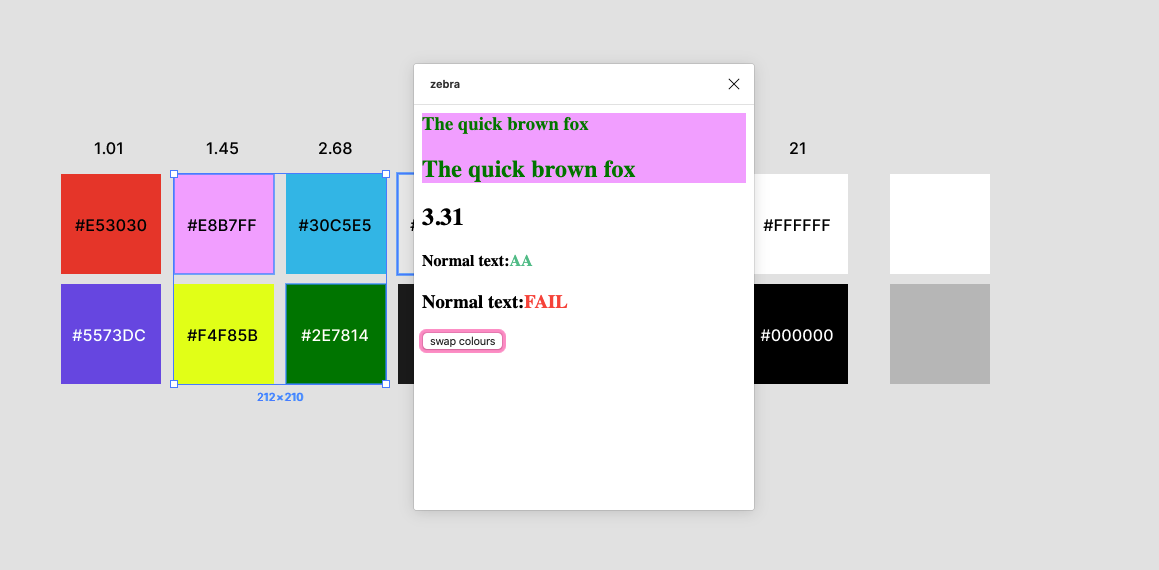
figma.showUI(__html__, { width: 340, height: 405 })And now we should see this when testing the plugin:
现在我们在测试插件时应该看到以下内容:
That’s basically everything we needed 🎉.
基本上这就是我们需要的一切。
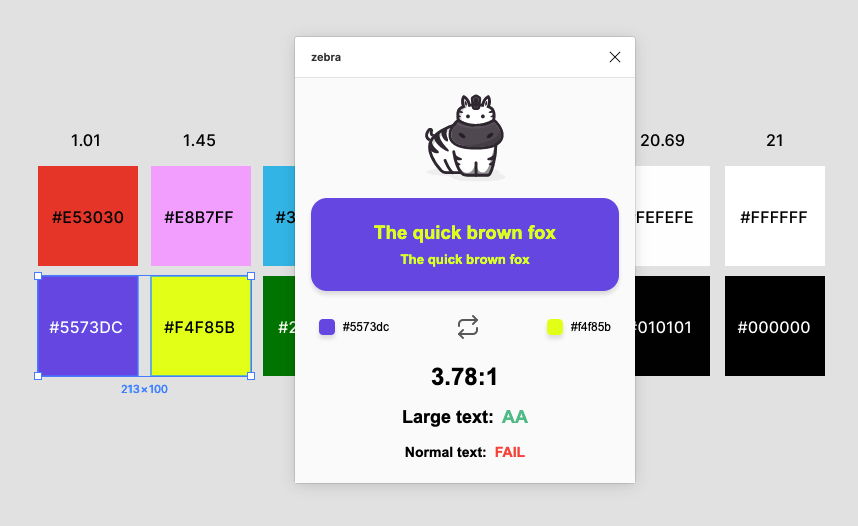
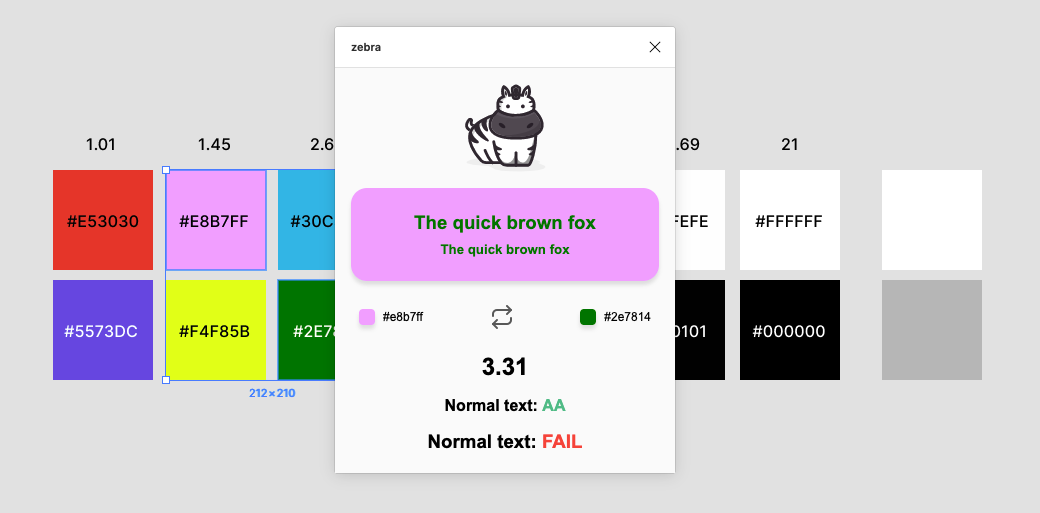
Yes, it still looks like 🔥hot trash™️. If you want to style the UI on your own you can totally do that from here. If you want to just copy my html and css you can find it here. In my version I added a few more changing elements like the colour blocks with hex values:
是的,看起来仍然像 🔥 热垃圾™ ️。 如果您想自己设置UI样式,则可以完全从这里开始。 如果您只想复制我的html和CSS,可以在这里找到。 在我的版本中,我添加了一些其他更改元素,例如带有十六进制值的色块:
I’m not going to spend time going through how to make it look pretty but I do want to go through some optional improvements I made.
我不会花时间去看如何使它看起来很漂亮,但是我确实想经历一些我做出的可选改进。
If you want you can easily stop here. The code for the final plugin is here.
如果您愿意,可以轻松在这里停下来。 最终插件 的代码在 这里。
Web与Webpack捆绑 (🌯 Bundling with Webpack)
If you did copy the HTML and CSS from the ui.html in that step, you will see that we have everything in one 200+ line file. All our CSS is in <style/>, all our JS is in <script/> and all our SVGs are inline in the HTML. This makes it difficult to read and if our plugin were a bit more complicated it would be a real problem.
如果您在该步骤中确实从ui.html复制了HTML和CSS,您将看到我们将所有内容都保存在一个200+行文件中。 我们所有CSS在<style/> ,我们所有的JS在<script/> ,所有SVG在HTML中都是内联的。 这使它很难阅读,如果我们的插件稍微复杂一点,那将是一个真正的问题。
The bummer is if we wanted to split things up into their own files it won’t just work™. What we need to do is use something called a bundler. All this does is take all our separate files, code.js, ui.html, ui.css, and bundle them into one JS file and one HTML file that Figma can read. That way we can split our code up any way we want in development.
令人讨厌的是,如果我们想将内容拆分成自己的文件,那将不仅仅适用于TM。 我们需要做的是使用称为捆绑器的东西。 所有这些都是将我们所有单独的文件code.js , ui.html , ui.css打包成一个JS文件和一个Figma可以读取HTML文件。 这样一来,我们便可以将代码拆分为开发所需的任何方式。
The Figma docs have a step-by-step guide to doing this so if you want to split things up I recommend following it.
Figma文档提供了执行此操作的分步指南 ,因此,如果您想分解内容,我建议您遵循它。
平滑粗糙边缘 (💎 Smoothing Rough Edges)
There were a few cases where the plugin wasn’t a super great experience.
在某些情况下,该插件并不是非常出色的体验。
- Without a selection the plugin is blank. 如果没有选择,则插件为空白。
If the user selects less than two layers the plugin doesn’t respond. This is not a big deal but I think it feels a little broken so I wanted to handle this by doing a contrast check with white in this case.
如果用户选择的层数少于两层,则插件不会响应。 这没什么大不了的,但是我认为感觉有点破损,因此在这种情况下,我想通过对白色进行对比检查来处理。
- If the selected layers don’t have any fills in them then the plugin throws an error. I want to catch that error and present a more useful message. 如果所选的图层中没有任何填充,则插件将引发错误。 我想捕获该错误并提出一条更有用的消息。
So that the plugin isn’t blank when a user starts it up I decided to assign some default values to our global variables, and then call calculateAndSendContrast() on plugin start:
为了使插件在用户启动时不会空白,我决定为我们的全局变量分配一些默认值,然后在插件启动时调用calculateAndSendContrast() :
let foregroundColor = [0, 0, 0] // black
let backgoundColor = [255, 255, 255] // white
let foregroundAlpha = 1
let backgroundAlpha = 1
// call on plugin start
figma.showUI(__html__, { width: 340, height: 405 })
calculateAndSendContrast(foregroundColor, foregroundAlpha, backgoundColor)
This way the plugin starts up with white as the background and black as the foreground.
这样,插件将以白色为背景启动,以黑色为前景启动。
To handle only one layer being selected I extracted the filtering we do on the selected layers into its own function and added a notify event if it returns nothing:
为了只处理被选择的一层,我将对选定的层所做的过滤提取到其自己的函数中,并在未返回任何内容的情况下添加了notify事件:
function findFills(nodes) {
  const nodesWithFills = nodes.filter(
    node =>
      node.fills && node.fills.length > 0 && node.fills[0].type === 'SOLID'
  )
  if (nodesWithFills.length <= 0) {
    return figma.notify('Please select a layer that has a solid fill', {
      timeout: 1000,
    })
  }
  const fills = nodesWithFills.map(node => node.fills[0])
  return fills
}
And then when selection changes I only check if there are actually any fills in the selection:
然后,当选择更改时,我仅检查选择中是否确实有填充:
figma.on('selectionchange', () => {
  const fills = findFills(figma.currentPage.selection)
  if (fills.length > 1) {
  // ...
  }
  if (fills.length === 1) {
    const fills = findFills(figma.currentPage.selection)
    foregroundColor = getRGB(fills[0].color)
    foregroundAlpha = fills[0].opacity
    calculateAndSendContrast(foregroundColor, foregroundAlpha, backgoundColor)
  }
})
If there is only one fill I do a comparison with the previous backgroundColor value which is initially white.
如果只有一个填充,我将与先前为白色的backgroundColor值进行比较。
And I think that’s about it. 🎉
我想就是这样。 🎉
As always the code for this plugin is here split up into steps so it is easier to follow. If you notice any issues please create an issue on the repo or better yet make a PR 😎
与往常一样,此插件的代码在此处分为多个步骤,因此更易于遵循。 如果您发现任何问题,请在回购中创建一个问题,或者更好地进行PR😎
🙏学分: (🙏 Credits:)
🙌 A lot of the code for checking colour contrast came from the brilliant repo for contrast-ratio.com.
🙌很多关于检查色彩对比的代码来自辉煌回购的contrast-ratio.com 。
👊 Tanya Hirst made the dope illustration of a zebra. You can check out her dribbble here.
👊 塔尼亚·赫斯特(Tanya Hirst)画了斑马的涂料插图。 你可以在这里查看她的运球 。
😍 The Figma team and their brilliant tool and their brilliant docs . A lot of the explanations were stolen from their docs site.
Fig Figma团队及其出色的工具和出色的文档 。 许多解释是从其文档站点窃取的。
- ❤️ Everyone on the Figma plugin slack . Searching through past issues helped a lot. ❤️Figma插件松弛的每个人。 搜索过去的问题很有帮助。
翻译自: https://blog.prototypr.io/figma-plugin-tutorial-6-6-638ac10ecae5
figma 安装插件


 1989
1989


 被折叠的 条评论
为什么被折叠?
被折叠的 条评论
为什么被折叠?
 到【灌水乐园】发言


