


 本文介绍了如何在Figma设计工具中使用真实的内容进行设计,以提升设计的准确性和用户体验。通过引用外部资源,设计师可以更好地模拟实际项目中的数据,从而创建更具代表性的设计原型。
figma设计
Content is king. Designers have known for quite some time now that it’s best to ditch Lorem ipsum and work with real content. Until recently though, it hasn’t been really easy to do. The main question is:
çontent为王。 设计师已经知道了很长时间了,最好抛弃Lorem ipsum并处理真实内容。 直到最近,这还不是很容易做到。 主要问题是:
How do you get real content into the design tool?
您如何将真实内容纳入设计工具?
I’m here to show you how. There are actually several ways of doing this and we will look at a specific one but you are free to explore (and I am going to hint at other ways at the end of this tutorial).
我在这里向您展示如何。 实际上,有几种方法可以做到这一点,我们将介绍一种特定的方法,但是您可以自由探索(我将在本教程的最后暗示其他方法)。
In this tutorial, we will:
在本教程中,我们将:
- model and create content 建模和创建内容
- design a simple product page 设计一个简单的产品页面
- connect real content to elements in our design file 将真实内容连接到我们设计文件中的元素
This is pretty exciting and I can’t wait to show you. Before we dive in, let’s briefly look at a mindset that this tutorial is coming from.
这非常令人兴奋,我迫不及待地向您展示。 在深入探讨之前,让我们简要地看一下本教程的思路。
内容至上的设计 (Content-first design)
For years, the prevalent mindset in design practice has been “form first, content second”. Designers would come up with layouts and then fit (or rather cram) real content in the existing layout. This is problematic for several reasons.
多年以来,设计实践中普遍存在的心态是“形式第一,内容第二”。 设计人员会提出布局,然后在现有布局中放入(或填入)真实内容。 这出于几个原因是有问题的。
It’s easy to run into a big mismatch between the design and the content. More importantly, though, it makes content second priority even though that’s what users and customers come to the business for.
容易在设计和内容之间出现很大的不匹配。 不过,更重要的是,即使用户和客户正是出于此目的,它仍将内容放在第二位。
This mindset has started to shift towards a content-first design in recent years. It’s the approach of thinking through the content first, modelling it, creating it and only then designing around it.
近年来,这种思维方式已开始转向内容优先的设计。 它是首先考虑内容,对其进行建模,创建它,然后才围绕它进行设计的方法。
I encourage you to read more about it: https://responsivedesign.is/design/content-first-design/
我鼓励您阅读有关此内容的更多信息: https : //sensitivedesign.is/design/content-first-design/
Now that we're on the same page, grab yourself a cup of your favourite hot beverage and let’s start.
现在我们在同一页上,为自己准备一杯您最喜欢的热饮料,然后开始吧。
在本教程中您需要什么 (What you'll need in this tutorial)
To make this happen, we’re gonna need a couple of things:
为了实现这一目标,我们需要做一些事情:
Source of content (I chose Kentico Kontent, the content-as-a-service platform I’m working on)
内容来源(我选择了Kentico Kontent ,我正在使用的内容即服务平台)
Design tool (Figma, because it's cool)
设计工具( Figma ,因为它很酷)
- Plugin to fetch the content and put it into the design file 插件来获取内容并将其放入设计文件
For the last bit, the “API / JSON Sync” plugin by Emin Sinani is a perfect choice. I know that API and JSON may sound scary but don’t worry, we won’t be writing any code. We will only fiddle with some URLs.
最后, Emin Sinani的“ API / JSON Sync”插件是一个完美的选择。 我知道API和JSON听起来很吓人,但是不用担心,我们不会编写任何代码。 我们只会摆弄一些URL。
Here's a visual overview of how it will work:
以下是其工作方式的直观概述:
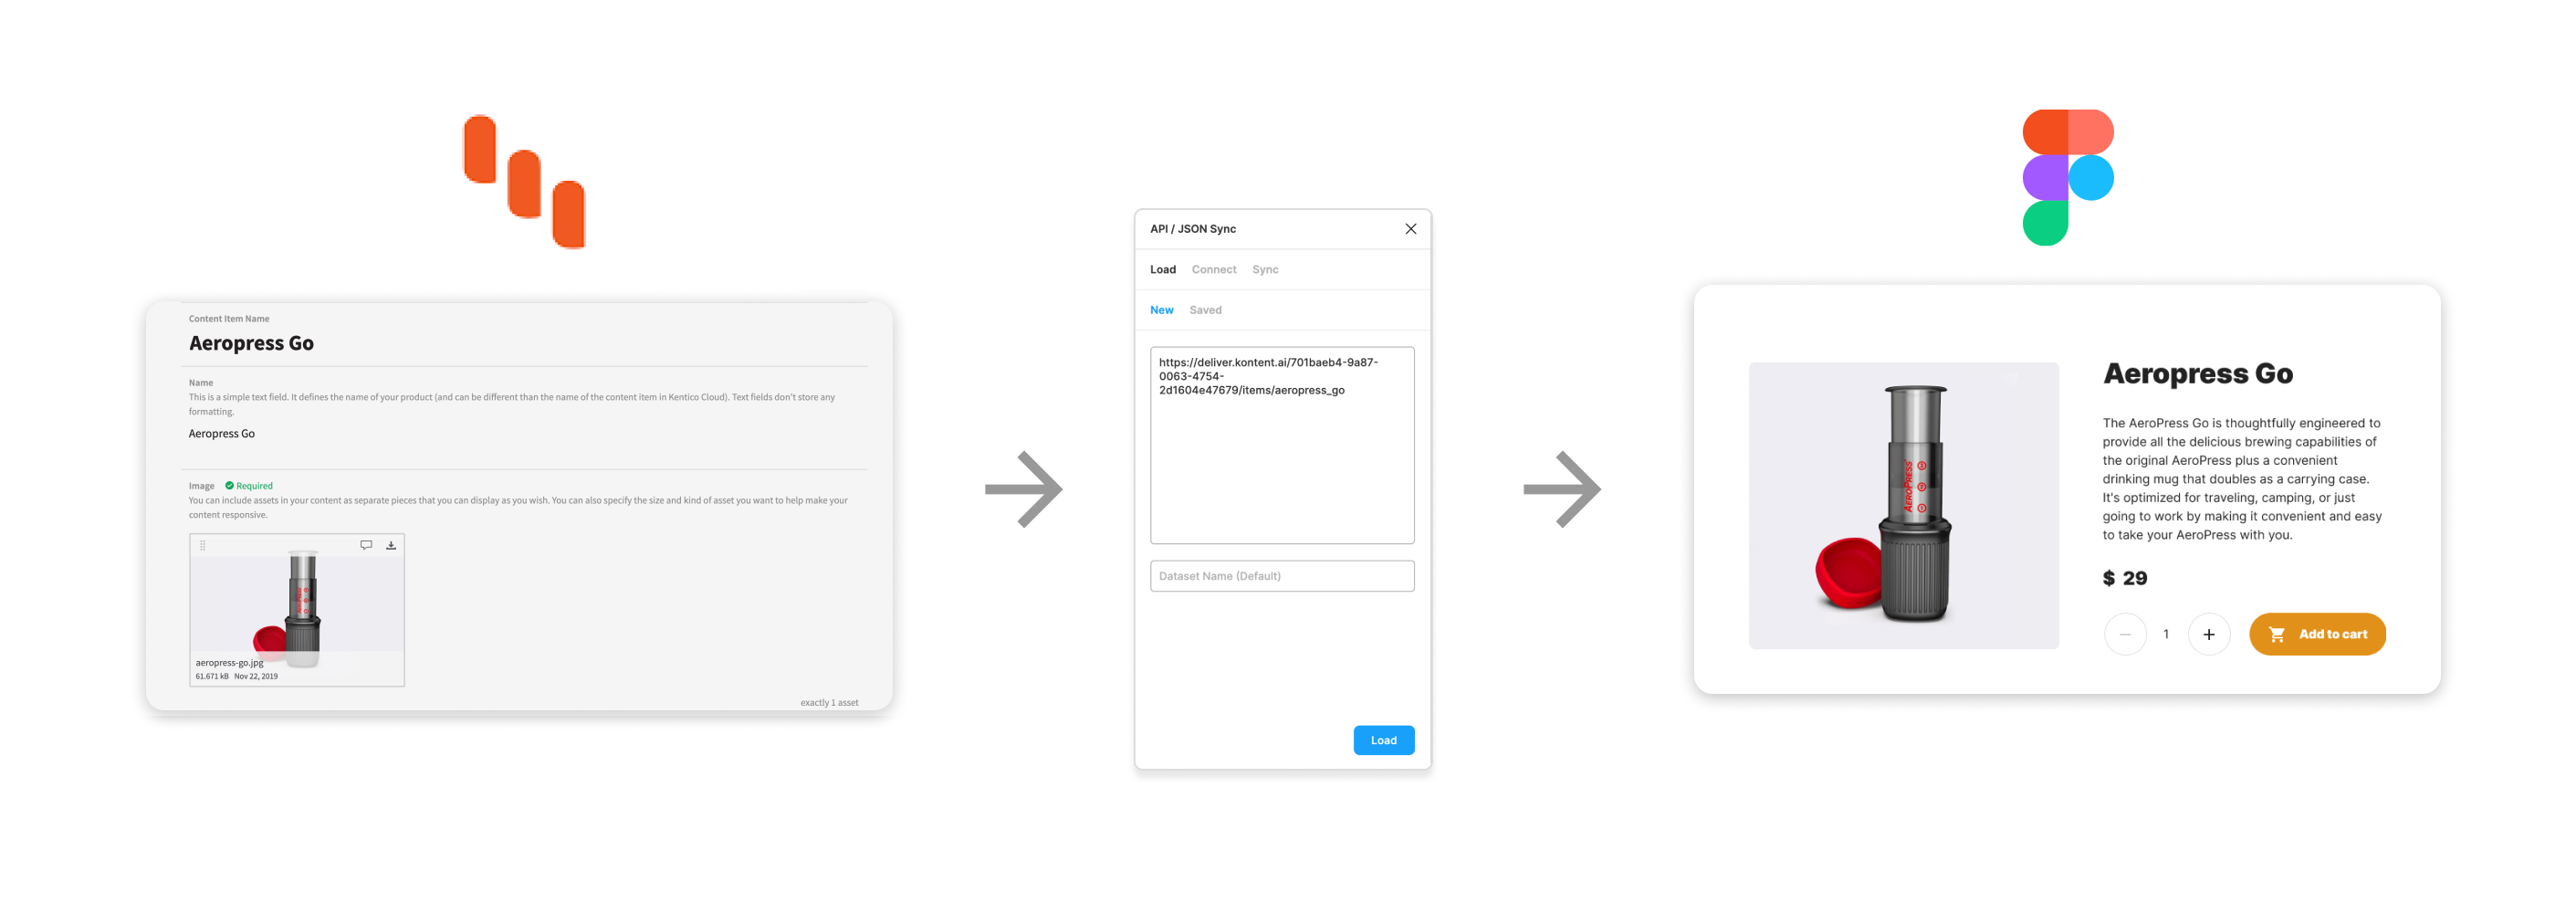
First, we will define, model and create the content we need. We’ll then go and design a simple product page for a coffee e-shop using that content. Finally, we'll populate the design with the content we prepared using the API/JSON sync plugin.
首先,我们将定义,建模和创建所需的内容。 然后,我们将使用该内容为咖啡店设计一个简单的产品页面。 最后,我们将使用使用API / JSON同步插件准备的内容填充设计。
I encourage you to create everything with me as you’ll go along to try it for yourself.
我鼓励您与我一起创造一切,然后继续自己尝试。
步骤1:为内容建模 (Step 1: Modelling content)
First, we have to think about the content we’re going to need and model it. For the purpose of this tutorial, I’m going to keep very simple. Let's say we're selling Aeropress Go on our e-shop (because Aeropress is awesome). The most basic content we'll need is:
首先,我们必须考虑我们需要的内容并对其建模。 就本教程而言,我将保持非常简单。 假设我们在我们的网上商店出售Aeropress Go(因为Aeropress很棒)。 我们需要的最基本的内容是:
- Name 名称
- Short description 简短的介绍
- Image 图片
- Price 价钱
Next, we’re going to need a source for this content and a place to model it. I’m gonna use Kentico Kontent but feel free to substitute it with a headless CMS of your choice.
接下来,我们将需要此内容的来源以及对其进行建模的地方。 我将使用Kentico Kontent,但可以用您选择的无头CMS替代它。
You can create a free account in Kontent and a new project for this (I named mine “Coffee Magazine”).
您可以在Kontent中创建一个免费帐户,并为此创建一个新项目(我将其命名为“ Coffee Magazine”)。
We’ll go to the Content types section and create a new type (let’s call it “Product”) which we’ll use to create our product later. Knowing what content we’ll be working with, we’ll add corresponding content elements:
我们将转到“内容类型”部分,并创建一个新类型(我们称其为“产品”),该类型将在以后用于创建产品。 知道我们将使用的内容后,我们将添加相应的内容元素:
- Text element for the name 名称的文本元素
- Image element for the product image 产品图片的图片元素
- Rich text element for the description 描述的富文本元素
- Number element for the price 价格的数字元素
We’re keeping it simple so that’s all we need for now.
我们将其保持简单,这就是我们现在所需要的。
One thing that’s going to be important for us later is the codename of each element. We’ll use it to tell which element is which when we fetch the data via the plugin in Figma. Go to each element and note down its codename.
对我们以后重要的一件事是每个元素的代号 。 通过Figma中的插件获取数据时,我们将使用它来判断哪个元素是哪个。 转到每个元素并记下其代号。
Good job! We just modelled how our content will look like and now we can continue with creating some.
做得好! 我们只是建模了内容的外观,现在我们可以继续创建内容。
步骤2:建立内容 (Step 2: Creating content)
With the right content type ready, we can create a new item to start working on our product’s content.
准备好正确的内容类型后,我们可以创建一个新项目来开始处理我们产品的内容。
We’re gonna write the name, upload the product image, and write a short description. Finally, we’ll give it a price of $34 so that's what we'll put in the number element.
我们将写下名称,上传产品图片并写上简短说明 。 最后,我们给它一个$ 34的价格,这就是我们放入数字元素中的价格。
The next step is to publish the content item because the API will only give us content from published items.
下一步是发布内容项,因为API仅会向我们提供已发布项的内容。
Nice, the content is ready. We can now jump to the fun part and start designing our product page.
好的,内容已经准备好了。 现在,我们可以跳到有趣的部分,开始设计我们的产品页面。
步骤3:设计产品页面 (Step 3: Designing the product page)
Because the content we’ll need is already prepared, it gives us a pretty good idea about what’s gonna be on the page and we can design for it accordingly. This is the big benefit of the content-first approach.
因为我们需要的内容已经准备好了,所以它使我们对页面上将要显示的内容有了一个很好的了解,我们可以据此进行设计。 这是内容优先方法的最大好处。
Let’s jump into Figma and design our layout. I won’t go into detail here so that you can get creative and design it however you want (and to keep the tutorial reasonably long).
让我们跳入Figma并设计布局。 我在这里不做详细介绍,以便您可以按自己的意愿进行创造性的设计和设计(并保持本教程相当长的时间)。
I created a very simple layout for the page that contains all the elements we’re going to need. Most importantly, the name, description, price and image elements.
我为页面创建了一个非常简单的布局,其中包含我们将需要的所有元素。 最重要的是名称,描述,价格和图像元素。
Because the content can change in the future, it’s good practice to use auto-layout so that for example longer description or longer name won’t break our design.
由于内容将来可能会更改,因此最好使用自动版式,以便较长的描述或较长的名称不会破坏我们的设计。
This is what our page looks like now:
这是我们的页面现在的样子:
You can get the Figma design file containing the template as well as the finished design.
您可以获得包含模板以及完成设计的Figma设计文件 。
步骤4:以真实内容填充设计 (Step 4: Populating the design with real content)
We are finally getting to the meat of this tutorial. We’re now ready to do the final step and populate our design with content we previously created.
我们终于了解了本教程的内容。 现在,我们准备执行最后一步,并使用我们先前创建的内容填充设计。
If you haven’t already, go ahead and install the API/JSON Sync plugin.
如果还没有安装,请继续安装API / JSON Sync插件 。
When you open it up, you’ll see that you can insert a URL or a JSON. We’re gonna be working with an API URL.
打开它时,您会看到可以插入URL或JSON。 我们将使用API URL。
Let’s open up Kentico Kontent’s Delivery API documentation. We need to find out how we can retrieve elements from a specific item. The API can provide us with a specific URL which, when visited, will return a JSON file:
让我们打开Kentico Kontent的Delivery API文档 。 我们需要找出如何从特定项目中检索元素的方法。 API可以为我们提供特定的URL,该URL在被访问时将返回JSON文件:
This is exactly the URL we need to feed the plugin in Figma:
这正是我们需要在Figma中提供插件的URL:
https://deliver.kontent.ai/{project_id}/items/{item_codename}
https://deliver.kontent.ai/ {project_id} / items / {item_codename}
Now we’ll go back to Kentico Kontent to get the Project ID and the item codename.
现在,我们将返回Kentico Kontent获取项目ID和项目代号。
You can easily copy the project ID from the URL in your browser:
您可以轻松地从浏览器中的URL复制项目ID:
And you will find the item codename inside your content item:
您会在内容项目中找到项目代号:
Let’s go back to Figma and open the API/JSON Sync plugin. We’ll paste there the API URL with our project ID and the item codename.
让我们回到Figma并打开API / JSON Sync插件。 我们将在其中粘贴API URL以及我们的项目ID和项目代号。
If you want, you can reuse mine:
如果需要,可以重用我的:
https://deliver.kontent.ai/701baeb4-9a87-0063-4754-2d1604e47679/items/aeropress_go
https://deliver.kontent.ai/701baeb4-9a87-0063-4754-2d1604e47679/items/aeropress_go
You can visit this URL in your browser to see the JSON file it provides you. When you load the URL in the plugin, you will see the content of the JSON file in a structured way.
您可以在浏览器中访问此URL,以查看它提供的JSON文件。 在插件中加载URL时,您将以结构化的方式看到JSON文件的内容。
We’re now ready to connect the content we got via API with elements in our design file.
现在,我们准备将通过API获得的内容与设计文件中的元素进行连接。
We can start with the name and the image. In the plugin, find the name's value, select it and also select the layer in Figma you want to connect it with. Do the same for the image, only now you’ll need the image URL.
我们可以从名称和图像开始。 在插件中,找到名称的值,选择它,然后在Figma中选择要与其连接的图层。 对图像执行相同的操作,只是现在您需要图像URL。
Voilá, the name and the image are now loaded from our content source!
现在,Voilá的名称和图像已从我们的内容源中加载!
We can repeat this process for all the remaining elements. It’s a little more complicated with the description.
我们可以对其余所有元素重复此过程。 描述稍微复杂一些。
If you remember, we modelled the description as a rich text element. That means it can contain various formatting and so the API will give us the value of this element as HTML. We have to remove the enclosing <p> tags manually and if we formatted the description in our CMS, we’d need to re-do the formatting here. That’s not ideal, but still way better than the old ways of copy-pasting!
如果您还记得的话,我们将描述建模为富文本元素。 这意味着它可以包含各种格式,因此API将为我们提供此元素HTML值。 我们必须手动删除封闭的<p>标记,如果我们在CMS中格式化了说明的格式,则需要在此处重新进行格式化。 这不是理想的方法,但是仍然比旧的粘贴方法更好!
For the price element, you’ll notice we split it into two text layers in Figma so that we can easily fill one of them with a simple number from our content source.
对于price元素,您会注意到我们在Figma中将其分为两个文本层,以便我们可以轻松地用内容源中的简单数字填充其中之一。
Great job! We now successfully filled our design with real content. It's looking pretty good now.
很好! 现在,我们成功地用真实的内容填充了我们的设计。 现在看起来还不错。
奖励:更改和更新? 不再需要复制粘贴! (Bonus: Changes and updates? No more copy-pasting!)
Of course, in the real world, things change and content gets updated. Let’s say our copywriters thought the description was too long and updated it. They also changed the name which is now longer and the price was increased. This is what it now looks in the content source:
当然,在现实世界中,事情会改变,内容也会更新。 假设我们的撰稿人认为描述过长,因此对其进行了更新。 他们还更改了名称,该名称现在更长了,价格也提高了。 这就是现在在内容源中看起来的样子:
In the old days, we’d have to go and copy-paste the updated content into our design to see if it needed any changes. That’s tedious and nobody wants to do it. The good news is, you don’t have to anymore.
在过去,我们必须将更新的内容复制粘贴到我们的设计中,以查看是否需要任何更改。 这很乏味,没有人愿意这样做。 好消息是,您不必再这样做了。
When the source content item was now updated, we can go and update the content in our design in just a few clicks — simply use the “Sync all” button in the plugin and the content will be updated in our design file.
现在,当更新源内容项时,我们只需单击几下即可去更新设计中的内容-只需使用插件中的“全部同步”按钮,内容就会在我们的设计文件中更新。

Sure, we still have to manually fix the rich text description but it’s now way less work than it used to be. This also nicely shows how the content changed in length and that's why using auto-layout should be a best practice.
当然,我们仍然必须手动修复RTF描述,但是现在它的工作量比以前少了。 这也很好地显示了内容的长度如何变化,这就是为什么使用自动布局应该是最佳实践的原因。
Below is our final result. It took us seconds to update our design with real content!
以下是我们的最终结果。 我们花了几秒钟用真实的内容更新我们的设计!
处理真实内容的其他选项 (Other options of working with real content)
This is just one way of working with real content. If you're not a Figma user, you can use the Data Populator plugin for Sketch and Adobe XD.
这只是处理真实内容的一种方式。 如果您不是Figma用户,则可以使用适用于Sketch和Adobe XD的Data Populator插件。
For the content source, you can choose a different headless CMS. Or you can use Google Sheets and sync your content with this cool plugin.
对于内容源,可以选择其他无头CMS。 或者,您可以使用Google表格并将您的内容与此炫酷的插件同步。
Here are more tips for other Figma plugins than enable you to work with real content: https://www.figma.com/blog/plugins-to-help-you-design-with-real-content/
除了使您能够使用真实内容之外,这里还有其他Figma插件的提示: https : //www.figma.com/blog/plugins-to-help-you-design-with-real-content/
内容第一,形式第二 (Content first, form second)
We covered a lot of stuff in this tutorial. From defining and modelling content in a headless CMS to working with it in Figma and even updating it after some changes. Hopefully, it was valuable and interesting for you.
在本教程中,我们涵盖了很多内容。 从在无头CMS中定义和建模内容到在Figma中使用它,甚至在进行一些更改后对其进行更新。 希望它对您来说很有价值和有趣。
I also hope I showed you how important but also easy is working with content first and designing the form second. Thanks to the advancement in design tools and headless CMS technology, it’s now possible for teams to shift the mindset to content-first design.
我也希望我向您展示了首先处理内容并设计表单的重要性和便捷性。 由于设计工具和无头CMS技术的进步,团队现在有可能将思维方式转变为内容优先的设计。
Designers and copywriters have the means of working more efficiently together and content finally gets the treatment it deserves.
设计师和文案作家可以更有效地合作,使内容最终得到应有的待遇。
资源资源 (Resources)
API/JSON Sync plugin for Figma
Figma的API / JSON Sync插件
Data Populator plugin for Sketch and Adobe XD
适用于Sketch和Adobe XD的Data Populator插件
Google Sheets Sync plugin for Figma
适用于Figma的Google Sheets Sync插件
翻译自: https://uxdesign.cc/how-to-design-with-real-content-in-figma-c26c0e707c6
figma设计


 678
678

 被折叠的 条评论
为什么被折叠?
被折叠的 条评论
为什么被折叠?
 到【灌水乐园】发言


