


Spirographs look complex, but most of them aren’t that hard to create. As promised, here is a follow-up tutorial on how to create a spirograph, only this time it’s a different kind of spirograph than the one we’ve created before. We’ll create a line spirograph. The one I created for this fictional fruit energy drink label.
S速记表看起来很复杂,但大多数都不难创建。 如所承诺的,这是有关如何创建呼吸描记器的后续教程,只是这次是与我们之前创建的呼吸描记器不同的一种描记器。 我们将创建一个线性呼吸描记器 。 我为这个虚构的水果能量饮料标签创建的一款。
I know I mentioned we would use the Blend tool in this follow-up tutorial, but I guess I shouted a bit too early, because instead we’re still going with the same basic technique like before of copy rotating. Because of the wide variety of spirographs, I figured I spend a bit more time on the subject and write 3 tutorials instead of 2.
我知道我在本后续教程中提到过我们将使用Blend工具,但是我想我喊得太早了,因为相反,我们仍然使用与复制旋转 之前相同的基本技术 。 由于呼吸描记器种类繁多,我认为我在该主题上花费了更多时间,并撰写了3篇教程,而不是2篇。

This fictional energy fruit drink label is only created for the purpose of this tutorial. Just to give you some ideas and inspiration of what you could do with the outcome of your creation. The photo used in this mockup and in the header is found on Unsplash, taken by Amy Shamblen. I had much fun creating this label. Being able to place this design directly on a real can finished it off. Thanks to these fabulous mockups by L Store it’s very easy to apply. It’s only a matter of copy and paste. The typeface used is Buffalo.
这个虚构的能量水果饮料标签仅是出于本教程的目的而创建的。 只是为了给您一些想法和启发,以帮助您完成创作的成果。 该模型和标题中使用的照片位于Unsplash上 ,由Amy Shamblen拍摄 。 创建这个标签让我很开心。 能够将这种设计直接放在真实物体上就可以完成它。 借助L Store出色的样机,它非常容易应用。 这只是复制和粘贴的问题。 使用的字体是Buffalo 。
To get started make sure Smart Guides is enabled. Go to View > Smart Guides and see if the checkmark is there. If not, hit Cmd/Ctrl + u. Make also sure that guides are set to visible: go to View > Guides and if you see ‘Hide Guides’ then it means they are. Furthermore make sure you have Snap to Point on: go to View > Snap to Point. Again, if you already see the checkmark there, you are all set.
要开始使用,请确保已启用智能指南 。 转到查看>智能指南,然后查看是否有复选标记。 如果不是,请按Cmd / Ctrl + u 。 还请确保将指南设置为可见 :转到“ 查看”>“指南” ,如果看到“隐藏指南”,则表示它们已经存在。 此外,请确保已启用“对齐点”:转到“ 视图”>“对齐点”。 同样,如果您已经在此处看到对号,则一切就绪。
1.画一个正方形 (1. Draw a Square)
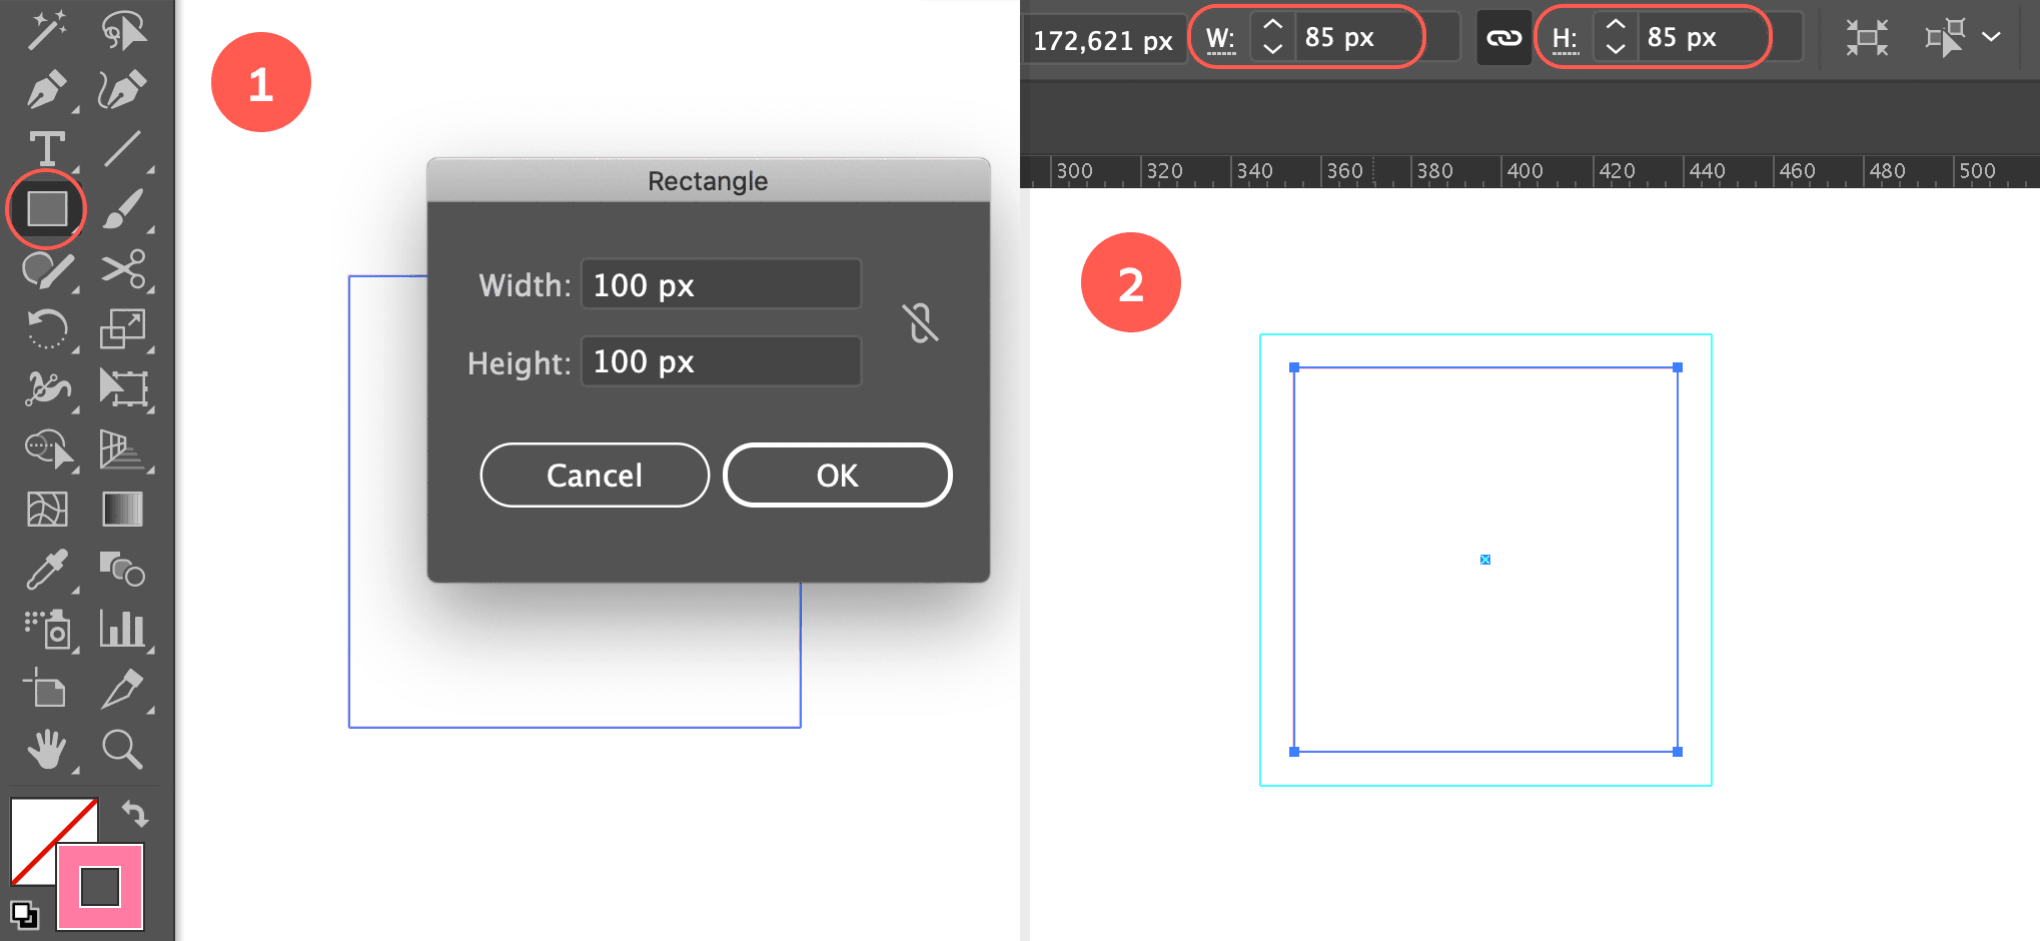
Start by drawing a square of 100 x 100 px. Select the Rectangle tool, click on the canvas of your document and enter these values. Apply a very thin stroke in the color of your choice. I used a bright pink and 0.35 pt stroke width.
首先绘制一个100 x 100像素的正方形 。 选择“ 矩形”工具 ,在文档的画布上单击,然后输入这些值。 以您选择的颜色涂抹一个非常细的笔触。 我使用了鲜艳的粉红色和0.35磅的笔触宽度 。
2.复制并粘贴在前面 (2. Copy & Paste in Front)
Copy the square shape and turn the shape into guides by hitting Cmd/Ctrl + 5 (View > Guides > Make Guides). Now hit Cmd/Ctrl + f to paste the square in front (in the exact same position). Change the size of the square to 85 x 85 px. First, make sure you resize the square from its center point. Go to the Control bar at the top (if this bar isn’t visible on your screen go to Window > Control) and make sure the center point is selected as Reference Point (located next to the X coordination). You can also do this via the Properties panel (if you use the CC version of Adobe Illustrator). Next to W and H change 100 px into 85 px.
通过单击Cmd / Ctrl + 5 (“ 视图”>“参考线”>“制作参考线” ),复制正方形并将其转换为参考线 。 现在按Cmd / Ctrl + f将正方形粘贴 在前面 (完全相同的位置)。 将正方形的大小更改为85 x 85像素。 首先,请确保从正方形的中心点调整正方形的大小。 转到顶部的控制栏(如果该栏在屏幕上不可见,请转到“ 窗口”>“控制” ),并确保将中心点选择为参考点(位于X坐标旁边)。 您也可以通过“ 属性”面板执行此操作(如果使用的是Adobe Illustrator的CC版本)。 将W和H旁边的100像素更改为85像素。
3.将左上角点更改为贝塞尔锚点 (3. Change Top Left Corner Point into Bezier Anchor Point)
Now, we’re about to turn all 4 corner points of the square into bezier anchor points. First select the Anchor Point tool(hit Shift + C) which is located under the Pen tool. Click into the top left corner point, keep holding down the mouse while starting to drag diagonally down to the left (see image below). While you start to drag hold down the Shift key. Keep dragging until you’ve reached the guide of the bigger square. It should snap to the vertical guide line of the square. Release the mouse once you’ve reached this snapping point. It’s important to note that you only start holding the Shift key when you are already dragging the bezier handles, not before or the end result will be wrong. In this case it’s better to start over and hit Cmd/Ctrl + z to undo your action.
现在,我们将把正方形的所有4个角点 变成bezier锚点 。 首先选择位于“钢笔”工具下方的“ 锚点”工具 (按Shift + C)。 单击进入左上角点,按住鼠标不放,同时开始向左斜向下拖动 (请参见下图)。 当您开始拖动时,按住Shift键。 不断拖动,直到到达较大正方形的导向。 它应捕捉到正方形的垂直参考线。 达到此捕捉点后,松开鼠标。 重要的是要注意,只有在已经拖动贝塞尔曲线手柄时才开始按住Shift键 ,而不是在此之前,否则最终结果将是错误的。 在这种情况下,最好重新开始并按Cmd / Ctrl + z撤消操作。
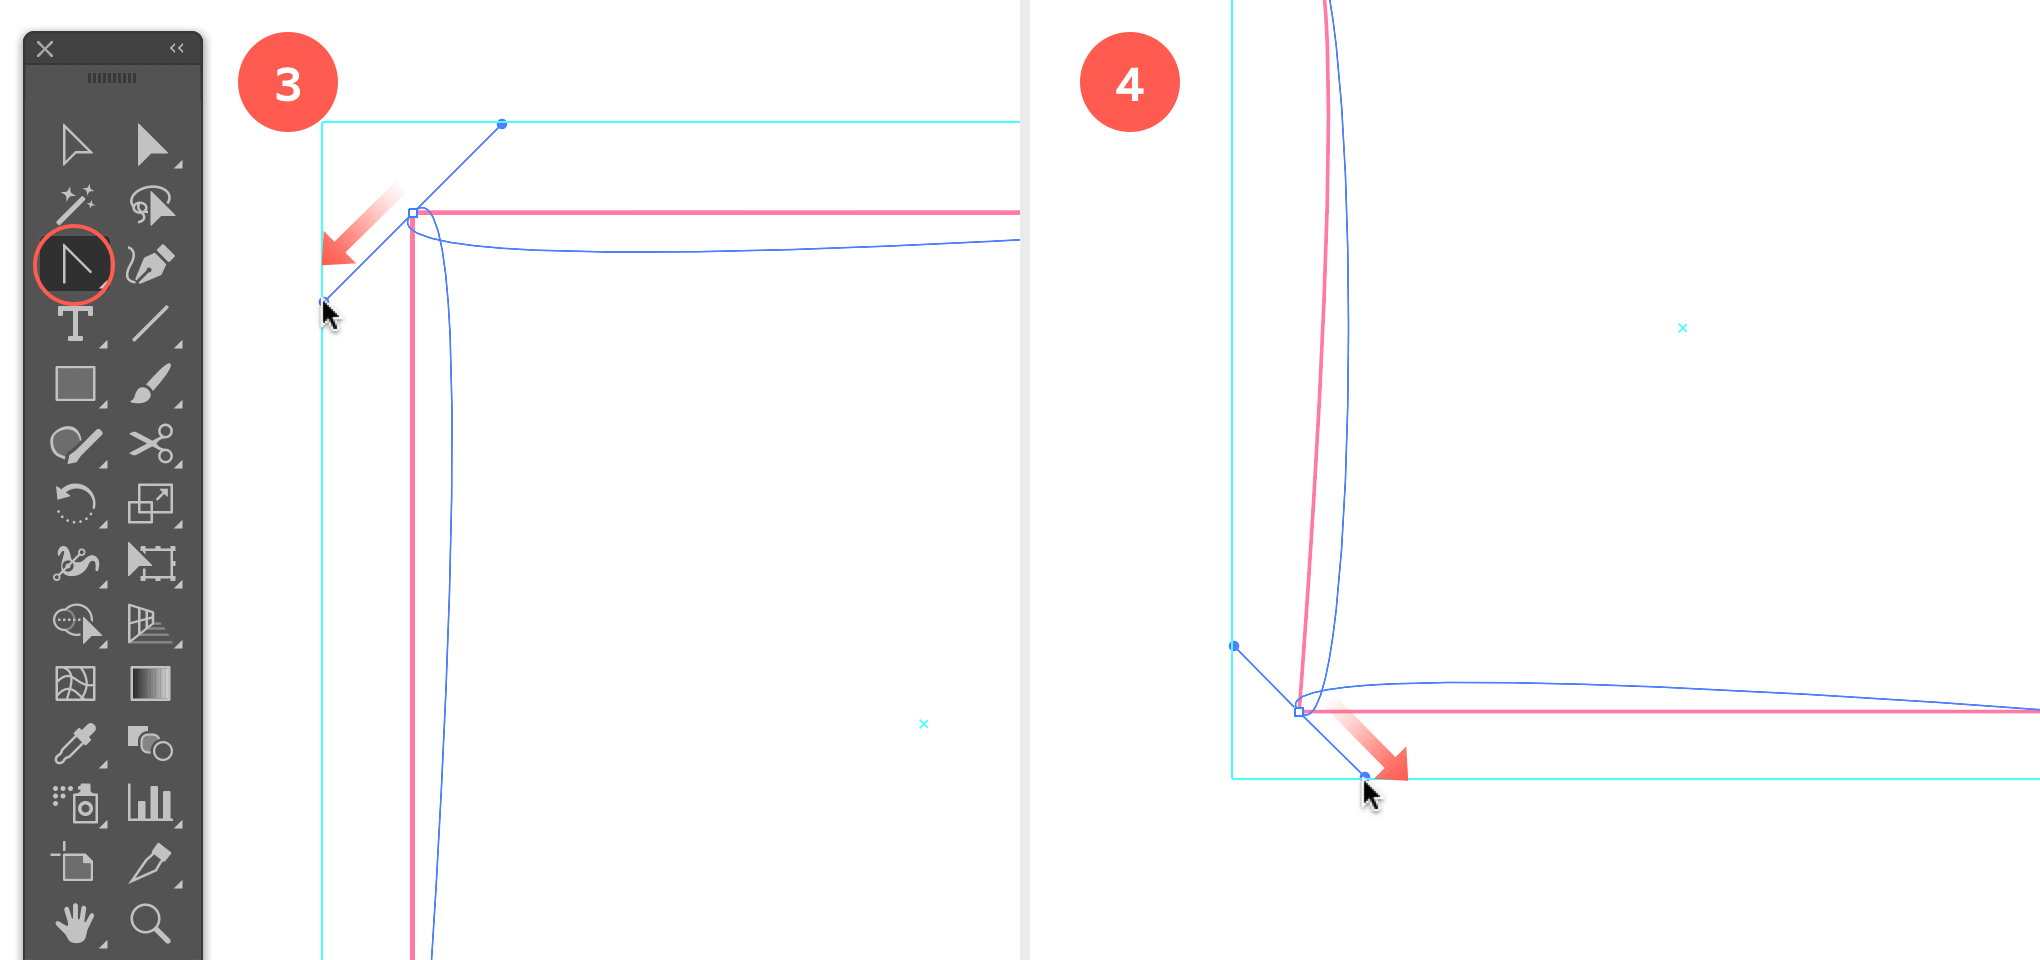
4.将左下角转为Bezier锚点 (4. Turn Bottom Left Corner Point into Bezier Anchor Point)
Do the same for the bottom left corner point. Now you drag diagonally bottom right. Again, hold down Shift if you’ve almost reached the (bottom) guide line of the square, and release the mouse when you reach the snapping point.
对左下角点执行相同的操作。 现在,您沿对角线右下拖动 。 同样,如果您几乎已到达正方形的(底部)指导线,请按住Shift键 ,然后在到达捕捉点时释放鼠标。
5.将右下角的角点变成贝塞尔曲线的锚点 (5. Turn Bottom Right Corner Point into Bezier Anchor Point)
Repeat the steps again for the bottom right corner point. This time you drag diagonally top right. Hold down Shift once you’ve almost reached the (top) guide line of the square, and release the mouse when you reach the snapping point.
再次对右下角点重复这些步骤。 这次您沿对角线右上拖动 。 几乎到达正方形的(顶部)参考线后,按住Shift键 ,然后在到达捕捉点时释放鼠标。

6.将右上角变成贝塞尔锚点 (6. Turn Top Right Corner Point into Bezier Anchor Point)
Lastly, do the same for the top right corner point. Now you drag diagonally top left, you hold down the Shift keyonce you’ve almost reached the (left) guide line of the square, and release the mouse when you’ve reached the snapping point.
最后,对右上角进行相同的操作。 现在,您沿对角线左上拖动 ,在几乎到达正方形的(左)引导线后按住Shift键 ,并在到达捕捉点时释放鼠标。
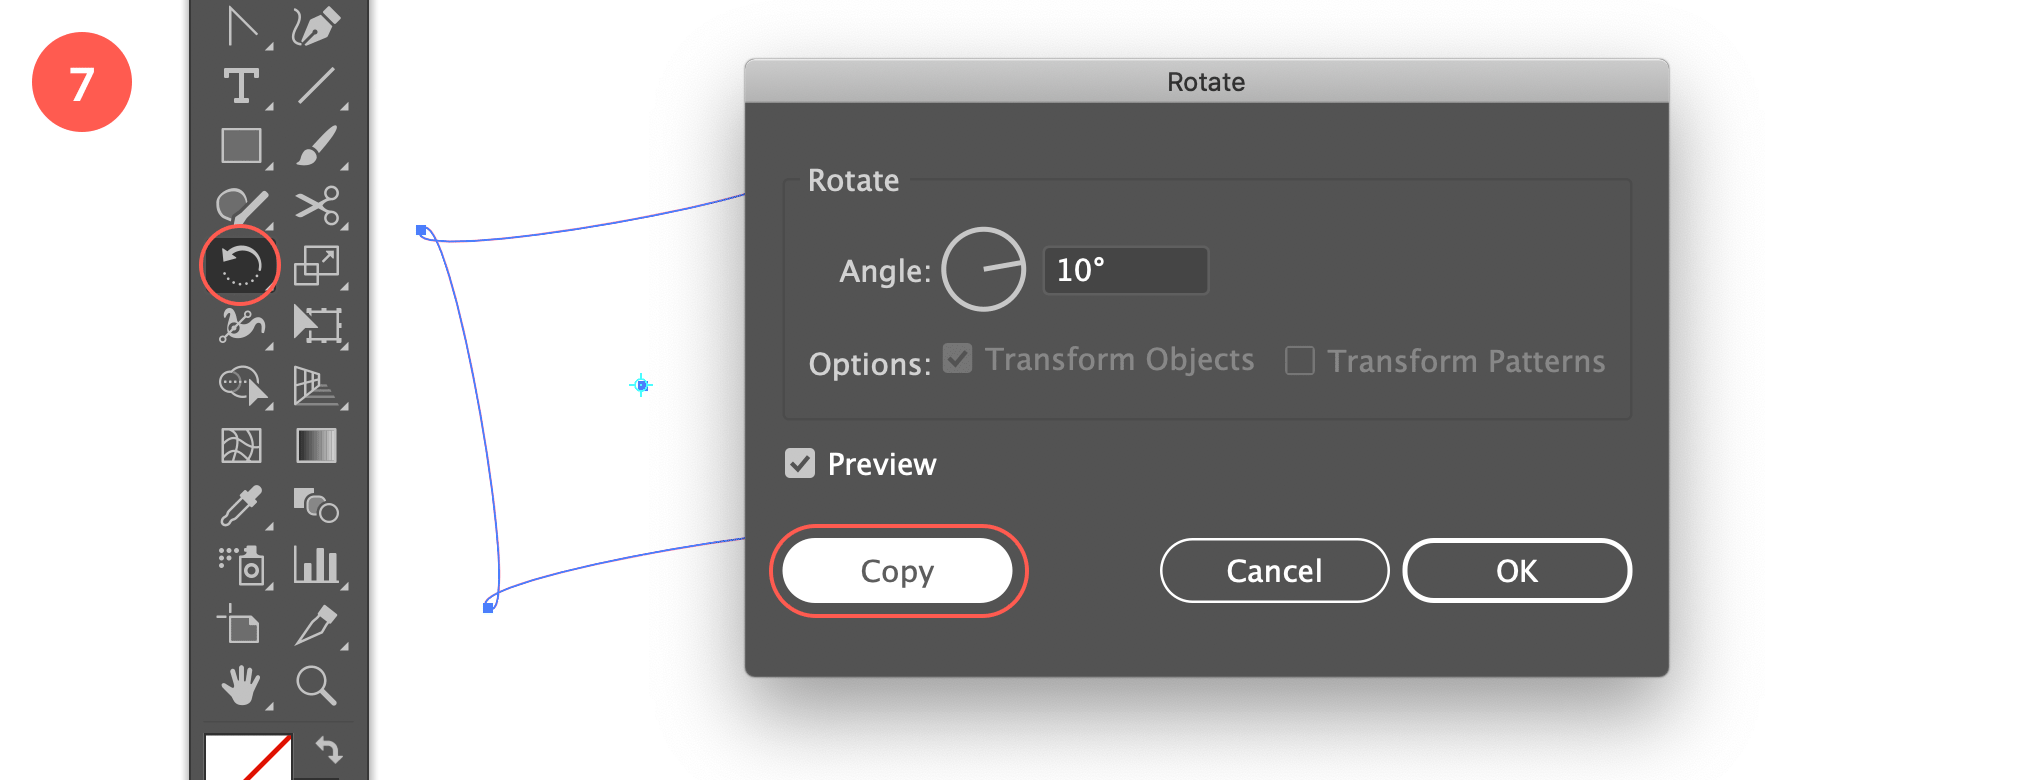
7.复制旋转10° (7. Copy Rotate at 10°)
With the object still selected, choose the Rotate tool and click into the center point of the object while holding down the Option/Alt key to evoke the Rotate window. Enter 10° as rotation Angle and hit the Copy button.
在仍然选择对象的情况下,选择“ 旋转”工具 ,然后在按住Option / Alt键的同时单击对象的中心点以调用“旋转”窗口。 输入10°作为旋转角度,然后单击“ 复制”按钮。
8.再次变换 (8. Transform Again)
Now simply hit Cmd/Ctrl + d 7 times in a row to complete the spirograph.
现在只需连续7次 按Cmd / Ctrl + d即可完成呼吸描记器。
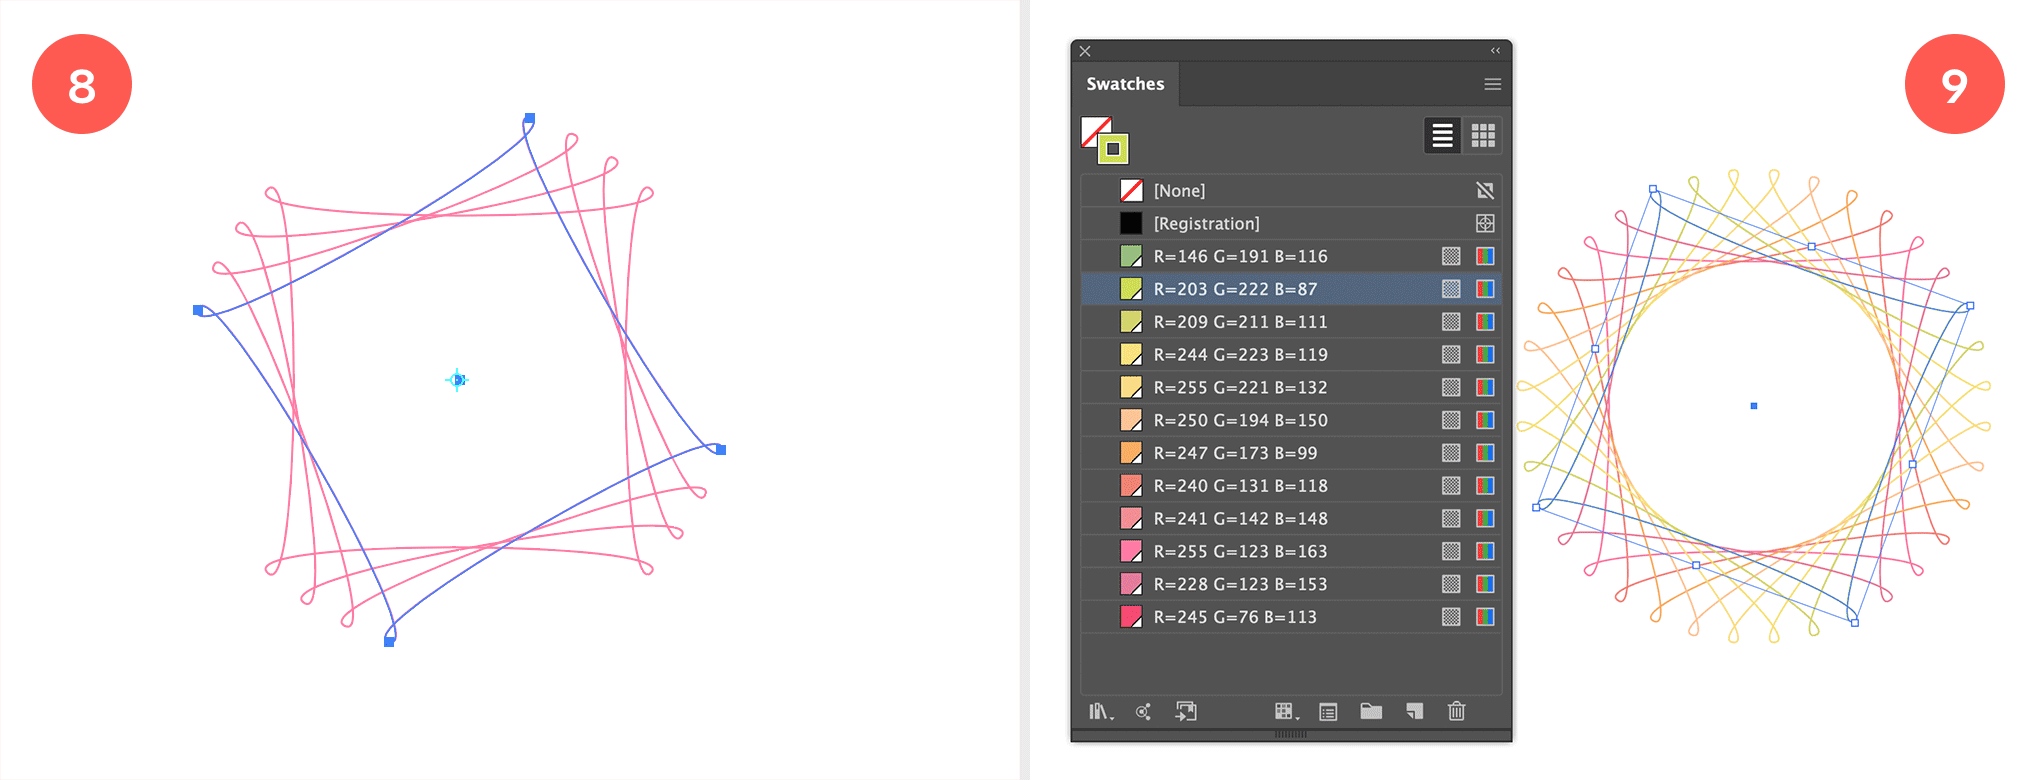
9.应用描边颜色 (9. Apply Stroke Color)
Apply a different stroke color for each object. Just choose colors to your liking. That’s it!
为每个对象应用不同的笔触颜色。 只需选择自己喜欢的颜色即可。 而已!
10.尝试其他形状 (10. Experiment with other Shapes)
This example is just one of the million things you can do to achieve an interesting result. Try things out using different shapes and angles. Best way to get a cool result is keep on experimenting. Here are a couple ideas to get you started:
这个示例只是您可以做的几百万件事情之一,可以取得有趣的结果。 使用不同的形状和角度尝试一下。 获得出色结果的最佳方法是继续尝试。 这里有一些想法可以帮助您入门:
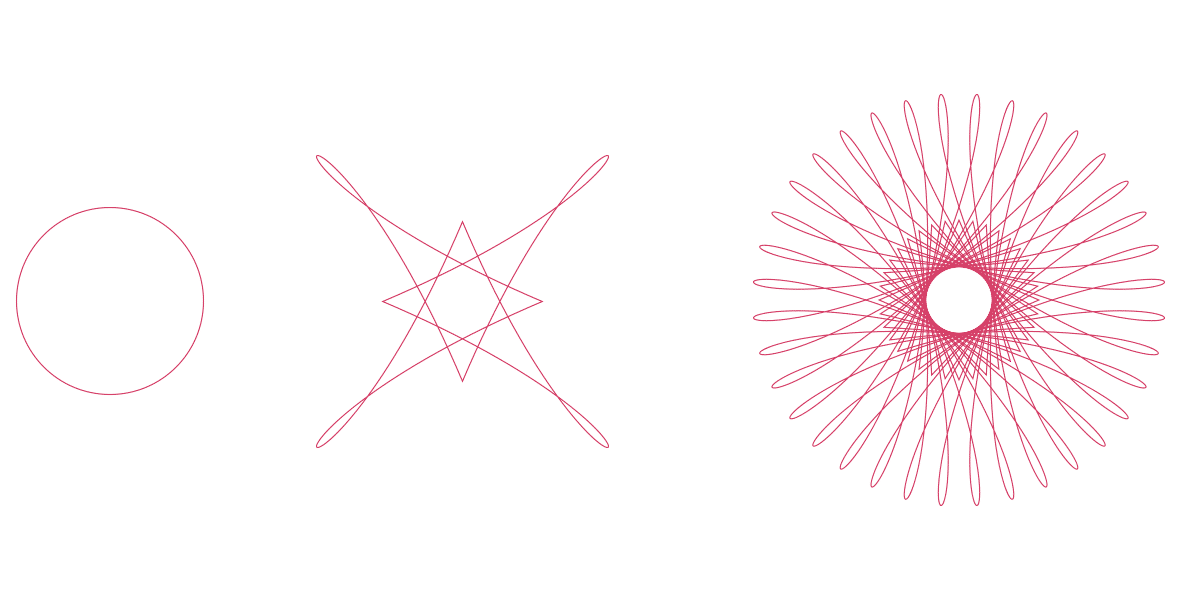
带有皱纹和膨胀效果的圆圈 (Circle with Pucker & Bloat Effect)
This one is actually a very simple one. You start with a circle (50px), apply Pucker & Bloat effect by going to Effects > Distort & Transform > Pucker & Bloat, and enter 185%. Expand the effect: go to Object > Expand Appearance. Select the Rotate tool and Option/Alt click into the enter point fo the object. Enter 10° as rotation angle, hit the Copy button and then hit Cmd/Ctrl + d 7 times in a row.
这实际上是非常简单的一个。 您从一个圆(50px)开始,通过转到效果>扭曲和变形>褶皱和膨胀 ,应用褶皱和膨胀效果,然后输入185% 。 扩展效果:转到“ 对象”>“扩展外观” 。 选择“ 太旋转” , 然后按Option / Alt键进入对象的输入点。 输入10°作为旋转角度,单击“ 复制”按钮,然后连续7次单击Cmd / Ctrl + d 。
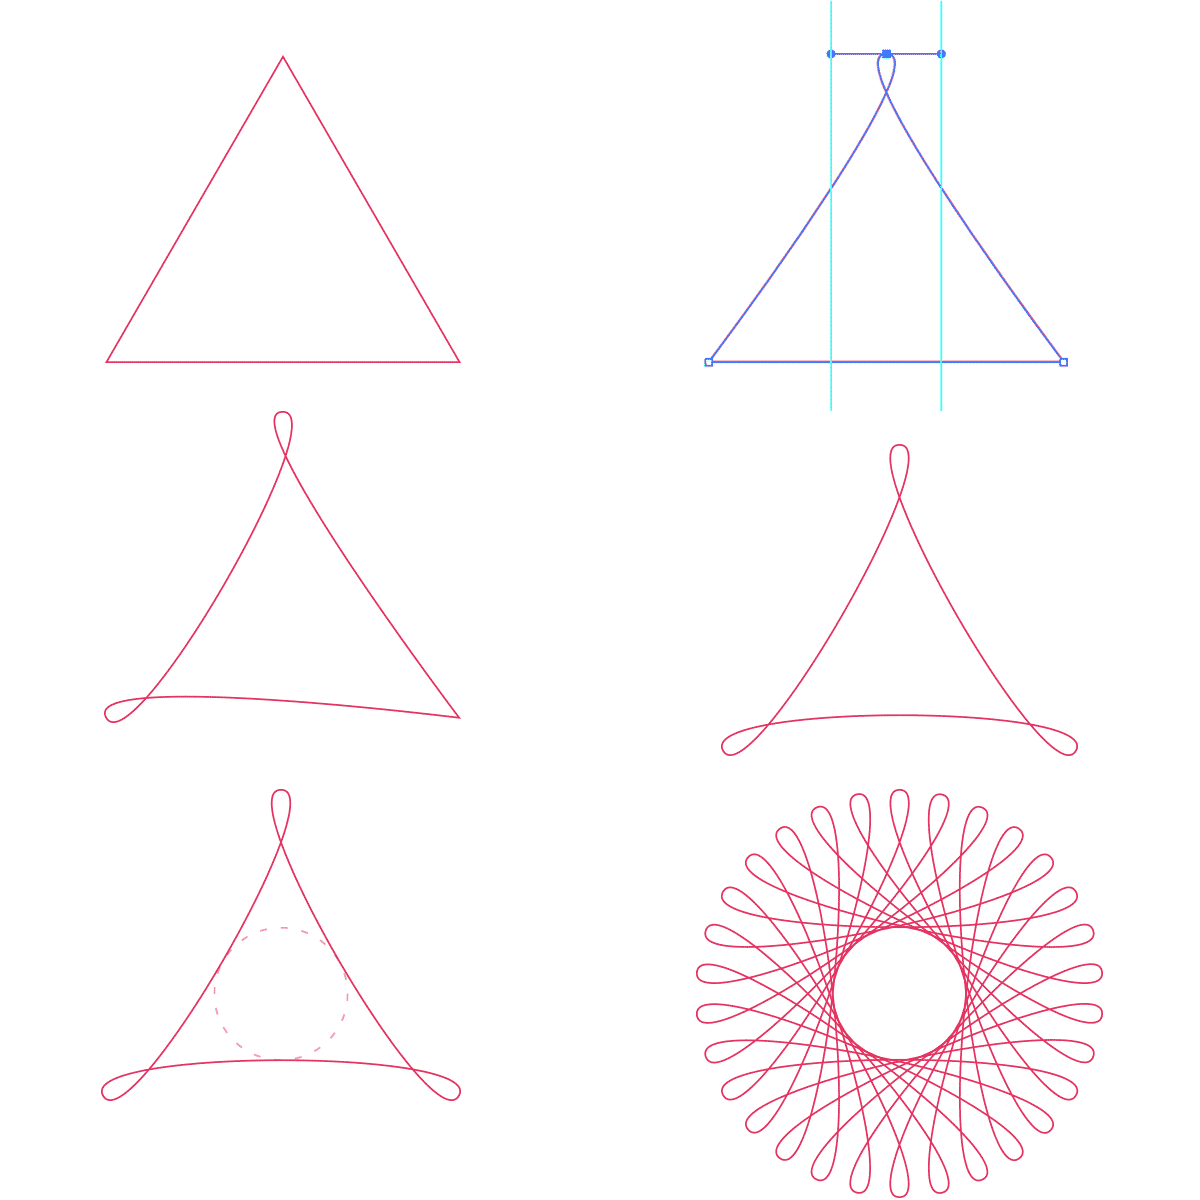
三角为12° (Triangle at 12°)
This one is I think the most difficult one, but still rather easy to do and I actually find the result of this one the nicest of the 3. Select the Polygon tool and enter 30 px Radius and 3 Sides. Just like in the tutorial, you need to turn each corner point into a smooth equal anchor point. Grab the Anchor Point tool (hit Shift + C) located under the Pen tool, click into the top corner point of the triangle and drag horizontally to the left.
我认为这是最困难的一个,但仍然相当容易实现,我实际上发现该结果是3中最好的。选择“ 多边形”工具,然后输入30 px的Radius和3 Sides 。 就像本教程中一样,您需要将每个拐角点变成一个平滑的相等锚点。 也可以抓住“ 钢笔”工具下方的锚点 (按Shift + C),单击到三角形的顶部角点,然后向左水平拖动 。
Hold down the Shift key once you are dragging and release the mouse when you have a nice smooth looking loop hole. Drag 2 vertical guides at the location of each bezier handle. Now rotate> the triangle at 120° from its center point. Select the Rotate tool, Option/Alt click into the center point and enter 120°, hit OK. Repeat the previous step and use the guides as snapping point(s). Rotate the triangle again at 120° and repeat the corner point conversion so you end up with 3 equal curved corners. Now draw a prefect circle into the center space of the object as shown in the image. It’s important to have it perfectly placed as shown in the image or the result won’t be a nice circle effect in the center of the spirograph. Find the center point of the circle to use as rotation reference point (use vertical and horizontal guides if needed). Select the Rotate tool again, Alt/Option click into the center point and enter 12° as rotation angle. Hit the Copy button and Cmd/Ctrl / d 8x in a row. That’s it!
拖动时按住Shift键 ,并在环Kong光滑的情况下释放鼠标。 在每个贝塞尔手柄的位置上拖动2个垂直参考线 。 现在, 旋转>距其中心点120°的三角形 。 选择“旋转”工具,按Option / Alt键进入中心点并输入120°, 然后单击“确定”。 重复上一步,并将参考线用作捕捉点。 再次以120°旋转三角形,并重复角点转换,因此最终得到3个相等的弯曲角。 现在,如图所示,将一个完美的圆圈绘制到对象的中心空间。 重要的是,如图像中所示正确放置它,否则结果将不会在呼吸描记器的中央产生良好的圆形效果。 找到圆的中心点 用作旋转参考点 (如果需要,请使用垂直和水平参考线 )。 再次选择旋转工具 , Alt / Option单击到中心点,然后输入12°作为旋转角度 。 点击“ 复制”按钮,然后连续按Cmd / Ctrl / d 8x 。 而已!
Hope you like this tutorial. If you do, don’t hesitate to share it ;) If you missed the 1st tutorial, make sure to check it out the Full Spectrum Spirograph tutorial. As mentioned before, I’ll write a 3rd tutorial on the subject of spirographs and in that one we’ll be using the Blend tool technique.
希望您喜欢本教程。 如果您愿意, 不要犹豫,分享它 ;)如果您错过了第一个教程 ,请确保检查一下Full Spectrum Spirograph教程 。 如前所述,我将撰写关于描记器主题的第三篇教程,在该教程中,我们将使用Blend工具技术 。
So stay tuned!
敬请期待!
This article first appeared on Veerle’s Blog 4.0.
本文首次发表在 Veerle的Blog 4.0上 。
翻译自: https://uxdesign.cc/create-a-line-spirograph-in-adobe-illustrator-b811ee53f735


 2万+
2万+

 被折叠的 条评论
为什么被折叠?
被折叠的 条评论
为什么被折叠?
 到【灌水乐园】发言


