


react 对象克隆
Hello readers!
各位读者好!
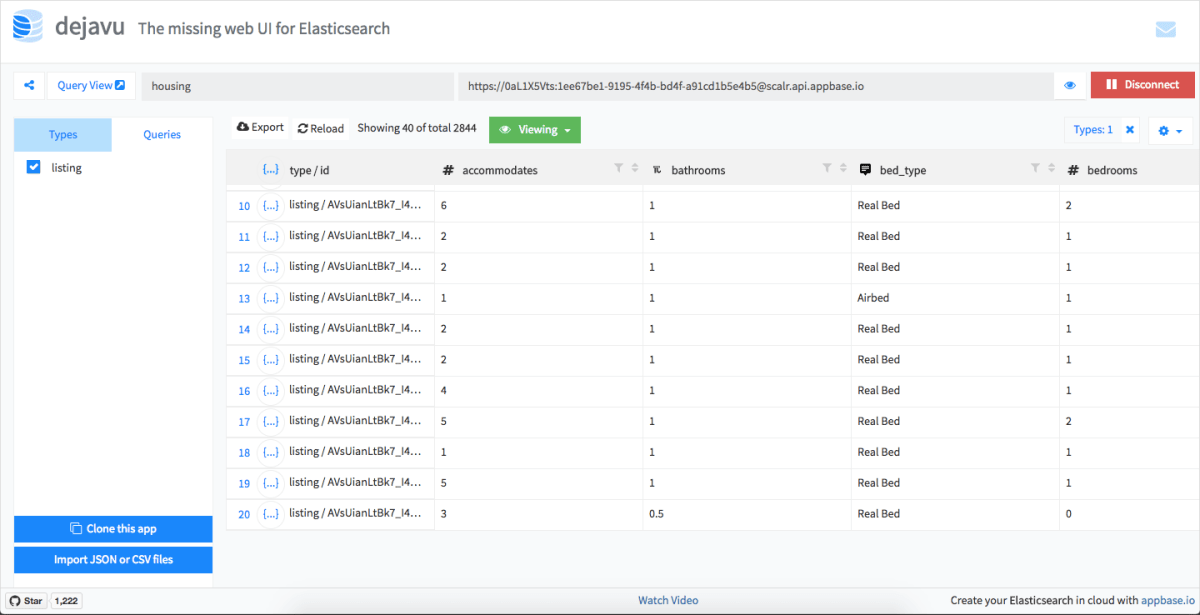
Today in this article we will see how to build an Airbnb Clone using React and Elastic. As we all familiar already about what is React?. Let’s see about little bit of Elastic Search.
今天在本文中,我们将看到如何使用React和Elastic构建Airbnb克隆。 众所周知,React是什么? 让我们来看看一些Elastic Search。
Elastic search is a super fast open source search engine. It is used to store, search and analyze high volume of data fastly.
弹性搜索是一个超快速的开源搜索引擎。 它用于快速存储,搜索和分析大量数据。
Using Elastic search we can build a fast searching query DSL. To set up elastic search correctly requires a lot of work. In Elastic search the data mapping should be set correctly. We can add more filters along with the search query resulting in search query.
使用弹性搜索,我们可以构建快速搜索查询DSL。 要正确设置弹性搜索,需要进行大量工作。 在弹性搜索中,应正确设置数据映射。 我们可以在搜索查询中添加更多过滤器,从而生成搜索查询。
如何在React中使用Elastic搜索? (How to use Elastic search with React?)
We are going to use ReactiveSearch an open-source components library for Elastic search. It provides a highly customizable UI components that connects with Elastic search server and provide an appropriate default search query for all use-cases.
我们将使用ReactiveSearch开源组件库进行Elastic搜索。 它提供了高度可定制的UI组件,该组件与Elastic搜索服务器连接,并为所有用例提供了适当的默认搜索查询。
Let’s build an searchbox UI example using Elastic search by the following code:
让我们通过以下代码使用Elastic search构建一个searchbox UI示例:
<DataSearch
    componentId="search"
    dataField="name"
    placeholder="Search housings..."
    iconPosition="left"
/>
先决条件 (Prerequisites)
To build an Airbnb like application we need set of things to gets started:
要构建类似于Airbnb的应用程序,我们需要开始一些事情:
- Data set for Airbnb housing properties. Airbnb房屋属性的数据集。
- Elastic search hosting. 弹性搜索托管。
I have created a data set for our application. You can checkout this:
我已经为我们的应用程序创建了一个数据集。 您可以签出此内容:
建立 (Setup)
To get started use the Create React App command in your local terminal. And then use yarn to import modules instead of npm.
要开始使用,请在本地终端中使用Create React App命令。 然后使用yarn导入模块,而不是npm 。
yarn global add create-react-app
create-react-app airbeds
cd airbeds
yarn start
At this point, your directory structure look like this:
此时,您的目录结构如下所示:
airbeds
├── README.md
├── node_modules
├── package.json
├── .gitignore
├── yarn.lock
├── public
│   └── favicon.ico
│   └── index.html
│   └── manifest.json
└── src
    └── App.css
    └── App.js
    └── App.test.js
    └── index.css
    └── index.js
    └── logo.svg
    └── registerServiceWorker.js
Next install ReactiveSearch by following command:
接下来通过以下命令安装ReactiveSearch:
yarn add @appbaseio/reactivesearch@2.16.1将第一个ReactiveSearch组件添加到ReactiveBase (Add the first ReactiveSearch component to ReactiveBase)
Add all the ReactiveSearch components inside a container component that includes the Elastic search index and the ReactiveSearch component in /src/App.js:
在包含弹性搜索索引和/src/App.js中的ReactiveSearch组件的容器组件内添加所有ReactiveSearch组件:
import React, { Component } from 'react';
import { ReactiveBase } from '@appbaseio/reactivesearch';
class App extends Component {
  render() {
    return (
      <section className="container">
        <ReactiveBase
          app="housing"
          credentials="0aL1X5Vts:1ee67be1-9195-4f4b-bd4f-a91cd1b5e4b5"
          type="listing"
        >
          Hello from ReactiveSearch!
        </ReactiveBase>
      </section>
    );
  }
}
export default App;
添加UI组件 (Adding UI Components)
First add the calender UI that allows the users to select the range of accommodation. The following code looks like this:
首先添加日历用户界面,该界面允许用户选择调节范围。 以下代码如下所示:
componentid is an important prop that requires unique string to identify component.
componentid是一个重要的道具,需要唯一的字符串来标识组件。
dataField props is used to set the data that the user Search for the query either string or array of strings.
dataField道具用于设置用户搜索查询的数据是字符串还是字符串数组。
queryFormat is used to set the date format for the DateRange component.
queryFormat用于设置DateRange组件的日期格式。
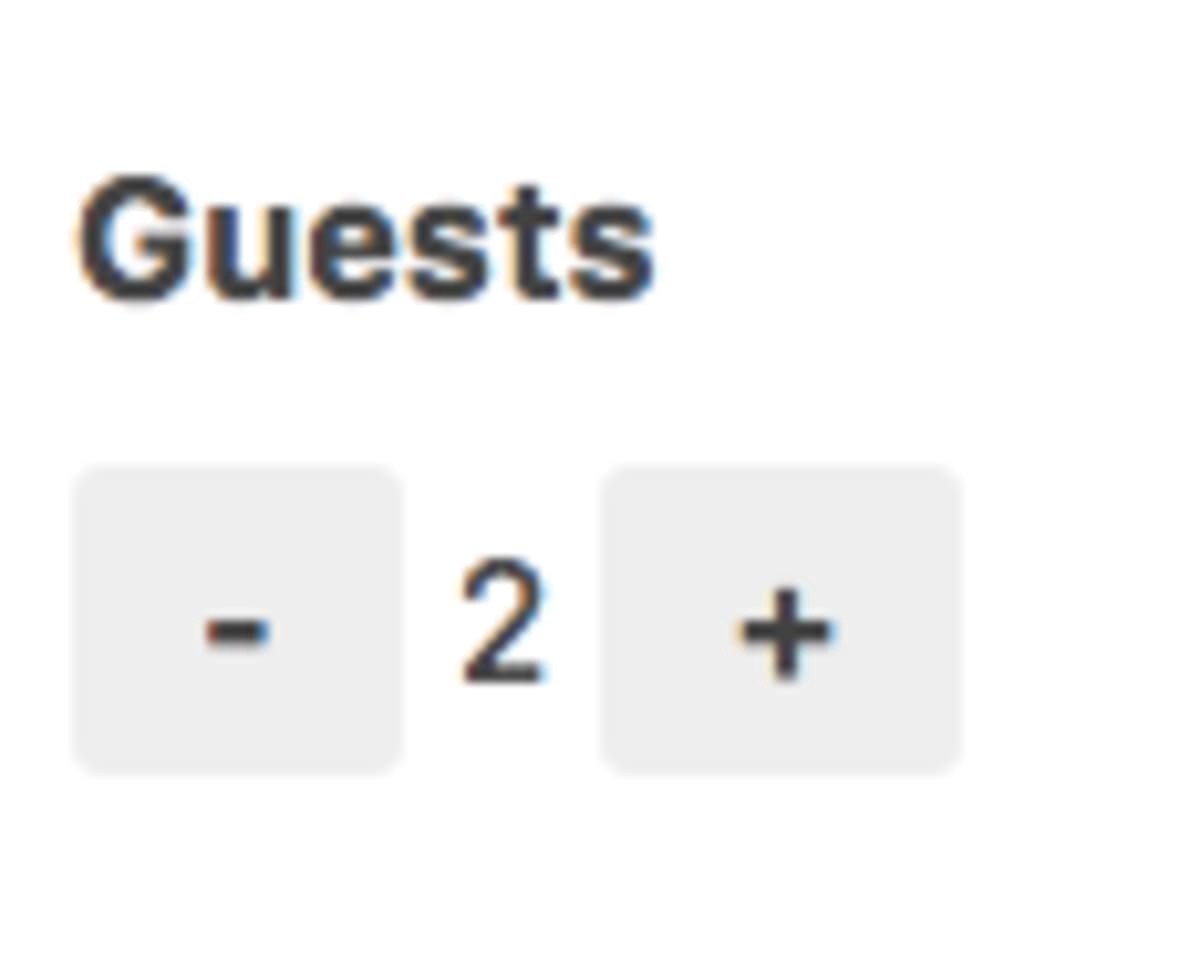
Now the NumberBox UI code looks like this:
现在, NumberBox UI代码如下所示:
import { NumberBox } from '@appbaseio/reactivesearch';
<NumberBox
    componentId="GuestSensor"
    dataField="accommodates"
    title="Guests"
    defaultSelected={2}
    data={{
        start: 1,
        end: 16
    }}
/>
Then the price filter is used for the customer to filter the accomodation based on their budget.
然后价格过滤器用于客户根据他们的预算过滤住宿。
import { RangeSlider } from '@appbaseio/reactivesearch';
<RangeSlider
    componentId="PriceSensor"
    dataField="price"
    title="Price Range"
    range={{
        start: 10,
        end: 250
    }}
    rangeLabels={{
        start: "$10",
        end: "$250"
    }}
    defaultSelected={{
        start: 10,
        end: 50
    }}
    stepValue={10}
    react={{
        and: ["DateRangeSensor"]
    }}
/>
Now we have created a RangeSlider that controls the slider bounds. It is used for add labels and select the ranges.
现在,我们创建了一个RangeSlider来控制滑块边界。 它用于添加标签和选择范围。
We are using new prop to update the price dynamically depending upon the selected date and number of guests.
我们正在使用新的道具来根据选择的日期和客人数量动态更新价格。

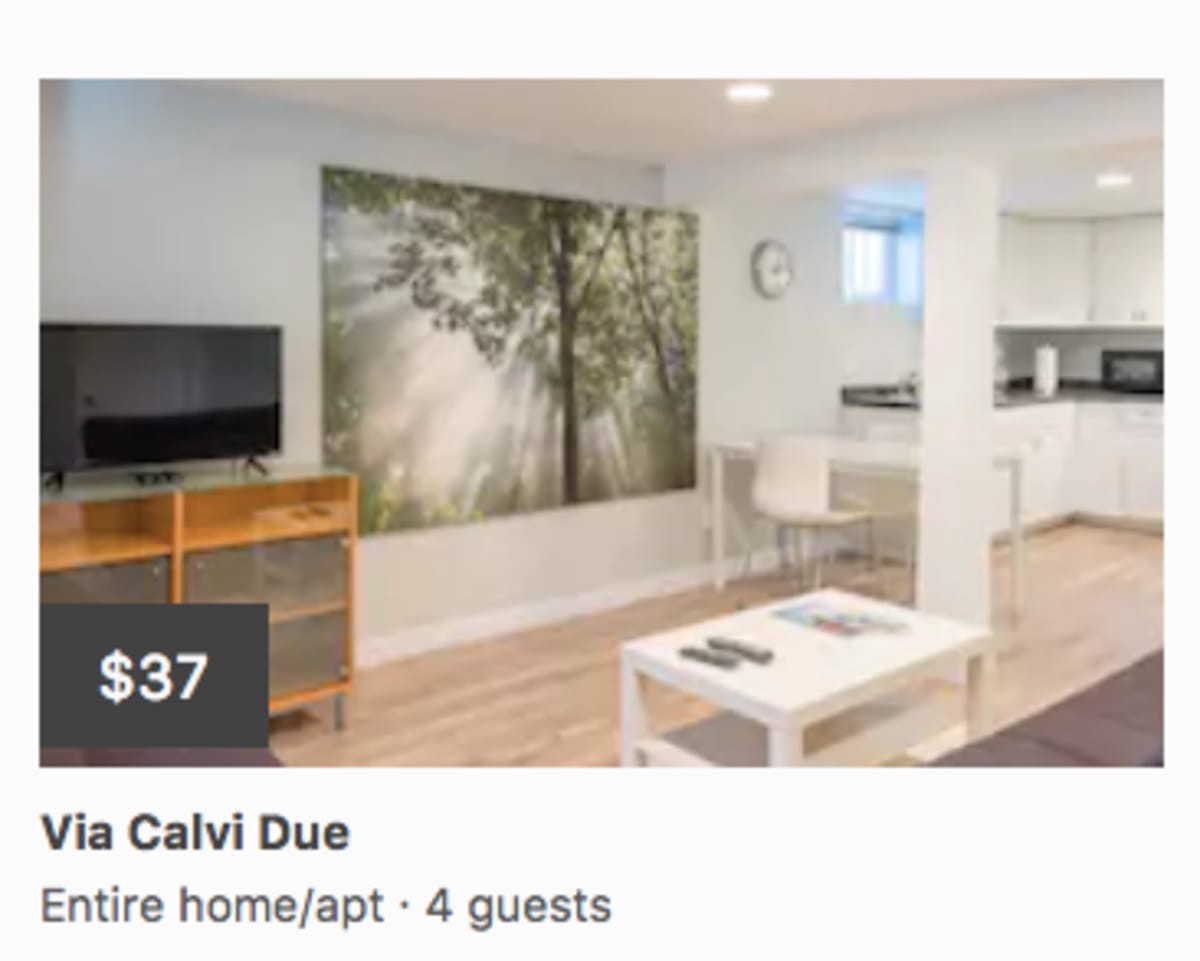
Now we have to create Airbnb card to show the search results:
现在,我们必须创建Airbnb卡以显示搜索结果:
import { ResultCard } from '@appbaseio/reactivesearch';
<ResultCard
    componentId="SearchResult"
    dataField="name"
    from={0}
    size={10}
    onData={this.onData}
    pagination={true}
    react={{
        and: ["GuestSensor", "PriceSensor", "DateRangeSensor"]
    }}
/>
Now by using all the props in our project the ResultCard data prop is used as callback function to return mapping between the ResultCard elements in our database. Now onData method code looks like this:
现在,通过使用项目中的所有道具,可以将ResultCard数据道具用作回调函数,以返回数据库中ResultCard元素之间的映射。 现在onData方法代码如下所示:
onData(data) {
    return {
        image: data.image,
        title: data.name,
        description: (
            <div>
                <div className="price">${data.price}</div>
                <p className="info">{data.room_type} · {data.accommodates} guests</p>
            </div>
        ),
        url: data.listing_url,
    };
}
We are returning an object that maps to the images, titles and descriptions to the card layout from the database in JSX.
我们将返回一个对象,该对象从JSX中的数据库映射到图像,标题和描述到卡片布局。
结合元素 (Combining The Elements)
Now combine all these components together in the src/App.js file. And then I will also add placeholder class in the className.
现在,将所有这些组件组合到src / App.js文件中。 然后,我还将在className中添加占位符类。
import React from 'react';
import { ReactiveBase, NumberBox, DateRange, RangeSlider, ResultCard } from '@appbaseio/reactivesearch';
export default () => (
    <div className="container">
        <ReactiveBase
            app="housing"
            credentials="0aL1X5Vts:1ee67be1-9195-4f4b-bd4f-a91cd1b5e4b5"
            type="listing"
            theme={{
                primaryColor: '#FF3A4E',
            }}
        >
            <nav className="nav">
                <div className="title">airbeds</div>
            </nav>
            <div className="left-col">
                <DateRange
                    dataField="date_from"
                    componentId="DateRangeSensor"
                    title="When"
                    numberOfMonths={2}
                    queryFormat="basic_date"
                    initialMonth={new Date('04-01-2017')}
                />
                <NumberBox
                    componentId="GuestSensor"
                    dataField="accommodates"
                    title="Guests"
                    defaultSelected={2}
                    labelPosition="right"
                    data={{
                        start: 1,
                        end: 16,
                    }}
                />
                <RangeSlider
                    componentId="PriceSensor"
                    dataField="price"
                    title="Price Range"
                    range={{
                        start: 10,
                        end: 250,
                    }}
                    rangeLabels={{
                        start: '$10',
                        end: '$250',
                    }}
                    defaultSelected={{
                        start: 10,
                        end: 50,
                    }}
                    stepValue={10}
                    interval={20}
                    react={{
                        and: ['DateRangeSensor'],
                    }}
                />
            </div>
            <ResultCard
                className="right-col"
                componentId="SearchResult"
                dataField="name"
                size={12}
                onData={data => ({
                    image: data.image,
                    title: data.name,
                    description: (
                        <div>
                            <div className="price">${data.price}</div>
                            <p className="info">{data.room_type} · {data.accommodates} guests</p>
                        </div>
                    ),
                    url: data.listing_url,
                })}
                pagination
                react={{
                    and: ['GuestSensor', 'PriceSensor', 'DateRangeSensor', 'search'],
                }}
                innerClass={{
                    resultStats: 'result-stats',
                    list: 'list',
                    listItem: 'list-item',
                    image: 'image',
                }}
            />
        </ReactiveBase>
    </div>
);
Now you can able to see the fully functional UI. You can able to see the sliding function and search results. The only thing missing is an layout and style arrangements.
现在,您可以看到功能齐全的UI。 您可以看到滑动功能和搜索结果。 唯一缺少的是布局和样式安排。
添加样式和布局 (Adding styles and layouts)
Now add the styles and layouts by adding the following codes in App.css and import it to the App.js file.
现在,通过在App.css中添加以下代码来添加样式和布局,并将其导入到App.js文件中。
.container {
  display: flex;
  padding-top: 52px;
}
.container .nav {
  width: 100%;
  position: fixed;
  top: 0;
  left: 0;
  z-index: 1;
  display: flex;
  justify-content: center;
  align-items: center;
  background-color: #FF3A4E;
  color: #fff;
  height: 52px;
  padding: 0 25px;
}
.container .left-col {
  width: 320px;
  height: 100%;
  padding: 15px 20px;
  position: fixed;
  left: 0;
  right: 0;
  border-right: 1px solid #f0f0f0;
}
.container .left-col > div {
  margin: 40px 0;
}
@media all and (max-width: 768px) {
  .container .left-col {
    position: static;
    width: 100%;
    height: auto;
    border-right: 0;
    border-bottom: 1px solid #f0f0f0;
  }
}
.container .right-col {
  width: calc(100% - 320px);
  position: relative;
  left: 320px;
  padding: 25px 30px;
  background-color: #fbfbfb;
}
.container .right-col .list {
  margin-bottom: 30px;
}
.container .right-col .list-item {
  max-width: none;
  min-width: 0;
  width: calc(30% - 16px);
  height: auto;
  background-color: transparent;
  border: 0;
  border-radius: 0;
  box-shadow: none;
  position: relative;
  padding: 0;
}
.container .right-col .list-item h2 {
  padding-bottom: 4px;
}
.container .right-col .list-item .image {
  background-size: cover;
}
.container .right-col .list-item .price {
  width: 70px;
  height: 44px;
  background-color: #424242;
  position: absolute;
  top: 160px;
  left: 0;
  color: #fafafa;
  font-size: 18px;
  display: flex;
  justify-content: center;
  align-items: center;
  letter-spacing: 0.03rem;
}
.container .right-col .list-item .info {
  color: #555;
  font-size: 14px;
  margin-bottom: 4px;
}
.container .right-col .result-stats {
  text-align: right;
  color: #666;
  font-size: 15px;
}
@media all and (min-width: 1441px) {
  .container .right-col .list-item {
    width: calc(25% - 16px);
  }
}
@media all and (max-width: 1024px) {
  .container .right-col .list-item {
    width: calc(50% - 16px);
  }
}
@media all and (max-width: 768px) {
  .container .right-col {
    width: 100%;
    position: static;
    padding: 25px 15px;
  }
}
@media all and (max-width: 480px) {
  .container .right-col .list-item {
    width: calc(100% - 16px);
    margin-bottom: 20px;
  }
}
结论 (Conclusion)
I hope you enjoyed a lot and now you will know how to build Airbnb UI using React. You can add some more features like authentication, add more search box and sorting the different orders.
我希望您喜欢它,现在您将知道如何使用React构建Airbnb UI。 您可以添加更多功能,例如身份验证,添加更多搜索框以及对不同的顺序进行排序。
Thanks for reading!
谢谢阅读!
普通英语JavaScript (JavaScript In Plain English)
Did you know that we have three publications and a YouTube channel? Find links to everything at plainenglish.io!
您知道我们有三个出版物和一个YouTube频道吗? 在plainenglish.io上找到所有内容的链接!
翻译自: https://medium.com/javascript-in-plain-english/how-to-build-airbnb-clone-in-react-70265acf5159
react 对象克隆


 524
524

 被折叠的 条评论
为什么被折叠?
被折叠的 条评论
为什么被折叠?
 到【灌水乐园】发言


