


正点原子迷你板调lcd亮度
Building on the last article, I’ll show you how to use the SparkLine component we built to create a “dashboard” of data points that anyone can quickly understand with sparklines.
在上一篇文章的基础上 ,我将向您展示如何使用我们构建的SparkLine组件来创建数据点的“仪表板”,任何人都可以通过迷你图快速理解。
In the previous article, we created a Vue component which accepts an array of numbers and creates a sparkline chart.
在上一篇文章中 ,我们创建了一个Vue组件 ,该组件接受数字数组并创建一个迷你图 。
Now, we can make a dashboard with that component.
现在,我们可以使用该组件制作仪表板。
If you don’t already have one created, you should create a Vue project with the Vue CLI.
如果尚未创建一个,则应使用Vue CLI创建一个Vue项目。
vue create sparkboardEither choose to use default options or customize to your preference.
您可以选择使用默认选项,也可以根据自己的喜好进行自定义。
Once you have a Vue project created, make sure the SparkLine.vue component we created last time is in the components/ directory. You may choose to copy it from the repository on GitHub.
一旦创建了Vue项目,请确保上次创建的SparkLine.vue组件位于components/目录中。 您可以选择从GitHub上的存储库复制它 。
Next, replace the entirety of App.vue with the following.
接下来,用以下内容替换整个App.vue 。
<template>
  <div style="width:100px">
    <SparkLine :data="[808, 1475, 1426, 1884, 1396]" />
    <SparkLine :data="[3246, 1941, 2649, 1633, 1262]" />
    <SparkLine :data="[190, 128, 209, 208, 116]" />
  </div>
</template><script>
import SparkLine from "./components/SparkLine.vue";export default {
  name: "App",
  components: {
    SparkLine
  }
};
</script>
Note that the arrays of data here are just random numbers I picked. Feel free to use whatever you’d like. Later we can pull data from external sources.
请注意,这里的数据数组只是我选择的随机数。 随意使用您想要的任何东西。 稍后我们可以从外部来源提取数据。
Run the development server.
运行开发服务器。
npm run serveYou can view the project at http://localhost:8080/
您可以在http:// localhost:8080 /上查看项目

Great! There’s three tiny sparklines just as the code describes.
大! 正如代码所描述的,有三个微小的迷你图。
I don’t like putting the data directly into the template, so the first thing we’ll do is move it into the script.
我不喜欢将数据直接放入模板中,因此我们要做的第一件事就是将其移入脚本中。
Let’s pretend our data comes from a set of sensors. The updated script looks like this:
假设我们的数据来自一组传感器。 更新后的脚本如下所示:
import SparkLine from "./components/SparkLine.vue";export default {
  name: "App",
  data() {
    return {
      sensors: [
        [808, 1475, 1426, 1884, 1396],
        [3246, 1941, 2649, 1633, 1262],
        [190, 128, 209, 208, 116]
      ]
    };
  },
  components: {
    SparkLine
  }
};
And the template can be modified to loop over this array of sensor data like this:
并且可以修改模板以遍历此传感器数据数组,如下所示:
<div style="width:100px">
  <div class="sensor" v-for="sensor in sensors" :key="sensor">
    <SparkLine :data="sensor" />
  </div>
</div>
So far, no visual change has been made, but moving the data into the script makes it much more flexible.
到目前为止,还没有进行任何可视化更改,但是将数据移到脚本中使其更加灵活。
Right now, our entire app is 100 pixels wide. Instead, we should remove this style from the root element.
现在,我们的整个应用程序的宽度为100像素。 相反,我们应该从根元素中删除此样式。
<div>
  <div class="sensor" v-for="sensor in sensors" :key="sensor">
    <SparkLine :data="sensor" />
  </div>
</div>
And instead add it to individual sensor <div>s. This requires us to add a <style scoped> section to the bottom of App.vue.
而是将其添加到单个传感器<div> 。 这要求我们在App.vue的底部添加<style scoped>部分。
<style scoped>
.sensor {
  width: 100px;
}
</style>
Now that we can style each sensor, it’s time to add some basic styles.
现在我们可以为每个传感器设置样式了,是时候添加一些基本样式了。
Some padding, rounded corners, and color will make a big difference.
一些填充,圆角和颜色会产生很大的不同。
.sensor {
  width: 100px;
  padding: 20px;
  border-radius: 4px;
  background-color: #313133;
}
I’m a fan of CSS grids. So I’m going to add a class to the root element…
我是CSS网格的粉丝。 所以我要在根元素中添加一个类……
<div class="sensors">
  <div class="sensor ... snip ...>
    <!-- ... snip ...>
  </div>
</div>
…and give it some grid styles.
…并为其提供一些网格样式。
.sensors {
  display: grid;
  grid-template-columns: repeat(auto-fit, minmax(200px, 1fr));
  grid-gap: 20px;
}
These styles make the sensors show up in a grid that will automatically adjust for screen size.
这些样式使传感器显示在网格中,该网格将根据屏幕大小自动调整。
We’ll also need to remove the width from each sensor, and instead add a max-width.
我们还需要删除每个传感器的width ,而是添加一个max-width 。
.sensor {
  max-width: 200px;
  padding: 20px;
  /* ... snip ... */
}
The chart itself doesn’t need to take up so much of the box. Add a class…
图表本身不需要占用太多时间。 添加课程...
<SparkLine class="sensor-chart" :data="sensor" />…and style it accordingly.
…并相应地设置样式。
.sensor {
  /* ... snip ... */
  text-align: center;
}.sensor-chart {
  width: 50%;
}
Each of these sensors surely has a name. We can add that in the data.
这些传感器中的每一个肯定都有一个名称。 我们可以将其添加到数据中。
data() {
    return {
      sensors: [
        { name: "Alt Volts", data: [808, 1475, 1426, 1884, 1396] },
        { name: "Alt Amps", data: [3246, 1941, 2649, 1633, 1262] },
        { name: "Aux HP", data: [190, 128, 209, 208, 116] }
      ]
    };
  },
Since we changed the format of our data, we need to update the template.
由于我们更改了数据格式,因此我们需要更新模板。
<div class="sensors">
  <div class="sensor" v-for="sensor in sensors" :key="sensor.name">
    <SparkLine class="sensor-chart" :data="sensor.data" />
  </div>
</div>
Now we can add the name below each chart.
现在,我们可以在每个图表下方添加名称。
<div class="sensors">
  <div class="sensor" v-for="sensor in sensors" :key="sensor.name">
    <SparkLine class="sensor-chart" :data="sensor.data" />
    <div class="sensor-name">{{ sensor.name }}</div>
  </div>
</div>
The font can be a little smaller, too.
字体也可以小一点。
.sensor-name {
  font-size: 12px;
}
Oops. It’s hard to read. We can change the font and color directly in the .sensor-name style, but I know we’re going to be adding some more text, so I’m going to make the change higher up.
哎呀。 很难读。 我们可以直接使用.sensor-name样式更改字体和颜色,但是我知道我们将添加更多文本,因此我将进行更大的更改。
.sensors {
  /* ... snip ... */
  font-family: sans-serif;
  color: #d8d9da;
}
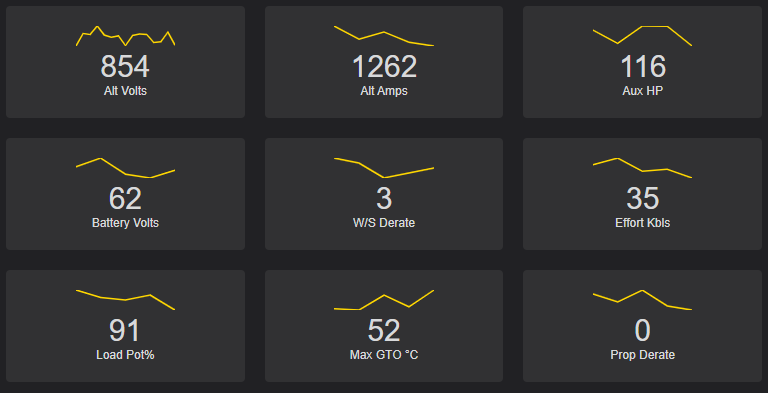
It’s starting to come together. How about we show the most recent data point for each sensor? Note the new lines in bold below.
它开始融合在一起。 我们如何显示每个传感器的最新数据点呢? 注意下面以粗体显示的新行。
<div class="sensors">
    <div class="sensor" v-for="sensor in sensors" :key="sensor.name">
      <SparkLine class="sensor-chart" :data="sensor.data" />      <div class="sensor-value">
        {{ sensor.data[sensor.data.length - 1] }}
      </div>      <div class="sensor-name">{{ sensor.name }}</div>
    </div>
  </div>
We can make these numbers bigger as you can imagine they might be valuable to see at a glance.
我们可以使这些数字更大,您可以想象一下,一眼就能看到它们的价值。
.sensor-value {
  font-size: 30px;
}
Just for personal preference, I’m going to set the entire background to a darker color. You can place this right alongside <style scoped>.
仅出于个人喜好,我将整个背景设置为深色。 您可以将其放在<style scoped>旁边。
<style>
body {
  background-color: #212124;
}
</style>
And the styles are complete! Let’s see what it looks like with many more sensors.
样式齐全! 让我们看看使用更多传感器的情况。
sensors: [
        { name: "Alt Volts", data: [808, 1475, 1426, 1884, 1396] },
        { name: "Alt Amps", data: [3246, 1941, 2649, 1633, 1262] },
        { name: "Aux HP", data: [190, 128, 209, 208, 116] },
        { name: "Battery Volts", data: [73, 101, 49, 37, 62] },
        { name: "W/S Derate", data: [5, 4, 1, 2, 3] },
        { name: "Effort Kbls", data: [61, 74, 48, 52, 35] },
        { name: "Load Pot%", data: [99, 96, 95, 97, 91] },
        { name: "Max GTO °C", data: [23, 21, 44, 26, 52] },
        { name: "Prop Derate", data: [4, 2, 5, 1, 0] },
        { name: "MPH", data: [18, 20, 21, 23, 26] },
        { name: "TE", data: [8, 9, 5, 7, 6] },
        { name: "Read No.", data: [9811, 9812, 9813, 9814, 9815] },
        { name: "Engine RPM", data: [1096, 598, 661, 777, 1027] },
        { name: "Gross HP", data: [5959, 2163, 3935, 3443, 4566] },
        { name: "Water °F", data: [243, 98, 101, 193, 184] },
        { name: "Oil °F", data: [253, 143, 150, 232, 215] },
        { name: "MPH/Minute", data: [5, 6, 4, 2, 3] }
      ]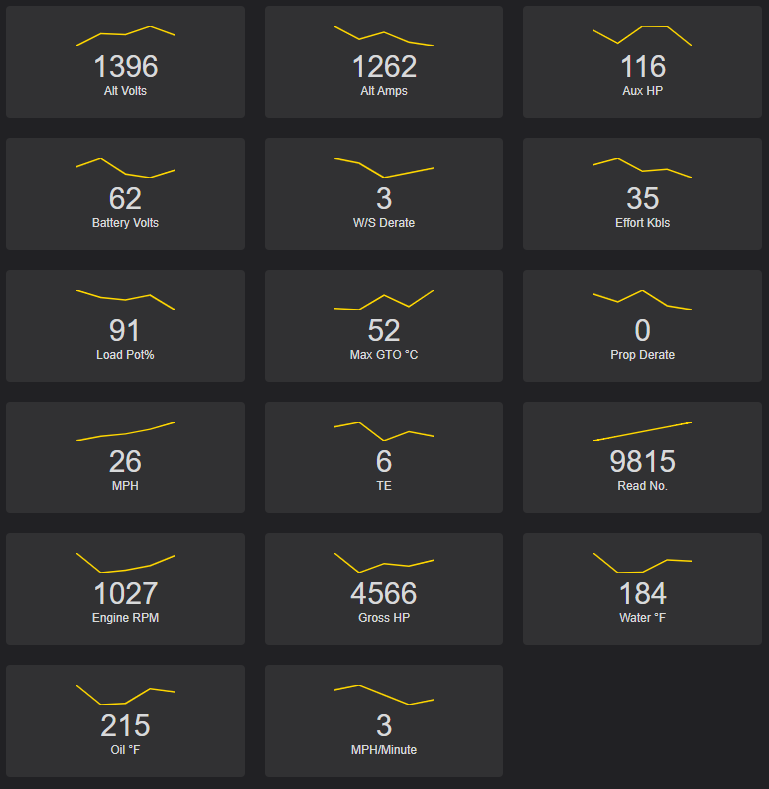
It looks good! And the best part? Everything is dynamic. You can change the data and everything updates.
看上去不错! 最好的部分是? 一切都是动态的。 您可以更改数据,所有内容都会更新。
Say you poll for updated data via an API. You simply replace or modify any of the sensors’ data properties and the dashboard will update.
假设您通过API查询更新的数据。 您只需替换或修改任何传感器的data属性,仪表板就会更新。
Here’s some code that adds a random data point to the first sensor’s array every second. It also “caps” the array to the latest 15 values only.
这是一些代码,每秒钟将一个随机数据点添加到第一个传感器的阵列中。 它还将数组仅限制为最新的15个值。
setInterval(() => {
  this
    .sensors[0]
    .data
    .push(Math.floor(Math.random() * 800 + 800));  this.sensors[0].data = this.sensors[0].data.slice(-15);
}, 1000);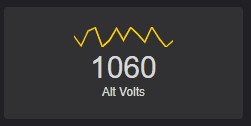
The code for this article is open source and can be found on GitHub.
本文的代码是开源的,可以在GitHub上找到。
Most of what was written today is contained in src/App.vue.
今天写的大部分内容都包含在src / App.vue中 。
翻译自: https://travishorn.com/building-a-sparkline-dashboard-8bbc9c26c401
正点原子迷你板调lcd亮度


 954
954

 被折叠的 条评论
为什么被折叠?
被折叠的 条评论
为什么被折叠?
 到【灌水乐园】发言


