


谷歌firebase
For the past few weeks, I have been coding and learning how to use firebase with my project, and in my last blog, we were going over the some of the features that firebase provides. And in today’s part II of the firebase blog series, we will be going over authentication using Google Firebase.
在过去的几周中,我一直在编码和学习如何在项目中使用firebase,在我的上一个博客中 ,我们介绍了firebase提供的一些功能。 在Firebase博客系列的第二部分中,我们将介绍使用Google Firebase进行身份验证的过程。
In my last blog, we went over how to setup firebase as a project, and web app, and how to use the database service that firebase provides. Today we will dive deeper into firebase and its authentication service. As we all know by now, authentication is very important but tedious at the same time, spending hours of research and coding, while the results might not be as fancy and visible to the users. Thanks to third party authentication service such as Google Firebase, we don’t have to write our own authentications. We simply start by setting up our authentication method through firebase (shown in the image below), and for demonstration purpose, we are only using email/password to sign in, but firebase offer so many other ways to link your accounts to your app.
在我的上一个博客中 ,我们介绍了如何将Firebase设置为项目和Web应用程序,以及如何使用firebase提供的数据库服务。 今天,我们将更深入地研究Firebase及其身份验证服务。 众所周知,身份验证非常重要,但同时又很乏味,需要花费大量时间进行研究和编码,而结果却可能不那么花哨和对用户可见。 感谢第三方认证服务(例如Google Firebase),我们不必编写自己的认证。 我们仅从通过Firebase设置身份验证方法开始(如下图所示),并且出于演示目的,我们仅使用电子邮件/密码登录,但是Firebase提供了许多其他方式将您的帐户链接到您的应用程序。
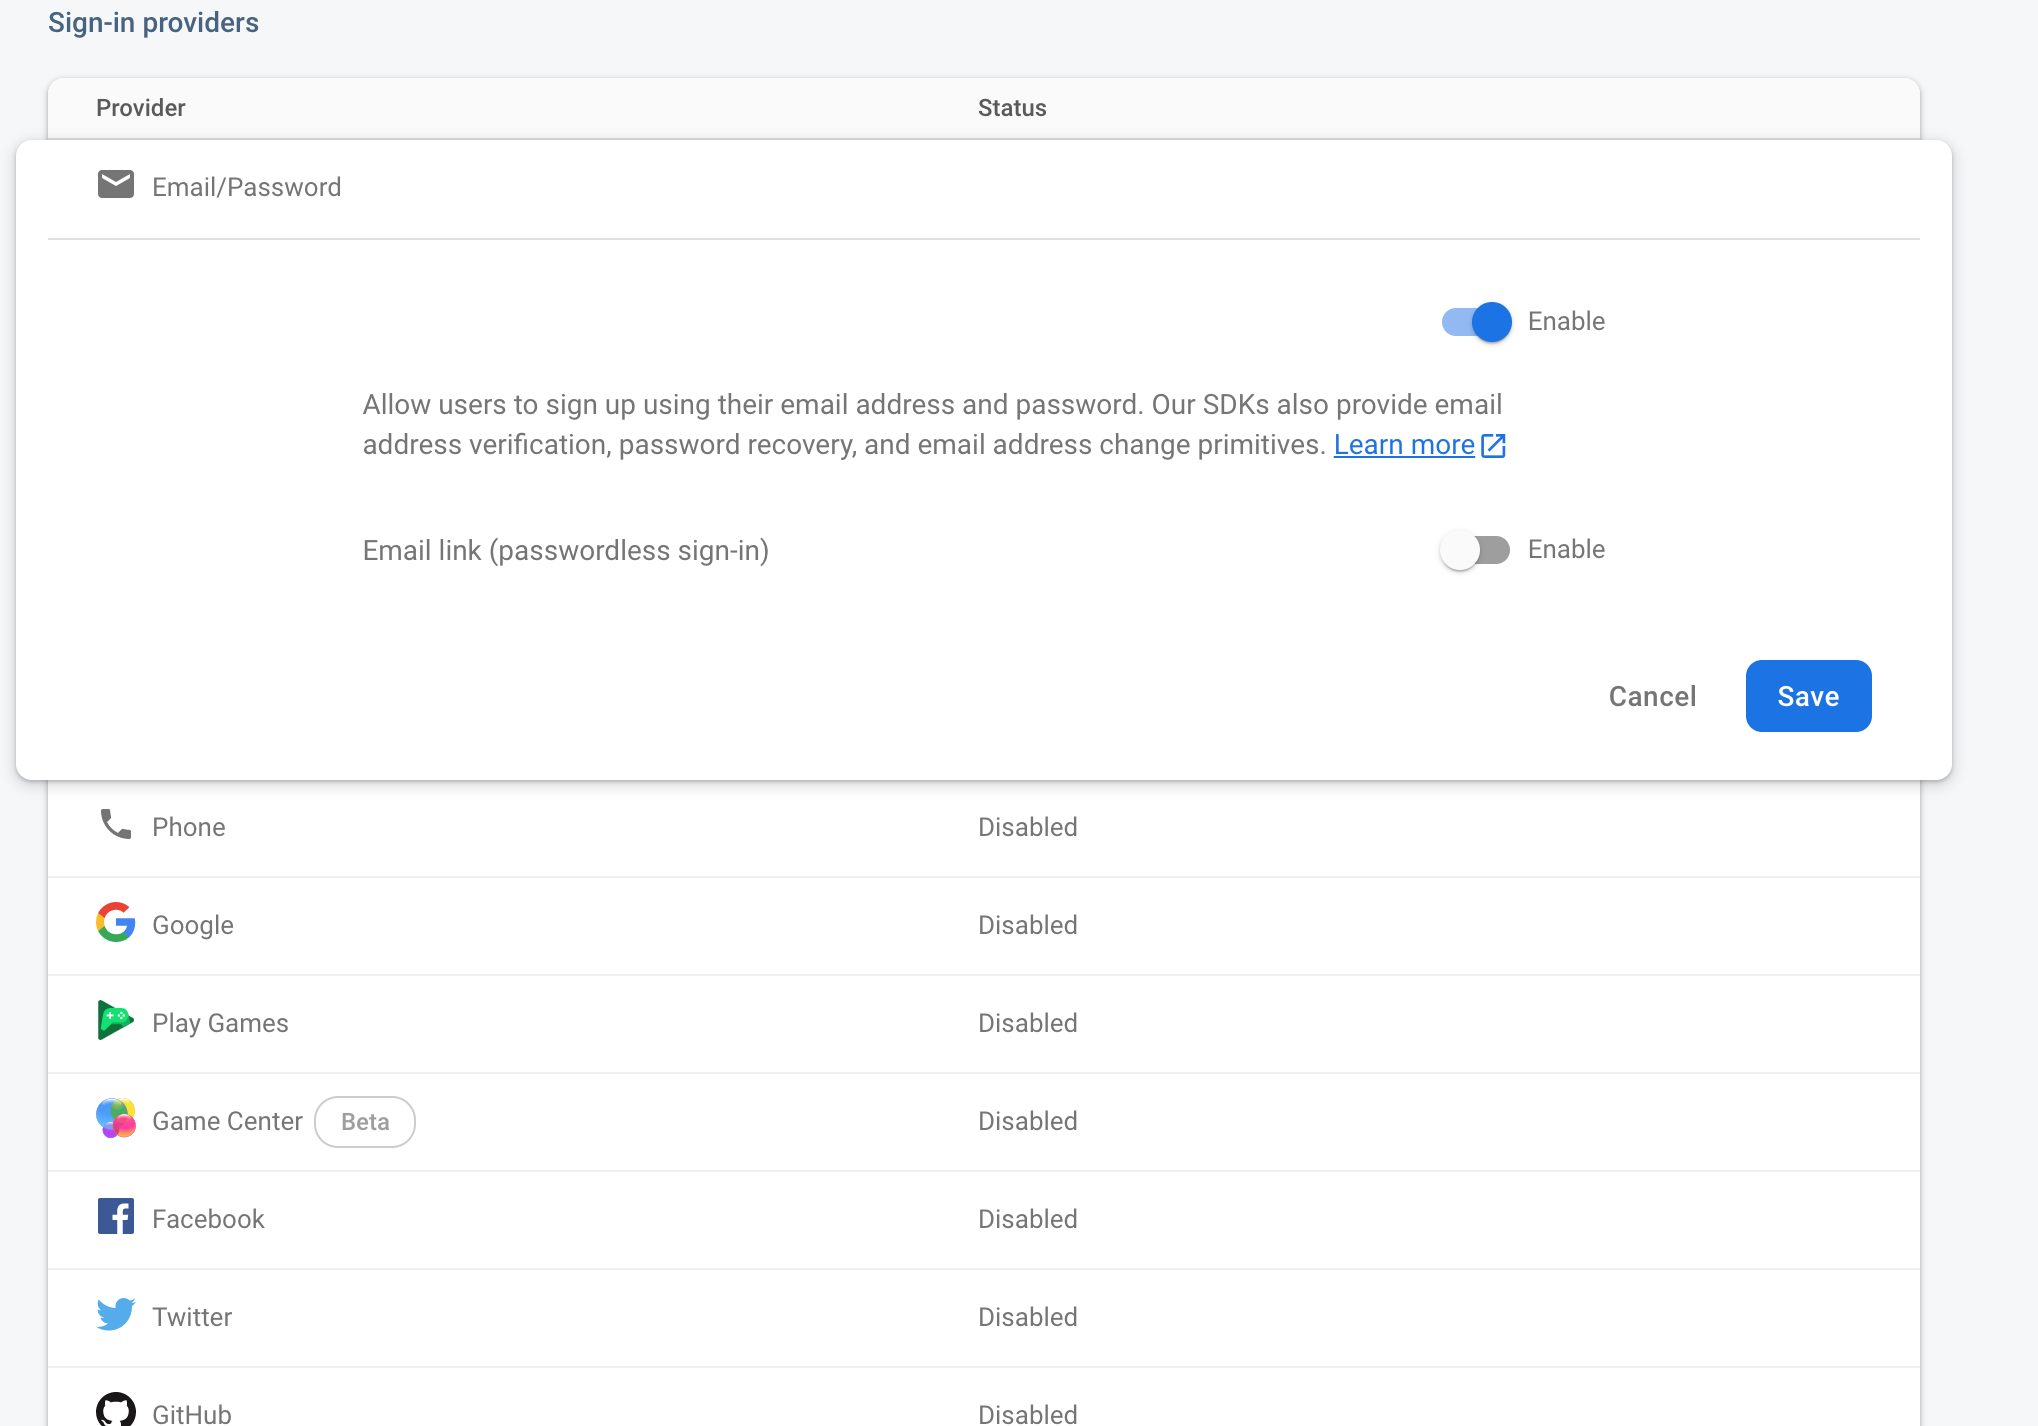
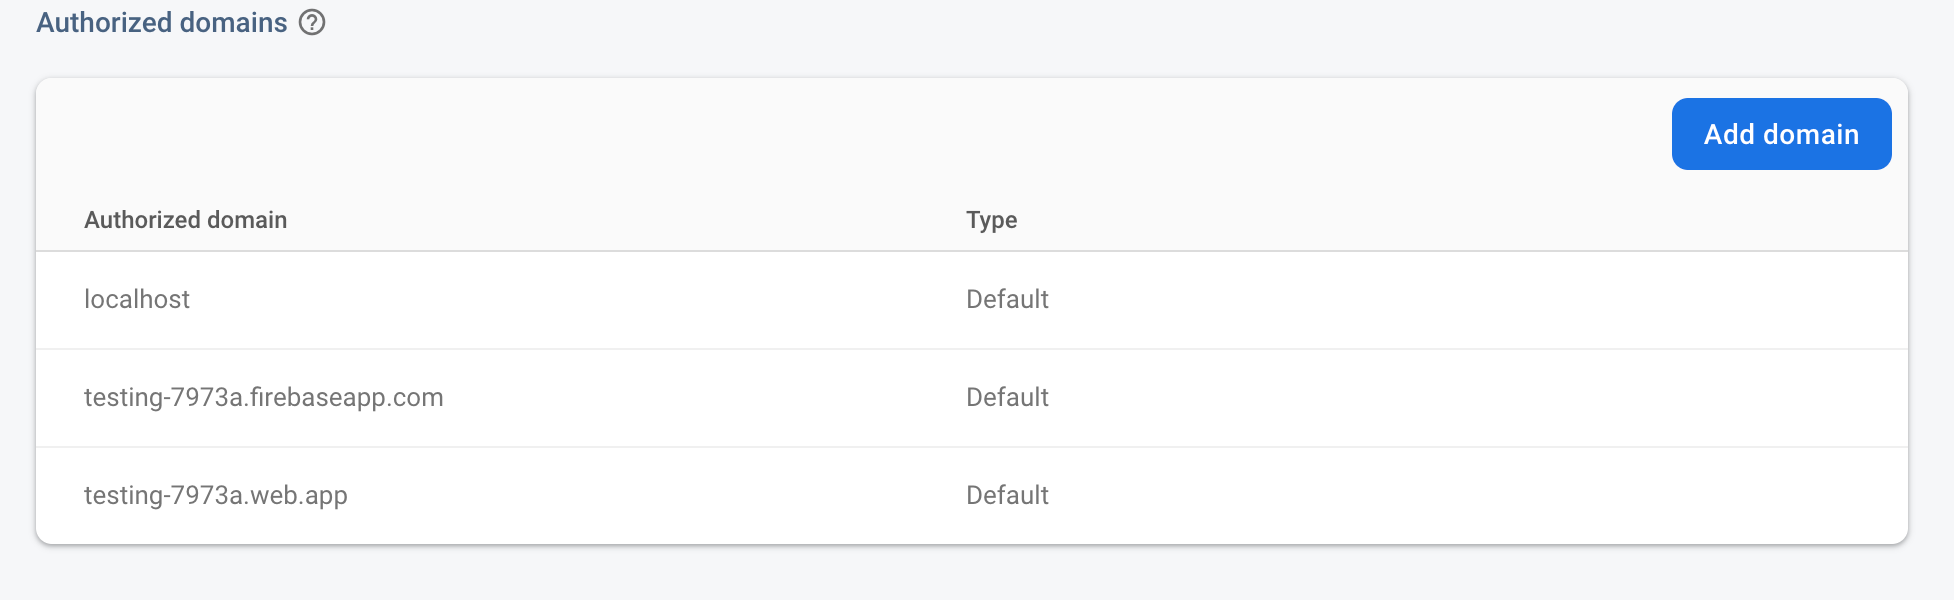
Notice how there is email link (password-less sign-in) option that we didn’t enable, if we enable the feature, it will mean that firebase will send email to first time users and allow them to click on a link to verify and sign in their account. On a side note here, if we scrolled down the authentication page on firebase, we will see the image below with authorized domains, this means that only the following domains will be able to authorize the authentication services on our app, which is one of the cool security feature that firebase provides.
请注意,没有启用我们没有启用的电子邮件链接(无密码登录)选项,如果启用此功能,则意味着Firebase会将电子邮件发送给首次使用的用户,并允许他们单击链接进行验证并登录他们的帐户。 在这里的旁注,如果我们向下滚动Firebase上的身份验证页面,我们将看到下图带有授权域的图片,这意味着只有以下域才能在我们的应用程序上授权身份验证服务,这是Firebase提供的超酷安全功能。
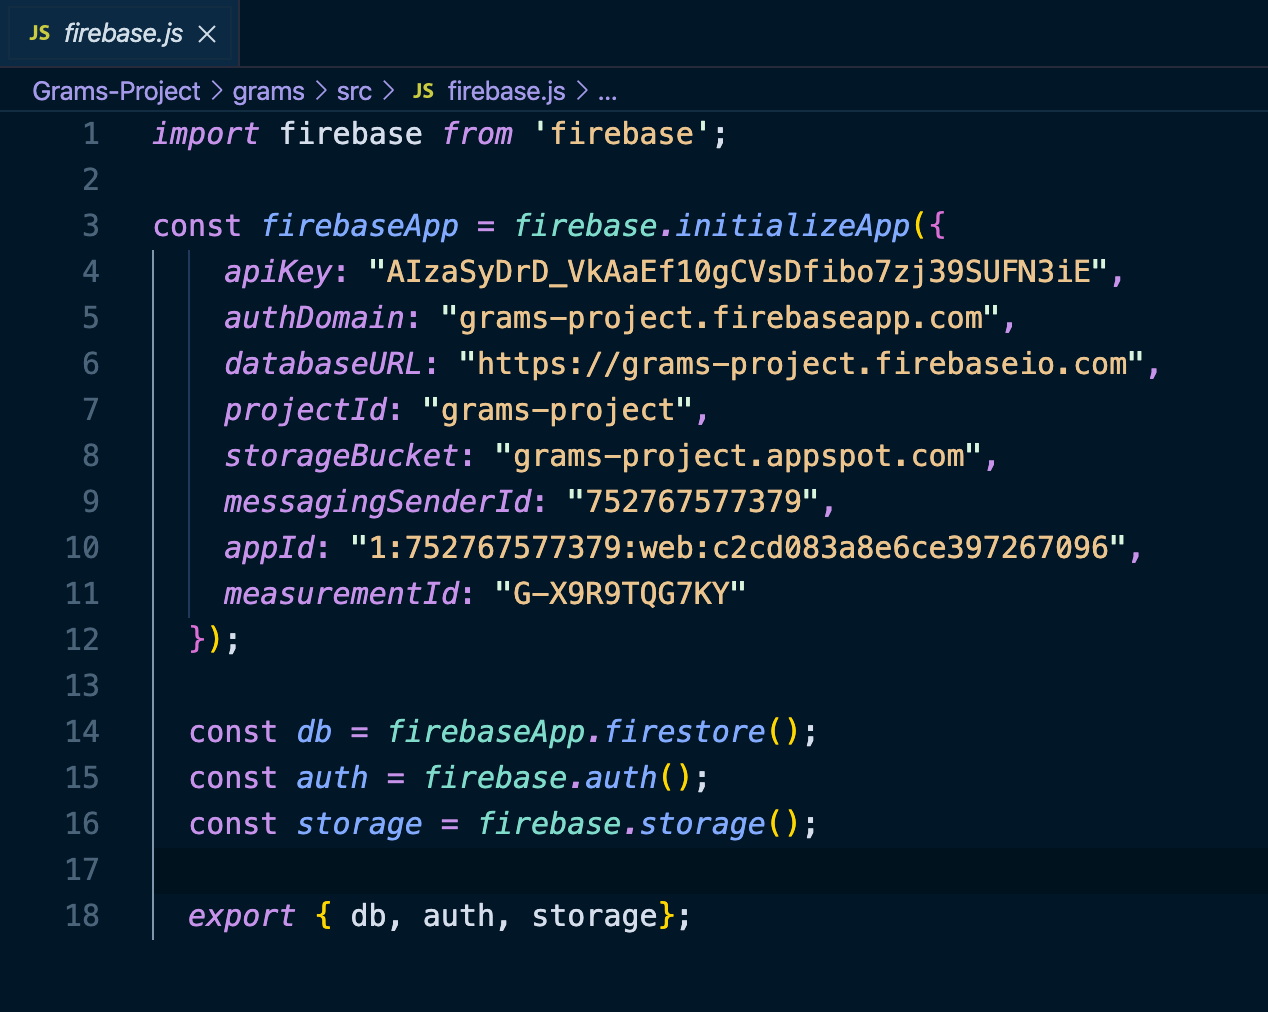
Once we enable allow users to sign up using their email and password, we need to add a few changes to our codes to access the authentication service. Remember in our last blog, we went over how to setup a file called firebase.js to import all the firebase services. One of the important feature we added was that we called db as firebase database, auth as firebase authentication, and storage as firebase storage service. Now it is time to access the authentication service by calling it in our codes.
启用允许用户使用其电子邮件和密码进行注册后,我们需要对代码进行一些更改以访问身份验证服务。 记住,在我们的上一个博客中,我们讨论了如何设置名为firebase.js的文件以导入所有firebase服务。 我们添加的重要功能之一是,我们将db称为firebase数据库,将auth称为firebase身份验证,并将存储称为firebase存储服务。 现在是时候通过在我们的代码中调用身份验证服务来访问它了。
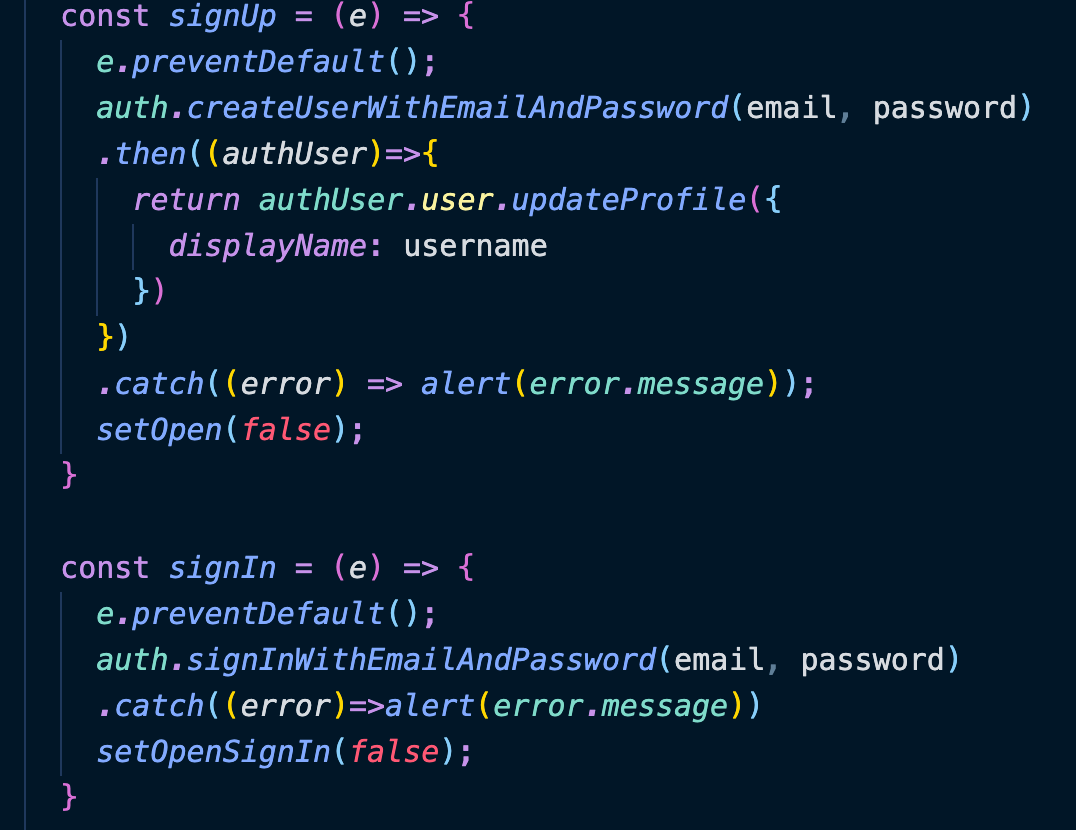
Once we import the firebase.js file import { db, auth, storage } from './firebase'; we can quickly access the authentication service by calling auth.createUserWithEmailAndPassword() in our signup function, this function is pretty self explanatory, we are trying to access firebase authentication sign up with email and password. On the side note, we always want to use event.preventDefault() because it will allow the form (signup/ sign-in) to not refresh when we submit the form. the email and password was a state management tool that we used and stored, this way the user information will be stored and passed to the firebase authentication, and we will try to catch and display any error with an alert message. So firebase provides back-end validation for us, shown in the image below. Yes! firebase gives us free validation service and tells us if our email address is not valid when we sign up.
一旦我们导入firebase.js文件import { db, auth, storage } from './firebase'; 我们可以通过在注册功能中调用auth.createUserWithEmailAndPassword()快速访问身份验证服务,此功能很容易说明,我们正在尝试使用电子邮件和密码访问Firebase身份验证注册。 在旁注中,我们始终要使用event.preventDefault(),因为它将允许我们在提交表单时不刷新表单(注册/登录)。 电子邮件和密码是我们使用和存储的状态管理工具,通过这种方式,用户信息将被存储并传递给Firebase身份验证,我们将尝试捕获并显示任何带有警报消息的错误。 因此,firebase为我们提供了后端验证,如下图所示。 是! firebase为我们提供了免费的验证服务,并告诉我们注册时我们的电子邮件地址是否无效。

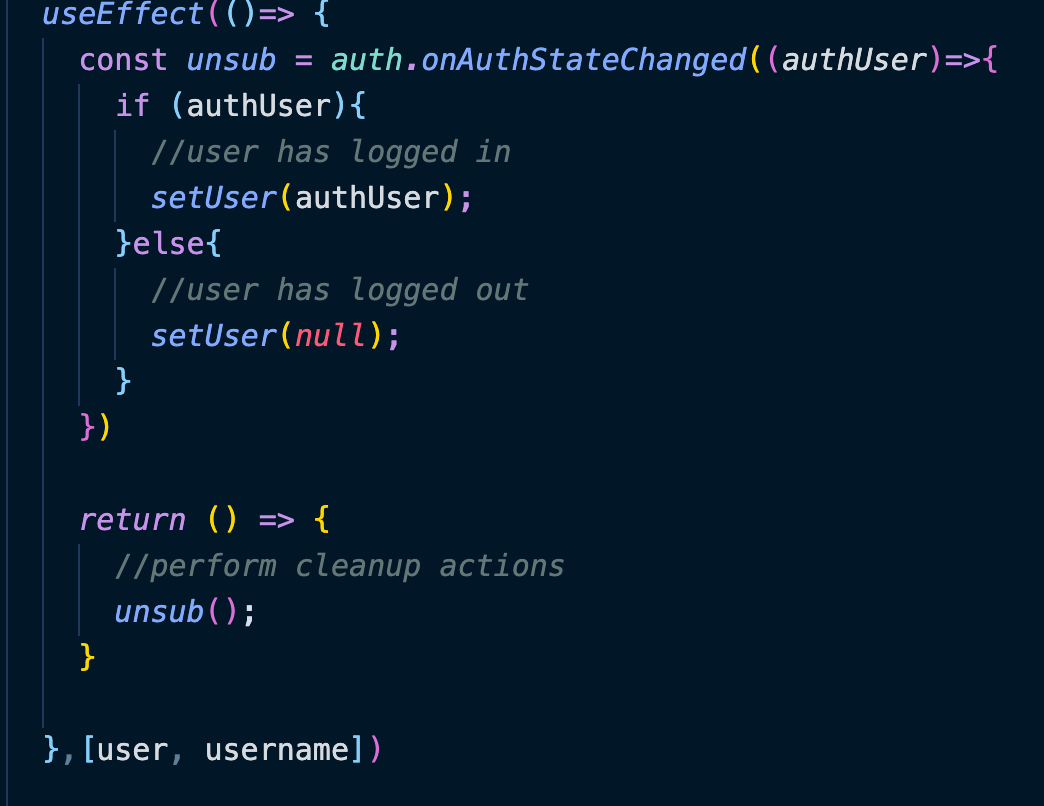
Before I explain the code .then( (authUser)=>{}), we need to take a look at another piece of code that will explain what authUser does. The code snippet shown below explains in details of what authUser does. We use React Hooks useEffect function, we use a listener auth.onAuthStateChanged(), this will listen for any single time any authentication changes, this function will run. If the user has logged in, set current user to the authUser, otherwise the user has logged out. And the last line of code in the snippet below means that every time the user and username state changes, the useEffect function will run. One note that we have in this code is that we set auth.onAuthStateChange function to a variable unsub, and then return it at the end of our useEffect function. This is to prevent too many listeners that will be fired off at the same time with useEffect, therefore we make it into a variable and return it at the end of the function, so it will perform some cleanup actions before the function will run again.
在解释代码.then((authUser)=> {})之前,我们需要看一下另一段代码,它将解释authUser的功能。 下面显示的代码段详细说明了authUser的功能。 我们使用React Hooks的useEffect函数,我们使用侦听器auth.onAuthStateChanged(),该函数将在任何时间进行任何身份验证更改的侦听,此函数将运行。 如果用户已登录,请将当前用户设置为authUser,否则用户已注销。 下面的代码片段的最后一行意味着,每当用户和用户名状态更改时,useEffect函数都将运行。 这段代码中的一个注释是,我们将auth.onAuthStateChange函数设置为变量unsub,然后在useEffect函数的末尾将其返回。 这是为了防止使用useEffect同时触发过多的侦听器,因此我们将其设置为变量,并在函数末尾将其返回,因此它将在函数再次运行之前执行一些清除操作。
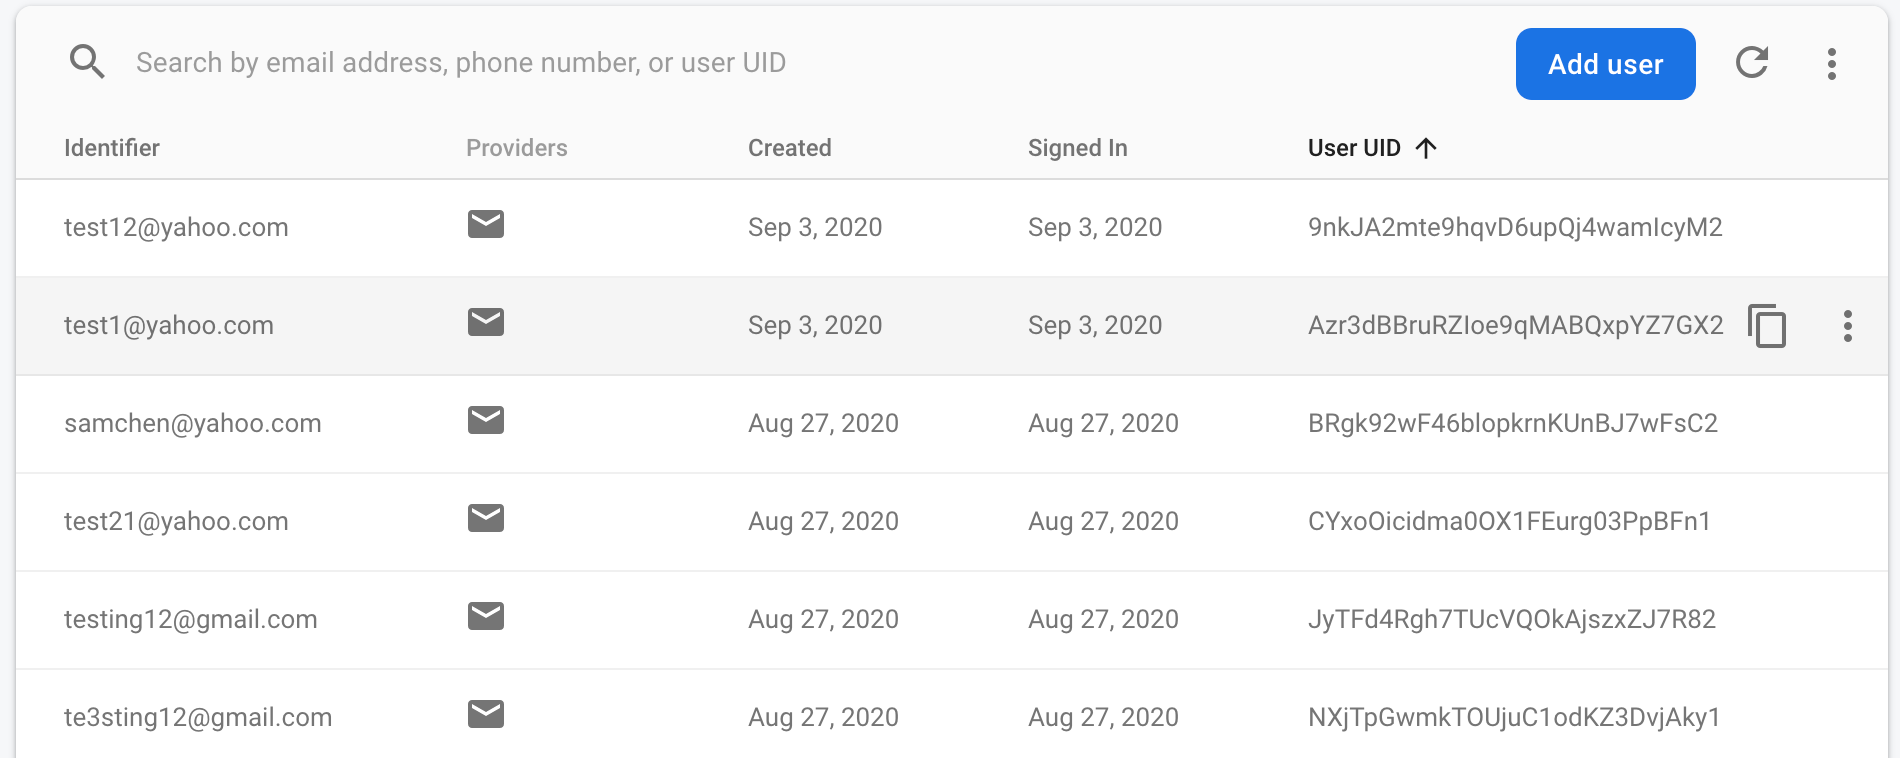
Once we setup our current user, we are tracking our current user with the state management, now we are updating our user profile on firebase to make sure the displayName is the username that we created with. And we can see with the image below, we can see bunch of test users that we created through our app and firebase has all the info of the users that we created.
设置当前用户后,我们将使用状态管理来跟踪当前用户,现在我们在firebase上更新用户配置文件,以确保displayName是我们创建时使用的用户名。 我们可以从下图看到,我们可以看到通过应用程序创建的一堆测试用户,firebase包含了我们创建的用户的所有信息。
In the previous code snippet, we also has a function called signIn, which is also very self explanatory. We are trying to create a sign-in method and verify the users who signs into our app. auth.signInWithEmailAndPassword(email, password) is the way that we access firebase authentication service and let them help us determine whether the user is signing in with correct email and password. And if there is any error, we will display that error message with an alert shown in the image below. We can see that firebase helped us determined whether it is our email or password is wrong when we try to sign in ( yes, we can change the error message for security purposes!)
在前面的代码片段中,我们还有一个名为signIn的函数,它也很容易解释。 我们正在尝试创建一种登录方法,并验证登录我们应用的用户。 auth.signInWithEmailAndPassword(电子邮件,密码)是我们访问Firebase身份验证服务的一种方式,可让他们帮助我们确定用户是否使用正确的电子邮件和密码登录。 如果有任何错误,我们将显示该错误消息,并带有下图所示的警报。 我们可以看到,当尝试登录时,firebase可以帮助我们确定是电子邮件还是密码错误(是的,出于安全目的,我们可以更改错误消息!)


Now that we have firebase authentication fully setup, feel free to play around with it! In the next blog of the firebase series, we will go over more features that Google Firebase has offered! Thanks for reading and stay tuned for the next part! In the mean time, feel free to check out my last blog about firebase part I and chat with me through my LinkedIn! Checkout the app that I built with google firebase!
既然我们已经完全设置了Firebase身份验证,请随时使用它! 在Firebase系列的下一个博客中,我们将介绍Google Firebase提供的更多功能! 感谢您的阅读,敬请期待下一部分! 同时,请随时查看我关于firebase第一部分的最新博客,并通过我的LinkedIn与我聊天! 检出我用Google Firebase构建的应用程序 !
翻译自: https://medium.com/swlh/things-i-have-learned-using-google-firebase-part-ii-7a36c6af09ad
谷歌firebase


 460
460


 被折叠的 条评论
为什么被折叠?
被折叠的 条评论
为什么被折叠?
 到【灌水乐园】发言


