


python pypi
Note: The complete source code can be found on GitHub.
注意:完整的源代码可以在GitHub上找到。
If you work with Python, then you are probably aware of packages that you can download and import into your projects using pip. It’s a robust tool that allows developers from all around the world to upload their code so that others can use it.
如果您使用Python,那么您可能知道可以使用pip下载并导入到项目中的软件包。 这是一个强大的工具,它使世界各地的开发人员都可以上载他们的代码,以便其他人可以使用它。
In today’s article, I will be showing you how to publish your Python package to the service PyPi, which is the Python Package Index. This is where pip goes to download those sweet packages for you to use in your projects and command-line tools that you can use on your computer.
在今天的文章中,我将向您展示如何将Python包发布到服务PyPi ,该服务是Python包索引。 这是pip用来下载这些实用程序包的地方,供您在项目中使用,以及可以在计算机上使用的命令行工具。
1.创建项目 (1. Creating the Project)
The first step that we are going to need to take is to create a very simple package for us to publish onto PyPi. This step can be as complex as you’d like depending on the application you wish to publish, but for this example, we will be creating a very simple package.
我们需要采取的第一步是创建一个非常简单的包,供我们发布到PyPi上。 根据您要发布的应用程序,此步骤可能非常复杂,但是对于本示例,我们将创建一个非常简单的包。
Let's go ahead and create a new directory structure for our project:
让我们继续为我们的项目创建一个新的目录结构:
sample-pypi-package
└── hello_world
    ├── __init__.py
    └── main.py
sample-pypi-package is the root level of the project and we are creating a module of hello_world inside the project. The contents of __init__.py are empty and main.py has the contents shown below:
sample-pypi-package是项目的根目录,我们正在项目内部创建一个hello_world模块。 __init__.py的内容为空, main.py的内容如下所示:
# main.py


def hello_world():
	print("Hello World")


hello_world()
That’s pretty much it for the first step. Nothing out of the ordinary if you are familiar with Python. The main.py file isn’t even necessary for this tutorial, but I added it just so that we have a file within the module.
第一步就差不多了。 如果您熟悉Python,这并没有什么不同。 本教程甚至不需要main.py文件,但是我添加了它只是为了在模块中有一个文件。
2. setup.py文件 (2. The setup.py File)
We will be creating a new file called setup.py that acts as the build script for our package. We will, however, need to have setuptools installed through pip. You can run the command below. Be aware of which version of Python you are using and use the appropriate pip version.
我们将创建一个名为setup.py的新文件,该文件充当我们程序包的构建脚本。 但是,我们需要通过pip安装setuptools 。 您可以运行以下命令。 请注意您使用的是哪个Python版本,并使用适当的pip版本。
pip install setuptools
OR
pip3 install setuptools
Now that we have setuptools installed, we can go ahead and start setting up our setup.py.
现在我们已经安装了setuptools ,我们可以继续设置setup.py 。
# Import our newly installed setuptools package.
import setuptools


# Opens our README.md and assigns it to long_description.
with open("README.md", "r") as fh:
	long_description = fh.read()


# Defines requests as a requirement in order for this package to operate. The dependencies of the project.
# requirements = ["requests<=2.21.0"]


# Function that takes several arguments. It assigns these values to our package.
setuptools.setup(
	# Distribution name the package. Name must be unique so adding your username at the end is common.
	name="hello_world_ericjaychi",
	# Version number of your package. Semantic versioning is commonly used.
	version="0.0.1",
	# Author name.
	author="Eric Chi",
	# Author's email address.
	author_email="ericjaychi@gmail.com",
	# Short description that will show on the PyPi page.
	description="A Hello World package",
	# Long description that will display on the PyPi page. Uses the repo's README.md to populate this.
	long_description=long_description,
	# Defines the content type that the long_description is using.
	long_description_content_type="text/markdown",
	# The URL that represents the homepage of the project. Most projects link to the repo.
	url="https://github.com/ericjaychi/sample-pypi-package",
	# Finds all packages within in the project and combines them into the distribution together.
	packages=setuptools.find_packages(),
	# requirements or dependencies that will be installed alongside your package when the user installs it via pip.
	# install_requires=requirements,
	# Gives pip some metadata about the package. Also displays on the PyPi page.
	classifiers=[
		"Programming Language :: Python :: 3.8",
		"License :: OSI Approved :: MIT License",
		"Operating System :: OS Independent",
	],
	# The version of Python that is required.
	python_requires='>=3.6',
)
As mentioned before, this file is responsible for building our distribution file that will be uploaded to PyPi. I left some comments describing each line.
如前所述,此文件负责构建我们的分发文件,该文件将上传到PyPi。 我留下了一些描述每一行的评论。
Two lines I want to highlight are:
我要强调的两行是:
requirements = ["requests<=2.21.0"]install_requires=requirements,I specifically commented these out because they are not needed inside this exercise. However, they are important if your package has dependencies. Realistically, an actual project will have outside dependencies, so this is how you would add those dependencies to the distribution so that the user who is installing your package will also install the required packages in order for the code to run properly. A typical practice would be to create a requirements.txt file that your setup.py can read instead of defining an array, but you get the idea.
我特别评论了这些内容,因为在本练习中不需要它们。 然而, 如果您的程序包具有依赖项,它们就很重要。 实际上,一个实际的项目将具有外部依赖关系,因此,这就是将这些依赖关系添加到分发中的方式,以便正在安装软件包的用户也将安装必需的软件包,以使代码正常运行。 一种典型的做法是创建一个setup.py可以读取而不是定义数组即可读取的requirements.txt文件,但是您明白了。
If you are curious about all the parameters that setuptools.setup() has to offer, see the official documentation.
如果您对setuptools.setup()必须提供的所有参数感到好奇,请参阅官方文档。
3. README.md和LICENSE文件 (3. README.md and LICENSE Files)
This part is not as exciting but is very important. Since you are publishing to the world, you want to make sure you have appropriate documentation as well as a proper open source license. We also need the README.md since we are using it inside the setup.py.
这部分并不那么令人兴奋,但非常重要。 由于要发布给全世界,因此您要确保拥有适当的文档以及适当的开源许可证。 我们还需要README.md因为我们正在setup.py中使用它。
So let’s create a simple README.md on the root level of the project:
因此,让我们在项目的根级别上创建一个简单的README.md :
# Sample PyPi Package

This is a simple exercise to publish a package onto PyPi.
README.md done.
README.md完成。
Choosing a license can be a little tricky. Luckily for us, https://choosealicense.com/ does a great job of overviewing the different open source licenses that can be used. I will be using the MIT license in this example, but if you are publishing an actual package, I advise you to look into which license you will want to go with.
选择许可证可能有些棘手。 幸运的是, https: //choosealicense.com/很好地概述了可以使用的各种开源许可证。 在此示例中,我将使用MIT许可证,但是如果您要发布实际的软件包,建议您查看要使用的许可证。
Now let’s go ahead and create a LICENSE file on the root level with the MIT license:
现在,让我们继续使用MIT许可证在根级别上创建一个LICENSE文件:
MIT License

Copyright (c) [year] [fullname]

Permission is hereby granted, free of charge, to any person obtaining a copy
of this software and associated documentation files (the "Software"), to deal
in the Software without restriction, including without limitation the rights
to use, copy, modify, merge, publish, distribute, sublicense, and/or sell
copies of the Software, and to permit persons to whom the Software is
furnished to do so, subject to the following conditions:

The above copyright notice and this permission notice shall be included in all
copies or substantial portions of the Software.

THE SOFTWARE IS PROVIDED "AS IS", WITHOUT WARRANTY OF ANY KIND, EXPRESS OR
IMPLIED, INCLUDING BUT NOT LIMITED TO THE WARRANTIES OF MERCHANTABILITY,
FITNESS FOR A PARTICULAR PURPOSE AND NONINFRINGEMENT. IN NO EVENT SHALL THE
AUTHORS OR COPYRIGHT HOLDERS BE LIABLE FOR ANY CLAIM, DAMAGES OR OTHER
LIABILITY, WHETHER IN AN ACTION OF CONTRACT, TORT OR OTHERWISE, ARISING FROM,
OUT OF OR IN CONNECTION WITH THE SOFTWARE OR THE USE OR OTHER DEALINGS IN THE
SOFTWARE.
Be sure to change the [year] and [fullname] section!
请务必更改[year]和[fullname]部分!
Now that we have our LICENSE and README.md created, the directory structure should look like this now:
现在我们已经创建了LICENSE和README.md ,目录结构现在应如下所示:
sample-pypi-package/
├── LICENSE
├── README.md
├── hello_world
│   ├── __init__.py
│   └── main.py
└── setup.py
4.生成分发文件 (4. Generating Distribution Files)
So now that we have our package all set, we are ready to generate our distribution files. A distribution file is a file that the user will be downloading on their machine and unpacking so that they can run your code. So when you run pip install on a package, you are downloading tarball/zip to unpack on your machine locally.
现在,我们已经准备好了所有程序包,可以开始生成分发文件了。 分发文件是用户将在其计算机上下载并解压缩的文件,以便他们可以运行您的代码。 因此,在软件包上运行pip install时,您正在下载tarball / zip,以在本地计算机上解压缩。
From here, we will need another tool to allow us to create the distribution file:
从这里,我们将需要另一个工具来允许我们创建分发文件:
pip install wheel
OR
pip3 install wheel
Once you have wheel downloaded, we can now leverage it to create the files.
一旦您下载了wheel ,我们现在就可以利用它来创建文件。
Run these commands in the same directory where setup.py resides (it should be your root directory if you are following along):
在setup.py所在的同一目录中运行这些命令(如果遵循,则应为您的根目录):
python setup.py sdist bdist_wheel
OR
python3 setup.py sdist bdist_wheel
Once you run this, your terminal should display some logs of what it’s doing. Once the command is done running, you should have a few new directories that were created that I have bolded below. I will not be uploading these directories into the repo!
运行此命令后,终端应显示一些正在执行的日志。 一旦命令运行完成,您应该已经创建了一些新的目录,这些目录在下面以粗体显示。 我不会将这些目录上传到仓库中!
sample-pypi-package/
├── LICENSE
├── README.md
├── build
│   ├── bdist.macosx-10.15-x86_64
│   └── lib
│       └── hello_world
│           ├── __init__.py
│           └── main.py
├── dist
│   ├── hello_world_ericjaychi-0.0.1-py3-none-any.whl
│   └── hello_world_ericjaychi-0.0.1.tar.gz
├── hello_world
│   ├── __init__.py
│   └── main.py
├── hello_world_ericjaychi.egg-info
│   ├── PKG-INFO
│   ├── SOURCES.txt
│   ├── dependency_links.txt
│   └── top_level.txt
└── setup.py
Both build and hello_world_ericjaychi.egg-info can be ignored. We want to focus on the dist directory:
build和hello_world_ericjaychi.egg-info都可以忽略。 我们要关注dist目录:
dist/
├── hello_world_ericjaychi-0.0.1-py3-none-any.whl
└── hello_world_ericjaychi-0.0.1.tar.gz
These are our distribution files that will be issued out to users when they download them via pip.
这些是我们的分发文件,当用户通过pip下载它们时,将分发给他们。
5.上传分发文件 (5. Uploading the Distribution Files)
So now it’s time to upload these files up to PyPi. Before we do that, we need to first create an account with PyPi. One detail I do want to highlight: PyPi offers a testing environment for publishing packages so that you can play around with this process before publishing for real. I will provide both registration forms. I would highly suggest tinkering with the test site before publishing your official one to the live servers.
因此,现在是时候将这些文件上传到PyPi。 在此之前,我们需要首先使用PyPi创建一个帐户。 我要强调的一个细节是:PyPi提供了一个发布包的测试环境,因此您可以在真正发布之前进行一下此过程。 我将提供两种注册表。 我强烈建议您在将官方站点发布到实时服务器之前,先对测试站点进行修补。
I will provide examples of publishing to both environments.
我将提供在两种环境下发布的示例。
Once you have signed up with the different environments, it’s time to install the final tool for us to push the distribution package to PyPi:
在使用了不同的环境后,就该为我们安装最终工具以将分发包推送到PyPi了:
pip install twine
OR
pip3 install twine
Once twine is installed, you are going to want to use this new tool to upload the package to PyPi. Run this command on the root level of the project:
安装了twine ,您将要使用此新工具将软件包上载到PyPi。 在项目的根级别上运行以下命令:
twine upload --repository testpypi dist/* (TEST)
twine upload --repository pypi dist/* (PROD)
If these commands don’t work, put python or python3 in front of them.
如果这些命令不起作用,请将python或python3放在它们前面。
After you type the respective command in, you will be prompted to put your credentials in for the respective environment you chose. Once you are finished with that, it will show a few progress bars for the files that are being uploaded:
键入相应的命令后,将提示您输入所选环境的凭据。 完成此操作后,它将显示一些正在上传文件的进度条:
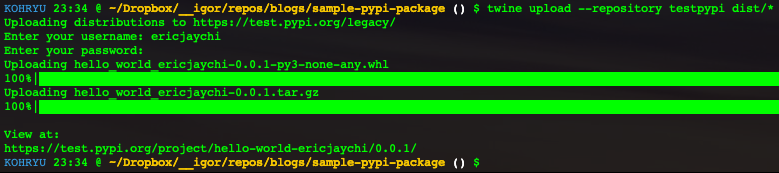
It will even give you a link at the end to show you that it has been published for that specific version. Here are the links that were generated during this exercise, representing TEST and PROD respectively:
甚至在末尾还会提供一个链接,以向您显示已针对该特定版本发布了该链接。 以下是在此练习期间生成的链接,分别代表TEST和PROD:
The final part would be to check to see if you can download it by simply using the link provided on the PyPi pages. You should be able to download it successfully, showing a typical installation message. You can omit the version number if you don’t want to be on a specific version.
最后一部分将是检查您是否可以仅通过使用PyPi页面上提供的链接来下载它。 您应该能够成功下载它,并显示一条典型的安装消息。 如果您不想使用特定版本,则可以省略版本号。
You can also omit -i https//test.pypi.org/simple/ if you wish to pull from the production version of PyPi, which is similar to how you use pip normally.
如果您希望退出PyPi的生产版本,则也可以省略-i https//test.pypi.org/simple/ ,这与您通常使用pip方式类似。

Now that we have the package installed, let’s verify to make sure it was installed correctly.
现在我们已经安装了软件包,让我们验证以确保它已正确安装。
Open up your Python interpreter and import the hello_world module that we created through this article.
打开您的Python解释器,并导入我们通过本文创建的hello_world模块。

If we did everything correctly, our interpreter should be able to recognize the import without any issues!
如果我们正确执行了所有操作,那么我们的解释器应该可以识别导入内容,而不会出现任何问题!
结论 (Conclusion)
Congrats! You successfully published a Python package to PyPi. PyPi is an awesome platform that allows the Python community to distribute code to others around the world with ease.
恭喜! 您已成功将Python软件包发布到PyPi。 PyPi是一个了不起的平台,它允许Python社区轻松地将代码分发给世界各地的其他人。
As you can tell, this process can be a little manual for each version you wish to release. If you’d like to see how we can automate this process or have any questions, please leave a response below!
如您所知,对于您要发行的每个版本,此过程可能只是一点点手册。 如果您想了解我们如何使此过程自动化或有任何疑问,请在下面留下答复!
I’ll see you all in the next one!
下一个见,大家见!
翻译自: https://medium.com/better-programming/publishing-your-python-packages-to-pypi-e48c169f4f09
python pypi


 1181
1181

 被折叠的 条评论
为什么被折叠?
被折叠的 条评论
为什么被折叠?
 到【灌水乐园】发言


