


 这篇博客是FastAPI的中文版入门指南,翻译自Medium上的文章。FastAPI是一个现代、高性能的Web框架,用于构建API。它使用Python语言,具有易用性和效率的特点。
fastapi中文
Rest APIs are beautiful pieces of software that enable applications to communicate with a database or with other software very effectively.
Rest API是漂亮的软件,可以使应用程序非常有效地与数据库或其他软件进行通信。
The kind of operations which you can perform are as follows are GET, POST, PUT, DELETE, TRACE, etc. The GET method is generally used for fetching some information from the backend. For example, if an app (web/phone) wants to fetch some information from the database, it will use the GET method. POST is used for creating new information. PUT is used for updating already existing records. DELETE, as the name suggests is used for the deletion of records in a database. The TRACE method is used for debugging purposes and used for checking what is received on the other end when a request is invoked.
您可以执行的操作类型如下: GET,POST,PUT,DELETE,TRACE等。GET方法通常用于从后端获取一些信息。 例如,如果某个应用程序(Web /电话)想要从数据库中获取某些信息,它将使用GET方法。 POST用于创建新信息。 PUT用于更新现有记录。 顾名思义, DELETE用于删除数据库中的记录。 TRACE方法用于调试目的,用于检查在调用请求时另一端收到的内容。
Since ages FLASK has been the most famous python framework for creating REST services. It is easy to use and deploy and can be used effectively for creating production-grade microservices.
自古以来,FLASK一直是用于创建REST服务的最著名的python框架。 它易于使用和部署,并且可以有效地用于创建生产级微服务。
FLASK has its own set of disadvantages though. It is not suitable for large applications. No admin site support. Does not provide any authentication mechanism. Lacks the powerful ORM tool which allows CRUD operations with any database.
FLASK有其自身的缺点。 它不适用于大型应用。 没有管理网站支持。 不提供任何身份验证机制。 缺少功能强大的ORM工具,该工具允许对任何数据库进行CRUD操作。
Recently, some extremely good men out there have come up with brand new framework for Python to mitigate the issues mentioned above, called FastAPI
最近,一些极好的人提出了全新的Python框架来缓解上述问题,称为FastAPI
https://github.com/tiangolo/fastapi (repo link)
The makers and users of this framework claim that the APIs created from FastAPI are literally very fast. As fast as Node and Go based Rest APIs.
此框架的创建者和用户声称,从FastAPI创建的API实际上非常快。 与基于Node and Go的Rest API一样快。
The official FastAPI website has multiple testimonials from developers working in major tech firms proving the effectiveness of this framework.
FastAPI官方网站上有来自大型技术公司的开发人员的多个推荐,证明了此框架的有效性。
Without much ado let’s go ahead and write a few APIs using this brand new framework and see it in action.
事不宜迟,让我们继续使用此全新框架编写一些API,并实际使用它。
Use pip to install fastapi and uvicorn as shown in fig 1 below. Uvicorn is ASGI server which we will be using for production.
使用pip安装fastapi和uvicorn ,如下图1所示。 Uvicorn是ASGI服务器,我们将用于生产。


We will go ahead and write a simple GET API and check the response from our browser. We will also explore the admin panel for FastAPI.
我们将继续编写一个简单的GET API,并检查浏览器的响应。 我们还将探索FastAPI的管理面板。

As shown in Fig 2, we have defined a route called “/” which returns a static response.
如图2所示,我们定义了一个路由“ /”,该路由返回静态响应。
Start the uvicorn server using the command shown in Fig 3 and you should see the info showing that the server is up and running
使用图3中所示的命令启动uvicorn服务器,您应该看到显示服务器已启动并正在运行的信息

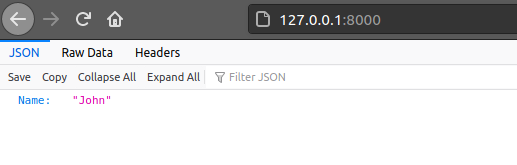
Hitting the address http://127.0.0.1:8000 in our browser window returns the expected response as shown in Fig 4.
到达地址http://127.0.0.1:8000 在我们的浏览器窗口中返回预期的响应,如图4所示。
One of the most coolest features of FastAPI is the internal automatic API documentation.Visiting http://server_IP:Port/docs#/ opens up this cool dashboard which can be used to view and test out the APIs created (Fig 5). When running on a local machine the URL would be http://127.0.0.1:8000/docs#/
内部自动API文档是FastAPI最酷的功能之一。访问http:// server_IP:Port / docs#/ 打开这个很酷的仪表板,可用于查看和测试创建的API(图5)。 在本地计算机上运行时,URL为http://127.0.0.1:8000/docs#/

Now we will create a POST api which let’s us upload a CSV file and convert it to json. That json is then returned in the API reponse
现在,我们将创建一个POST api,让我们上传一个CSV文件并将其转换为json。 然后在API响应中返回该json
First we will go head and write the functions needed to convert bytes to string and then convert that to json using pandas Dataframe. Fig 6 shows the two functions which will be needed for this task. Inside convertBytesToString , we call parse_csv which converts our pandas dataframe to a json file.
首先,我们开始编写将字节转换为字符串,然后使用pandas Dataframe将其转换为json所需的函数。 图6显示了此任务所需的两个功能。 在convertBytesToString内部,我们调用parse_csv ,它将我们的熊猫数据帧转换为json文件。

Next, we will put down our POST method to upload the CSV file from the client-end and receive a json from the server.
接下来,我们将放下POST方法,以从客户端上传CSV文件并从服务器接收json。
Fig 7 demonstrates the process of creating this API.
图7演示了创建此API的过程。
On the top we import the UploadFile and File class from fastapi. UploadFile is a very powerful class and actually presents the file in a spooledfile format. Spooled files are actually temporary files stored in memory until the file size exceeds the max size specified. As result spooled files are extremely fast to work on and reduce the I/O needed for files on disc.
在顶部,我们从fastapi导入UploadFile和File类。 UploadFile是一个非常强大的类,实际上以假脱机文件格式显示文件。 假脱机文件实际上是存储在内存中的临时文件,直到文件大小超过指定的最大大小为止。 结果,假脱机文件的处理速度非常快,并减少了磁盘上文件所需的I / O。
Next we import the convertBytesToString function from our parse_csv file.
接下来,我们从parse_csv文件中导入convertBytesToString函数。

We declare a POST method called “/csv/” which has the parsecsv method defined to parse our csv file. The parameter is a file of type UploadFile.
我们声明一个名为“ / csv / ”的POST方法,该方法具有定义为解析我们的csv文件的parsecsv方法。 该参数是类型为UploadFile的文件。
As you can see that we have used the async and await keyword to asure concurrency in our API methods. We will talk more about the usage of these types in later posts.
如您所见,我们已经使用async和await关键字来确保API方法中的并发性。 我们将在以后的文章中进一步讨论这些类型的用法。
The variable to json_string receives the parsed csv file which is returned in the API response.
json_string的变量接收已解析的csv文件,该文件在API响应中返回。
Now let’s go ahead and test out our newly created API.
现在,让我们继续测试新创建的API。
Navigate to the FastAPI api debugging link mentioned top. You should see your newly created API listed (Fig 8) , along with the API which was previously created (getName)
导航到上面提到的FastAPI api调试链接。 您应该看到列出了新创建的API(图8)以及先前创建的API( getName )。

In order to test the API out we will have to create a dummy csv file. I have created a csv called grades.csv (Fig 9) .This will be used for our testing.
为了测试API,我们将不得不创建一个虚拟的csv文件。 我创建了一个名为grades.csv的csv(图9)。这将用于我们的测试。

Let’s upload our csv file and check the response on the dashboard. By clicking on our newly created API, you should a browse button, which prompts the user to upload a file. The Execute button below that hits the API with the the correct params (Fig 10).
让我们上传csv文件,并在信息中心上检查响应。 通过单击我们新创建的API,您应该浏览按钮,提示用户上传文件。 下面的Execute按钮以正确的参数命中API(图10)。

Fig 11 shows the result on hitting the Execute button. The Response body shows the json created from the csv file. I agree the json could be formatted in a much better way 😄, but the goal to parse the csv successfully using FastAPI was achieved.
图11显示了单击Execute按钮的结果。 响应正文显示了从csv文件创建的json。 我同意可以用更好的方式格式化json,但是实现了使用FastAPI成功解析csv的目标。

I will be posting more blogs with FastAPI as the major tool and will be creating REST services for AI purposes as well.
我将发布更多以FastAPI作为主要工具的博客,还将创建用于AI的REST服务。
Thank for reading. Cheers!!
感谢阅读。 干杯!!
翻译自: https://medium.com/swlh/getting-started-with-fastapi-7774e6afe2e4
fastapi中文


 1044
1044

 被折叠的 条评论
为什么被折叠?
被折叠的 条评论
为什么被折叠?
 到【灌水乐园】发言


