


jUnit tests or automation tests? That is the question.
jUnit测试还是自动化测试? 就是那个问题。
Every project developed along with unit tests. Sometimes it based on TDD/BDD approach, when test and method under the test developed in parallel.
每个项目都与单元测试一起开发。 有时它是基于TDD / BDD方法的,当测试和被测方法并行开发时。
Also there are mock tests, integration tests and UI tests. In case of UI Java Android it is a Espresso and UIAutomation standard libraries. Developer can see and work with Java source code: packages, classes and methods.
也有模拟测试,集成测试和UI测试。 对于UI Java Android,它是Espresso和UIAutomation标准库。 开发人员可以查看和使用Java源代码:包,类和方法。
But also it is a possibility to look at the compiled application from the user side of view and, by example, use Appium framework with usage of Selenium. This approach of testing is not so obvious. Let’s describe this straightforward and some times the tricky process. All these details are necessary to begin the testing.
但是,也有可能从用户的角度查看已编译的应用程序,并举例说明将Appium框架与Selenium结合使用。 这种测试方法不是很明显。 让我们描述一下这个简单而有时棘手的过程。 所有这些细节对于开始测试都是必需的。
When a user installs the Android application and play with it, he doesn’t know about the classes and methods inside, he does not concern about it. And we should follow with this logic too.
当用户安装并使用Android应用程序时,他不知道其中的类和方法,也不关心它。 我们也应该遵循这种逻辑。
First, we need to visit website https://appium.io/ and install Appium framework. This violet interface catches the eye.
首先,我们需要访问网站https://appium.io/并安装Appium框架。 紫罗兰色的界面引人注目。

After install we need to set up right IP address we will use during testing:0.0.0.0:4723 for the real device127.0.0.1:4723 for the emulator
安装后,我们需要设置正确的IP地址,我们将在测试过程中使用:真实设备使用0.0.0.0:4723,仿真器使用127.0.0.1:4723
I prefer to test on real device, but it matter of taste.
我更喜欢在真实的设备上进行测试,但这与口味有关。
Appium also need to set 2 environment variables for proper work. Click on “Edit Configuration” and input right paths to: ANDROID_HOME JAVA_HOME
Appium还需要设置2个环境变量才能正常工作。 单击“编辑配置”,然后输入正确的路径:ANDROID_HOME JAVA_HOME
ADB
亚行
ADB tool from previous installations could react in a strange way, so it could be necessary to upgrade the Android SDK.open Command Prompt and input: “sdkmanager — update”or install Android Studio from scratch.
先前安装的ADB工具可能会以一种奇怪的方式做出React,因此可能有必要升级Android SDK。打开命令提示符并输入:“ sdkmanager — update”或从头开始安装Android Studio。
I have made this work on Microsoft Windows, but all this setup is quite similar with Linux or Mac.
我已经在Microsoft Windows上完成了这项工作,但是所有这些设置与Linux或Mac都非常相似。
Also we need to check environment variables on local computer: open Control panel, click on “Edit environment variables for your account” and set right path to: ANDROID_HOME ANDROID_SDK_ROOT ANDROID_PLATFORM_TOOLS APPIUM_HOME APPIUM_BINARY_PATH JAVA_HOME
此外,我们还需要检查本地计算机上的环境变量:打开控制面板,单击“编辑您的帐户的环境变量”,然后设置以下正确路径:ANDROID_HOME ANDROID_SDK_ROOT ANDROID_PLATFORM_TOOLS APPIUM_HOME APPIUM_BINARY_PATH JAVA_HOME
When everything is installed, it is the time to open IntelliJ IDEA or Eclipse editor to work with Java. I intended to test Google Play application.
安装完所有组件后,就该打开IntelliJ IDEA或Eclipse编辑器以使用Java了。 我打算测试Google Play应用程序。
Create new project and input these specific dependencies to “pom.xml” to start work with Appium.
创建新项目,并将这些特定的依赖项输入到“ pom.xml”以开始使用Appium。
<?xml version="1.0" encoding="UTF-8"?>
<project xmlns="http://maven.apache.org/POM/4.0.0"
         xmlns:xsi="http://www.w3.org/2001/XMLSchema-instance"
         xsi:schemaLocation="http://maven.apache.org/POM/4.0.0 http://maven.apache.org/xsd/maven-4.0.0.xsd">
    <modelVersion>4.0.0</modelVersion>


    <groupId>my.appium</groupId>
    <artifactId>probe</artifactId>
    <version>1.0-SNAPSHOT</version>


    <dependencies>
        <!-- https://mvnrepository.com/artifact/io.appium/java-client -->
        <dependency>
            <groupId>io.appium</groupId>
            <artifactId>java-client</artifactId>
            <version>7.0.0</version>
        </dependency>


        <!-- https://mvnrepository.com/artifact/org.seleniumhq.selenium/selenium-java -->
        <dependency>
            <groupId>org.seleniumhq.selenium</groupId>
            <artifactId>selenium-java</artifactId>
            <version>3.141.59</version>
        </dependency>


        <!-- https://mvnrepository.com/artifact/org.testng/testng -->
        <dependency>
            <groupId>org.testng</groupId>
            <artifactId>testng</artifactId>
            <version>6.14.3</version>
            <scope>test</scope>
        </dependency>
    </dependencies>


</project>
First of all, we need to add some initial values: We has to set package and activity we want to test, but also phone version. Go to your Phone Settings ->About Phone ->get version number.
首先,我们需要添加一些初始值:我们必须设置要测试的程序包和活动,还必须设置手机版本。 转到电话设置->关于电话->获取版本号。
We need to initialize main object of the testing task — AndroidDriver.
我们需要初始化测试任务的主要对象AndroidDriver。
public class GooglePlayTest extends BaseTest {
    private AndroidDriver<MobileElement> driver;
    private WebDriverWait wait;


    @BeforeClass
    public void setUp() throws Exception {
        DesiredCapabilities capabilities = new DesiredCapabilities();
        capabilities.setCapability("platformName", "Android");
        capabilities.setCapability("deviceName", "Android Device");
        capabilities.setCapability(MobileCapabilityType.PLATFORM_VERSION, "6.0");
        capabilities.setCapability("appPackage", "com.android.vending");
        capabilities.setCapability("appActivity", "com.google.android.finsky.activities.MainActivity");
        capabilities.setCapability("noReset", "false");


        driver = new AndroidDriver<MobileElement>(new URL("http://localhost:4723/wd/hub"), capabilities);

        driver.manage().timeouts().implicitlyWait(10, TimeUnit.SECONDS);
        wait = new WebDriverWait(driver, 5);
    }
We can and should test for internet connection:
我们可以并且应该测试互联网连接:
@Test
    public void testNetworkConnection() {
        // Appium provide these masks for network connection:
        // AIRPLANE_MODE(1), ALL_NETWORK_ON(6), DATA_ONLY(4), WIFI_ONLY(2), NONE(0);
        ConnectionState connectionState = new ConnectionState(2);
        driver.setConnection(connectionState);
        assertTrue(driver.getConnection().isWiFiEnabled());
        Assert.assertEquals(connectionState.getBitMask(), driver.getConnection().getBitMask());
    }
Before work with UI testing we has to open 1 useful tool from Android SDK — UIAutomatorViewer. In case of Windows, it locates at: Local\Android\sdk\tools\bin\UiAutomatorViewer.bat
在进行UI测试之前,我们必须从Android SDK中打开1个有用的工具UIAutomatorViewer 。 如果是Windows,则位于:Local \ Android \ sdk \ tools \ bin \ UiAutomatorViewer.bat
Just open Any application on your smartphone and click on your local computer on second menu button at UiAutomatorViewer to create the ‘Device screenshot’. It will create very “interactive” screenshot of UI.
只需在智能手机上打开任何应用程序,然后在UiAutomatorViewer的第二个菜单按钮上单击本地计算机,即可创建“设备屏幕截图”。 它将创建非常“交互式”的UI屏幕截图。

UIAutomatorViewer helps to identify UI items and make reference on them during testing. Move mouse to the object at left and you will see details at right.
UIAutomatorViewer有助于识别UI项目并在测试期间对其进行引用。 将鼠标移到左侧的对象上,您将在右侧看到详细信息。

It allows us to get item by its ID, class, text or content description. During the testing, I noticed that ID is the most useless element for correct object identification… More practical is to use a chain of class name and text / description.
它允许我们通过ID,类,文本或内容描述来获取项目。 在测试期间,我注意到ID是用于正确识别对象的最无用的元素……更实用的方法是使用类名称和文本/描述的链。

When we know element details, we can try to reach everything we want: by example, find similar element using findElements() and getAttribute(“text”)method.
当我们知道元素的详细信息时,我们可以尝试达到所需的一切:例如,使用findElements()和getAttribute(“text”)方法查找相似的元素。
List<MobileElement> elements = driver.findElements(By.className("android.widget.ImageView"));
for(MobileElement element : elements) {
	if(element.getAttribute("contentDescription").equals("Search")) {
		element.click();
		break;
	}
}
work with the list items, found by similar object:
使用类似对象找到的列表项:
List<MobileElement> recyclerViewResults = driver.findElements(
    MobileBy.AndroidUIAutomator("new UiSelector().classNameMatches(\".*\")"));
assertTrue(recyclerViewResults.size() > 1);


//or get all elements by class name
List<MobileElement> items = driver.findElements(By.xpath("//android.widget.TextView"));
find element using XPath:
使用XPath查找元素:
driver.findElement(By.xpath("//android.widget.EditText[@text = 'Search Google Play']")).sendKeys("Google");


driver.findElement(By.xpath("//*[@text = 'Search Google Play']")).sendKeys("Google");


driver.findElementByxpath("//*[@id='android:id/title'][@text='Display']").click();
make scrolling to certain element on the screen. More examples available here
滚动到屏幕上的某些元素。 此处提供更多示例
MobileElement elem = (MobileElement) driver
                .findElementByAndroidUIAutomator("new UiScrollable("
                        + "new UiSelector().scrollable(true)).scrollIntoView("
                        + "new UiSelector().textContains(\"Notifications\"));");
        assert (elem.isDisplayed());
it could be very different UI elements that we can reach and change its state.
我们可以到达并更改其状态的UI元素可能非常不同。
WebElement first = driver.findElementById("com.android.calculator2:id/digit_9");


driver.findElement(By.xpath("//android.widget.Switch[@text = 'ON']")).click();


driver.findElement(MobileBy.className("android.widget.EditText")).sendKeys(testAppName);


driver.findElement(By.xpath("//android.widget.ImageButton[@content-desc = 'Navigate up']")).click();


driver.findElement(By.xpath("//android.support.v7.widget.RecyclerView[1]/android.widget.LinearLayout[1]")).click();


// find element by description and click on it:
driver.findElement(By.xpath("//android.widget.FrameLayout[@content-desc = 'Show navigation drawer']")).click();
Also it is very helpful to work with key codes to simulate touch action automatically:
使用按键代码自动模拟触摸动作也非常有帮助:
//return back to the previous screen
driver.pressKey(new KeyEvent(AndroidKey.BACK));


//input a char
driver.pressKey(new KeyEvent(AndroidKey.BACKSLASH));


//implement backspace action
driver.pressKey(new KeyEvent(AndroidKey.DEL));

//return to Android Home
driver.pressKey(new KeyEvent(AndroidKey.HOME));
There is also a useful tool — the WebDriverWait object. It allows us to wait until the asynchronous application finish loading.
还有一个有用的工具-WebDriverWait对象。 它允许我们等到异步应用程序完成加载。
public class AppiumTest {
    private AndroidDriver<MobileElement> driver;
    private WebDriverWait wait;


    @BeforeMethod
    public void setup() throws MalformedURLException {
        ...
        driver = new AndroidDriver<MobileElement>(new URL("http://127.0.0.1:4723/wd/hub"),caps);
        this.wait = new WebDriverWait(driver, 5);
    }
    @Test
    public void waitUiTest() throws InterruptedException {
        wait.until(ExpectedConditions.visibilityOfElementLocated
                (By.xpath("//android.widget.ImageView[@text = 'customImage']")));

        wait.until(ExpectedConditions.visibilityOfElementLocated
                (By.id("id/TextView"))).click();

        // continue to interact with elements...
    }
}
And finally, we can move redundant check of item visibility to the method:
最后,我们可以将冗余的项目可见性检查移至该方法:
private boolean isElementPresentAndDisplayed(final WebElement element) {
        try {
            return element.isDisplayed();
        } catch (org.openqa.selenium.StaleElementReferenceException e) {
            return false;
        } catch (NoSuchElementException e) {
            return false;
        }
    }
So we can create a lot of combinations, to work with UI interactive elements properly.
因此,我们可以创建很多组合,以正确使用UI交互元素。
Run The Script And Automate The App
运行脚本并使应用程序自动化
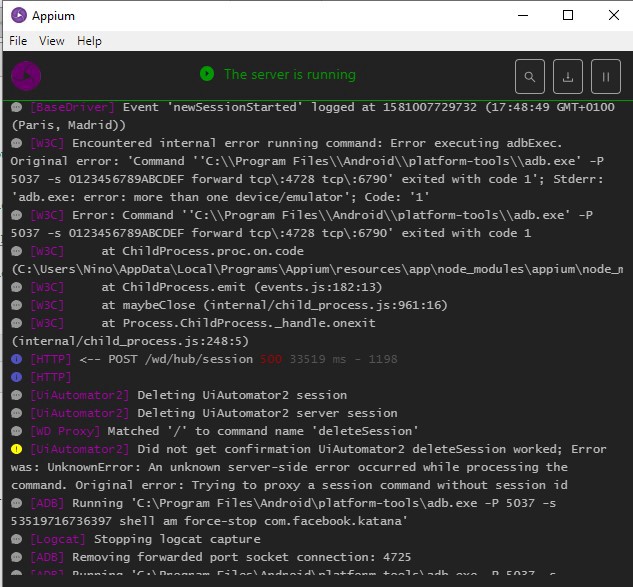
Run the script as a Java application or TestNG application from Java editor.After execution, you can see that the Appium files logs for all actions performed against the mobile device. Something like this:
通过Java编辑器将脚本作为Java应用程序或TestNG应用程序运行。执行后,您可以看到Appium文件记录了针对移动设备执行的所有操作。 像这样:
Conclusion.
结论。
We have made step-by-step process to automate testing applications from the user side. Quite helpful, because allows to test unusual behavior we did not expect to see. Unit testing is good, but may be not enough to get whole picture.
我们已逐步完成了从用户端自动测试应用程序的过程。 非常有帮助,因为可以测试我们未曾看到的异常行为。 单元测试是好的,但可能不足以了解整个情况。
Appium documentation contains all the details we need for development process. Some docs and examples here: http://www.automationtestinghub.com/category/appium/
Appium文档包含我们开发过程所需的所有详细信息。 此处提供一些文档和示例: http : //www.automationtestinghub.com/category/appium/
Also, nice tutorial: https://developers.perfectomobile.com/pages/viewpage.action?pageId=31103222
另外,很好的教程: https : //developers.perfectomobile.com/pages/viewpage.action?pageId=31103222
You can find the entire example in my Github Kotlin repository: here
您可以在我的Github Kotlin存储库中找到整个示例: 此处
翻译自: https://proandroiddev.com/appium-automates-testing-java-kotlin-android-applications-d51292871fa5


 343
343


 被折叠的 条评论
为什么被折叠?
被折叠的 条评论
为什么被折叠?
 到【灌水乐园】发言


