


This is part 2 of the series How to Use Git in Android Studio. If you haven’t read part 1, you can read it at the link below for hands-on basic functionalities:
这是“ 如何在Android Studio中使用Git ”系列的第2部分。 如果您还没有阅读第1部分,则可以在下面的链接上阅读它以了解动手的基本功能:
涵盖范围 (What’s Covered)
In this piece, I’ll show you some functionalities related to commit, resolve conflicts, and compare changes when working with Git in Android Studio, including:
在本文中,我将向您展示一些与提交,解决冲突和比较更改有关的功能 在Android Studio中使用Git时,包括:
- Interactive staging. 互动舞台。
- Best practices before committing. 提交之前的最佳做法。
- Resolving conflicts. 解决冲突。
- Annotate. 注释。
- Comparing changes. 比较变化。
Let’s get started!
让我们开始吧!
Note: All the reference paths, options, names, and configurations in this article are based on Android Studio on the macOS system. It may be slightly different on other systems like Windows or Linux, but the spirit will be the same.
注意:本文中的所有参考路径,选项,名称和配置均基于macOS系统上的Android Studio。 在其他系统(例如Windows或Linux)上,它可能会略有不同,但实质是相同的。
互动舞台 (Interactive Staging)
One of the best practice when working with Git is “commit early, commit often”.
使用Git的最佳实践之一是“尽早提交,经常提交”。
It means that instead of waiting to make the commit perfect, it is better to work in small chunks and keep committing your work. To do that, you can use the--interactive option. Go to “VCS” -> “Commit”:
这意味着,与其等待使提交完美无缺,不如分小块地工作并继续提交工作。 为此,您可以使用--interactive选项。 转到“ VCS”->“提交”:

For each file, you can check/uncheck which part you want/don’t want to be in the current commit in the diff panel. With this interactive mode, you can group related changes into one commit.
对于每个文件,您可以在diff面板中选中/取消选中想要/不希望包含在当前提交中的部分。 通过这种interactive模式,您可以将相关更改分组为一次提交。
提交前的最佳做法 (Best Practices Before Committing)
In the “Commit Changes” popup, there are many options in the “Before Commit”, let’s walk through them:
在“提交更改”弹出窗口中,“提交之前”有很多选项,让我们逐步进行介绍:

Reformat code: The same as when you choose “Code” -> “Reformat code” or shortcut
Option + CMD + L. It will remove the extra spaces/tabs that you might have given and arranges them in a properly indented format.重新格式化代码:与选择“代码”->“重新格式化代码”或快捷键
Option + CMD + L。 它将删除您可能已给的多余空格/制表符,并以适当的缩进格式排列它们。

- Rearrange code: The same as when you choose “Code” -> “Rearrange code“. It will order all the attributes in a certain way, according to the pre-defined code style guidelines in “Preferences”-> “Editor” -> “Code style” -> “Java” -> tab “Arrangement”. 重新排列代码:与选择“代码”->“重新排列代码”时相同。 它将按照“首选项”->“编辑器”->“代码样式”->“ Java”->选项卡“排列”中预定义的代码样式指南,以某种方式对所有属性进行排序。
Optimize imports: The same as when you choose “Code” -> “Optimize Imports“ or shortcut
CTRL + Option + O.优化导入:与选择“代码”->“优化导入”或快捷键
CTRL + Option + O。
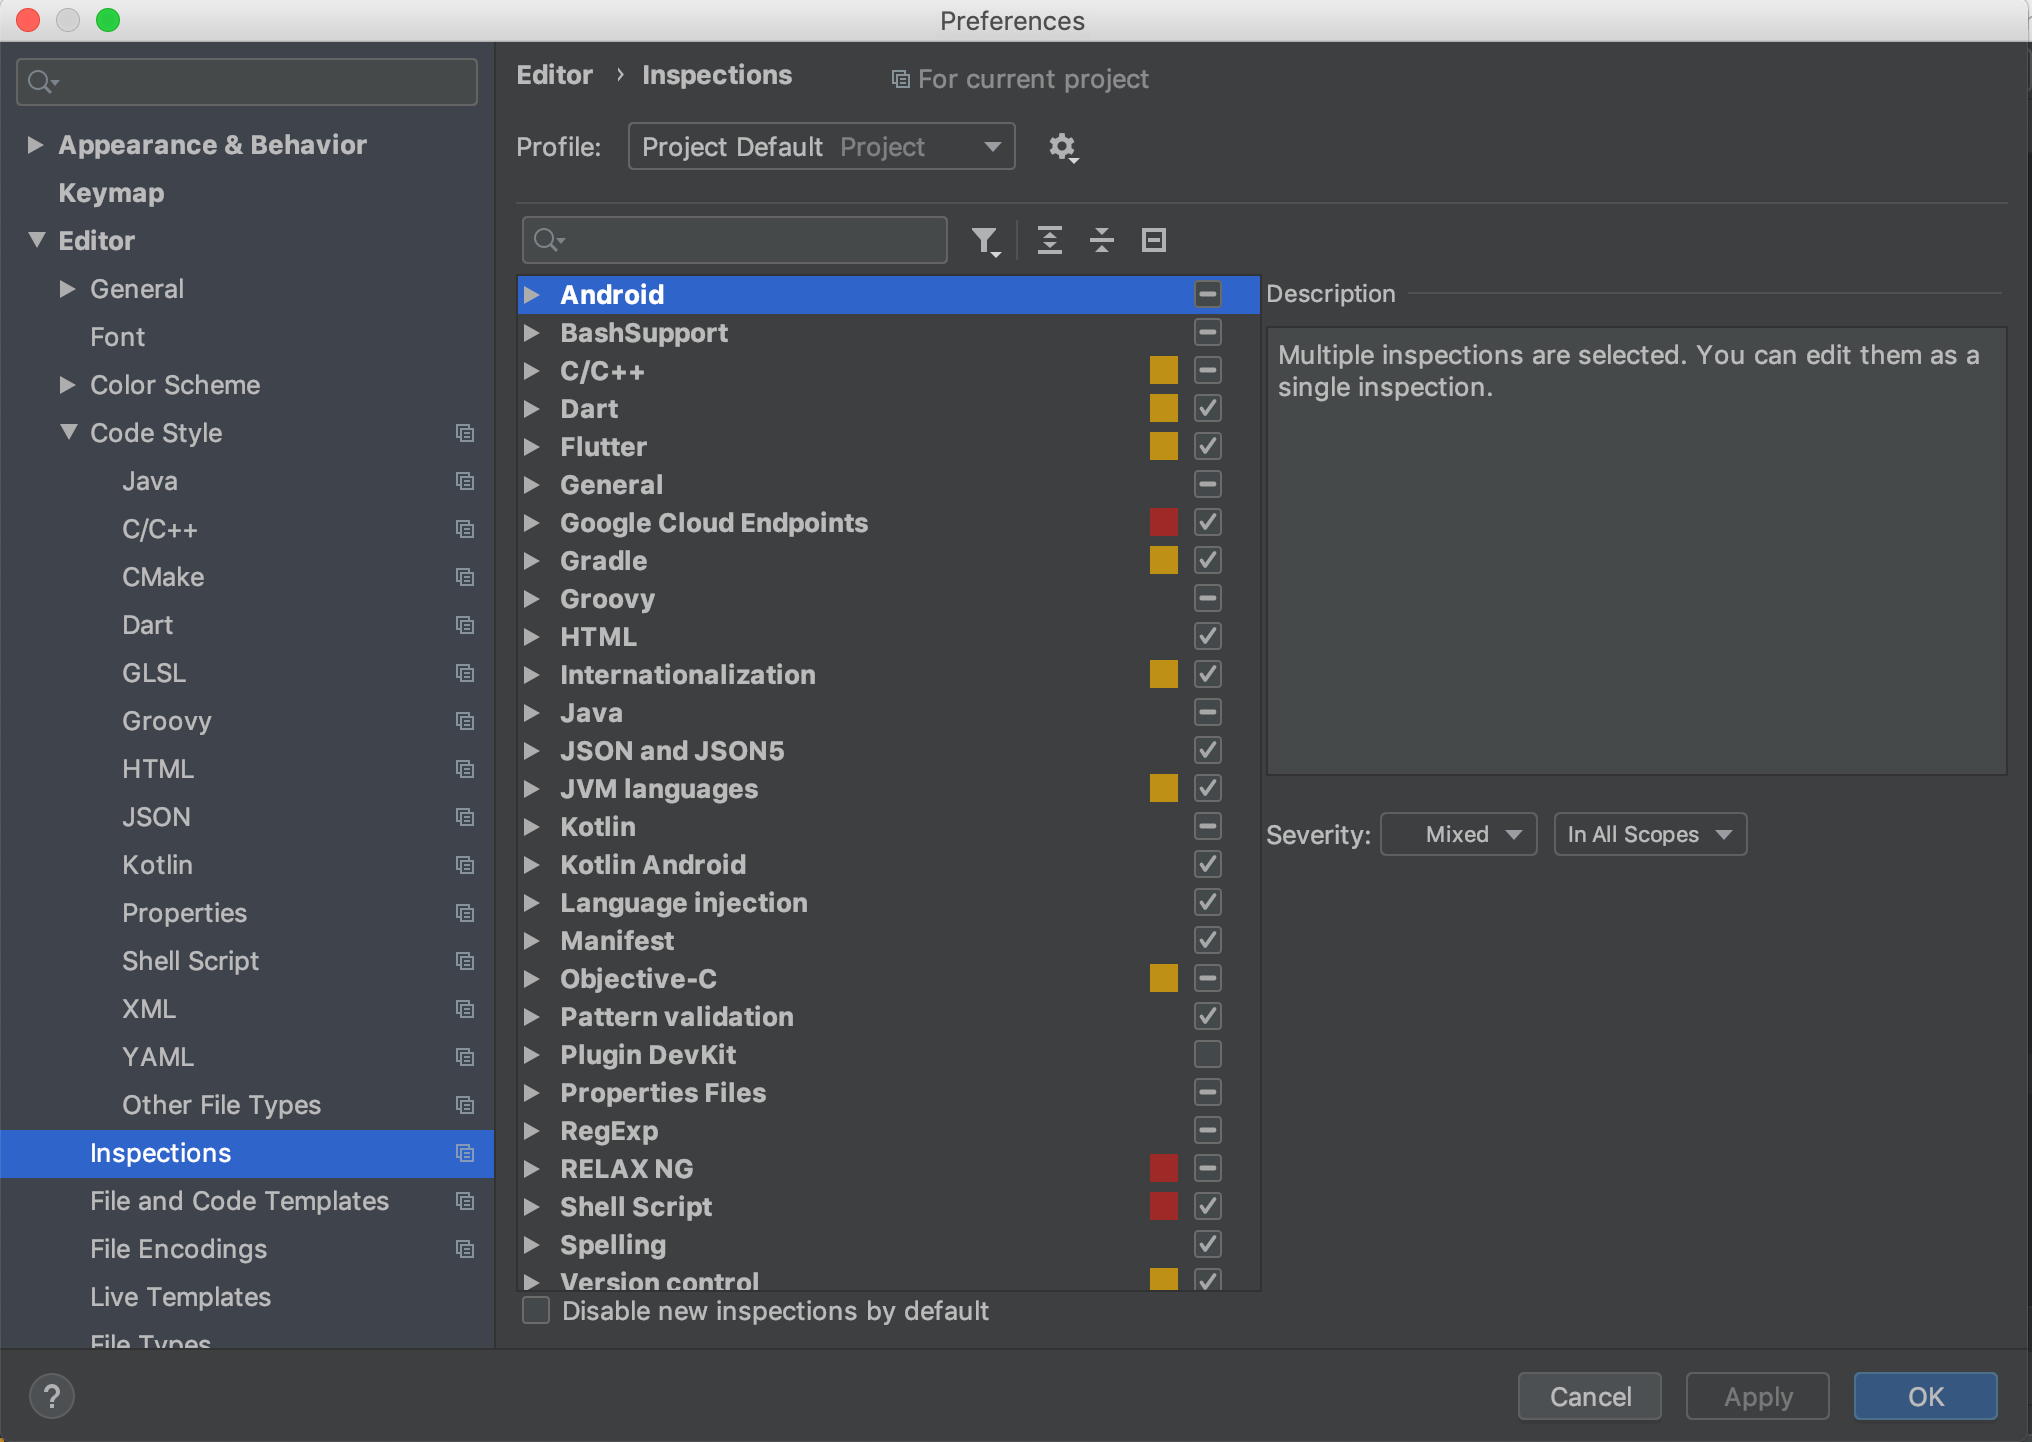
- Perform code analysis: The same as when you choose “Analyze” -> “Inspect Code”. It is a set of code inspections that detect and correct anomalous code in your project before you compile/commit it. 执行代码分析:与选择“分析”->“检查代码”时相同。 它是一组代码检查,可在编译/提交项目之前检测并纠正项目中的异常代码。
- Check TODO: One of my favorite options before committing. I will explain later 提交之前,请检查TODO:我最喜欢的选项之一。 我会在后面解释
- Cleanup: Means finding potentially problematic code fragments and automatically fixes them right away. 清除:表示找到潜在有问题的代码片段并立即自动对其进行修复。
TL;DR; Let’s do a demo.
TL; DR; 让我们做一个演示。

As you can see, there are so many things that need to be corrected in this code.
如您所见,此代码中有很多事情需要更正。
Here I chose the options: Reformat code, Rearrange code, Optimize imports, Perform code analysis, and Cleanup. Everything will be auto-corrected, the final result will be:
在这里,我选择了以下选项: 重新格式化代码,重新排列代码,优化导入,执行代码分析和清理 。 一切都会自动更正,最终结果将是:

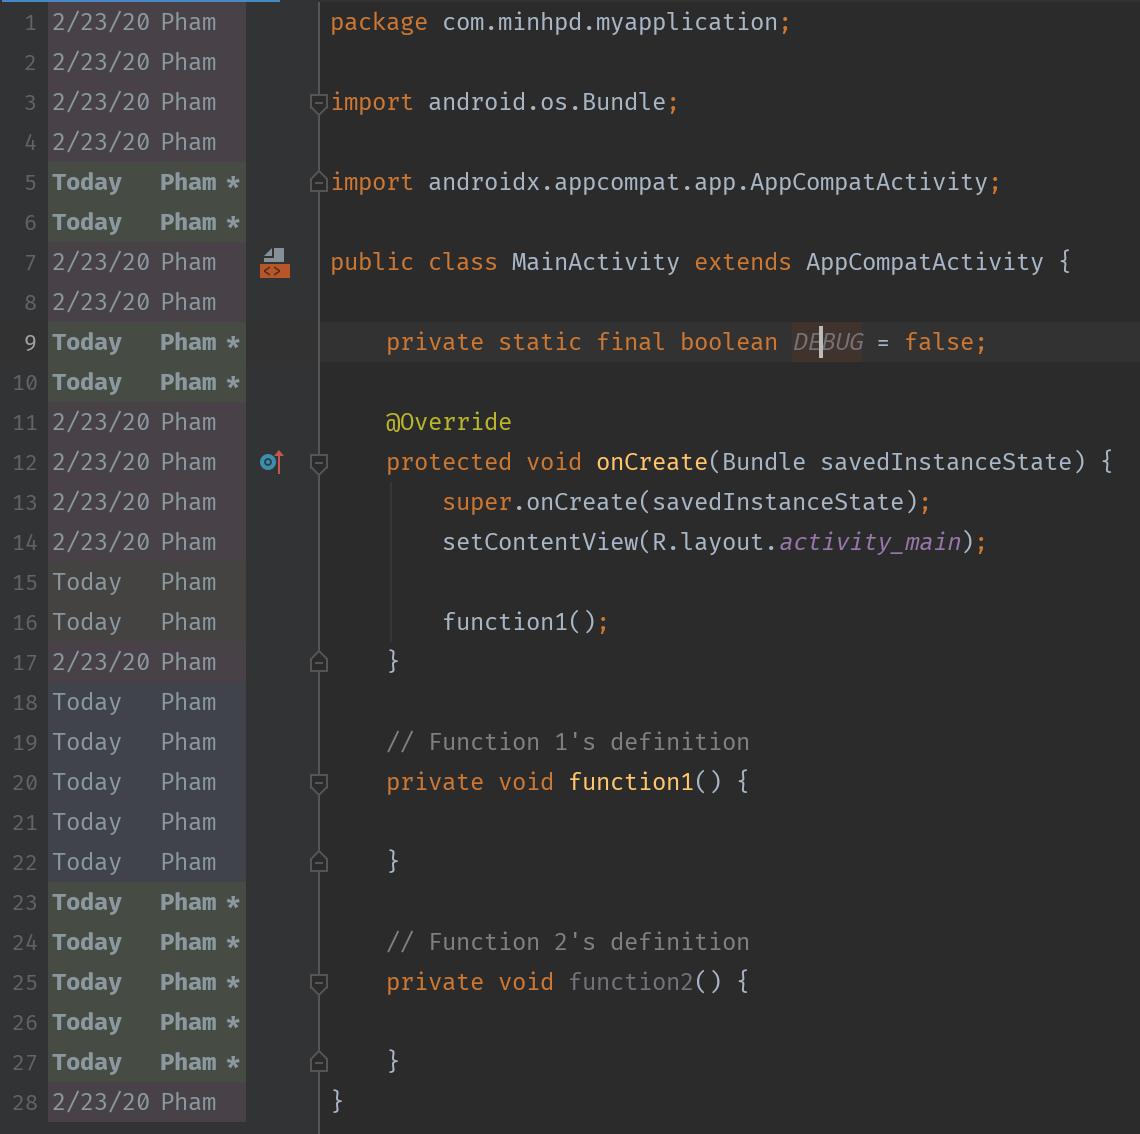
Ah, I forgot the Check TODO option. Suppose I need to set true for the flag DEBUG, and I add a to-do to remind me to revert it back to false when I’ve finished debugging.
啊,我忘记了“ 检查待办事项”选项。 假设我需要将标志DEBUG设置为true,并添加一个待办事项以提醒我在完成调试后将其还原为false。

Now, let’s say you totally forget to revert it back, and you go ahead committing this dangerous change, checking the TODO option will save you when you click the Commit button.
现在,假设您完全忘记了将其还原,然后继续进行此危险的更改,单击“ 提交”按钮时选中“待办事项”选项将保存您。

A popup appears to say that: “One added/edited TODO item was found. Would you like to review it?” If you click the Review button, it will show the TODO you need to check.
出现一个弹出窗口,说明:“找到了一个添加/编辑的待办事项。 您要审查吗?” 如果单击“ 查看”按钮,它将显示您需要检查的待办事项。

One thing to note here is that it is kind of a reminder, and you have to deal with it yourself by checking the change, remove the TODO so that you can continue committing.
这里要注意的一件事是,它只是一种提醒,您必须自己检查更改,删除TODO,以便继续提交,以进行处理。
解决冲突 (Resolving Conflicts)
If you are a developer, sooner or later you have to deal with conflicts. There are many resolve-conflict UI tools out there but in my humble opinion, Android Studio is the best for Android developers.
如果您是开发人员,则迟早必须处理冲突。 有很多解决冲突的UI工具,但以我的拙见,Android Studio是最适合Android开发人员的工具。
When you merge or rebase one branch into/onto another branch if you get a conflict, a “Conflict” popup will appear with a list of conflicts as below:
如果您在发生冲突时将一个分支合并到另一个分支中或在另一个分支上重新建立基础,则将显示“冲突”弹出窗口,其中包含冲突列表,如下所示:

- Accept Yours: Keep your changes in the current branch (feature), and discard all the changes from the branch you merge into (master). 接受您的更改:将您的更改保留在当前分支(功能)中,并放弃合并到您的分支(主)中的所有更改。
- Accept Theirs: Discard all your changes in the current branch (feature), and use the changes from the branch you merge into (master). 接受他们的意见:放弃当前分支(功能)中的所有更改,并使用合并到(主)分支中的更改。
- Merge: Resolve conflicts by hand. 合并:手动解决冲突。
If you choose Merge, a popup will appear with changes from the local repo on the left and changes from the remote on the right and a merge result in the middle will be shown in a separate dialogue.
如果选择“ 合并” ,则将出现一个弹出窗口,其中左侧是本地存储库的更改,右侧是来自远程仓库的更改,中间的合并结果将在单独的对话框中显示。

Let me explain a little bit about the colors:
让我解释一下颜色:
- Green color: Changes are always safe to move from either side. 绿色:始终可以安全地从任何一侧移动更改。
- Blue color: Changes have modifications directly in the merge result in the middle window. 蓝色:更改直接在中间窗口的合并结果中进行了修改。
- Red color: Modification on both sides, which needs to be resolved carefully. 红色:两侧的修改,需要仔细解决。
- Gray color: Shows you the deleted lines. 灰色:向您显示已删除的行。
Notes: Before resolving any conflict, I recommend you click the magic button in the top panel, Android Studio will try to resolve as many simple conflicts as it can. And it is truly a lifesaver for you.
注意:在解决任何冲突之前,建议您单击顶部面板中的魔术按钮,Android Studio会尝试解决尽可能多的简单冲突。 对您而言,这确实是一个救星。

After clicking the “Resolve Simple Conflicts” button, all you have to do is to fix the red lines.
单击“解决简单冲突”按钮后,您要做的就是修复红线。

You can use the arrowheads to move the changes between the local and remote repo until the IDE tells you the conflicts have been processed.
您可以使用箭头在本地和远程存储库之间移动更改,直到IDE 告诉您冲突已经处理。
Tips: In the top left of the Merge Revision panel, you can move the arrow up/down to move to the previous/next difference. This can be extremely useful if you have a file with thousands of lines and the conflicts reside somewhere in the file.
提示:在“ 合并修订”面板的左上方,您可以向上/向下移动箭头以移至上一个/下一个差异。 如果您有一个包含数千行的文件,并且冲突存在于文件中的某个位置,这可能非常有用。
注释 (Annotate)
Sometimes you want to show what revision and which author last modified each line of a file. Then, annotate will help you.
有时您想显示什么修订以及哪个作者最后修改了文件的每一行。 然后, 注释将为您提供帮助。
You can annotate the whole file by right-clicking in the space between line number and file content.
您可以通过右键单击行号和文件内容之间的空格来注释整个文件。

It will show the date and the author who last modified each line of a file.
它将显示日期和最后修改文件每一行的作者。
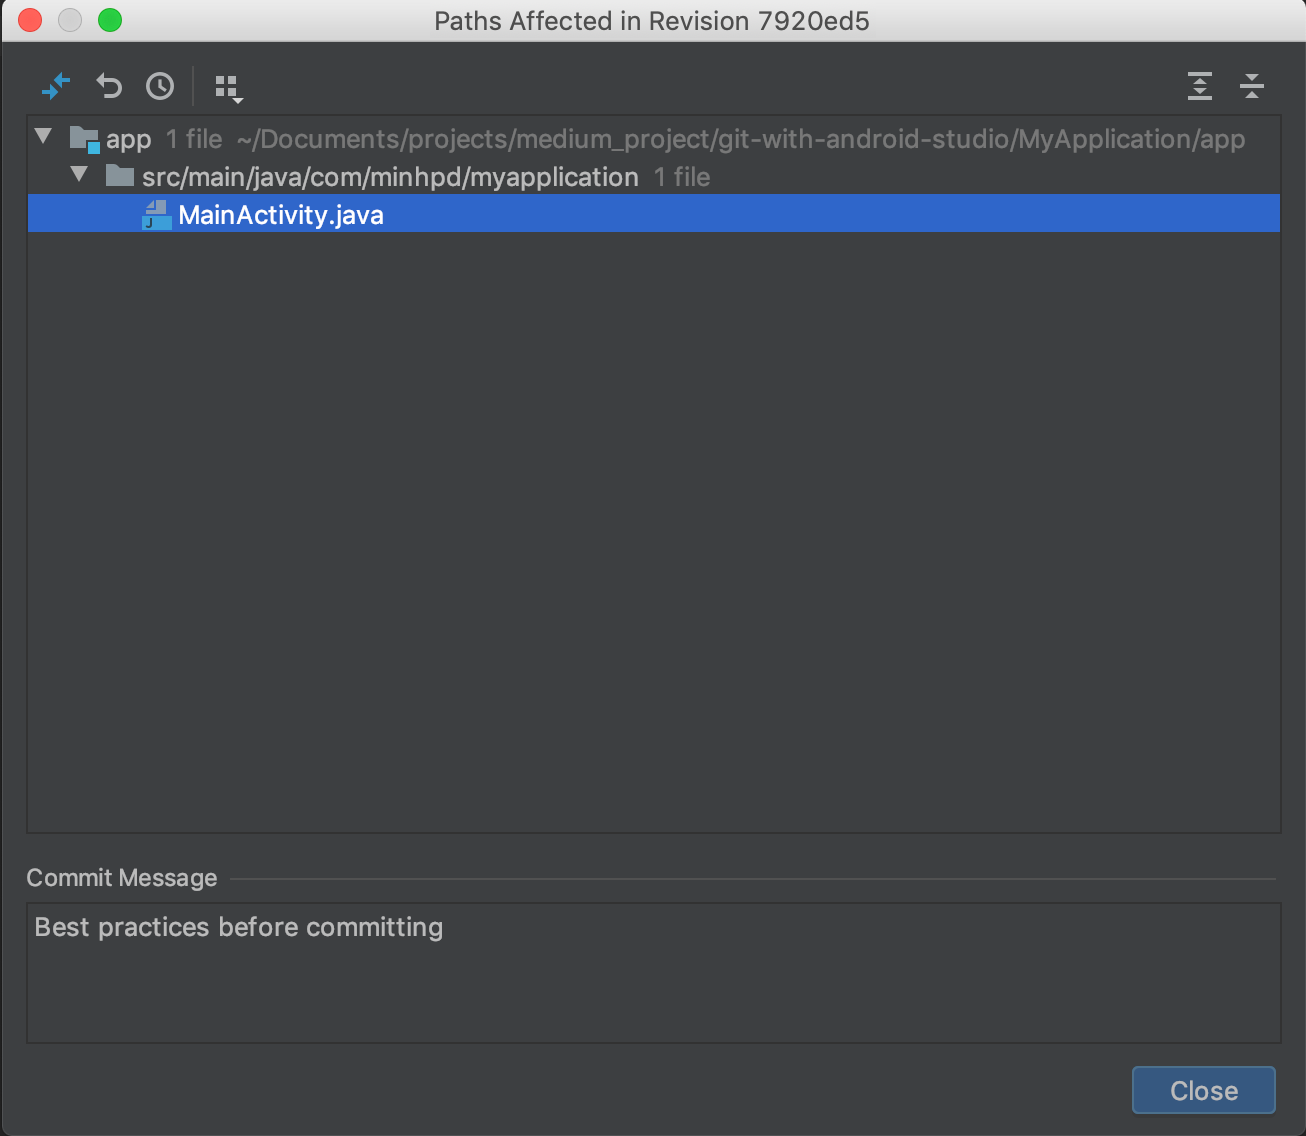
By clicking on the annotate content, you can see the detail of that revision including file changes and commit messages.
通过单击注释内容,您可以查看该修订的详细信息,包括文件更改和提交消息。
比较变化 (Comparing Changes)
文件比较〜git diff (File comparison ~ git diff)
Suppose you receive a bug from a customer and you know exactly which file causes that bug, but you don’t know which line the bug resides in, or who made that change.
假设您从客户那里收到了一个错误,并且您确切地知道哪个文件导致了该错误,但是您不知道该错误所在的行或进行此更改的人。
Comparing the current revision of that file with the previous one will help you figure it out.
将文件的当前版本与上一个版本进行比较,可以帮助您弄清楚该文件。
Right-click on the file, choose “Git” -> “Compare with…”
右键单击文件,选择“ Git”->“与...比较”。

The “File Revisions” popup will show every commit related to that file, from the beginning. Then you can follow the file’s history change to track down the bug.
“文件修订”弹出窗口将从一开始就显示与该文件相关的每个提交。 然后,您可以按照文件的历史记录更改来跟踪错误。

One of my favorite features is “Compare with Branch…” With this facility, you can compare the current change with every branch on which the logic still works fine (usually master or production branch).
我最喜欢的功能之一是“与分支比较...”,使用此功能,您可以将当前更改与逻辑仍然可以正常工作的每个分支(通常是主分支或生产分支)进行比较。


In the “Select Branch to Compare”, you can start typing any character to search the specific branch you want to choose, in case you have a bunch of branches
在“选择要比较的分支”中,如果您有一堆分支,则可以开始输入任何字符以搜索要选择的特定分支。
分支比较〜git log <分支1> .. <分支2> (Branch comparison ~ git log <branch1>..<branch2>)
This is for when you want to compare all the changes between the two branches.
当您要比较两个分支之间的所有更改时。
Suppose I’m in the feature branch, and I want to compare it with the master branch. Go to “VSC” -> “Git” -> “Branches”, select the master branch and choose “Compare with current”.
假设我在功能分支中,并且想将其与master分支进行比较。 转到“ VSC”->“ Git”->“分支”,选择主分支,然后选择“与当前比较”。

A popup “Compare feature with master” shows up with all the differences between the two branches, commits to commits, files to files.
将显示一个弹出窗口“与主控件比较”,显示两个分支之间的所有差异,提交,文件与文件。

Above will be “Commits that exist in master but don’t exist in feature”: the same result as with the command
git log feature..master.上面将是“存在于master中但功能中不存在的提交”:与命令
git log feature..master结果相同。Below will be “Commits that exist in feature but don’t exist in master”: the same result as with the command
git log master..feature.下面是“功能中存在但主节点中不存在的提交”:与
git log master..feature命令相同的结果。
If you click on each commit above or below, you can see the changes belonging to selected commit in the right panel.
如果单击上方或下方的每个提交,则可以在右侧面板中查看属于所选提交的更改。
If you want to see all the file changes between two branches, you can click on the tab Files in the popup. With this view, you can quickly compare all the changes.
如果要查看两个分支之间的所有文件更改,可以在弹出窗口中单击“ 文件 ”选项卡。 使用此视图,您可以快速比较所有更改。

结论 (Conclusion)
Thanks for reading this far!
感谢您阅读本文!
That’s all for part 2. I hope you learned something new and eventually master using these useful tools in Android Studio.
这就是第2部分的全部内容。我希望您学到了一些新知识,并最终掌握了在Android Studio中使用这些有用工具的方法。
Happy gitting!
快乐的混蛋!
翻译自: https://medium.com/better-programming/how-to-use-git-in-android-studio-part-2-93cec67b91b0


 666
666

 被折叠的 条评论
为什么被折叠?
被折叠的 条评论
为什么被折叠?
 到【灌水乐园】发言


