


In this tutorial, we’ll learn about the handy copyWith() operation in Flutter.
在本教程中,我们将学习Flutter中方便的copyWith()操作。
It allows us to obtain a copy of the existing widget but with some specified modifications.
它允许我们获取现有小部件的副本,但进行一些指定的修改。
The source code of the project is available at the bottom of the article.
该项目的源代码位于文章底部。
开始吧 (Let’s Start)
Consider the following layout:
考虑以下布局:
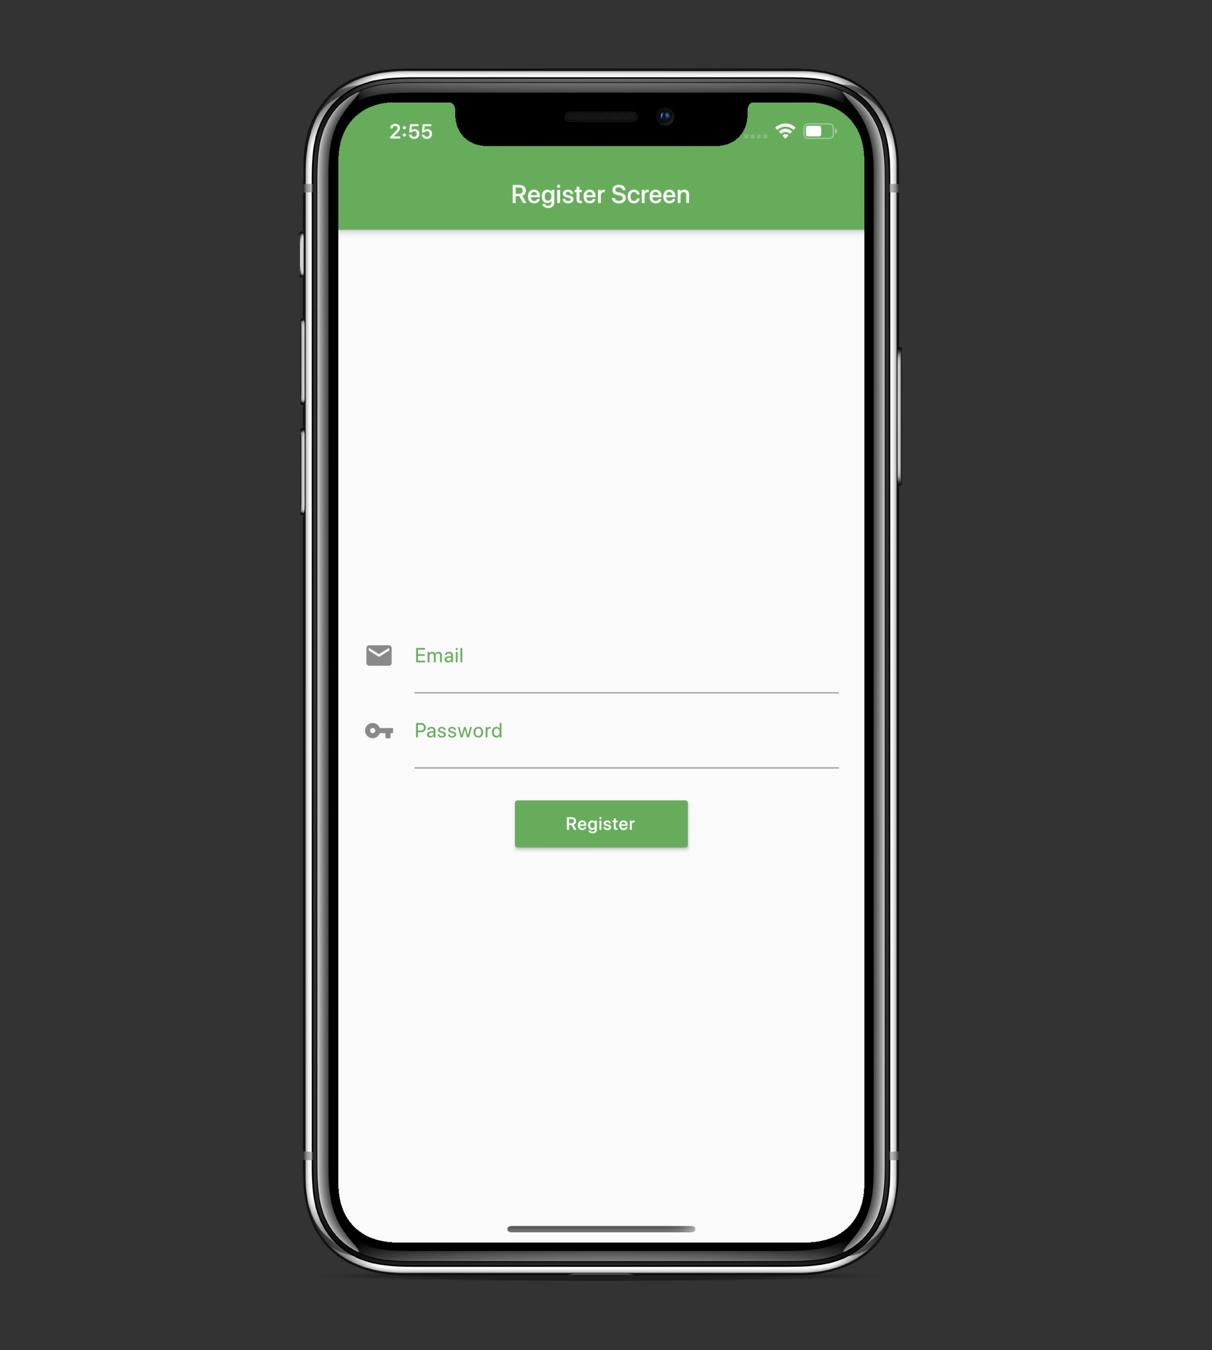
We can see that we have two similarly looking text fields and a button. How do we make these text fields of the same style without writing repetitive code?
我们可以看到我们有两个外观相似的文本字段和一个按钮。 我们如何在不编写重复代码的情况下使这些文本字段具有相同的样式?
Let’s jump straight into the code and explore the copyWith() operation.
让我们直接进入代码并探索copyWith()操作。
This is our main.dart file:
这是我们的main.dart文件:
import 'package:copy_with/register_screen.dart';
import 'package:flutter/material.dart';


void main() => runApp(MyApp());


class MyApp extends StatelessWidget {
  @override
  Widget build(BuildContext context) {
    return MaterialApp(
      debugShowCheckedModeBanner: false,
      home: RegisterScreen(),
    );
  }
}
And the actual RegisterScreen widget:
和实际的RegisterScreen小部件:
import 'package:flutter/material.dart';


class RegisterScreen extends StatelessWidget {
  @override
  Widget build(BuildContext context) {
    return Scaffold(
      appBar: AppBar(
        backgroundColor: Colors.green,
        title: Text('Register Screen'),
      ),
      body: Padding(
        padding: EdgeInsets.all(20.0),
        child: Column(
          mainAxisAlignment: MainAxisAlignment.center,
          children: <Widget>[
            Theme(
              data: Theme.of(context).copyWith(primaryColor: Colors.green),
              child: TextField(
                keyboardType: TextInputType.emailAddress,
                decoration: InputDecoration(
                  hintText: 'example@email.com',
                  icon: Icon(Icons.email),
                  labelText: 'Email',
                  labelStyle: TextStyle(color: Colors.green),
                ),
                textAlign: TextAlign.center,
              ),
            ),
            Theme(
              data: Theme.of(context).copyWith(primaryColor: Colors.green),
              child: TextField(
                obscureText: true,
                decoration: InputDecoration(
                  hintText: 'Password',
                  icon: Icon(Icons.vpn_key),
                  labelText: 'Password',
                  labelStyle: TextStyle(color: Colors.green),
                ),
                textAlign: TextAlign.center,
              ),
            ),
            SizedBox(
              height: 20,
            ),
            RaisedButton(
              padding: EdgeInsets.symmetric(vertical: 10, horizontal: 40),
              color: Colors.green,
              textColor: Colors.white,
              child: Text('Register'),
              onPressed: () {},
            ),
          ],
        ),
      ),
    );
  }
}
We can see that inside both TextField widgets, we write almost identical InputDecorations. How could we shorten our code?
我们可以看到,在两个TextField小部件内,我们都编写了几乎相同的InputDecoration 。 我们如何缩短代码?
Let’s create a constant called kTextFieldDecoration inside a new constants.dart file:
让我们在新的constants.dart文件中创建一个称为kTextFieldDecoration的constants.dart :
import 'package:flutter/material.dart';


const kTextFieldDecoration = InputDecoration(
  hintText: 'example@email.com',
  icon: Icon(Icons.email),
  labelText: 'Email',
  labelStyle: TextStyle(color: Colors.green),
);
Now, we can use it inside our text fields (don’t forget to import the constants.dart file at the top):
现在,我们可以在文本字段中使用它(不要忘记在顶部导入constants.dart文件):
import 'package:copy_with/constants.dart';
import 'package:flutter/material.dart';
class RegisterScreen extends StatelessWidget {
@override
Widget build(BuildContext context) {
return Scaffold(
appBar: AppBar(
backgroundColor: Colors.green,
title: Text('Register Screen'),
),
body: Padding(
padding: EdgeInsets.all(20.0),
child: Column(
mainAxisAlignment: MainAxisAlignment.center,
children: <Widget>[
Theme(
data: Theme.of(context).copyWith(primaryColor: Colors.green),
child: TextField(
keyboardType: TextInputType.emailAddress,
decoration: kTextFieldDecoration,
textAlign: TextAlign.center,
),
),
Theme(
data: Theme.of(context).copyWith(primaryColor: Colors.green),
child: TextField(
obscureText: true,
decoration: kTextFieldDecoration,
textAlign: TextAlign.center,
),
),
SizedBox(
height: 20,
),
RaisedButton(
padding: EdgeInsets.symmetric(vertical: 10, horizontal: 40),
color: Colors.green,
textColor: Colors.white,
child: Text('Register'),
onPressed: () {},
),
],
),
),
);
}
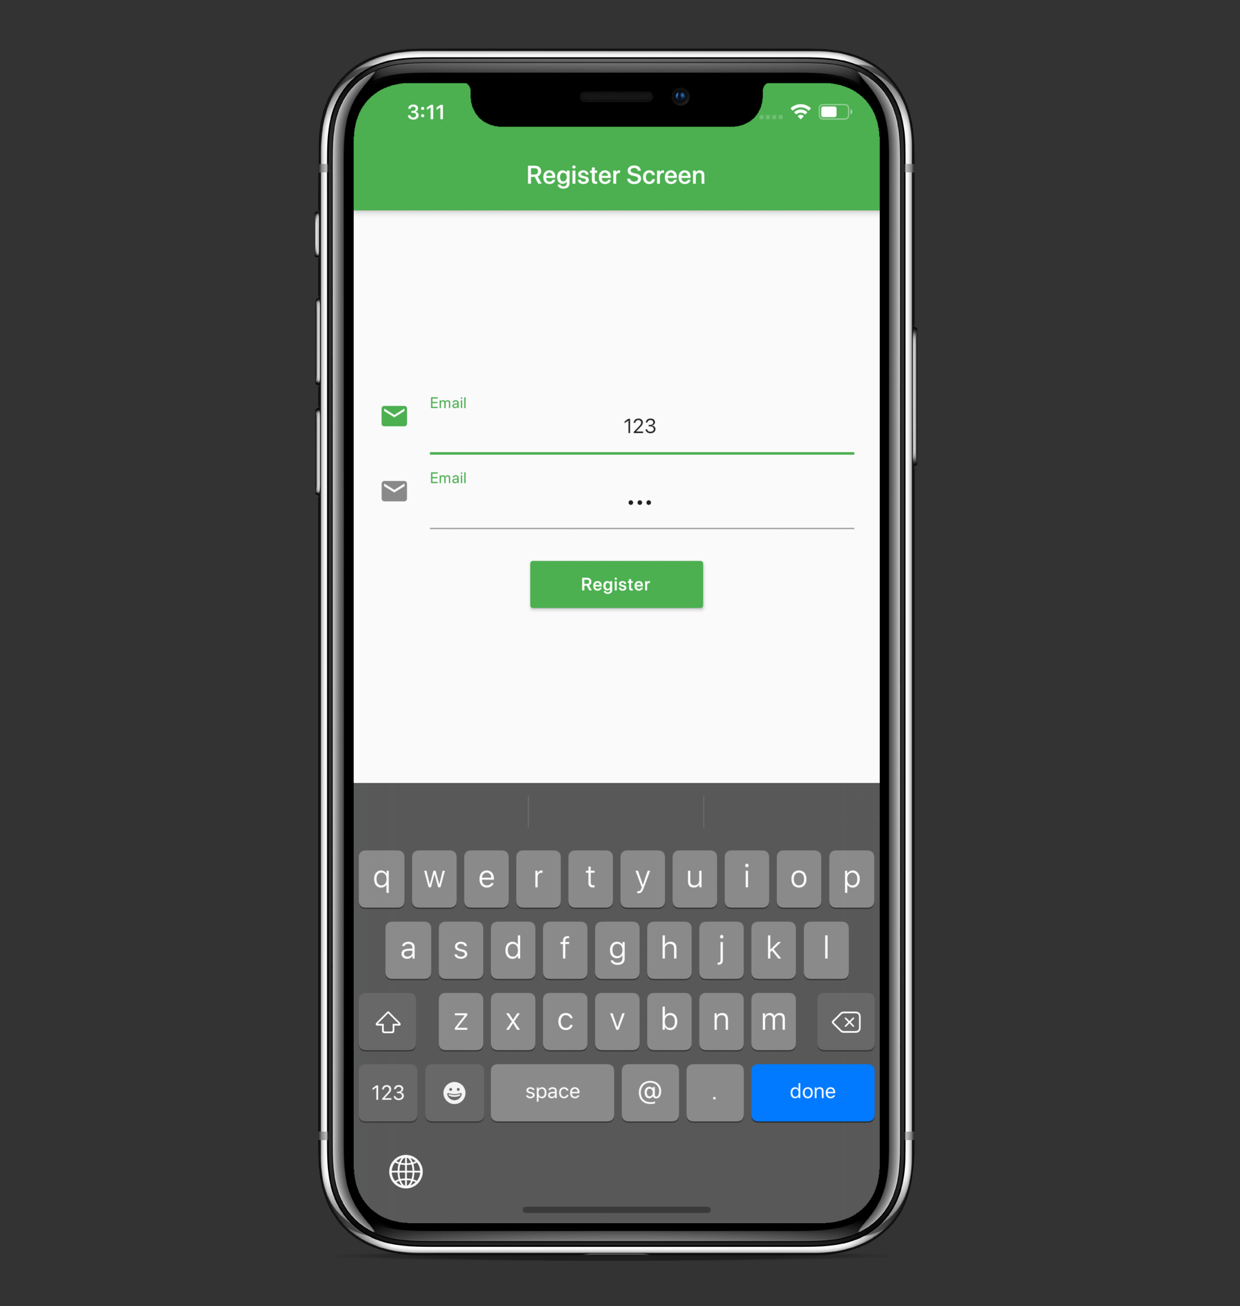
}But now we have a problem — both of the text fields now show ‘Email’ as a hint:
但是现在我们遇到了一个问题-现在两个文本字段都显示'Email'作为提示:
Here’s where the copyWith() function comes in handy. Now, we’re able to copy the existing kTextFieldDecoration and change only some of its properties:
这是copyWith()函数派上用场的地方。 现在,我们能够复制现有的kTextFieldDecoration并仅更改其某些属性:
import 'package:copy_with/constants.dart';
import 'package:flutter/material.dart';


class RegisterScreen extends StatelessWidget {
  @override
  Widget build(BuildContext context) {
    return Scaffold(
      appBar: AppBar(
        backgroundColor: Colors.green,
        title: Text('Register Screen'),
      ),
      body: Padding(
        padding: EdgeInsets.all(20.0),
        child: Column(
          mainAxisAlignment: MainAxisAlignment.center,
          children: <Widget>[
            Theme(
              data: Theme.of(context).copyWith(primaryColor: Colors.green),
              child: TextField(
                keyboardType: TextInputType.emailAddress,
                decoration: kTextFieldDecoration,
                textAlign: TextAlign.center,
              ),
            ),
            Theme(
              data: Theme.of(context).copyWith(primaryColor: Colors.green),
              child: TextField(
                obscureText: true,
                decoration: kTextFieldDecoration.copyWith(
                    icon: Icon(Icons.vpn_key),
                    hintText: 'Password',
                    labelText: 'Password'),
                textAlign: TextAlign.center,
              ),
            ),
            SizedBox(
              height: 20,
            ),
            RaisedButton(
              padding: EdgeInsets.symmetric(vertical: 10, horizontal: 40),
              color: Colors.green,
              textColor: Colors.white,
              child: Text('Register'),
              onPressed: () {},
            ),
          ],
        ),
      ),
    );
  }
}
We can see that we change the icon, hintText, and labelText properties. The labelStyle property remains the same for both text fields.
我们可以看到我们更改了icon , hintText和labelText属性。 两个文本字段的labelStyle属性保持不变。
Note that when we created the Theme widget, we also used the copyWith() operation to specify a certain color and to copy other properties.
请注意,在创建Theme窗口小部件时,我们还使用了copyWith()操作来指定某种颜色并复制其他属性。
翻译自: https://medium.com/better-programming/what-is-the-copywith-operation-in-flutter-2567e4d924bf


 1151
1151

 被折叠的 条评论
为什么被折叠?
被折叠的 条评论
为什么被折叠?
 到【灌水乐园】发言


