


android获取所有组件
Recently I was thinking about whether we have an alternative way to navigate in the app back and forth instead of Intents. It is because, in Android app development, we have many new libraries and tools that help Android developers reduce the number of code lines while enabling them to focus on the core functionality of their application. I came across the Jetpack navigation component library. Google has introduced a stable version of this library on March 14, 2019. It provides a simple and complete way to maintain the flow of our app from a central location.
[R ecently我在想,我们是否有另一种方式在应用回到浏览,而不是来回的意图 。 这是因为,在Android应用程序开发中 ,我们拥有许多新的库和工具,可帮助Android开发人员减少代码行的数量,同时使他们能够专注于应用程序的核心功能。 我遇到了Jetpack导航组件库 。 Google已于2019年3月14日推出此库的稳定版本。 它提供了一种简单而完整的方法来从中心位置维护我们的应用程序流。
After having this brief introduction, let’s make our hands dirty with some code in the navigation component.
在进行了简要介绍之后,让我们动手使用导航组件中的一些代码。
val navController=Navigation.findNavController(view)
 navController.navigate(LoginFragmentDirections.actionNavigationHomeToNavHome(loginViewModel.email.value.toString()))
activity.getFragmentManager().beginTransaction()
.add(R.id. container_of_this_frag, new HomeFragment())
.remove(this)
.commit();
so let's make one app in which we are using the Navigation library with MVVM architecture.
因此,让我们制作一个使用MVVM架构导航库的应用程序。
for using the Navigation library we need to add their dependency in build.gradle file.
为了使用导航库,我们需要在build.gradle文件中添加它们的依赖关系。
def nav_version = "2.1.0"


 // navigation lib
 implementation "androidx.navigation:navigation-fragment-ktx:$nav_version"
 implementation "androidx.navigation:navigation-ui-ktx:$nav_version"
Now here we are using a safe argument plugin, this is recommended by google, safe argument plugin creates classes for each fragment and also create static methods for each action. To add a safe argument plugin we need to add the following dependency into app.gradle and build.gradle
现在,我们在这里使用安全参数插件,这是Google推荐的,安全参数插件为每个片段创建类,并为每个操作创建静态方法。 要添加安全的参数插件,我们需要将以下依赖项添加到app.gradle和build.gradle中
apply plugin: "androidx.navigation.safeargs.kotlin"Now we are good to go, so let's create navigation files in the res folder, for creating a navigation folder follow these steps.
现在我们可以使用了,所以让我们在res文件夹中创建导航文件,要创建导航文件夹,请遵循以下步骤。
res-> android资源目录->选择导航作为资源类型 (res-> android resource directory -> select navigation as resource type)
So now you can see a navigation folder, for creating a new graph right click on the navigation folder and select create a new file, after this now you able to see a new graph file, we have two options for creating the graph for our application. here for each graph, we have start navigation which shows the first fragment which loaded in navHost.
因此,现在您可以看到一个导航文件夹,用于创建一个新图,右键单击该导航文件夹并选择创建一个新文件,之后,您现在可以看到一个新图文件,我们有两个选项可以为应用程序创建图。 在这里,对于每个图形,我们都有开始导航,该导航显示了加载在navHost中的第一个片段。
By drag and drop
通过拖放
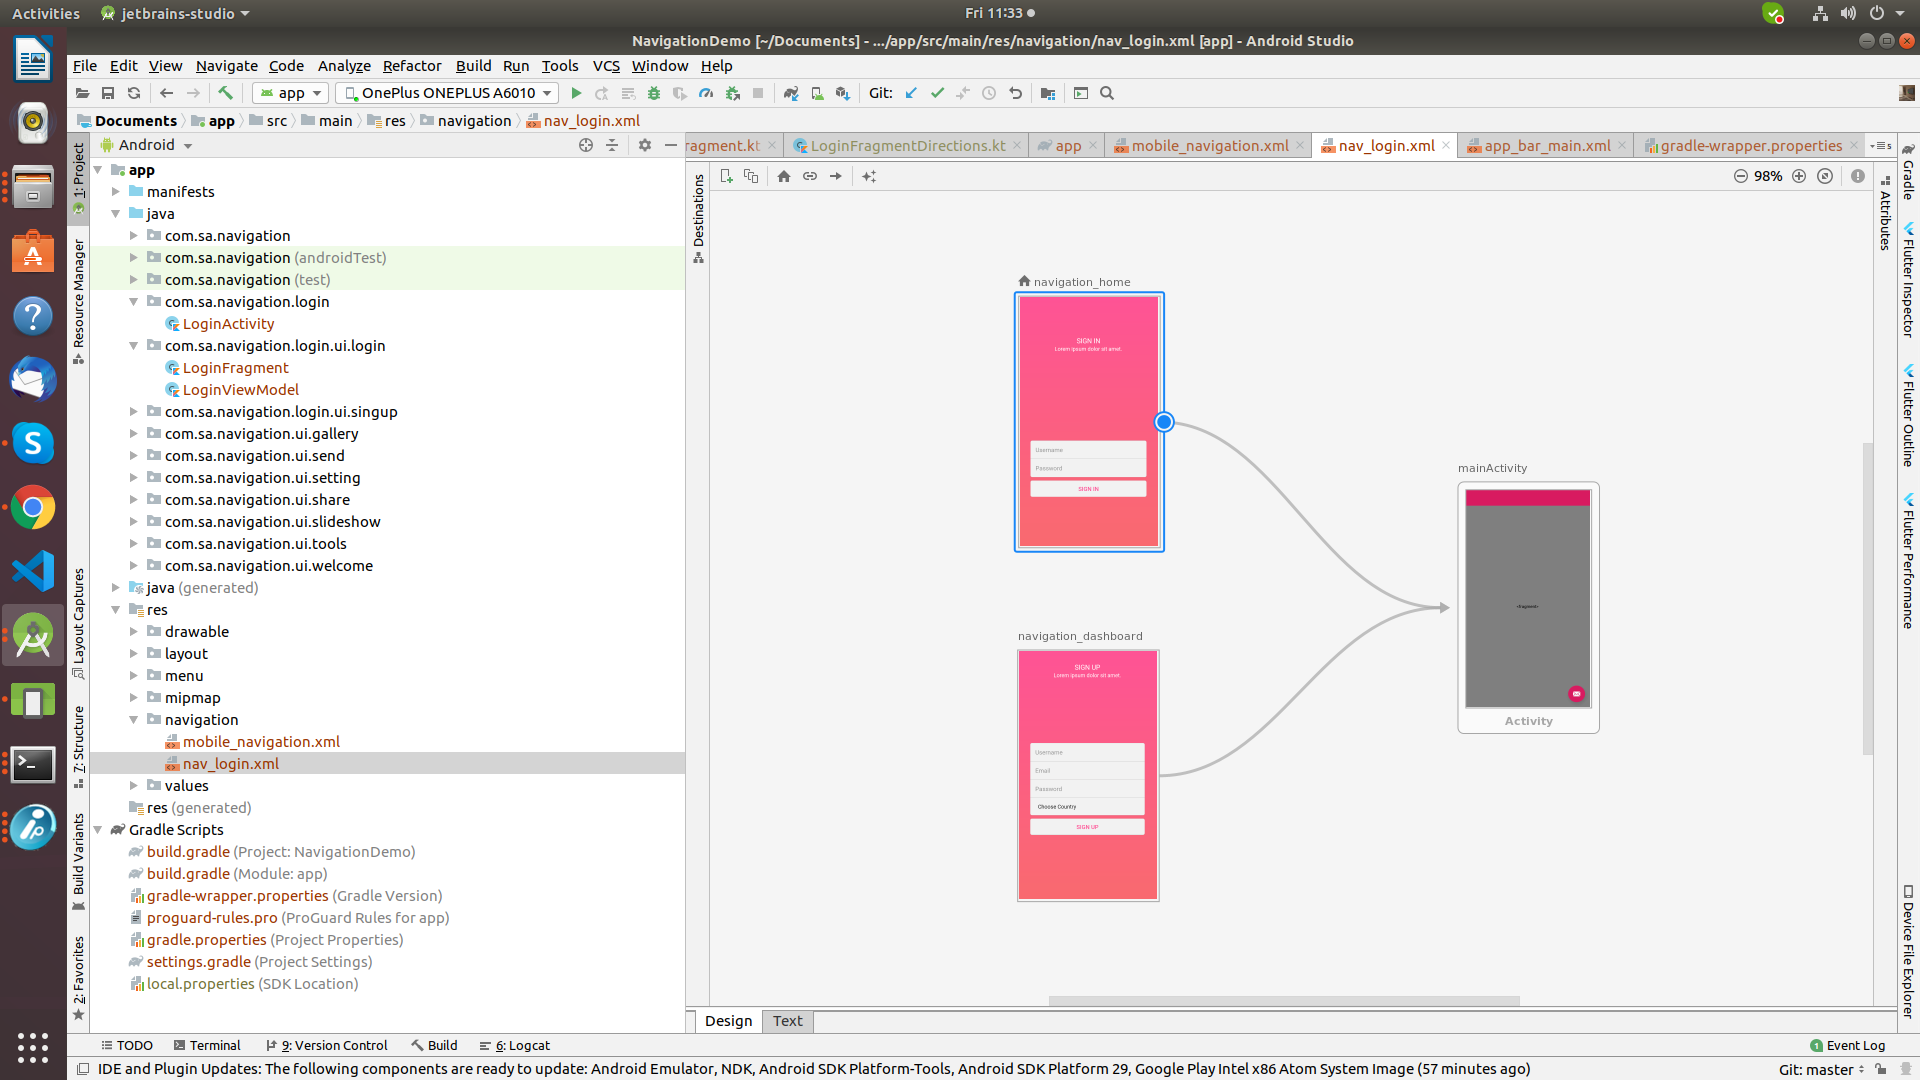
2. By XML code
2.通过XML代码
if your chosen design then you can click on + button at the right-hand side now you can select fragments/activity as per requirement, now by click on any item you can make one action which
如果您选择了设计,那么您可以单击右侧的+按钮,现在您可以根据需要选择片段/活动,现在通过单击任何项目,您可以执行一项操作
<navigation xmlns:android="http://schemas.android.com/apk/res/android"
    xmlns:app="http://schemas.android.com/apk/res-auto"
    xmlns:tools="http://schemas.android.com/tools"
    android:id="@+id/nv_graph"
    app:startDestination="@id/navigation">
<fragment
        android:id="@+id/homeFragment"
        android:name="com.rudraksh.netednavigation.HomeFragment"
        android:label="activity"
        tools:layout="@layout/fragment_home"/>

  <activity
        android:id="@+id/mainActivity"
        android:name="com.rudraksh.netednavigation.MainActivity"
        android:label="activity"
        tools:layout="@layout/activity_main"/>
</navigation>
So now let's understand each property of navigation item
现在让我们了解导航项的每个属性
id = activity/fragment/custome view id
ID =活动/片段/客户视图ID
lable=xml file name
lable = xml文件名
Name = path for a fragment with package
名称=带包的片段的路径
layout=layout file path
layout =布局文件路径
Now when we create any action, here the action is an entity that represents the navigation between one fragment to another fragment or activity, and we create any action and if we are using safe argument then safe arg create a static method for each action in particular fragment/activity class. Let’s understand each property of action
现在,当我们创建任何动作时,这里的动作是一个实体,它代表一个片段到另一个片段或活动之间的导航,我们创建任何动作,如果我们使用安全参数,那么安全arg会为每个动作特别创建一个静态方法片段/活动类。 让我们了解动作的每个属性
1 app: id = This is a unique id for each action and base on that safe arg create a static method
1个应用程序:id =这是每个操作的唯一ID,并基于该安全arg创建一个静态方法
2 app : popUpTo = When you want to handle back press and want to stop user for coming back to fragment than we use this property
2 app:popUpTo =当您想处理后退操作并想要阻止用户返回碎片时,我们会使用此属性
3 app:popUpToInclusive = Whether you want to include the fragment in the back stack which you have specified in app : popUpTo
3 app:popUpToInclusive =是否要在app中指定的后台堆栈中包含片段:popUpTo
4 app: destination = Destination fragment id.
4个应用程序:destination =目标片段ID。
<action
            android:id="@+id/action_homeFragment_to_signout"
            app:popUpTo="@id/homeFragment"
            app:popUpToInclusive="false"
            app:destination="@id/signout" >

             <argument
                    android:name="loginName"
                    app:argType="com.rudraksh.netednavigation.Destination"
                    android:defaultValue="a"
                    />
</action>
If you want to pass the data between we are using the argument and argument can be any type like string, int, double, float, enum, parcelable, serializable. Now let's understand each property and its usage.
如果要在我们使用参数之间传递数据,则参数可以是字符串,整数,双精度数,浮点数,枚举,可拆分和可序列化的任何类型。 现在让我们了解每个属性及其用法。
1 android:name = it working as key , by this key name we can send and receive data
1 android:name =它用作键,通过此键名,我们可以发送和接收数据
2 app:argType = it is specified which type of data you want to send in the argument
2 app:argType =在参数中指定要发送的数据类型
3 android:defaultValue = it is specified default value of that argument
3 android:defaultValue =它是该参数的默认值
Now let's go to our MainActivity or host activity which has navHost and understand each property
现在,让我们转到具有navHost的 MainActivity或主机活动,了解每个属性
<fragment
        android:id="@+id/nav_host_fragment"
        android:name="androidx.navigation.fragment.NavHostFragment"
        android:layout_width="0dp"
        android:layout_height="0dp"
        app:defaultNavHost="true"
        app:layout_constraintBottom_toBottomOf="parent"
        app:layout_constraintEnd_toEndOf="parent"
        app:layout_constraintStart_toStartOf="parent"
        app:layout_constraintTop_toTopOf="parent"
        app:navGraph="@navigation/nv_graph" />
Here android: name contains the class name of your NavHost implementation, app:navGraph is showing that the graph is loaded in particular NavHostFragment. app:defaultNavHost is responsible for the activity’s intercept for the system back button press.
此处的android:name包含您的NavHost实现的类名,app:navGraph显示该图已加载到特定的NavHostFragment中 。 app:defaultNavHost负责活动对系统后退按钮按下的拦截。
Now from fragment when we want to change fragment or activity we have one auto-generated class by safe arg plugin which has a method for action we have already defined in the graph and we can pass argument in that method as well.
现在从片段开始,当我们想要更改片段或活动时,我们有一个由安全arg插件自动生成的类,该类具有一种已经在图形中定义的操作方法,我们也可以在该方法中传递参数。
class HomeFragment : Fragment(),View.OnClickListener {
    override fun onClick(p0: View?) {
        when(p0!!.id)
        {
            R.id.button2->{
                val dit=Distination("ad")
                navController.navigate(HomeFragmentDirections.actionNavigationHomeToWelcome(dit))


            }
        }
    }


    lateinit var navController: NavController
    override fun onCreateView(
        inflater: LayoutInflater, container: ViewGroup?,
        savedInstanceState: Bundle?
    ): View? {
        // Inflate the layout for this fragment
        return inflater.inflate(R.layout.fragment_home, container, false)
    }


    override fun onViewCreated(view: View, savedInstanceState: Bundle?) {
        super.onViewCreated(view, savedInstanceState)
        navController=Navigation.findNavController(view)


        view.button2.setOnClickListener(this)
    }


}
Now let's understand HomeFragment class. Here we have used the navController is responsible to call navigate() method. navigate() take NavDirections object as an argument to change fragment. Here we have used the “safe arg plugin”. So there will be auto-generated class which will be available in HomeFragmentDirections and in that there will be a method namely actionHomeFragmentToSignout().
现在让我们了解HomeFragment类。 在这里,我们使用了navController负责调用navigation ()方法。 navigation()采取 NavDirections对象作为更改片段的参数。 在这里,我们使用了“ safe arg plugin”。 因此,将有一个自动生成的类,该类将在HomeFragmentDirections中可用,并且将有一个名为actionHomeFragmentToSignout()的方法。
This depends on the action which takes a parameter as per the argument we define in action tag in navGraph earlier.
这取决于根据我们在navGraph的action标签中定义的参数采用参数的操作。
So now let's understand how to receive parameter at destination fragment.
现在,让我们了解如何在目标片段处接收参数。
class WelcomeFragment : Fragment(),View.OnClickListener{
    val args: welcomeFragmentArgs by navArgs()


    lateinit var navController:NavController
    override fun onClick(p0: View?) {
        when(p0!!.id)
        {
            R.id.button->{
              navController.navigate(welcomeFragmentDirections.actionGlobalMain2Activity())
                activity!!.finish()
            }


        }
    }


    override fun onCreateView(
        inflater: LayoutInflater, container: ViewGroup?,
        savedInstanceState: Bundle?
    ): View? {
        // Inflate the layout for this fragment
        return inflater.inflate(R.layout.fragment_welcome, container, false)
    }


    override fun onViewCreated(view: View, savedInstanceState: Bundle?) {
        super.onViewCreated(view, savedInstanceState)
        view.button.setOnClickListener(this)
        val name = args.loginName.name
        userName.text=name


        navController= Navigation.findNavController(view)


    }


}
As we have used safe arg plugin, there are auto-generated class welcomeFragmentArgs which depend upon the argument which we declare in navGraph.xml so you can receive that parameter by an instance of navArgs(). now let’s deep dive into the navigation library in the next blog of this series in which we will use the bottom navigation bar, menu, slide navigation bar.
由于我们使用了安全的arg插件,因此有一些自动生成的类welcomeFragmentArgs,它依赖于我们在navGraph.xml中声明的参数,因此您可以通过navArgs()的实例接收该参数。 现在,让我们深入了解本系列下一个博客中的导航库,在其中我们将使用底部的导航栏,菜单,滑动导航栏。
Thank you Aanal Mehta for constructive criticism of this blog.
感谢 Aanal Mehta 对这个博客的建设性批评。
翻译自: https://medium.com/swlh/all-you-need-to-know-about-android-navigation-component-96778b4f471c
android获取所有组件


 7148
7148

 被折叠的 条评论
为什么被折叠?
被折叠的 条评论
为什么被折叠?
 到【灌水乐园】发言


