


从头实现linux操作系统
2020年必须自动进行依赖关系升级 (Automated Dependency Upgrading Is a Must in 2020)
In 2020, web, mobile, and machine learning development has become unbelievably modularized, meaning most projects depend on a significant amount of packages.
到2020年,Web,移动和机器学习的开发已实现了令人难以置信的模块化,这意味着大多数项目都依赖大量软件包。
Although modularization provides reusability, maintaining the dependencies to be up to date can be tedious.
尽管模块化提供了可重用性,但保持依赖关系为最新状态可能很繁琐。
To reduce the time wasted on managing dependencies, Dependabot (a utility to automate dependency upgrading) was introduced. Please see my previous piece for more details on Dependabot.
为减少浪费在管理依赖项上的时间,引入了Dependabot (一种用于自动化依赖项升级的实用程序)。 请参阅我的上一篇文章 ,了解有关Dependabot的更多详细信息。
Dependabot非常出色,但支持新工具的速度可能很慢 (Dependabot Is Excellent but Can Be Slow in Supporting New Tools)
As a product used by thousands, Dependabot has to consider many corner cases while building new features, so it will be relatively slow in supporting new languages/frameworks.
作为成千上万使用的产品,Dependabot在构建新功能时必须考虑很多特殊情况,因此在支持新语言/框架方面相对较慢。
As a result, support for Dart/Flutter is still not supported per this issue (which has been idle for a while).
GitHub Action提供了构建Dependabot的所有构件 (GitHub Action Provides All Building Blocks to Build a Dependabot)
If there is a tool that you want but doesn’t exist, then we shall create it.
如果有您需要但不存在的工具,那么我们将创建它。
Fortunately, as a platform for automation, GitHub Action provides all the building blocks we need to build our Dependabot.
幸运的是,作为自动化平台,GitHub Action提供了构建Dependabot所需的所有构建块。
Let’s build a Dependabot step by step together.
让我们逐步构建一个Dependabot。
Note: I borrowed the code from my side project, Flutter Package Updater (the Dependabot alternative for Flutter), which is located in this repository:
注意:我从我的辅助项目Flutter Package Updater(Flutter的Dependabot替代品)借来了代码,该项目位于此存储库中:
Here is the plug-and-play action in GitHub Marketplace:
这是GitHub Marketplace中的即插即用操作:
To see how it works in a real Flutter project, check out the 5% app repository:
要查看其在实际Flutter项目中的工作方式,请查看5%应用程序存储库:
步骤1:初始化JS GitHub Action (Step 1: Initialize a JS GitHub Action)
Every GitHub Action requires an action.yml for GitHub to identify:
每个GitHub Action都需要一个action.yml来让GitHub识别:

Inside the action.yml, we need to define the information we need from the user:
在action.yml内部,我们需要定义用户需要的信息:

Here’s the important information:
重要信息如下:
- The GitHub credential to commit the change and open the pull request. 提交更改并打开拉取请求的GitHub凭证。
- The preferred name for branches and the pull request title/content. 分支的首选名称和请求请求的标题/内容。
步骤2:从操作输入中检索所需的值 (Step 2: Retrieve Required Values From the Action Inputs)
The GitHub Action toolkit provides a utility function to retrieve the user-defined value programmatically:
GitHub Action工具箱提供了一个实用程序功能,可通过编程方式检索用户定义的值:

步骤3:实施程序包升级 (Step 3: Implement the Package Upgrades)
The GitHub Action toolkit also provides a way to easily execute bash commands:
GitHub Action工具箱还提供了一种轻松执行bash命令的方法:

As shown above, here we first run git branch -b $target_branch to create a new branch where we upgrade the pubspec.yml file. Then we execute flutter pub upgrade to upgrade the packages in pubspec.yml.
如上所示,在这里我们首先运行git branch -b $target_branch创建一个新的分支,在该分支中我们升级pubspec.yml文件。 然后我们执行flutter pub upgrade来升级pubspec.yml的软件包。
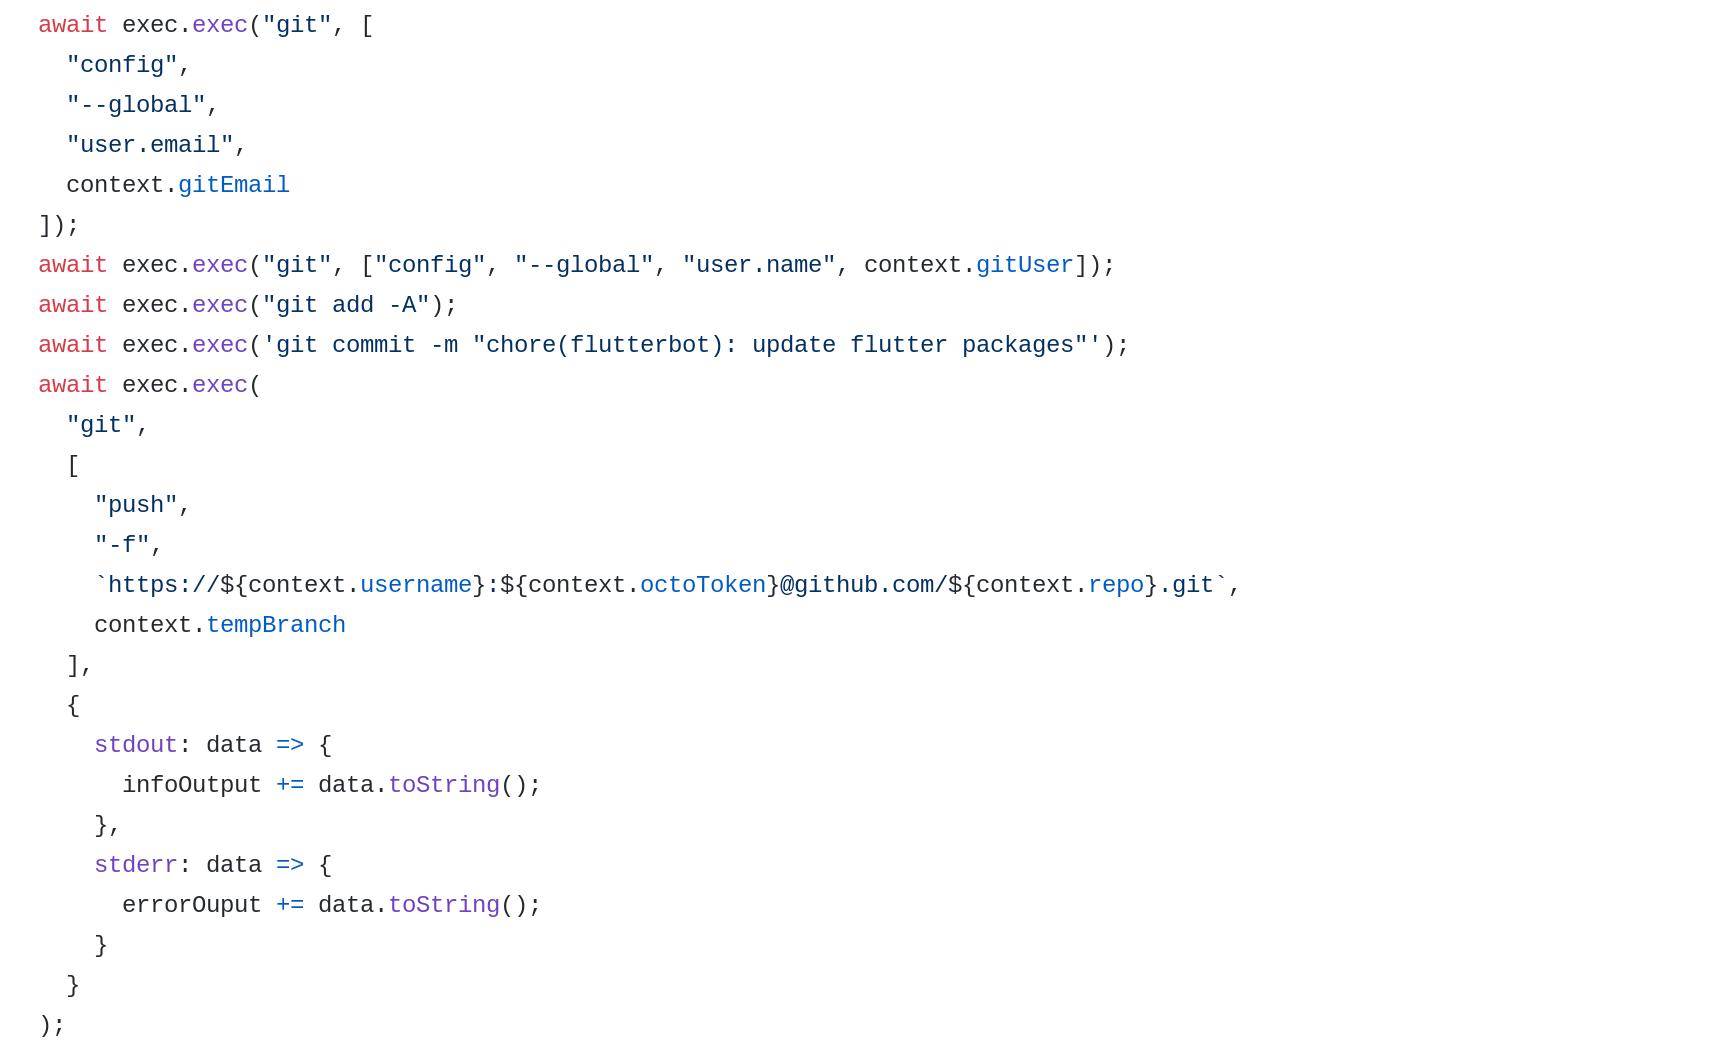
步骤4:提交升级的软件包并推送更新 (Step 4: Commit the Upgraded Packages and Push the Update)
With the upgrades saved in pubspec.yml, we need to commit the changes to our target branch:
将升级保存在pubspec.yml ,我们需要将更改提交到目标分支:
步骤5:打开到主分支的拉取请求 (Step 5: Open a Pull Request to the Main Branch)
Finally, with the changes committed and pushed, we need to open a pull request to notify the owner. For this, we can use Octokit, the GitHub API library:
最后,在提交并推送更改后,我们需要打开一个拉取请求以通知所有者。 为此,我们可以使用GitHub API库Octokit :

Once finished, a pull request like this one will appear every time there is a new package release:
完成后,每次发布新的软件包时,都会出现这样的拉取请求:


结论 (Conclusion)
With your Dependabot for Flutter, you can save time on dependency management and go build new features.
使用Dependabot for Flutter,您可以节省依赖关系管理的时间,并建立新功能。
从头实现linux操作系统


 被折叠的 条评论
为什么被折叠?
被折叠的 条评论
为什么被折叠?
 到【灌水乐园】发言


